2TR-FBE ENGINE MECHANICAL ENGINE ASSEMBLY REMOVAL
CAUTION / NOTICE / HINT
The necessary procedures (adjustment, calibration, initialization, or registration) that must be performed after parts are removed, installed, or replaced during the engine assembly removal/installation are shown below.
| Replacement Part or Procedure | Necessary Procedures | Effects/Inoperative when not Performed | Link |
|---|---|---|---|
| Replacement of ECM | Vehicle Identification Number (VIN) registration | DTC P0630 is output | ( ) |
| Code registration (Immobiliser system) | Engine start function | See the Service Bulletin for the registration method. | |
| Replacement of engine assembly | Inspection after repair | Poor idle, engine start, etc. | ()
|
·
Replacement of throttle with motor body assembly ·
Cleaning the deposits from the throttle with motor body assembly ·
Replacement of cylinder head sub-assembly ·
Replacement of camshaft (for intake or exhaust camshaft) ·
Replacement of camshaft timing gear assembly ·
Replacement of camshaft timing exhaust gear assembly ·
Replacement of piston or piston ring ·
Replacement of mass air flow meter sub-assembly ·
Replacement of fuel injector assembly ·
Replacement of fuel pump ·
Replacement of air fuel ratio sensor ·
Replacement of engine coolant temperature sensor ·
Replacement of spark plug ·
Replacement of ignition coil assembly ·
Air leaks from intake system ·
Gas leaks from exhaust system ·
Replacement of knock sensor |
Inspection after repair | Poor idle, engine start, etc. | ()
|
for AC60E:
Replacement of automatic transmission assembly |
Reset memory | ·
Large shift shock ·
Engine overruns |
()
|
for AC60E:
Replacement of automatic transmission fluid |
ATF thermal degradation estimate reset | The value of the Data List item "ATF Thermal Degradation Estimate" is not estimated correctly | ()
|
for AC60F:
Replacement of automatic transmission assembly |
Reset memory | ·
Large shift shock ·
Engine overruns |
()
|
for AC60F:
Replacement of automatic transmission fluid |
ATF thermal degradation estimate reset | The value of the Data List item "ATF Thermal Degradation Estimate" is not estimated correctly | ()
|
- CAUTION:
- ·
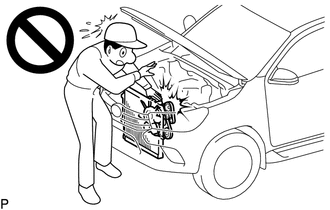
To prevent injury due to contact with an operating fan and generator V-belt or cooling fan, keep your hands and clothing away from the fan and generator V-belt and cooling fans when working in the engine compartment with the engine running.
·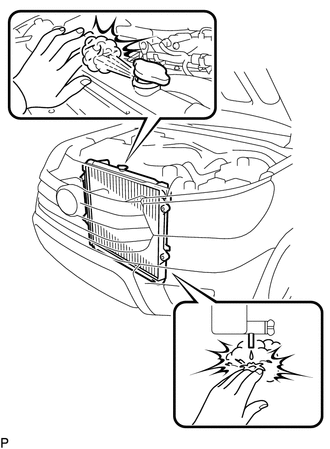
Do not remove the radiator cap sub-assembly, cylinder block drain cock plugs or radiator drain cock plug while the engine and radiator assembly are still hot. Pressurized, hot engine coolant and steam may be released and cause serious burns.
·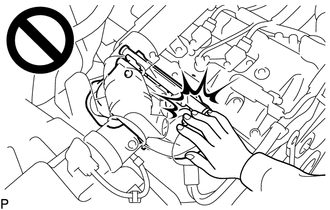
To prevent burns, do not touch the engine, exhaust manifold or other high temperature components while the engine is hot.
·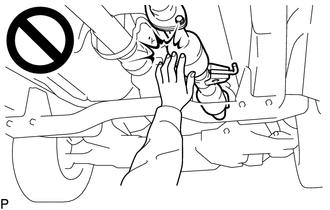
To prevent burns, do not touch the engine, exhaust pipe or other high temperature components while the engine is hot.
PROCEDURE

 1.PLACE FRONT WHEELS FACING STRAIGHT AHEAD (for 4WD)
2.DISCHARGE FUEL SYSTEM PRESSURE
3. PRECAUTION
- NOTICE:
-
After turning the engine switch off, waiting time may be required before disconnecting the cable from the battery terminal. Therefore, make sure to read the disconnecting the cable from the battery terminal notice before proceeding with work.
-
Click hereGeneral>INTRODUCTION>REPAIR INSTRUCTION>PRECAUTION
4.DISCONNECT CABLE FROM NEGATIVE BATTERY TERMINAL
- NOTICE:
-
When disconnecting the cable, some systems need to be initialized after the cable is reconnected.
-
Click hereGeneral>INTRODUCTION>REPAIR INSTRUCTION>INITIALIZATION
5.DRAIN ENGINE COOLANT
6.DRAIN ENGINE OIL
7.DRAIN AUTOMATIC TRANSMISSION FLUID
for AC60E:
Click hereDrivetrain>AC60E AUTOMATIC TRANSMISSION / TRANSAXLE>TRANSMISSION WIRE>REMOVAL
for AC60F:
Click hereDrivetrain>AC60F AUTOMATIC TRANSMISSION / TRANSAXLE>TRANSMISSION WIRE>REMOVAL
8.DRAIN DIFFERENTIAL OIL (for 4WD)
53301
9.REMOVE HOOD SUB-ASSEMBLY
Disconnect the washer nozzle hose from the hood sub-assembly.
Remove the 4 bolts and hood sub-assembly from the 2 hood hinge assemblies.
17705
10.REMOVE AIR CLEANER CAP SUB-ASSEMBLY WITH NO. 1 AIR CLEANER HOSE
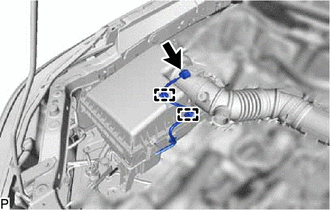
Disconnect the intake mass air flow meter connector and detach the 2 wire harness clamps.
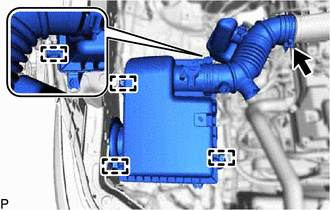
Detach the 4 clamps.
Loosen the hose clamp and remove the air cleaner cap sub-assembly with No. 1 air cleaner hose.
17801
11.REMOVE AIR CLEANER FILTER ELEMENT SUB-ASSEMBLY
Remove the air cleaner filter element sub-assembly from the air cleaner case sub-assembly.
17701
12.REMOVE AIR CLEANER CASE SUB-ASSEMBLY
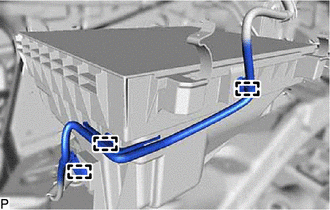
Detach the 3 wire harness clamps.
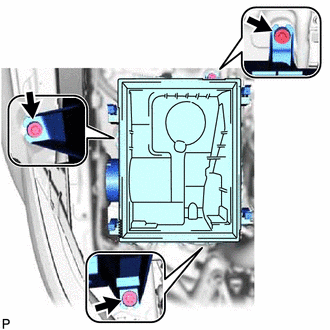
Remove the 3 bolts and air cleaner case sub-assembly.
17861
13.REMOVE INTAKE AIR CONNECTOR
51410
14.REMOVE NO. 1 ENGINE UNDER COVER ASSEMBLY
51442
15.REMOVE NO. 2 ENGINE UNDER COVER
51407A
16.REMOVE NO. 3 ENGINE UNDER COVER SUB-ASSEMBLY (w/ Cover)
53737B
17.REMOVE FRONT UPPER FENDER APRON SEAL LH
Remove the 6 clips and front upper fender apron seal LH.
53736
18.REMOVE FRONT UPPER FENDER APRON SEAL RH
Remove the 5 clips and front upper fender apron seal RH.
53882F
19.REMOVE FRONT FENDER SEAL LH
Remove the 6 clips and front fender seal LH.
53882F
20.REMOVE FRONT FENDER SEAL RH
Remove the 6 clips and front fender seal RH.
53294C
21.REMOVE RADIATOR SIDE DEFLECTOR LH
53293C
22.REMOVE RADIATOR SIDE DEFLECTOR RH
- HINT:
-
Use the same procedure described for the LH side.
16593
23.REMOVE NO. 1 RADIATOR AIR GUIDE
16571
24.REMOVE RADIATOR HOSE INLET
16572
25.REMOVE RADIATOR HOSE OUTLET
17621A
26.DISCONNECT AIR PUMP INLET
16470
27.REMOVE RADIATOR RESERVOIR
16711
28.REMOVE FAN SHROUD
32941
29.DISCONNECT NO. 1 OIL COOLER INLET HOSE
32942
30.DISCONNECT NO. 1 OIL COOLER OUTLET HOSE
16400
31.REMOVE RADIATOR ASSEMBLY
32.DISCONNECT HEATER HOSE
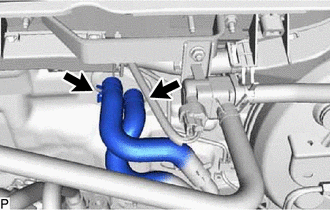
Slide the clamp and disconnect the heater water outlet hose from the heater radiator unit sub-assembly.
Slide the clamp and disconnect the heater water inlet hose from the heater radiator unit sub-assembly.
44320
33.DISCONNECT VANE PUMP ASSEMBLY
Disconnect the power steering oil pressure switch connector.
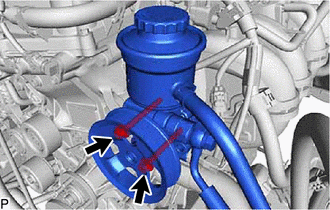
Remove the 2 bolts and disconnect the vane pump assembly.
- NOTICE:
-
Do not hit other parts with the pulley when disconnecting the vane pump assembly.
- HINT:
-
Be sure to suspend the vane pump assembly securely.
15301
34.REMOVE ENGINE OIL LEVEL DIPSTICK
11452
35.REMOVE ENGINE OIL LEVEL DIPSTICK GUIDE
Remove the bolt, engine oil level dipstick guide and O-ring.
- NOTICE:
-
Cover the engine oil level dipstick guide hole to prevent foreign matter from entering it.
88320
36.DISCONNECT COOLER COMPRESSOR ASSEMBLY
28100
37.REMOVE STARTER ASSEMBLY
38.DISCONNECT PURGE LINE HOSE
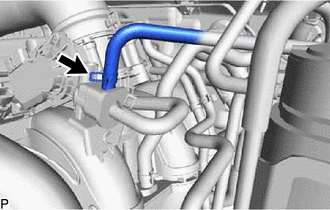
Slide the clamp and disconnect the purge line hose from the purge VSV.
44774
39.DISCONNECT UNION TO CONNECTOR TUBE HOSE
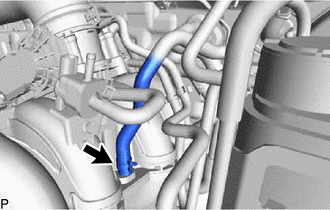
Slide the clamp and disconnect the union to connector tube hose from the intake manifold.
17344
40.DISCONNECT NO. 4 AIR INJECTION SYSTEM HOSE
23273C
41.DISCONNECT NO. 2 FUEL HOSE
23271H
42.DISCONNECT NO. 1 FUEL HOSE
55550
43.REMOVE GLOVE COMPARTMENT DOOR ASSEMBLY
89661
44.REMOVE ECM
45.DISCONNECT ENGINE WIRE
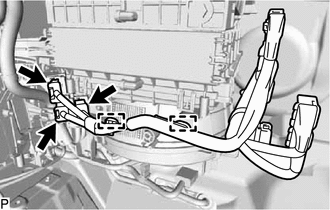
Detach the 2 clamps and disconnect the 3 connectors from the instrument panel wire.
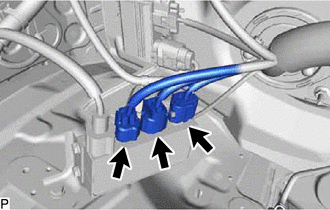
Disconnect the 3 glow plug controller connectors.
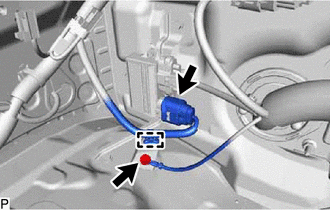
Disconnect the air injection control driver connector.
Detach the clamp.
Remove the bolt and disconnect the engine wire from the air injection control bracket.
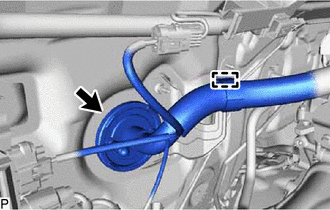
Detach the grommet and pull out the engine wire from the cabin.
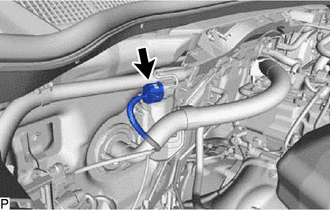
Disconnect the connector from the engine room main wire.
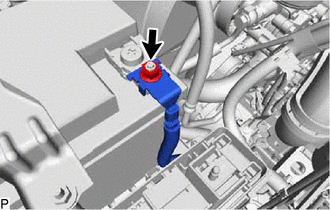
Remove the nut and disconnect the engine room main wire from the positive (+) battery terminal.
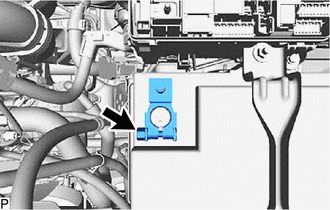
Loosen the nut and remove the positive (+) battery terminal.
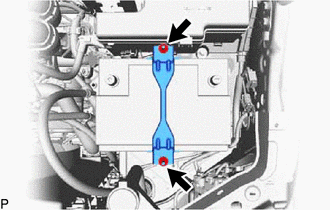
Loosen the 2 nuts and remove the battery hold down clamp.
Remove the battery.
Remove the battery tray.
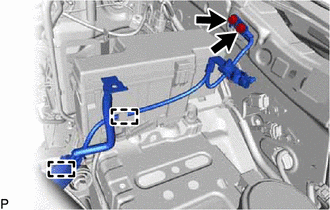
Detach the 2 clamps and remove the 2 bolts and disconnect the No. 2 engine wire.
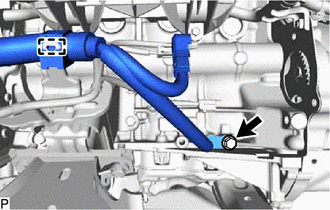
Detach the clamp and remove the bolt and No. 2 engine wire.
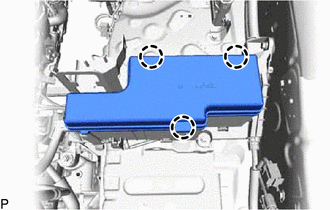
Detach the 3 claws and remove the No. 1 relay block cover upper from the engine room relay block.
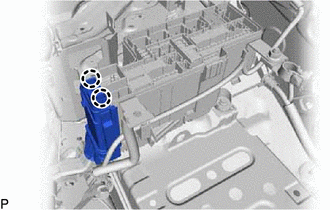
Detach the 2 claws and remove the No. 1 relay block cover side from the engine room relay block.
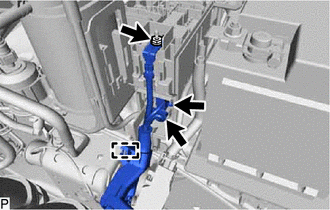
Remove the nut and disconnect the engine wire from the engine room relay block.
Disconnect the 2 connectors from the engine room relay block.
Detach the clamp.
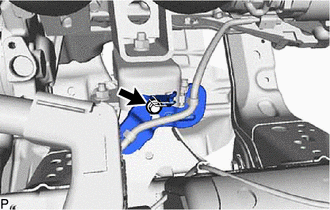
Remove the bolt and disconnect the wire clamp from the front engine mounting bracket LH.
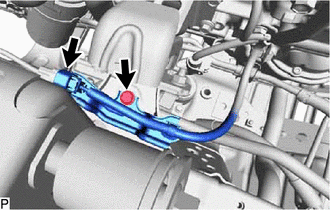
Disconnect the air fuel ratio sensor connector.
Remove the bolt and disconnect the sensor bracket from the right side of the frame.
17410
46.REMOVE FRONT EXHAUST PIPE ASSEMBLY
51561D
47.REMOVE PROPELLER SHAFT GUARD (for 4WD)
37140
48.REMOVE FRONT PROPELLER SHAFT ASSEMBLY (for 4WD)
51569
49.REMOVE PROPELLER SHAFT GUARD
37100
50.REMOVE PROPELLER SHAFT WITH CENTER BEARING ASSEMBLY (for Pre-Runner)
37100
51.REMOVE PROPELLER SHAFT WITH CENTER BEARING ASSEMBLY (for 4WD)
43514C
52.REMOVE FRONT AXLE HUB GREASE CAP LH (for 4WD)
43502H
53.REMOVE FRONT AXLE SHAFT NUT LH (for 4WD)
89543
54.DISCONNECT FRONT SPEED SENSOR LH (for 4WD)
55.DISCONNECT TIE ROD END SUB-ASSEMBLY LH (for 4WD)
48069
56.DISCONNECT FRONT LOWER NO. 1 SUSPENSION ARM ASSEMBLY LH (for 4WD)
43420
57.REMOVE FRONT DRIVE SHAFT ASSEMBLY LH (for 4WD)
43410
58.REMOVE FRONT DRIVE SHAFT ASSEMBLY RH (for 4WD)
- HINT:
-
Use the same procedure described for the LH side.
43410D
59.REMOVE FRONT DRIVE SHAFT HOLE SNAP RING (for 4WD)
60.SECURE STEERING WHEEL ASSEMBLY (for 4WD)
45219
61.DISCONNECT STEERING SLIDING YOKE (for 4WD)
44250
62.REMOVE POWER STEERING LINK ASSEMBLY (for 4WD)
41110F
63.REMOVE FRONT DIFFERENTIAL CARRIER ASSEMBLY (for 4WD)
35000
64.REMOVE AUTOMATIC TRANSMISSION ASSEMBLY
32101
65.REMOVE DRIVE PLATE AND RING GEAR SUB-ASSEMBLY
11355
66.REMOVE REAR END PLATE
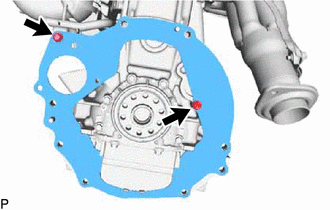
Remove the bolt and disconnect the No. 1 water by-pass pipe from the rear end plate.
Remove the bolt and rear end plate from the cylinder block sub-assembly.
67.INSTALL ENGINE HANGER
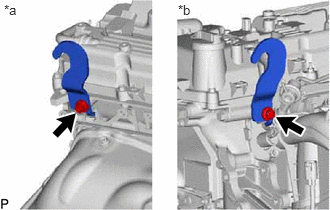
| *a | Rear Side |
| *b | Front Side |
Install the 2 engine hangers with the 2 bolts as shown in the illustration.
- Torque:
- 42 N*m (428 kgf*cm, 31 ft.*lbf)
- HINT:
No. 1 Engine Hanger 12281-0C010
12281-0C030Bolt 90119-T0388
91672-81025
68.REMOVE ENGINE ASSEMBLY
Attach an engine sling device and hang the engine assembly with a chain block.
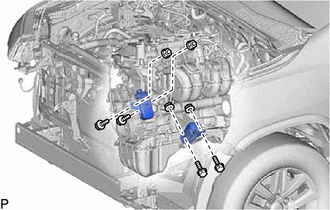
Remove the 4 bolts and 4 nuts from the body.
Remove the engine assembly by operating the engine sling device and chain block.
- NOTICE:
- ·
Make sure that the engine is clear of all wiring and hoses.
·While lowering the engine from the vehicle, do not allow it to contact the vehicle.
69.INSTALL ENGINE ASSEMBLY TO ENGINE STAND
Install the engine to an engine stand with bolts.
- NOTICE:
- ·
Pay attention to the angle of the sling device as the engine assembly or engine hangers may be damaged or deformed if the angle is incorrect.
·With the exception of installing the engine assembly to an engine stand or removing the engine assembly from an engine stand, do not perform any work on the engine while it is suspended, as doing so is dangerous.
Remove the 2 bolts and 2 engine hangers.
82121
70.REMOVE ENGINE WIRE
Remove the engine wire from the engine assembly.
12391
71.REMOVE FRONT ENGINE MOUNTING HEAT INSULATOR RH
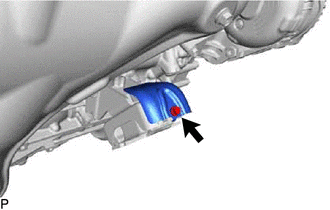
Remove the bolt and front engine mounting heat insulator RH from the front engine mounting insulator.
12361
72.REMOVE FRONT ENGINE MOUNTING INSULATOR
- HINT:
-
Perform this procedure only when replacement of the front engine mounting insulator is necessary.
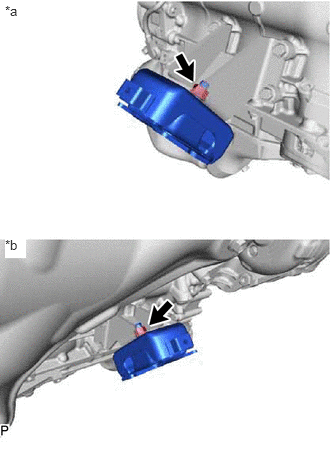
| *a | LH Side |
| *b | RH Side |
Remove the 2 nuts and 2 front engine mounting insulators from the 2 front engine mounting brackets.