INSTALLATION
Removal / installation · Vehicles built Aug 2013 – Jul 2014
Versions by build date: Aug 2013 – Jul 2014 from Aug 2014
| 1. INSTALL NO. 3 PARKING BRAKE CABLE ASSEMBLY |

for 3 Door:
Install the No. 4 parking brake cable clamp with the bolt.
- Torque:
- 13 N*m{ 127 kgf*cm , 9 ft.*lbf }
Attach the No. 2 parking brake cable clamp to the No. 3 parking brake cable.
Install the No. 3 parking brake cable with the 2 bolts and 3 nuts.
- Torque:
- 13 N*m{ 127 kgf*cm , 9 ft.*lbf }
for 5 Door:
Attach the No. 3 parking brake cable clamp to the No. 3 parking brake cable.
Install the No. 3 parking brake cable with the 4 bolts.
- Torque:
- 13 N*m{ 127 kgf*cm , 9 ft.*lbf }
Install the No. 1 parking brake cable heat insulator.
- Torque:
- 13 N*m{ 127 kgf*cm , 9 ft.*lbf }
Attach the claws of the No. 3 parking brake cable.
Connect the No. 3 parking brake cable to the No. 1 parking brake pull rod.
Install the No. 3 parking brake cable assembly to the backing plate with the 2 bolts.
- Torque:
- 8.0 N*m{ 82 kgf*cm , 71 in.*lbf }
| 2. INSTALL NO. 2 PARKING BRAKE CABLE ASSEMBLY |
for 3 Door:
Install the No. 3 parking brake cable clamp with the bolt.
- Torque:
- 13 N*m{ 127 kgf*cm , 9 ft.*lbf }
Attach the No. 1 parking brake cable clamp to the No. 2 parking brake cable.
Install the No. 2 parking brake cable with the 2 bolts and 3 nuts.
- Torque:
- 13 N*m{ 127 kgf*cm , 9 ft.*lbf }
for 5 Door:
Attach the No. 2 parking brake cable clamp to the No. 2 parking brake cable.
Install the No. 2 parking brake cable with the 5 bolts.
- Torque:
- 13 N*m{ 127 kgf*cm , 9 ft.*lbf }
Attach the claws of the No. 2 parking brake cable.
Connect the No. 2 parking brake cable to the No. 1 parking brake pull rod.
Install the No. 2 parking brake cable assembly to the backing plate with the 2 bolts.
- Torque:
- 8.0 N*m{ 82 kgf*cm , 71 in.*lbf }
| 3. CONNECT NO. 2 PARKING BRAKE SHOE ASSEMBLY WITH PARKING BRAKE SHOE LEVER |
- HINT:
- Refer to the procedures from "Install No. 2 Parking Brake Shoe Assembly with Parking Brake Shoe Lever" (Click here).
| 4. INSTALL FUEL TANK SUB-ASSEMBLY |
for 1GR-FE:
Install the fuel tank sub-assembly (Click here).
for 1KD-FTV, for 3 Door:
Install the fuel tank sub-assembly (Click here).
for 1KD-FTV, for 5 Door:
Install the fuel tank sub-assembly (Click here).
for 2TR-FE, for 3 Door:
Install the fuel tank sub-assembly (Click here).
for 2TR-FE, for 5 Door:
Install the fuel tank sub-assembly (Click here).
for 5L-E:
Install the fuel tank sub-assembly (Click here).
| 5. INSTALL CENTER EXHAUST PIPE ASSEMBLY (for 3 Door) |
for 1KD-FTV:
Install the center exhaust pipe assembly (Click here).
for 2TR-FE:
Install the center exhaust pipe assembly (Click here).
| 6. INSPECT PARKING BRAKE LEVER TRAVEL |
Fully pull the parking brake lever to engage the parking brake.
Release the lever to disengage the parking brake.
Slowly pull the parking brake lever all the way and count the number of clicks.
- Standard parking brake lever travel when pulled with a force of 200 N (20 kgf, 45 lbf):
- 5 to 7 clicks
| 7. ADJUST PARKING BRAKE LEVER TRAVEL |
for Automatic Transmission:
Remove the rear console box assembly (Click here).
for Manual Transmission:
Remove the rear console box assembly (Click here).
w/ Refrigerated Cool Box:
Remove the rear console box assembly (Click here).
for Bench Seat Type:
Remove the rear console box assembly (Click here).
Completely release the parking brake lever.
Loosen the adjusting nut to completely release the parking brake cable.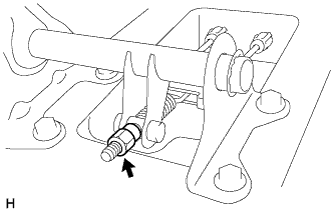

Temporarily install the hub nuts.
Turn the shoe adjuster so that it expands until the disc locks.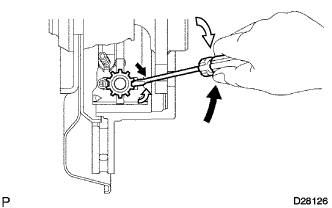
Text in Illustration 
Shoe Adjuster Contracts

Shoe Adjuster Expands
Turn the shoe adjuster so that it contracts until the disc can rotate smoothly.
- OK:
- 8 notches
Check that there is no brake drag against the shoe.
Install the hole plug.
Remove the hub nuts.
Turn the adjusting nut until the parking brake lever travel becomes correct.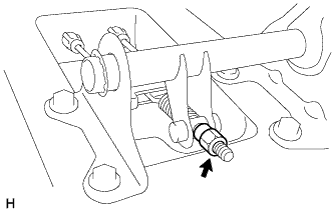
- Standard parking brake lever travel when pulled with a force of 200 N (20 kgf, 45 lbf):
- 5 to 7 clicks
Operate the parking brake lever 3 to 4 times and check the parking brake lever travel.
- Standard parking brake lever travel when pulled with a force of 200 N (20 kgf, 45 lbf):
- 5 to 7 clicks
Check whether the parking brake drags or not.
When operating the parking brake lever, check that the brake warning light comes on.
- Standard:
- The brake warning light always illuminates at the first click.
for Automatic Transmission:
Install the rear console box assembly (Click here).
for Manual Transmission:
Install the rear console box assembly (Click here).
w/ Refrigerated Cool Box:
Install the rear console box assembly (Click here).
for Bench Seat Type:
Install the rear console box assembly (Click here).
| 8. INSTALL REAR CONSOLE BOX ASSEMBLY |
for Automatic Transmission:
Install the rear console box assembly (Click here).
for Manual Transmission:
Install the rear console box assembly (Click here).
w/ Refrigerated Cool Box:
Install the rear console box assembly (Click here).
for Bench Seat Type:
Install the rear console box assembly (Click here).
| 9. INSTALL REAR WHEEL |
- Torque:
- for Aluminum Wheel:
- 103 N*m{ 1050 kgf*cm , 76 ft.*lbf }
- for Steel Wheel:
- 112 N*m{ 1137 kgf*cm , 82 ft.*lbf }