Front Passenger Side Seat Belt Warning Light Malfunction
Circuit diagnosis · Vehicles built Sep 2011 – Dec 2011
Versions by build date: Sep 2011 – Dec 2011 from Jan 2012
DESCRIPTION
The combination meter detects the state of the front seat inner belt assembly (for Front Passenger Side) when the front passenger seat is occupied with the ignition switch ON. If the front passenger seat belt is not fastened, the front passenger side seat belt warning light on the display and navigation module display*1 or clock assembly*2 blinks. If the seat belt is fastened, the warning light goes off.- *1: w/ Navigation System
- *2: w/o Navigation System
WIRING DIAGRAM
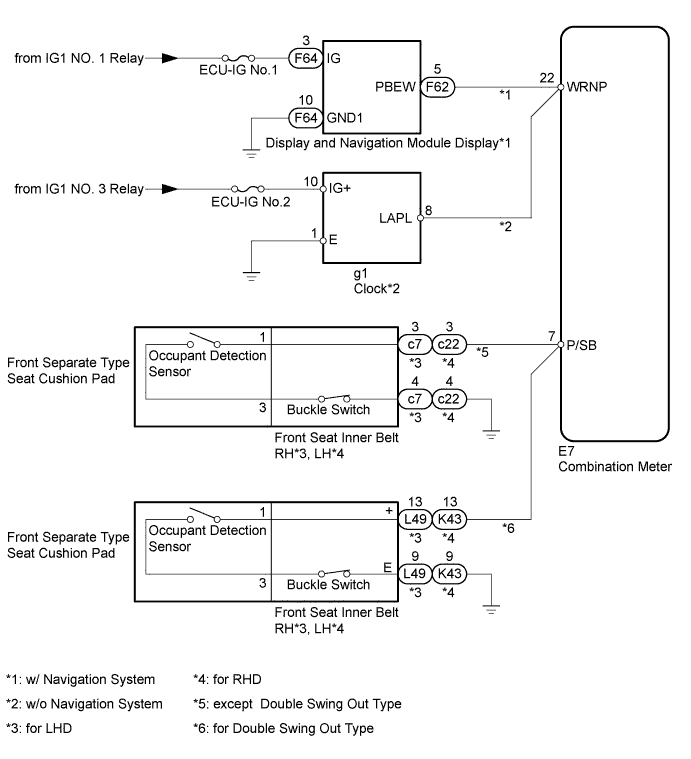

INSPECTION PROCEDURE
- NOTICE:
- Inspect the fuses for circuits related to this system before performing the following inspection procedure.
| 1. CHECK VEHICLE TYPE |

Check the vehicle type.
Result Result
Proceed to
except Double Swing Out Type
A
for Double Swing Out Type
B
|
|
||||

| A | |
 |
| 2. CHECK FOR DTC |
Check for DTCs.
Result Result
Proceed to
DTC is not output
A
CAN communication system DTC is output (for LHD)
B
CAN communication system DTC is output (for RHD)
C
Airbag system DTC is output
D
|
|
||||
|
|
||||
|
|
||||

| A | |
|
| 3. READ VALUE USING INTELLIGENT TESTER (PASSENGER SIDE BUCKLE SWITCH) |
Check the Data List for proper functioning of the front passenger side seat belt buckle switch.
Combination Meter Tester Display
Measurement Item/Range
Normal Condition
Diagnostic Note
P-Seatbelt Buckle SW
Front passenger side seat belt buckle signal / ON or OFF
ON: Front passenger side seat is occupied, front passenger side seat belt is fastened
OFF: Front passenger side seat is occupied, front passenger side seat belt is unfastened
-
- OK:
- The display is as specified in the normal condition column.
|
|
||||
| OK | |
|
| 4. PERFORM ACTIVE TEST USING INTELLIGENT TESTER (FRONT PASSENGER SIDE SEAT BELT WARNING LIGHT) |
Operate the intelligent tester according to the steps on the display and select Active Test.
Combination Meter Item
Test Part
Control Range
Diagnostic Note
Front Passenger Side Seat Belt
Front passenger side seat belt warning light
ON or OFF
Confirm that the vehicle is stopped and the engine is idling.
Result Result
Proceed to
Front passenger side seat belt warning light condition cannot be switched by Active Test (w/ Navigation System)
A
Front passenger side seat belt warning light condition cannot be switched by Active Test (w/o Navigation System)
B
Front passenger side seat belt warning light condition can be switched by Active Test (w/ Multi-information Display)
C
Front passenger side seat belt warning light condition can be switched by Active Test (w/o Multi-information Display)
D
|
|
||||
|
|
||||
|
|
||||
| A | |
|
| 5. CHECK HARNESS AND CONNECTOR (DISPLAY AND NAVIGATION MODULE DISPLAY - COMBINATION METER, BATTERY AND BODY GROUND) |
Disconnect the F62 and F64 display and navigation module display connectors.
Disconnect the E7 combination meter assembly connector.
Measure the resistance according to the value(s) in the table below.
- Standard Resistance:
Tester Connection
Condition
Specified Condition
F62-5 (PBEW) - E7-22 (WRNP)
Always
Below 1 Ω
F62-5 (PBEW) or E7-22 (WRNP) - Body ground
Always
10 kΩ or higher
F64-10 (GND1) - Body ground
Always
Below 1 Ω
Measure the voltage according to the value(s) in the table below.
- Standard Voltage:
Tester Connection
Switch Condition
Specified Condition
F64-3 (IG) - Body ground
Ignition switch ON
11 to 14 V
|
|
||||
| OK | |
|
| 6. INSPECT DISPLAY AND NAVIGATION MODULE DISPLAY |
Disconnect the F62 and F64 display and navigation module display connectors.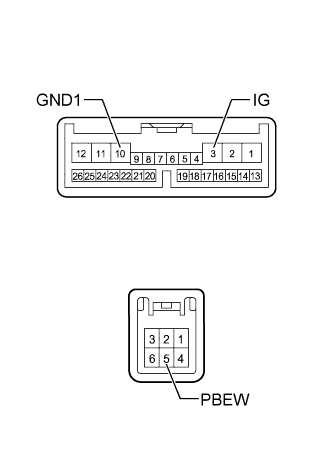
Apply battery voltage to the terminals and check that the front passenger seat belt warning light illuminates.
- OK:
Measurement Connection
Specified Condition
Battery Positive (+) → 3 (IG)
Battery negative (-) → 5 (PBEW)
Battery negative (-) → 10 (GND1)
Front passenger side seat belt warning light on
Result Result
Proceed to
NG
A
OK (w/ Multi-information Display)
B
OK (w/o Multi-information Display)
C
|
|
||||
|
|
||||
| A | ||
 |
||
| ||
| 7. CHECK HARNESS AND CONNECTOR (CLOCK - COMBINATION METER, BATTERY AND BODY GROUND) |
Disconnect the g1 clock assembly connector.
Disconnect the E7 combination meter assembly connector.
Measure the resistance and voltage according to the value(s) in the table below.
- Standard Resistance:
Tester Connection
Condition
Specified Condition
g1-1 (E) - Body ground
Always
Below 1 Ω
g1-8 (LAPL) - Body ground
Always
10 kΩ or higher
g1-8 (LAPL) - E7-22 (WRNP)
Always
Below 1 Ω
Measure the voltage according to the value(s) in the table below.
- Standard Voltage:
Tester Connection
Switch Condition
Specified Condition
g1-10 (IG+) - Body ground
Ignition switch ON
11 to 14 V
|
|
||||
| OK | |
|
| 8. INSPECT CLOCK ASSEMBLY |
Disconnect the g1 clock assembly connector.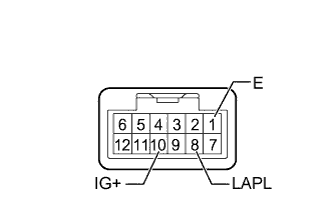
Apply battery voltage to the terminals and check that the front passenger seat belt warning light illuminates.
- OK:
Measurement Connection
Specified Condition
Battery Positive (+) → 10 (IG+)
Battery negative (-) → 8 (LAPL)
Battery negative (-) → 1 (E)
Front passenger seat belt warning light Illuminates
Result Result
Proceed to
NG
A
OK (w/ Multi-information Display)
B
OK (w/o Multi-information Display)
C
|
|
||||
|
|
||||
| A | ||
|
||
| ||
| 9. CHECK HARNESS AND CONNECTOR (FRONT SEAT INNER BELT - COMBINATION METER AND BODY GROUND) |
Disconnect the c7*1 or c22*2 front seat inner belt assembly (for Front Passenger Side) connector.
- *1: for LHD
- *2: for RHD
- *1: for LHD
Disconnect the E7 combination meter assembly connector.
Measure the resistance according to the value(s) in the table below.
- Standard Resistance:
- for LHD:
Tester Connection
Condition
Specified Condition
c7-3 - E7-7 (P/SB)
Always
Below 1 Ω
c7-3 or E7-7 (P/SB) - Body ground
Always
10 kΩ or higher
c7-4 - Body ground
Always
Below 1 Ω
- Standard Resistance:
- for LHD:
Tester Connection
Condition
Specified Condition
c22-3 - E7-7 (P/SB)
Always
Below 1 Ω
c22-3 or E7-7 (P/SB) - Body ground
Always
10 kΩ or higher
c22-4 - Body ground
Always
Below 1 Ω
|
|
||||
| OK | |
|
| 10. INSPECT FRONT SEPARATE TYPE SEAT CUSHION PAD (OCCUPANT DETECTION SENSOR) |
Remove the front separate type seat cushion pad.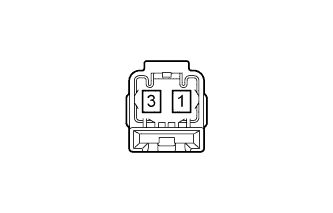
- for Manual Seat: Click here
- for Power Seat: Click here
- for Bench Seat: Click here
- for Manual Seat: Click here
Measure the resistance according to the value(s) in the table below.
- Standard Resistance:
Tester Connection
Condition
Specified Condition
1 - 3
More than 147 N (15 kgf, 33.0 lbf) applied to occupant detection sensor
Below 100 Ω
Result Result
Proceed to
OK
A
NG (for Manual Seat)
B
NG (for Power Seat)
C
NG (for Bench Seat)
D
|
|
||||
|
|
||||
|
|
||||
| A | |
|
| 11. REPLACE FRONT SEAT INNER BELT ASSEMBLY (for Front Passenger Side) |
Temporarily replace the front seat inner belt assembly RH*1 or LH*2 with a new one.
- *1: for LHD
- *2: for RHD
- except Bench Seat: Click here
- for Bench Seat: Click here
- *1: for LHD
| NEXT | |
|
| 12. CHECK FRONT PASSENGER SIDE SEAT BELT WARNING LIGHT |
Check the front passenger side seat belt warning light function (Click here).
- OK:
- Front passenger side seat belt warning light operates normally.
Result Result
Proceed to
OK
A
NG (w/ Multi-information Display)
B
NG (w/o Multi-information Display)
C
|
|
||||
|
|
||||
| A | ||
|
||
| ||
| 13. READ VALUE USING INTELLIGENT TESTER (PASSENGER SIDE BUCKLE SWITCH) |
Check the Data List for proper functioning of the front passenger side seat belt buckle switch.
Combination Meter Tester Display
Measurement Item/Range
Normal Condition
Diagnostic Note
P-Seatbelt Buckle SW
Front passenger side seat belt buckle signal / ON or OFF
ON: Front passenger side seat is occupied, front passenger side seat belt is fastened
OFF: Front passenger side seat is occupied, front passenger side seat belt is unfastened
-
- OK:
- The display is as specified in the normal condition column.
|
|
||||
| OK | |
|
| 14. PERFORM ACTIVE TEST USING INTELLIGENT TESTER (FRONT PASSENGER SIDE SEAT BELT WARNING LIGHT) |
Operate the intelligent tester according to the steps on the display and select Active Test.
Combination Meter Item
Test Part
Control Range
Diagnostic Note
Front Passenger Side Seat Belt
Front passenger side seat belt warning light
ON or OFF
Confirm that the vehicle is stopped and the engine is idling.
- OK:
- Passenger side seat belt warning light condition can be switched by Active Test.
|
|
||||
| OK | ||
|
||
| ||
| 15. CHECK HARNESS AND CONNECTOR (CLOCK - COMBINATION METER, BATTERY AND BODY GROUND) |
Disconnect the g1 clock assembly connector.
Disconnect the E7 combination meter assembly connector.
Measure the resistance and voltage according to the value(s) in the table below.
- Standard Resistance:
Tester Connection
Condition
Specified Condition
g1-1 (E) - Body ground
Always
Below 1 Ω
g1-8 (LAPL) - E7-22 (WRNP)
Always
Below 1 Ω
g1-8 (LAPL) - Body ground
Always
10 kΩ or higher
|
|
||||
| OK | |
|
| 16. INSPECT CLOCK ASSEMBLY |
Disconnect the g1 clock assembly connector.
Apply battery voltage to the terminals and check that the front passenger seat belt warning light illuminates.
- OK:
Measurement Connection
Specified Condition
Battery Positive (+) → 10 (IG+)
Battery negative (-) → 8 (LAPL)
Battery negative (-) → 1 (E)
Front passenger seat belt warning light Illuminates
|
|
||||
| OK | ||
|
||
| ||
| 17. INSPECT FRONT SEAT INNER BELT ASSEMBLY (for Front Passenger Side) |
Remove the front seat inner belt assembly (for Front Passenger Side).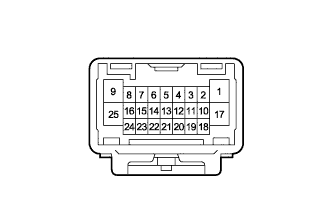
- except Bench Seat: Click here
- for Bench Seat: Click here
- except Bench Seat: Click here
Measure the resistance according to the value(s) in the table below.
- Standard Resistance:
Tester Connection
Switch Condition
Specified Condition
13 - 9
Seat belt unfastened (buckle switch is off)
Below 1 Ω
Seat belt fastened (buckle switch is on)
10 kΩ or higher
Result Result
Proceed to
OK
A
NG (except Bench Seat)
B
NG (for Bench seat)
C
|
|
||||
|
|
||||
| A | |
|
| 18. INSPECT FRONT SEPARATE TYPE SEAT CUSHION PAD |
Remove the front separate type seat cushion pad.
- except Bench Seat: Click here
- for Bench Seat: Click here
- except Bench Seat: Click here
Measure the resistance according to the value(s) in the table below.
- Standard Resistance:
Tester Connection
Condition
Specified Condition
1 - 3
More than 147 N (15 kgf, 33.0 lbf) applied to occupant detection sensor
Below 100 Ω
Result Result
Proceed to
OK
A
NG (except Bench Seat)
B
NG (for Bench Seat)
C
|
|
||||
|
|
||||
| A | |
|
| 19. CHECK HARNESS AND CONNECTOR (FRONT SEAT INNER BELT - COMBINATION METER AND BODY GROUND) |
Disconnect the L49*1 or K43*2 front seat inner belt assembly (for Front Passenger Side) connector.
Disconnect the E7 combination meter assembly connector.
Measure the resistance according to the value(s) in the table below.
- Standard Resistance:
- for LHD:
Tester Connection
Condition
Specified Condition
L49-13 - E7-7 (P/SB)
Always
Below 1 Ω
L49-13 or E7-7 (P/SB) - Body ground
Always
10 kΩ or higher
L49-9 - Body ground
Always
Below 1 Ω
- for RHD:
Tester Connection
Condition
Specified Condition
K43-13 - E7-7 (P/SB)
Always
Below 1 Ω
K43-13 or E7-7 (P/SB) - Body ground
Always
10 kΩ or higher
K43-9 - Body ground
Always
Below 1 Ω
|
|
||||
| OK | ||
|
||
| ||