C0200/31 Front Speed Sensor RH Circuit
Diagnostic trouble codes · Vehicles built Sep 2011 – Dec 2011
Also covers:
- C0205/32 Front Speed Sensor LH Circuit
- C1235/35 Foreign Object is Attached on Tip of Front Speed Sensor RH
- C1236/36 Foreign Object is Attached on Tip of Front Speed Sensor LH
DESCRIPTION
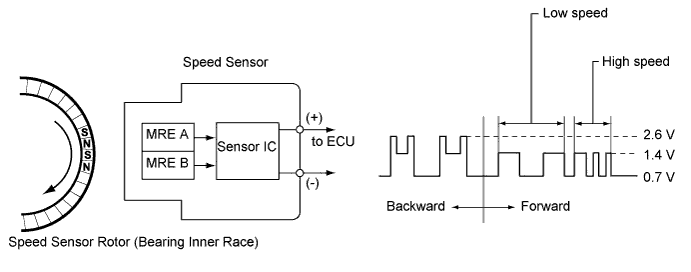
The speed sensor detects wheel speed and sends the appropriate signals to the ECU. These signals are used to control the Multi-terrain ABS, EBD, BA, VSC, A-TRC, CRAWL and hill-start assist control systems. This speed sensor contains a sensor IC, which consists of 2 MREs (Magnetic Resistance Element). The speed sensor rotor, which consists of 48 sets of N and S poles that are arranged in a circle, is integrated with the inner race of the hub bearing.To detect the rotation direction, the output waves are used to determine the relationship of the pulses that are generated by 2 MREs. Upon receiving this signal, the sensor IC outputs a forward or backward wave to the skid control ECU.

| DTC Code |
DTC Detection Condition |
Trouble Area |
| C0200/31 C0205/32 |
When any of the following conditions is detected: 1. At a vehicle speed of 10 km/h (6 mph) or more, the pulses are not input for 1 second. 2. A momentary interruption of the speed sensor signal occurs at least 255 times when switching the ignition switch ON and off. 3. Continuous noise occurs in the speed sensor signals at a vehicle speed of 20 km/h (12 mph) or more. 4. The speed sensor signal circuit is open for 0.12 seconds or more. |
|
| C1235/35 C1236/36 |
Noise in the speed sensor signals occurs 75 times or more for 5 seconds when the vehicle speed is 20 km/h (12 mph) or more. |
|
- HINT:
- DTC C0200/31 and C1235/35 are for the front speed sensor RH.
- DTC C0205/32 and C1236/36 are for the front speed sensor LH.
- DTC C0200/31 and C1235/35 are for the front speed sensor RH.
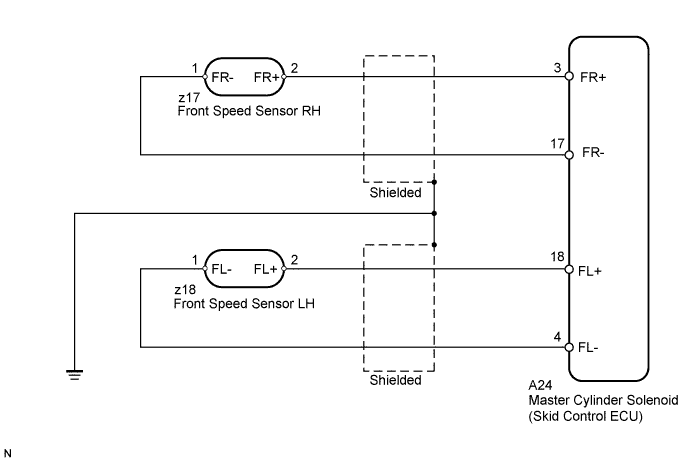
WIRING DIAGRAM
INSPECTION PROCEDURE
- NOTICE:
- When replacing the master cylinder solenoid, perform zero point calibration (Click here).
| 1. READ VALUE USING INTELLIGENT TESTER (FR/FL SPEED OPEN) |

Connect the intelligent tester to the DLC3.
Turn the ignition switch to ON and turn the intelligent tester on.
Enter the following menus: Chassis / ABS/VSC/TRC / Data List.
ABS/VSC/TRC Tester Display
Measurement Item/Range
Normal Condition
Diagnostic Note
FR Speed Open
Front speed sensor RH open detection / Error or Normal
Error: Momentary interruption
Normal: Normal
-
FL Speed Open
Front speed sensor LH open detection / Error or Normal
Error: Momentary interruption
Normal: Normal
-
Check for any momentary interruption in the wire harness and connector corresponding to the DTC (Click here).
- OK:
- There are no momentary interruptions.
- HINT:
- Perform the above inspection before removing the sensor and connector.
|
|
||||

| OK | |
 |
| 2. READ VALUE USING INTELLIGENT TESTER (FR/FL WHEEL SPEED, FR/FL WHEEL DIRECTION) |
Check that there is no difference between the speed value output from the speed sensor displayed on the intelligent tester and the speed value displayed on the speedometer when driving the vehicle.
ABS/VSC/TRC Tester Display
Measurement Item/Range
Normal Condition
Diagnostic Note
FR Wheel Speed
Front wheel speed sensor RH reading /min.: 0 km/h (0 mph), max.: 326 km/h (202 mph)
Actual wheel speed
A similar speed is indicated on the speedometer.
FL Wheel Speed
Front wheel speed sensor LH reading /min.: 0 km/h (0 mph), max.: 326 km/h (202 mph)
Actual wheel speed
A similar speed is indicated on the speedometer.
- OK:
- The speed value output from the speed sensor displayed on the intelligent tester is the same as the actual vehicle speed.
Check that the sensor signal conforms to the wheel direction.
ABS/VSC/TRC Tester Display
Measurement Item/Range
Normal Condition
Diagnostic Note
FR Wheel Direction
Front wheel direction RH / Forward or Back
Forward: Forward
Back: Backward
-
FL Wheel Direction
Front wheel direction LH / Forward or Back
Forward: Forward
Back: Backward
-
- OK:
- The wheel direction is displayed correctly.
|
|
||||

| OK | |
|
| 3. PERFORM SIGNAL CHECK |
Check if test mode (signal check) DTCs are output.
- HINT:
- Enter the following menus: Chassis / ABS/VSC/TRC / Utility / Signal Check.
Result Result
Proceed to
Test mode (signal check) DTC is output
A
Test mode (signal check) DTC is not output
B
|
|
||||
| A | |
|
| 4. INSPECT FRONT SPEED SENSOR INSTALLATION |
Check the speed sensor installation (Click here).
- OK:
- The installation bolt is tightened properly.
- There is no clearance between the sensor and front steering knuckle.
- NOTICE:
- Check the speed sensor signal after replacement (Click here).
|
|
||||
| OK | |
|
| 5. INSPECT SPEED SENSOR TIP |
Remove the front speed sensor (Click here).
Check the sensor tip.
- OK:
- No scratches or foreign matter on the sensor tip.
- NOTICE:
- Check the speed sensor signal after cleaning/replacement (Click here).
|
|
||||
| OK | |
|
| 6. INSPECT FRONT SPEED SENSOR |
Install the front speed sensor.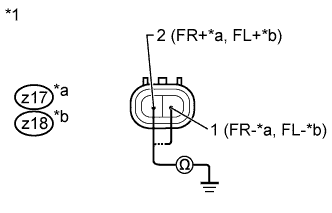
Turn the ignition switch off.
Disconnect the z17 and/or z18 front speed sensor connector.
Measure the resistance according to the value(s) in the table below.
- Standard Resistance:
- for RH:
Tester Connection
Switch Condition
Specified Condition
z17-2 (FR+) - Body ground
Ignition switch off
10 kΩ or higher
z17-1 (FR-) - Body ground
Ignition switch off
10 kΩ or higher
- for LH:
Tester Connection
Switch Condition
Specified Condition
z18-2 (FL+) - Body ground
Ignition switch off
10 kΩ or higher
z18-1 (FL-) - Body ground
Ignition switch off
10 kΩ or higher
Text in Illustration *1
Component without harness connected
(Front Speed Sensor)
*a
for RH
*b
for LH
|
|
||||
| OK | |
|
| 7. INSPECT SKID CONTROL SENSOR WIRE |
Disconnect the z17 and Az2/z18 and Az1 skid control sensor wire connectors.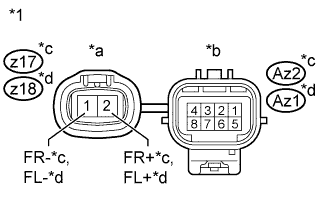
Measure the resistance according to the value(s) in the table below.
- Standard Resistance:
- for RH:
Tester Connection
Condition
Specified Condition
z17-2 (FR+) - Az2-5
Always
Below 1 Ω
z17-2 (FR+) - Az2-1
Always
10 kΩ or higher
z17-2 (FR+) - Body ground
Always
10 kΩ or higher
z17-1 (FR-) - Az2-1
Always
Below 1 Ω
z17-1 (FR-) - Az2-5
Always
10 kΩ or higher
z17-1 (FR-) - Body ground
Always
10 kΩ or higher
- for LH:
Tester Connection
Condition
Specified Condition
z18-2 (FL+) - Az1-5
Always
Below 1 Ω
z18-2 (FL+) - Az1-1
Always
10 kΩ or higher
z18-2 (FL+) - Body ground
Always
10 kΩ or higher
z18-1 (FL-) - Az1-1
Always
Below 1 Ω
z18-1 (FL-) - Az1-5
Always
10 kΩ or higher
z18-1 (FL-) - Body ground
Always
10 kΩ or higher
Text in Illustration *1
Component without harness connected
(Skid Control Sensor Wire)
*a
Sensor Side Connector
*b
Vehicle Side Connector
*c
for RH
*d
for LH
- NOTICE:
- Check the speed sensor signal after replacement (Click here).
|
|
||||
| OK | |
|
| 8. CHECK HARNESS AND CONNECTOR (SKID CONTROL ECU - FRONT SPEED SENSOR WIRE) |
Disconnect the A24 skid control ECU connector and Az2/Az1 skid control sensor wire connector.
Measure the resistance according to the value(s) in the table below.
- Standard Resistance:
- for RH:
Tester Connection
Condition
Specified Condition
A24-3 (FR+) - Az2-5
Always
Below 1 Ω
A24-3 (FR+) - Body ground
Always
10 kΩ or higher
A24-17 (FR-) - Az2-1
Always
Below 1 Ω
A24-17 (FR-) - Body ground
Always
10 kΩ or higher
- for LH:
Tester Connection
Condition
Specified Condition
A24-18 (FL+) - Az1-5
Always
Below 1 Ω
A24-18 (FL+) - Body ground
Always
10 kΩ or higher
A24-4 (FL-) - Az1-1
Always
Below 1 Ω
A24-4 (FL-) - Body ground
Always
10 kΩ or higher
|
|
||||
| OK | |
|
| 9. INSPECT MASTER CYLINDER SOLENOID (SKID CONTROL ECU OUTPUT VOLTAGE) |
Reconnect the A24 skid control ECU connector.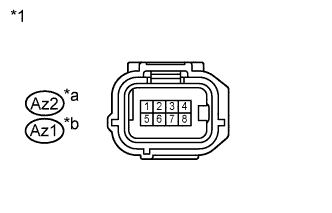
Turn the ignition switch to ON.
Measure the voltage according to the value(s) in the table below.
- Standard Voltage:
- for RH:
Tester Connection
Switch Condition
Specified Condition
Az2-5 - Body ground
Ignition switch ON
7.5 to 12 V
- for LH:
Tester Connection
Switch Condition
Specified Condition
Az1-5 - Body ground
Ignition switch ON
7.5 to 12 V
Text in Illustration *1
Front view of wire harness connector
(to Front Speed Sensor Wire)
*a
for RH
*b
for LH
Result Result
Proceed to
OK
A
NG
for LHD
B
for RHD
C
|
|
||||
|
|
||||
| A | |
|
| 10. RECONFIRM DTC |
Clear the DTCs (Click here).
Drive the vehicle at a speed of approximately 32 km/h (20 mph) or more for 60 seconds or more.
Check if the same DTCs are output (Click here).
- HINT:
- Reinstall the sensors, connectors, etc. and restore the previous vehicle conditions before rechecking for DTCs.
Result Result
Proceed to
DTC is output
A
DTC is not output (When troubleshooting in accordance with the Diagnostic Trouble Code Chart)
B
DTC is not output (When troubleshooting in accordance with the Problem Symptoms Table)
C
|
|
||||
|
|
||||
| A | |
|
| 11. REPLACE FRONT SPEED SENSOR |
Replace the front speed sensor (Click here).
- NOTICE:
- Check the speed sensor signal after replacement (Click here).
| NEXT | |
|
| 12. RECONFIRM DTC |
Clear the DTCs (Click here).
Drive the vehicle at a speed of approximately 32 km/h (20 mph) or more for 60 seconds or more.
Check if the same DTCs are output (Click here).
- HINT:
- Reinstall the sensors, connectors, etc. and restore the previous vehicle conditions before rechecking for DTCs.
Result Result
Proceed to
DTC is output
A
DTC is not output
B
|
|
||||
| A | |
|
| 13. INSPECT SPEED SENSOR ROTOR |
Remove the front axle hub sub-assembly (Click here).
Check the sensor rotor.
- OK:
- No scratches, oil, or foreign matter on the rotors.
- NOTICE:
- Check the speed sensor signal after cleaning/replacement (Click here).
Result Result
Proceed to
NG
A
OK
for LHD
B
for RHD
C
|
|
||||
|
|
||||
| A | ||
 |
||
| ||