1VD-FTV FUEL FUEL TANK INSTALLATION
PROCEDURE

 77697
1.INSTALL NO. 1 FUEL TANK HEAT INSULATOR
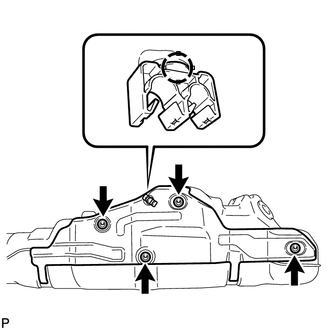
Install the heat insulator with the 4 clips.
Install the fuel tube clamp to the heat insulator.
77213B
2.INSTALL FUEL TANK TO FILLER PIPE HOSE
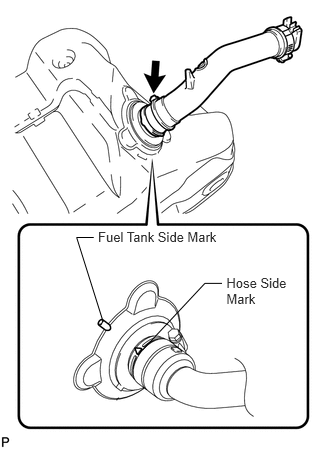
Install the fuel tank to filler pipe hose to the fuel tank as shown in the illustration.
- HINT:
- ·
Align the fuel tank side mark with the hose side mark when installing the hose.
·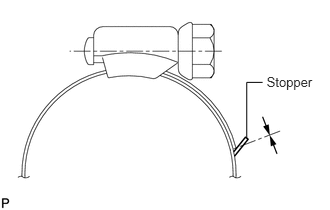 2.777,0.77 3.316,0.952 0.539,0.183 10 Stopper 2.736,0.858 2.57,0.858 2.57,0.858 2.57,1.44 false
Tighten the hose clamp until the end of the hose clamp contacts the stopper as shown in the illustration.
77020A
3.INSTALL FUEL SUCTION WITH PUMP AND GAUGE TUBE ASSEMBLY
4.INSTALL FUEL TANK MAIN TUBE SUB-ASSEMBLY AND FUEL TANK RETURN TUBE (for Single Tank Type)
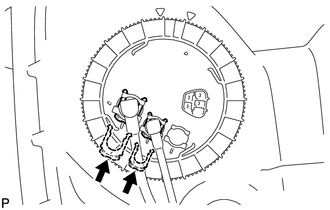
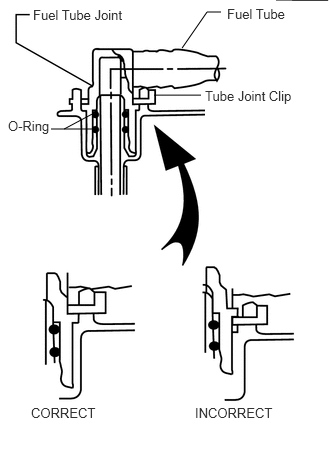
Install the 2 fuel tank tubes with the 2 tube joint clips.
- NOTICE:
- ·
Check that there are no scratches or foreign objects on the connecting parts.
·Check that the fuel tube joints are inserted securely.
·Check that the tube joint clips are on the collars of the fuel tube joints.
·After installing the tube joint clips, check that the fuel tube joints cannot be pulled off.
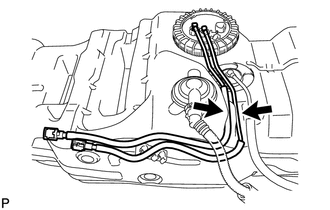
Install the 2 fuel tubes to the fuel tank.
5.INSTALL FUEL TANK MAIN TUBE SUB-ASSEMBLY, FUEL TANK RETURN TUBE AND NO. 2 FUEL MAIN TUBE SUB-ASSEMBLY (for Double Tank Type)
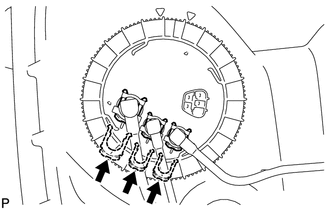
Install the 3 fuel tank tubes with the 3 tube joint clips.
- NOTICE:
- ·
Check that there are no scratches or foreign objects on the connecting parts.
·Check that the fuel tube joints are inserted securely.
·Check that the tube joint clips are on the collars of the fuel tube joints.
·After installing the tube joint clips, check that the fuel tube joints cannot be pulled off.
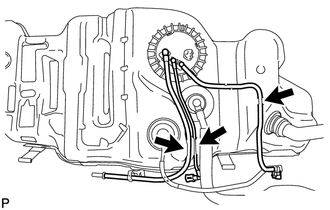
Install the 3 fuel tubes to the fuel tank.
77100U
6.INSTALL FUEL TANK SUB-ASSEMBLY
Set the fuel tank on a transmission jack.
Raise the transmission jack.
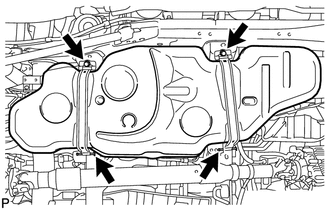
Install the 2 fuel tank bands with the 2 pins and 2 clips.
Connect the 2 fuel tank bands with the 2 bolts.
- Torque:
- 40 N*m (408 kgf*cm, 30 ft.*lbf)
7.CONNECT FUEL TANK TO FILLER PIPE HOSE (for Single Tank Type)
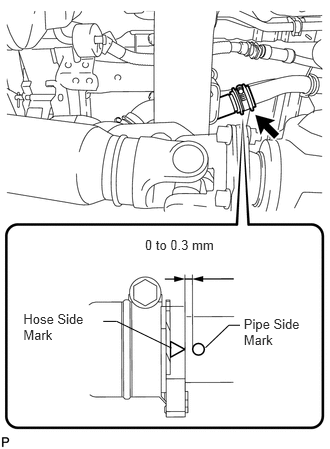
Connect the hose to the fuel tank filler pipe as shown in the illustration.
- HINT:
- ·
Install the hose so that the distance between the fuel tank inlet pipe side mark and fuel tank to filler pipe hose side mark is 0 to 0.3 mm (0 to 0.0118 in.) as shown in the illustration.
·
2.777,0.77 3.316,0.952 0.539,0.183 10 Stopper 2.736,0.858 2.57,0.858 2.57,0.858 2.57,1.44 false
Tighten the hose clamp until the end of the hose clamp contacts the stopper as shown in the illustration.
8.CONNECT FUEL TANK TO FILLER PIPE HOSE (for Double Tank Type)
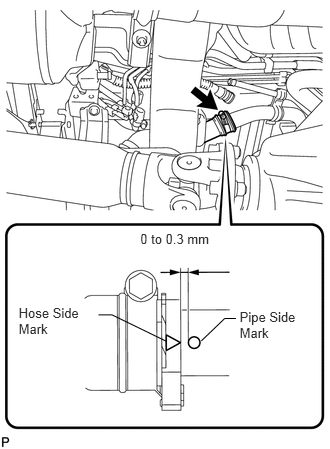
Connect the hose to the fuel tank filler pipe as shown in the illustration.
- HINT:
- ·
Install the hose so that the distance between the fuel tank inlet pipe side mark and fuel tank to filler pipe hose side mark is 0 to 0.3 mm (0 to 0.0118 in.) as shown in the illustration.
·
2.777,0.77 3.316,0.952 0.539,0.183 10 Stopper 2.736,0.858 2.57,0.858 2.57,0.858 2.57,1.44 false
Tighten the hose clamp until the end of the hose clamp contacts the stopper as shown in the illustration.
9.CONNECT FUEL TANK BREATHER TUBE (for Single Tank Type)
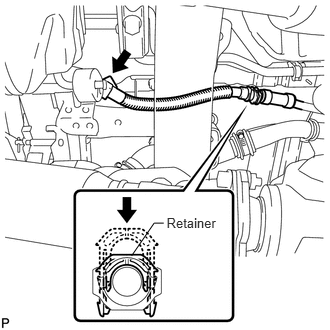
Connect the fuel tank breather tube to the filler pipe and push the retainer.
- HINT:
-
Push the parts together firmly until a "click" sound is heard.
- NOTICE:
- ·
Before installing the tube connectors to the pipes, check if there is any damage or foreign matter in the connectors.
·After the connection, check if the connectors and pipes are securely connected by trying to pull them apart.
Attach the fuel tube clamp.
10.CONNECT FUEL TANK BREATHER TUBE (for Double Tank Type)
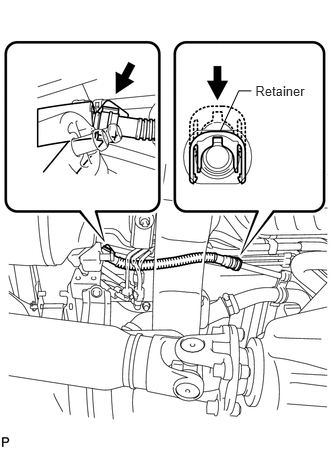
Connect the fuel tank breather tube to the filler pipe and push the retainer.
- HINT:
-
Push the parts together firmly until a "click" sound is heard.
- NOTICE:
- ·
Before installing the tube connectors to the pipes, check if there is any damage or foreign matter in the connectors.
·After the connection, check if the connectors and pipes are securely connected by trying to pull them apart.
Attach the fuel tube clamp.
11.CONNECT NO. 2 FUEL TANK BREATHER TUBE (for Single Tank Type)
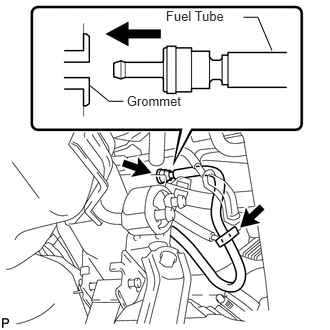
Connect the No. 2 fuel tank breather tube to the body.
- HINT:
-
Make sure the No. 2 fuel tank breather tube is securely inserted into the grommet.
Attach the fuel tube clamp.
12.CONNECT NO. 2 FUEL TANK BREATHER TUBE (for Double Tank Type)
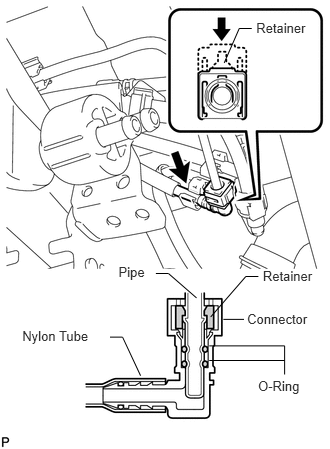
Connect the fuel tank breather tube and push the retainer.
- HINT:
-
Push the parts together firmly until a "click" sound is heard.
- NOTICE:
- ·
Before installing the tube connectors to the pipes, check if there is any damage or foreign matter in the connectors.
·After the connection, check if the connectors and pipes are securely connected by trying to pull them apart.
Attach the fuel tube clamp.
77206C
13.CONNECT NO. 2 FUEL MAIN TUBE SUB-ASSEMBLY (for Double Tank Type)
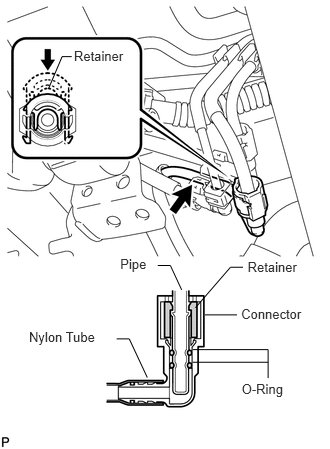
Connect the No. 2 fuel main tube and push the retainer.
- HINT:
-
Push the parts together firmly until a "click" sound is heard.
- NOTICE:
- ·
Before installing the tube connectors to the pipes, check if there is any damage or foreign matter in the connectors.
·After the connection, check if the connectors and pipes are securely connected by trying to pull them apart.
Attach the fuel tube clamp.
77209C
14.CONNECT FUEL TANK MAIN TUBE SUB-ASSEMBLY
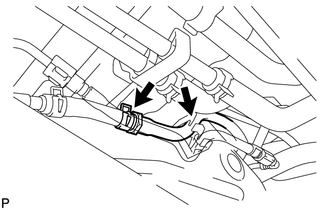
Connect the fuel tank main tube.
Attach the fuel tube clamp.
77204A
15.CONNECT FUEL TANK RETURN TUBE
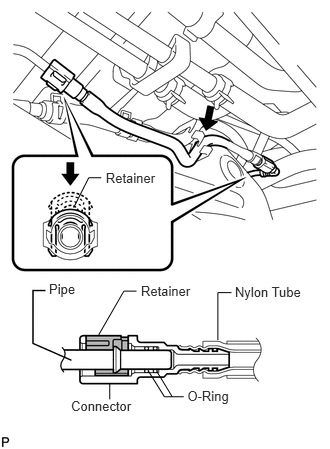
Connect both ends of the fuel tank return tube and push the retainer.
- HINT:
-
Push the parts together firmly until a "click" sound is heard.
- NOTICE:
- ·
Before installing the tube connectors to the pipes, check if there is any damage or foreign matter in the connectors.
·After the connection, check if the connectors and pipes are securely connected by trying to pull them apart.
Attach the fuel tube clamp.
77606
16.INSTALL NO. 1 FUEL TANK PROTECTOR SUB-ASSEMBLY
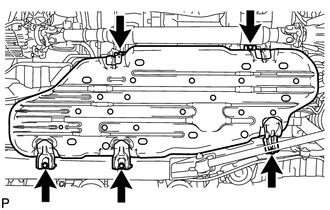
Install the tank protector with the 5 bolts.
- Torque:
- 20 N*m (204 kgf*cm, 15 ft.*lbf)
77310A
17.INSTALL FUEL TANK CAP ASSEMBLY
58329F
18.INSTALL REAR FLOOR NO. 2 SERVICE HOLE COVER
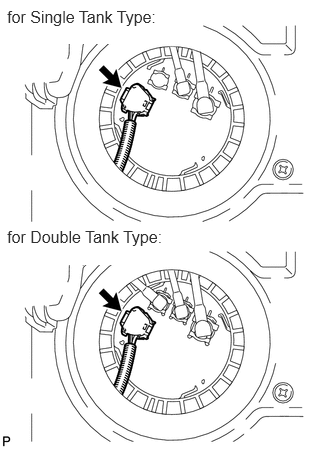
Connect the fuel pump and fuel sender gauge connector.
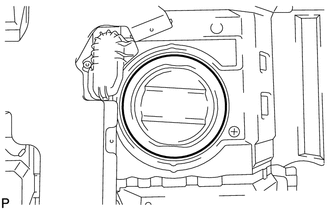
Install the service hole cover with new butyl tape.
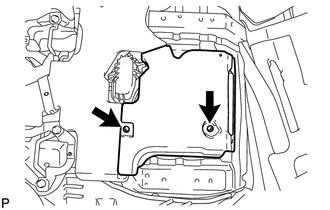
w/ Rear Air Conditioning System:
Install the air duct and 2 screws.
58510D
19.INSTALL FRONT FLOOR CARPET ASSEMBLY
87174
20.INSTALL REAR AIR DUCT GUIDE (w/ Rear Air Conditioning System)
87217B
21.INSTALL AIR DUCT PLUG (w/ Rear Air Conditioning System)
62520P
22.INSTALL FRONT QUARTER TRIM PANEL ASSEMBLY LH
w/ Sliding Roof:
Install the front quarter trim panel assembly LH (See page Vehicle Interior>INTERIOR PANELS / TRIM>ROOF HEADLINING (w/ Sliding Roof)>INSTALLATION).
w/o Sliding Roof:
Install the front quarter trim panel assembly LH (See page Vehicle Interior>INTERIOR PANELS / TRIM>ROOF HEADLINING (w/o Sliding Roof)>INSTALLATION).
62510P
23.INSTALL FRONT QUARTER TRIM PANEL ASSEMBLY RH
w/ Sliding Roof:
Install the front quarter trim panel assembly RH (See page Vehicle Interior>INTERIOR PANELS / TRIM>ROOF HEADLINING (w/ Sliding Roof)>INSTALLATION).
w/o Sliding Roof:
Install the front quarter trim panel assembly RH (See page Vehicle Interior>INTERIOR PANELS / TRIM>ROOF HEADLINING (w/o Sliding Roof)>INSTALLATION).
71845B
24.INSTALL REAR SEAT COVER CAP (w/ Rear No. 2 Seat, except Face to Face Seat Type)
58574A
25.INSTALL REAR FLOOR MAT REAR SUPPORT PLATE
67918E
26.INSTALL REAR DOOR SCUFF PLATE LH
67917C
27.INSTALL REAR DOOR SCUFF PLATE RH
51775
28.INSTALL REAR STEP COVER
71696
29.INSTALL REAR NO. 2 SEAT PROTECTOR
71695C
30.INSTALL REAR NO. 1 SEAT PROTECTOR
31.INSTALL REAR NO. 2 SEAT ASSEMBLY
for Face to Face Seat Type:
Install the rear No. 2 seat assembly (See page Vehicle Interior>SEAT>REAR NO. 2 SEAT ASSEMBLY(for Face to Face Seat Type)>INSTALLATION).
except Face to Face Seat Type:
Install the rear No. 2 seat assembly (See page Vehicle Interior>SEAT>REAR NO. 2 SEAT ASSEMBLY(except Face to Face Seat Type)>INSTALLATION).
71300S
32.INSTALL REAR NO. 1 SEAT ASSEMBLY RH (for 60/40 Split Seat Type 40 Side)
Install the rear No. 1 seat assembly RH (See page Vehicle Interior>SEAT>REAR NO. 1 SEAT ASSEMBLY (for 60/40 Split Seat Type 40 Side)>INSTALLATION).
71400S
33.INSTALL REAR NO. 1 SEAT ASSEMBLY LH (for 60/40 Split Seat Type 60 Side)
Install the rear No. 1 seat assembly LH (See page Vehicle Interior>SEAT>REAR NO. 1 SEAT ASSEMBLY (for 60/40 Split Seat Type 60 Side)>INSTALLATION).
34.BLEED AIR FROM FUEL SYSTEM
35.CONNECT CABLE TO NEGATIVE BATTERY TERMINAL
- NOTICE:
-
When disconnecting the cable, some systems need to be initialized after the cable is reconnected (See page General>INTRODUCTION>REPAIR INSTRUCTION>INITIALIZATION).
Connect the cables to the negative (-) main battery and sub-battery terminals.
36.CHECK SRS WARNING LIGHT
Check the SRS warning light (See page Vehicle Interior>SUPPLEMENTAL RESTRAINT SYSTEMS>AIRBAG SYSTEM>DIAGNOSIS SYSTEM).
37.ADD FUEL
38.INSPECT FOR FUEL LEAK