1UR-FE INTAKE / EXHAUST EXHAUST MANIFOLD INSTALLATION
PROCEDURE

 89467B
1.INSTALL AIR FUEL RATIO SENSOR (for Bank 1 Sensor 1)
89467B
2.INSTALL AIR FUEL RATIO SENSOR (for Bank 2 Sensor 1)
17140
3.INSTALL EXHAUST MANIFOLD ASSEMBLY RH
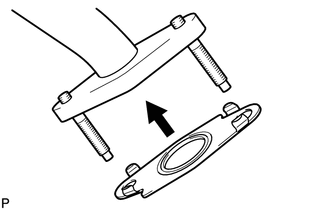
w/ Secondary Air Injection System:
Install a new gasket to the No. 3 air tube.
- HINT:
-
Install the gasket with the claws of the gasket facing the tube.
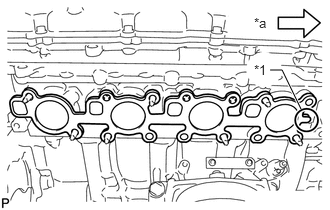
Install a new gasket to the cylinder head.
| *1 | Tab |
| *a | Front |
- HINT:
-
Install the gasket with the gasket tab facing toward the front of the engine.
w/ Secondary Air Injection System:
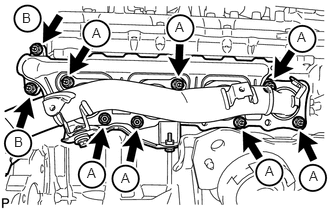
Install the exhaust manifold to the cylinder head with the 7 new nuts labeled A.
- Torque:
- 21 N*m (214 kgf*cm, 15 ft.*lbf)
Install the exhaust manifold to the No. 3 air tube with the 2 nuts labeled B.
- Torque:
- 10 N*m (102 kgf*cm, 7 ft.*lbf)
w/o Secondary Air Injection System:
Install the exhaust manifold with 7 new nuts.
- Torque:
- 21 N*m (214 kgf*cm, 15 ft.*lbf)
Connect the air fuel ratio sensor connector and attach the wire harness clamp.
17167
4.INSTALL NO. 1 EXHAUST MANIFOLD HEAT INSULATOR
Install the heat insulator with 3 new bolts.
- Torque:
- 10 N*m (102 kgf*cm, 7 ft.*lbf)
11452
5.INSTALL ENGINE OIL LEVEL DIPSTICK GUIDE
Apply engine oil to a new O-ring, and then install the O-ring to the engine oil level dipstick guide.
Install the engine oil level dipstick guide with the bolt.
- Torque:
- 10 N*m (102 kgf*cm, 7 ft.*lbf)
Attach the engine wire clamp.
Install the engine oil level dipstick.
17118
6.INSTALL MANIFOLD STAY
Temporarily install the manifold stay with the 3 bolts.
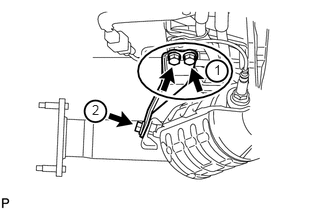
Tighten the 3 bolts in the sequence shown in the illustration.
- Torque:
- 40 N*m (408 kgf*cm, 30 ft.*lbf)
17150
7.INSTALL EXHAUST MANIFOLD ASSEMBLY LH
w/ Secondary Air Injection System:
Install a new gasket to the No. 4 air tube.
- HINT:
-
Install the gasket with the claws of the gasket facing the tube.
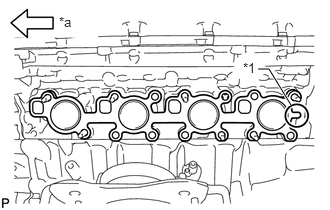
Install a new gasket to the cylinder head.
| *1 | Tab |
| *a | Front |
- HINT:
-
Install the gasket with the gasket tab facing toward the rear of the engine.
w/ Secondary Air Injection System:
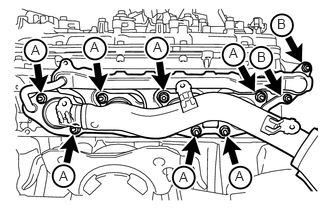
Install the exhaust manifold to the cylinder head with the 7 new nuts labeled A.
- Torque:
- 21 N*m (214 kgf*cm, 15 ft.*lbf)
Install the exhaust manifold to the No. 4 air tube with the 2 nuts labeled B.
- Torque:
- 10 N*m (102 kgf*cm, 7 ft.*lbf)
w/o Secondary Air Injection System:
Install the exhaust manifold with 7 new nuts.
- Torque:
- 21 N*m (214 kgf*cm, 15 ft.*lbf)
Connect the air fuel ratio sensor connector and attach the wire harness clamp.
17168
8.INSTALL NO. 2 EXHAUST MANIFOLD HEAT INSULATOR
Install the heat insulator with 3 new bolts.
- Torque:
- 10 N*m (102 kgf*cm, 7 ft.*lbf)
17119
9.INSTALL NO. 2 MANIFOLD STAY
Temporarily install the manifold stay with the 3 bolts.
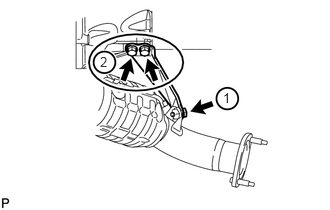
Tighten the 3 bolts in the sequence shown in the illustration.
- Torque:
- 40 N*m (408 kgf*cm, 30 ft.*lbf)
37117
10.INSTALL PROPELLER SHAFT HEAT INSULATOR
Install the propeller shaft heat insulator with the 2 bolts.
- Torque:
- 16 N*m (160 kgf*cm, 12 ft.*lbf)
37140
11.INSTALL FRONT PROPELLER SHAFT ASSEMBLY
17410
12.INSTALL FRONT EXHAUST PIPE ASSEMBLY
13.INSPECT FOR EXHAUST GAS LEAK
If gas is leaking, tighten the areas necessary to stop the leak. Replace damaged parts as necessary.
53784
14.INSTALL FRONT FENDER APRON TRIM PACKING C
Install the front fender apron trim packing C with the 4 clips.
53782
15.INSTALL FRONT FENDER APRON TRIM PACKING A
Install the front fender apron trim packing A with the 3 clips.
53785B
16.INSTALL FRONT FENDER APRON TRIM PACKING D
Install the front fender apron trim packing D with the 4 clips.
53783
17.INSTALL FRONT FENDER APRON TRIM PACKING B
w/ KDSS
Install the front fender apron trim packing B with the 3 clips.
w/o KDSS
Install the front fender apron trim packing B with the 4 clips.
51442
18.INSTALL NO. 2 ENGINE UNDER COVER
51405A
19.INSTALL NO. 1 ENGINE UNDER COVER SUB-ASSEMBLY
53805
20.INSTALL FRONT FENDER SPLASH SHIELD SUB-ASSEMBLY RH
53806
21.INSTALL FRONT FENDER SPLASH SHIELD SUB-ASSEMBLY LH
22.INSTALL AIR CLEANER AND HOSE
11209
23.INSTALL V-BANK COVER SUB-ASSEMBLY