1VD-FTV COOLING THERMOSTAT INSTALLATION
PROCEDURE

 16331A
1.INSTALL THERMOSTAT
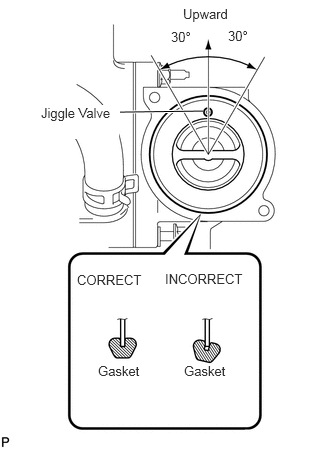
Install a new gasket to the thermostat.
- NOTICE:
-
When installing the gasket to the thermostat, be careful not to deform the gasket. Make sure that the groove of the gasket is properly installed onto the thermostat, as shown in the illustration.
Insert the thermostat into the water pump with the jiggle valve facing straight upward.
- HINT:
-
The jiggle valve may be set within 30° of either side of the prescribed position.
16321
2.INSTALL WATER INLET
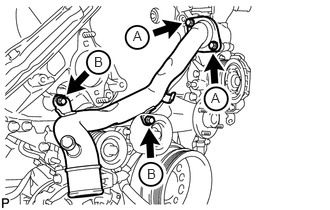
Install the water inlet with the 4 bolts.
- Torque:
- for bolt A : 21 N*m (214 kgf*cm, 15 ft.*lbf)
- for bolt B : 25 N*m (250 kgf*cm, 18 ft.*lbf)
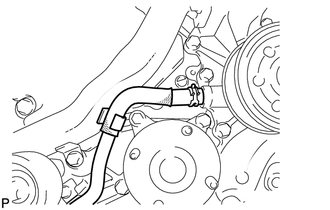
Connect the No. 2 oil cooler hose to the clamp and water pump.
3.INSTALL NO. 1 IDLER PULLEY BRACKET (w/ Viscous Heater)
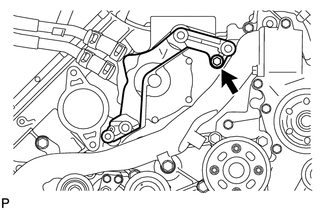
Install the No. 1 idler pulley bracket with the bolt.
- Torque:
- 49 N*m (495 kgf*cm, 36 ft.*lbf)
87120G
4.INSTALL VISCOUS WITH MAGNET CLUTCH HEATER ASSEMBLY (w/ Viscous Heater)
87208
5.INSTALL HEATER WATER PIPE SUB-ASSEMBLY (w/ Viscous Heater)
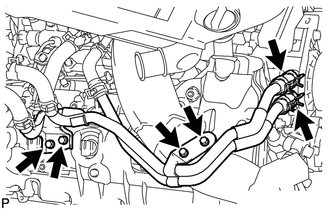
Connect the heater water pipe to the viscous heater with magnet clutch, and install the 4 bolts.
- Torque:
- 9.8 N*m (100 kgf*cm, 87 in.*lbf)
16371
6.INSTALL FAN PULLEY
16711
7.INSTALL FAN SHROUD WITH FAN
Install the shroud together with the fluid coupling fan between the radiator and engine components.
- NOTICE:
-
Be careful not to damage the radiator core.
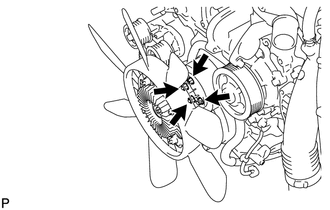
Temporarily install the fluid coupling fan to the fan bracket with the 4 nuts.
- HINT:
-
Tighten the nuts as much as possible by hand.
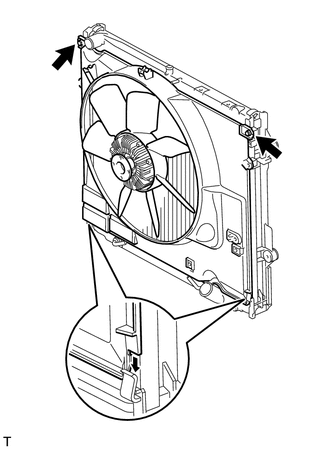
Attach the shroud claws to the radiator.
Install the shroud with the 2 bolts.
- Torque:
- 8.0 N*m (82 kgf*cm, 71 in.*lbf)
Tighten the 4 nuts of the fluid coupling fan.
- Torque:
- 21 N*m (214 kgf*cm, 15 ft.*lbf)
32942
8.INSTALL OIL COOLER TUBE (for Automatic Transmission)
16361A
9.INSTALL V-RIBBED BELT
10.INSTALL NO. 3 IDLER PULLEY (w/ Viscous Heater)
11.INSTALL NO. 1 IDLER PULLEY (w/ Viscous Heater)
12.INSTALL V-RIBBED BELT (w/ Viscous Heater)
16572D
13.CONNECT NO. 2 RADIATOR HOSE
16571C
14.CONNECT NO. 1 RADIATOR HOSE
44310
15.INSTALL VANE PUMP ASSEMBLY
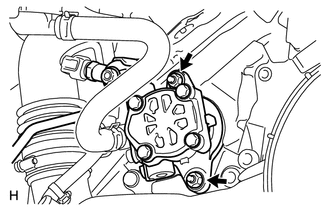
Apply a light coat of engine oil to a new O-ring, and install it to the vane pump.
Install the vane pump with 2 new nuts.
- Torque:
- 29 N*m (296 kgf*cm, 21 ft.*lbf)
16470
16.INSTALL RADIATOR RESERVOIR ASSEMBLY
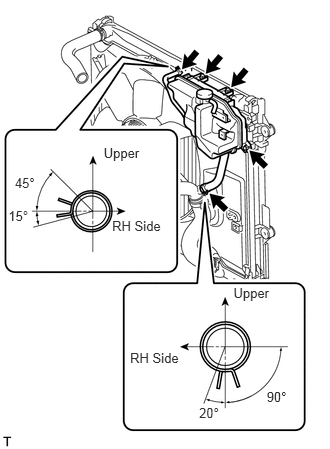
Install the radiator reservoir with the 3 bolts.
Connect the 2 hoses to the upper radiator tank and water inlet.
- HINT:
-
Make sure the directions of the hose clamps are as shown in the illustration.
44369A
17.INSTALL NO. 1 OIL RESERVOIR BRACKET
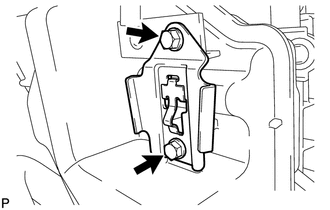
Install a new bracket with the 2 bolts.
- Torque:
- 4.5 N*m (46 kgf*cm, 40 in.*lbf)
44360
18.INSTALL VANE PUMP OIL RESERVOIR ASSEMBLY
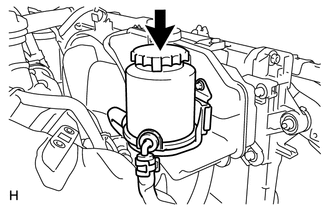
Install the vane pump oil reservoir to the bracket.
17861
19.INSTALL INTAKE AIR CONNECTOR
17881
20.TEMPORARILY INSTALL NO. 1 AIR CLEANER HOSE
17705
21.INSTALL AIR CLEANER CAP SUB-ASSEMBLY
12601E
22.INSTALL NO. 1 ENGINE COVER SUB-ASSEMBLY (w/ Intercooler)
82113
23.INSTALL NO. 3 ENGINE ROOM WIRE
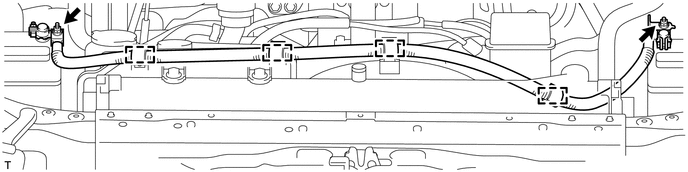
Install the No. 3 engine room wire to the main battery and sub-battery positive terminals with the 2 nuts.
- Torque:
- 7.6 N*m (77 kgf*cm, 67 in.*lbf)
Connect the No. 3 engine room wire with the 4 clamps.
28800
24.CONNECT CABLE TO NEGATIVE BATTERY TERMINAL
- NOTICE:
-
When disconnecting the cable, some systems need to be initialized after the cable is reconnected (See page General>INTRODUCTION>REPAIR INSTRUCTION>INITIALIZATION).
Connect the cables to negative (-) main battery and sub-battery terminals.
25.ADD ENGINE COOLANT
26.INSPECT FOR ENGINE COOLANT LEAK
53292A
27.INSTALL UPPER RADIATOR SUPPORT SEAL
51405A
28.INSTALL NO. 1 ENGINE UNDER COVER SUB-ASSEMBLY
53805
29.INSTALL FRONT FENDER SPLASH SHIELD SUB-ASSEMBLY RH
53806
30.INSTALL FRONT FENDER SPLASH SHIELD SUB-ASSEMBLY LH
53736G
31.INSTALL FRONT FENDER APRON SEAL FRONT RH
32.INSTALL FRONT WHEEL RH