1UR-FE LUBRICATION OIL PUMP REMOVAL
PROCEDURE

 1.DISCHARGE FUEL SYSTEM PRESSURE
2. PRECAUTION
- NOTICE:
-
After turning the engine switch off, waiting time may be required before disconnecting the cable from the battery terminal. Therefore, make sure to read the disconnecting the cable from the battery terminal notice before proceeding with work (See page General>INTRODUCTION>REPAIR INSTRUCTION>PRECAUTION).
3.DISCONNECT CABLE FROM NEGATIVE BATTERY TERMINAL
- NOTICE:
-
When disconnecting the cable, some systems need to be initialized after the cable is reconnected (See page General>INTRODUCTION>REPAIR INSTRUCTION>INITIALIZATION).
11209
4.REMOVE V-BANK COVER SUB-ASSEMBLY
5.REMOVE AIR CLEANER AND HOSE
53782
6.REMOVE FRONT FENDER APRON TRIM PACKING A
7.DRAIN ENGINE OIL
16400
8.REMOVE RADIATOR ASSEMBLY
17111
9.REMOVE INTAKE MANIFOLD
88320
10.DISCONNECT COOLER COMPRESSOR ASSEMBLY
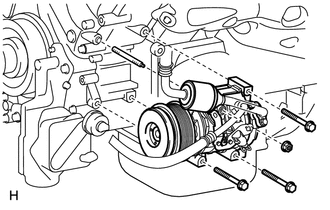
Remove the 3 bolts, nut and stud bolt, and then disconnect the cooler compressor.
- HINT:
-
It is not necessary to completely remove the compressor. With the hoses connected to the compressor, hang the compressor on the vehicle body with a rope.
25710
11.REMOVE AIR SWITCHING VALVE ASSEMBLY (w/ Secondary Air Injection System)
for Bank 1 (See page Engine / Hybrid System>1UR-FE (EMISSION CONTROL)>AIR SWITCHING VALVE(for Bank 1)>REMOVAL)
17361
12.REMOVE AIR TUBE (w/ Secondary Air Injection System)
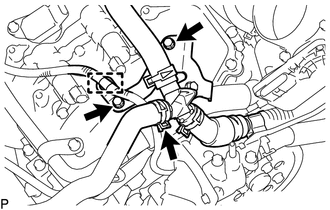
Detach the wire harness clamp.
Disconnect the No. 3 air injection system hose.
Remove the 2 bolts and air tube.
13.DISCONNECT ENGINE WIRE
for Engine Room LH Side:
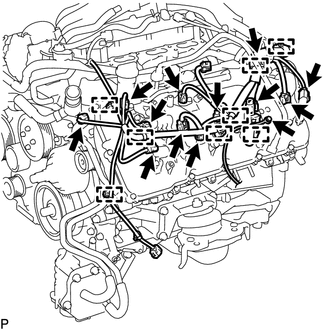
Disconnect the injector connector.
Disconnect the 2 camshaft timing oil control valve connectors.
Disconnect the 4 ignition coil connectors.
Disconnect the 2 VVT sensor connectors.
Disconnect the camshaft position sensor connector.
Disconnect the engine coolant temperature sensor connector.
Disconnect the noise filter connector.
Disconnect the 8 clamps.
Remove the bolt and ground wire.
for Engine Room RH Side:
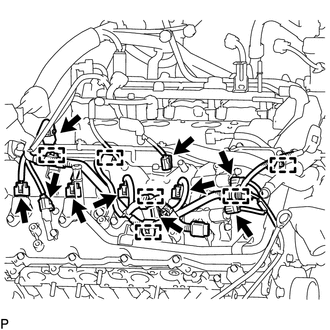
Disconnect the 2 camshaft timing oil control valve connectors.
Disconnect the 4 ignition coil connectors.
Disconnect the 2 VVT sensor connectors.
Disconnect the injector connector.
Disconnect the noise filter connector.
Disconnect the 6 clamps.
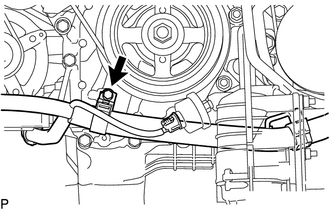
Remove the bolt and disconnect the clamp and engine wire.
14.REMOVE OIL FILTER ELEMENT
83520
15.REMOVE OIL PRESSURE SENDER GAUGE ASSEMBLY
15781
16.REMOVE NO. 1 OIL COOLER BRACKET
15671
17.REMOVE OIL FILTER BRACKET
11452
18.REMOVE ENGINE OIL LEVEL DIPSTICK GUIDE
19.DISCONNECT POWER STEERING OIL PRESSURE SWITCH CONNECTOR
44310
20.DISCONNECT VANE PUMP ASSEMBLY
Remove the 2 bolts and disconnect the vane pump.
32907A
21.DISCONNECT OIL COOLER TUBE
27020
22.REMOVE GENERATOR ASSEMBLY
12614
23.REMOVE NO. 4 ENGINE COVER
12613
24.REMOVE NO. 3 ENGINE COVER
23902
25.REMOVE FUEL TUBE SUB-ASSEMBLY
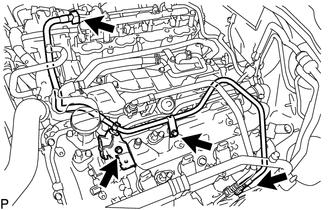
Remove the 2 bolts and fuel tube (See page Engine / Hybrid System>1UR-FE (FUEL)>FUEL SYSTEM>PRECAUTION).
77259E
26.REMOVE FUEL HOSE
Remove the fuel pipe clamp.
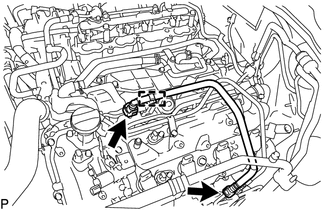
Disconnect the 2 clamps and remove the fuel hose (See page Engine / Hybrid System>1UR-FE (FUEL)>FUEL SYSTEM>PRECAUTION).
17364A
27.REMOVE NO. 4 AIR TUBE (w/ Secondary Air Injection System)
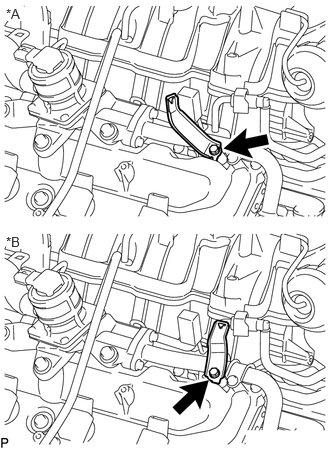
Remove the bolt and bracket.
| *A | for RHD |
| *B | for LHD |
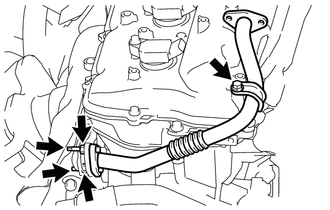
Remove the bolt, 2 nuts, 2 stud bolts, No. 4 air tube and gasket.
17363Q
28.REMOVE NO. 3 AIR TUBE (w/ Secondary Air Injection System)
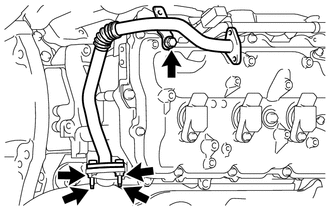
Remove the bolt, 2 nuts, 2 stud bolts, No. 3 air tube and gasket.
16268
29.REMOVE NO. 1 WATER BY-PASS PIPE
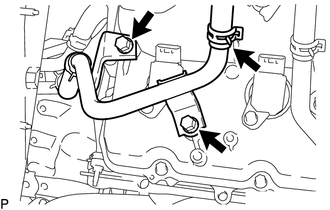
Disconnect the heater water hose.
Remove the 2 bolts and disconnect the No. 1 water by-pass pipe.
16261L
30.DISCONNECT WATER BY-PASS HOSE
16261G
31.REMOVE NO. 1 WATER BY-PASS HOSE
16278K
32.REMOVE NO. 2 WATER BY-PASS PIPE SUB-ASSEMBLY
16281F
33.DISCONNECT NO. 5 WATER BY-PASS HOSE
16206
34.REMOVE WATER BY-PASS PIPE SUB-ASSEMBLY
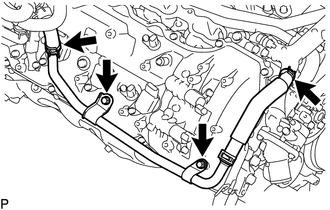
Disconnect the No. 2 water by-pass hose from the front water by-pass joint.
Disconnect the heater hose.
Remove the 2 bolts and water by-pass pipe sub-assembly.
16323
35.REMOVE WATER INLET HOUSING
16355
36.REMOVE FRONT WATER BY-PASS JOINT
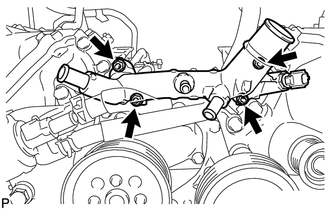
Remove the 4 nuts, water by-pass joint and 2 gaskets.
16173
37.REMOVE WATER PUMP PULLEY
16603
38.REMOVE NO. 1 IDLER PULLEY SUB-ASSEMBLY
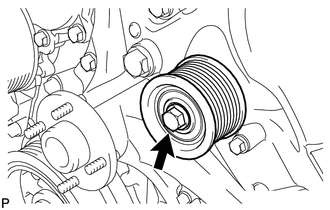
Remove the bolt and No. 1 idler pulley.
16211
39.REMOVE FAN BRACKET ASSEMBLY
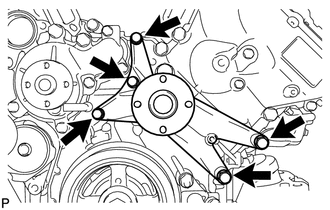
Remove the 5 bolts and fan bracket.
16620
40.REMOVE V-RIBBED BELT TENSIONER ASSEMBLY
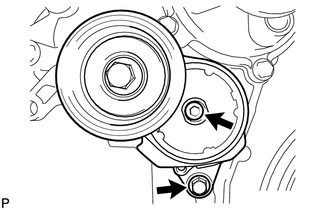
Remove the bolt, 6 mm hexagon bolt and belt tensioner.
19500
41.REMOVE IGNITION COIL ASSEMBLY
11202
42.REMOVE CYLINDER HEAD COVER SUB-ASSEMBLY LH
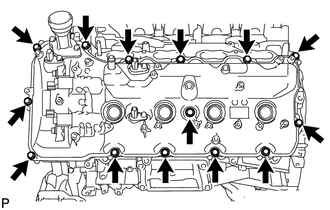
Remove the 14 bolts, seal washer, cylinder head cover sub-assembly LH and cylinder head cover gasket LH.
- HINT:
-
Make sure the removed parts are returned to the same places they were removed from.
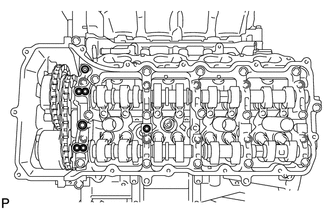
Remove the 5 gaskets from the camshaft bearing caps (No. 2, No. 3).

|
Gasket |
11201
43.REMOVE CYLINDER HEAD COVER SUB-ASSEMBLY RH
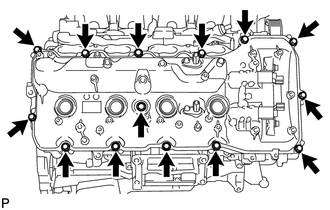
Remove the 14 bolts, seal washer, cylinder head cover sub-assembly RH and cylinder head cover gasket RH.
- HINT:
-
Make sure the removed parts are returned to the same places they were removed from.
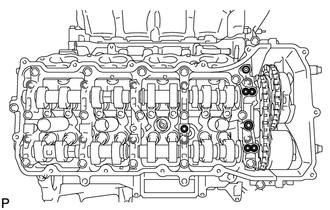
Remove the 5 gaskets from the camshaft bearing caps (No. 1, No. 3).
|
|
Gasket |
13471
44.REMOVE CRANKSHAFT PULLEY
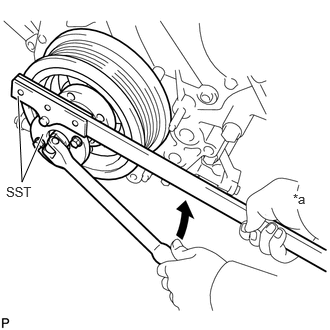
Using SST, remove the crankshaft pulley set bolt.
- SST
- 09213-70011
09330-00021
| *a | Hold |

|
Turn |
Temporarily install the pulley set bolt to the crankshaft until 2 or 3 threads are engaged.
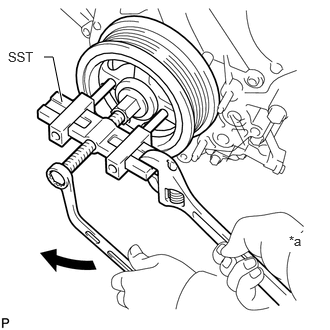
Using the pulley set bolt and SST, remove the crankshaft pulley.
- SST
- 09950-50013 (09951-05010, 09952-05010, 09953-05010, 09954-05011)
| *a | Hold |
|
|
Turn |
11302
45.REMOVE TIMING CHAIN COVER SUB-ASSEMBLY
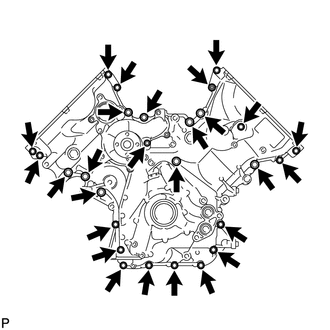
Remove the 26 bolts and nut shown in the illustration.
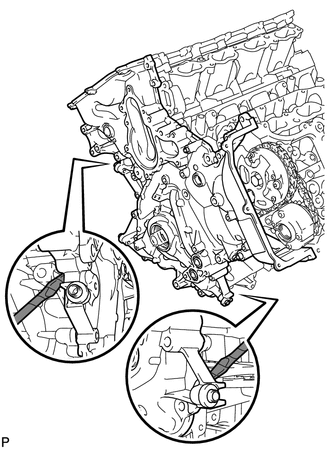
Remove the timing chain cover by prying between it and the cylinder head and cylinder block with a screwdriver as shown in the illustration.

|
Protective Tape |
- NOTICE:
-
Be careful not to damage the cylinder head, camshaft housing and cylinder block contact surfaces of the chain cover.
- HINT:
-
Tape the screwdriver tip before use.
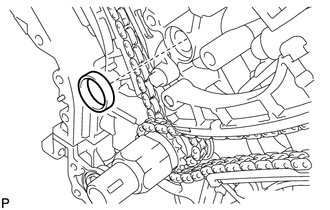
Remove the gasket from the cylinder block.
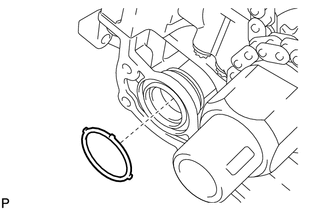
Remove the O-ring from the oil pan.
16322
46.REMOVE WATER INLET PIPE
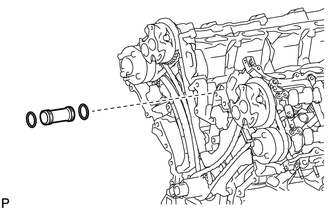
Remove the water inlet pipe.
Remove the 2 O-rings from the water inlet pipe.
11301C
47.REMOVE FRONT CRANKSHAFT OIL SEAL