A750F AUTOMATIC TRANSMISSION / TRANSAXLE AUTOMATIC TRANSMISSION ASSEMBLY(for 1GR-FE) INSTALLATION
PROCEDURE

 32000
1.INSTALL TORQUE CONVERTER CLUTCH ASSEMBLY
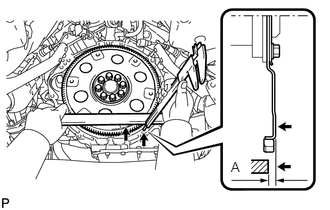
Using a vernier caliper and straightedge, measure dimension A between the end surface of the engine and the torque converter contact surface of the drive plate.
Install the torque converter clutch to the transmission housing.
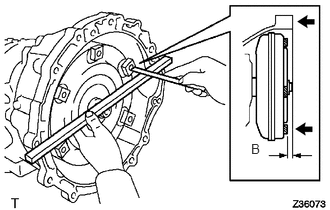
Using a vernier caliper and straightedge, measure dimension B shown in the illustration and check that B is more than A measured in the first step.
- Standard distance:
B = A + 1.00 mm (0.0394 in.) or more
36100
2.INSTALL TRANSFER ASSEMBLY
Install the transfer with the 8 bolts.
- Torque:
- 40 N*m (408 kgf*cm, 30 ft.*lbf)
- NOTICE:
-
Be careful not to damage the oil seal of the transfer adapter.
Install the transfer case lower protector with the 7 bolts.
- Torque:
- 14 N*m (143 kgf*cm, 10 ft.*lbf)
Connect the clamp of the ground cable to the transfer case lower protector.
Attach the 2 breather hose clamps to connect the transfer breather hose to the automatic transmission breather tube.
3.INSTALL HARNESS CLAMP BRACKET
Install the 2 harness clamp brackets with the 2 bolts.
- Torque:
- 29 N*m (296 kgf*cm, 21 ft.*lbf)
35000
4.INSTALL AUTOMATIC TRANSMISSION ASSEMBLY
- NOTICE:
-
Check that the 2 straight pins are attached to the engine side.
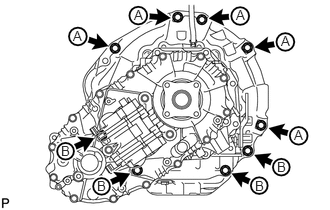
Install the transmission with the 9 bolts.
- Torque:
- for 17 mm head bolt A : 71 N*m (724 kgf*cm, 52 ft.*lbf)
- for 14 mm head bolt B : 37 N*m (377 kgf*cm, 27 ft.*lbf)
32907A
5.CONNECT OIL COOLER TUBE
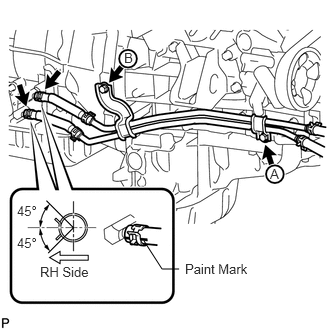
Temporarily install the oil cooler tube to the engine with the bolt A. Install the bolt B and tighten it to the specified torque. Then tighten the bolt A to the specified torque.
- Torque:
- 14 N*m (143 kgf*cm, 21 ft.*lbf)
Connect the 2 transmission oil cooler hoses to the oil cooler tube union.
- NOTICE:
- ·
Make sure the pinching portion of each clip is facing the direction shown in the illustration.
·Make sure the paint mark of each hose is facing outward.
35104V
6.CONNECT BREATHER PLUG HOSE
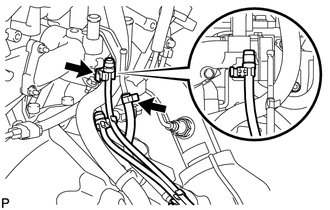
Connect the breather plug hose and attach the transfer breather hose.
17119
7.INSTALL NO. 2 MANIFOLD STAY
Install the stay with the 3 bolts.
- Torque:
- 40 N*m (408 kgf*cm, 30 ft.*lbf)
17118
8.INSTALL MANIFOLD STAY
Install the stay with the 3 bolts.
- Torque:
- 40 N*m (408 kgf*cm, 30 ft.*lbf)
9.CONNECT WIRE HARNESS AND CONNECTOR
Connect the park/neutral position switch connector, transmission wire connector, 2 speed sensor connectors and 2 transfer control side connectors.
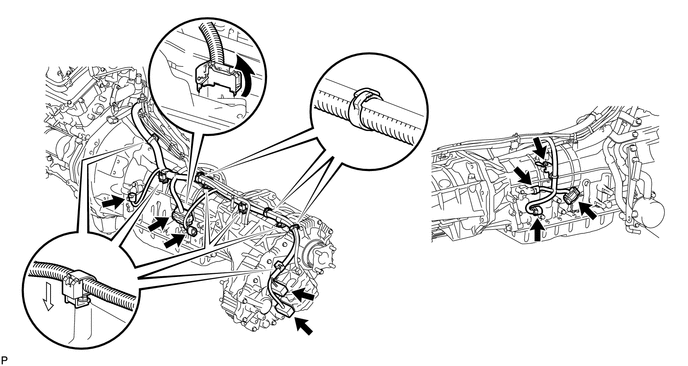
- HINT:
-
Push up the lever until the claw of the transmission wire connector makes a connection sound.
Connect the harness with the bolt.
- Torque:
- 8.0 N*m (82 kgf*cm, 71 in.*lbf)
Connect the 2 connector clamps and 6 harness clamps.
Tilt up the automatic transmission.
Connect the ground cable with the bolt.
- Torque:
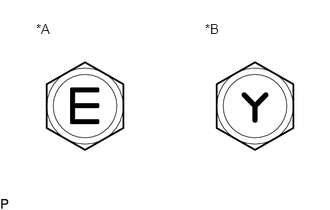
- for Type A : 8.4 N*m (86 kgf*cm, 74 in.*lbf)
- for Type B : 10 N*m (102 kgf*cm, 7 ft.*lbf)
- HINT:
-
 0.375,0.219 0.688,0.375 0.313,0.156 10 false *A 2.135,0.219 2.448,0.375 0.313,0.156 10 false *B
*A for Type A *B for Type B
-
Type A or B can be distinguished by confirming the mark on the bolt.
12371
10.INSTALL REAR NO. 1 ENGINE MOUNTING INSULATOR
Install the rear engine mounting insulator to the transmission with the 4 bolts.
- Torque:
- 59 N*m (602 kgf*cm, 44 ft.*lbf)
51203
11.INSTALL NO. 2 FRAME CROSSMEMBER SUB-ASSEMBLY
Install the frame crossmember to the rear engine mounting insulator with the 4 bolts.
- Torque:
- 37 N*m (377 kgf*cm, 27 ft.*lbf)
Install the frame crossmember to the frame with the 4 bolts and 4 nuts.
- Torque:
- 110 N*m (1122 kgf*cm, 81 ft.*lbf)
Install the engine mounting hole cover.
32101A
12.INSTALL DRIVE PLATE AND TORQUE CONVERTER CLUTCH SETTING BOLT
Turn the crankshaft to gain access to the installation locations of the 6 bolts and install each bolt while holding the crankshaft pulley setting bolt with a wrench.
- Torque:
- 48 N*m (489 kgf*cm, 35 ft.*lbf)
- NOTICE:
-
First install the black colored bolt and then install the remaining 5 bolts.
28100
13.INSTALL STARTER ASSEMBLY
33702B
14.CONNECT FLOOR SHIFT GEAR SHIFTING ROD SUB-ASSEMBLY
Connect the gear shifting rod to the transmission control shaft lever RH with the pin and a new clip.
15.INSTALL EXHAUST PIPE
37110
16.INSTALL PROPELLER SHAFT ASSEMBLY
37140
17.INSTALL FRONT PROPELLER SHAFT ASSEMBLY
18.CONNECT CABLE TO NEGATIVE BATTERY TERMINAL
- NOTICE:
-
When disconnecting the cable, some systems need to be initialized after the cable is reconnected (See page General>INTRODUCTION>REPAIR INSTRUCTION>INITIALIZATION).
19.ADD AUTOMATIC TRANSMISSION FLUID
20.INSPECT SHIFT LEVER POSITION
When moving the shift lever from P to R with the engine switch on (IG) and the brake pedal depressed, make sure that it moves smoothly and correctly into position.
Check that the shift lever does not stop when moving the shift lever from R to P, and check that the shift lever does not stick when moving the shift lever from D to S.
Start the engine and make sure that the vehicle moves forward after moving the shift lever from N to D and moves rearward after moving the shift lever to R.
If there are no problems during the above inspections, perform the adjustment using the following procedures.
Move the shift lever to N
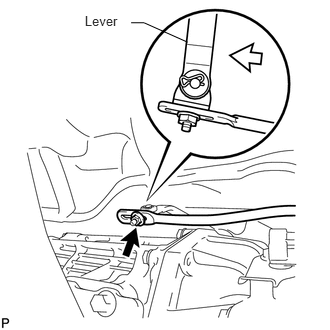
Loosen the nut of the floor shift gear shifting rod. Then, with the lever of the floor shift assembly lightly pushed towards the rear of the vehicle, tighten the nut.
- Torque:
- 13 N*m (130 kgf*cm, 9 ft.*lbf)
21.INSPECT FOR EXHAUST GAS LEAK
53783
22.INSTALL FRONT FENDER APRON TRIM PACKING B
53782
23.INSTALL FRONT FENDER APRON TRIM PACKING A
53785B
24.INSTALL FRONT FENDER APRON TRIM PACKING D
53784
25.INSTALL FRONT FENDER APRON TRIM PACKING C
51405A
26.INSTALL NO. 1 ENGINE UNDER COVER
51442
27.INSTALL NO. 2 ENGINE UNDER COVER
53806
28.INSTALL FRONT FENDER SPLASH SHIELD SUB-ASSEMBLY LH
53805
29.INSTALL FRONT FENDER SPLASH SHIELD SUB-ASSEMBLY RH
30.RESET MEMORY
Perform the Reset Memory procedures (A/T initialization) (See page Drivetrain>A750F (AUTOMATIC TRANSMISSION / TRANSAXLE)>AUTOMATIC TRANSMISSION SYSTEM(for 1GR-FE)>INITIALIZATION).