VARIABLE GEAR RATIO STEERING STEERING ACTUATOR REMOVAL
CAUTION / NOTICE / HINT
- CAUTION:
-
Some of these service operations affect the SRS airbag system. Read the precautionary notices concerning the SRS airbag system before servicing the steering column (See page Vehicle Interior>SUPPLEMENTAL RESTRAINT SYSTEMS>AIRBAG SYSTEM>PRECAUTION).
- HINT:
- ·
Use the same procedure for RHD and LHD vehicles.
·The procedure listed below is for LHD vehicles.
PROCEDURE

 1.PLACE FRONT WHEELS FACING STRAIGHT AHEAD
2.DISCONNECT CABLE FROM NEGATIVE BATTERY TERMINAL
Disable the AUTO TILT AWAY function by changing the customize parameter (See page General>INTRODUCTION>REPAIR INSTRUCTION>CUSTOMIZE PARAMETERS).
- NOTICE:
-
Record the current customize parameter setting (whether the AUTO TILT AWAY function is enabled or disabled) in order to restore the current setting after finishing the operation.
- HINT:
-
Performing the above operation causes the AUTO TILT AWAY function to be disabled when the engine switch is turned off.
Turn the engine switch on (IG). Operate the tilt and telescopic switch to fully extend and lower the steering column assembly.
Turn the engine switch off and disconnect the cable from the negative (-) battery terminal.
- CAUTION:
-
Wait at least 90 seconds after disconnecting the cable from the negative (-) battery terminal to disable the SRS system.
- NOTICE:
-
When disconnecting the cable, some systems need to be initialized after the cable is reconnected (See page General>INTRODUCTION>REPAIR INSTRUCTION>INITIALIZATION).
45187
3.REMOVE LOWER NO. 3 STEERING WHEEL COVER
45186
4.REMOVE LOWER NO. 2 STEERING WHEEL COVER
45130
5.REMOVE STEERING PAD
45100
6.REMOVE STEERING WHEEL ASSEMBLY
7.REMOVE LOWER STEERING COLUMN COVER
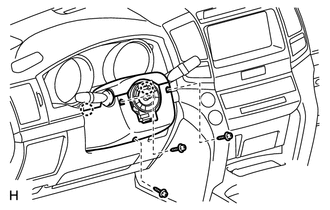
Remove the 3 screws.
Detach the 2 claws to remove the lower steering column cover.
- NOTICE:
-
Do not damage the tilt and telescopic switch.
45286B
8.REMOVE UPPER STEERING COLUMN COVER
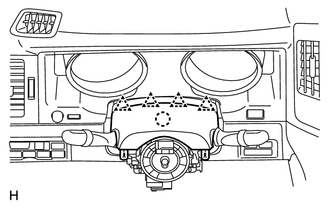
Detach the 4 clips.
Detach the claw to remove the upper steering column cover.
89235A
9.REMOVE TILT AND TELESCOPIC SWITCH
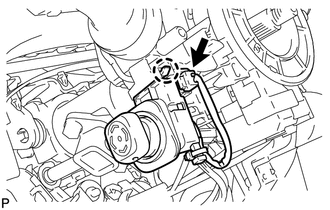
Disconnect the switch connector.
Using a screwdriver, detach the claw and pull out the switch.
- HINT:
-
Tape the screwdriver tip before use.
- NOTICE:
-
Pushing on the claw too hard will break the claw.
10.REMOVE COMBINATION SWITCH ASSEMBLY WITH SPIRAL CABLE SUB-ASSEMBLY
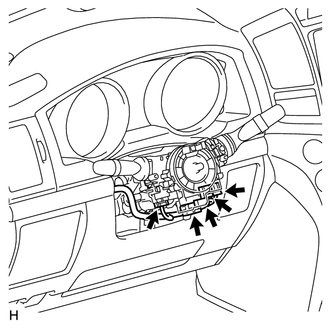
Disconnect the 5 connectors from the combination switch with spiral cable.
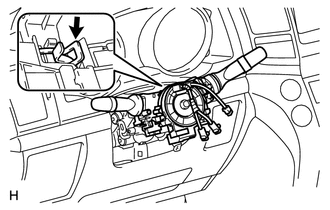
Using pliers, grip the claws of the clamp and remove the combination switch with spiral cable from the steering column.
55449C
11.REMOVE NO. 2 INSTRUMENT PANEL FINISH PANEL CUSHION
55403C
12.REMOVE LOWER INSTRUMENT PANEL PAD SUB-ASSEMBLY LH
55318C
13.REMOVE INSTRUMENT SIDE PANEL LH
55474C
14.REMOVE NO. 1 INSTRUMENT CLUSTER FINISH PANEL GARNISH
55475A
15.REMOVE NO. 2 INSTRUMENT CLUSTER FINISH PANEL GARNISH
55404C
16.REMOVE INSTRUMENT CLUSTER FINISH PANEL SUB-ASSEMBLY (w/ Multi-information Display)
55404C
17.REMOVE INSTRUMENT CLUSTER FINISH PANEL SUB-ASSEMBLY (w/o Multi-information Display)
67914B
18.REMOVE FRONT DOOR SCUFF PLATE LH
55606
19.REMOVE NO. 1 INSTRUMENT PANEL UNDER COVER SUB-ASSEMBLY (w/ Floor Under Cover)
62112
20.REMOVE COWL SIDE TRIM BOARD LH
55432D
21.REMOVE LOWER NO. 1 INSTRUMENT PANEL FINISH PANEL
55446A
22.REMOVE NO. 1 SWITCH HOLE BASE
73900
23.REMOVE DRIVER SIDE KNEE AIRBAG ASSEMBLY (w/ Driver Side Knee Airbag)
55303B
24.REMOVE LOWER INSTRUMENT PANEL SUB-ASSEMBLY (w/o Driver Side Knee Airbag)
25.DISCONNECT WIRE HARNESS PROTECTOR AND WIRE HARNESS
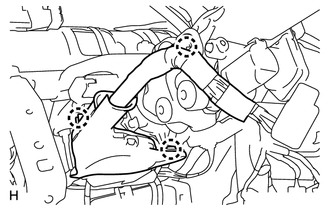
Detach the 3 claws to disconnect the wire harness protector and wire harness.
87201F
26.REMOVE NO. 3 AIR DUCT SUB-ASSEMBLY
45250
27.REMOVE STEERING COLUMN ASSEMBLY
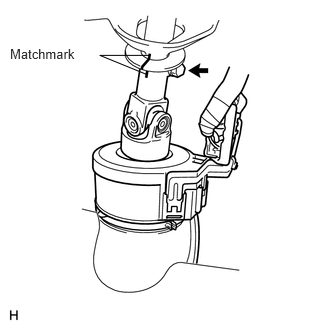
Put matchmarks on the steering actuator and steering column.
Remove the bolt.
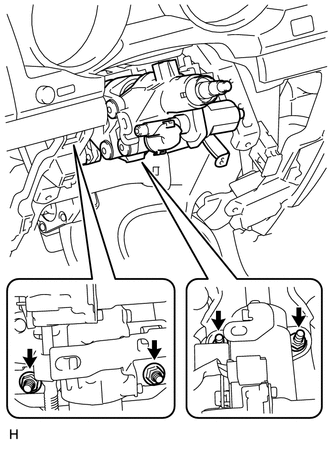
Remove the 4 nuts and steering column.
45240J
28.REMOVE STEERING ACTUATOR ASSEMBLY
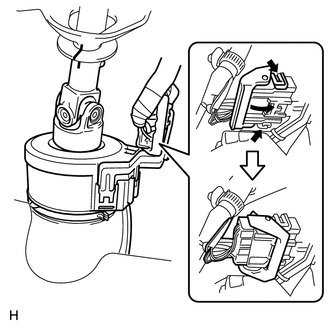
While pushing the claws on both sides of the connector, move the lock in the direction of the arrow.
Disconnect the connector.
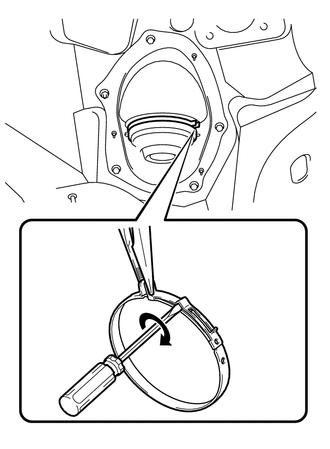
Hold the clamp with needle nose pliers, then insert a screwdriver and turn it in the direction shown in the illustration to remove the clamp of the steering column hole cover.
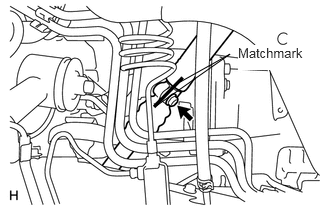
Put matchmarks on the steering actuator and No. 2 steering intermediate shaft.
Remove the bolt, and then pull out the actuator assembly toward the inside of the vehicle.