HEATING / AIR CONDITIONING REAR AIR CONDITIONING UNIT(w/ Heater) REMOVAL
PROCEDURE

 53806
1.REMOVE FRONT FENDER SPLASH SHIELD SUB-ASSEMBLY LH
for Standard:
(See page Vehicle Exterior>EXTERIOR PANELS / TRIM>FRONT BUMPER(for Standard)>REMOVAL)
w/ Winch:
(See page Vehicle Exterior>EXTERIOR PANELS / TRIM>FRONT BUMPER(w/ Winch)>REMOVAL)
53805
2.REMOVE FRONT FENDER SPLASH SHIELD SUB-ASSEMBLY RH
for Standard:
(See page Vehicle Exterior>EXTERIOR PANELS / TRIM>FRONT BUMPER(for Standard)>REMOVAL)
w/ Winch:
(See page Vehicle Exterior>EXTERIOR PANELS / TRIM>FRONT BUMPER(w/ Winch)>REMOVAL)
51405A
3.REMOVE NO. 1 ENGINE UNDER COVER SUB-ASSEMBLY
for 1UR-FE:
(See page Engine / Hybrid System>1UR-FE (ENGINE MECHANICAL)>ENGINE ASSEMBLY>REMOVAL)
for 3UR-FE:
(See page Engine / Hybrid System>3UR-FE (ENGINE MECHANICAL)>ENGINE ASSEMBLY>REMOVAL)
for 1VD-FTV:
(See page Engine / Hybrid System>1VD-FTV (ENGINE MECHANICAL)>ENGINE ASSEMBLY>REMOVAL)
53292A
4.REMOVE UPPER RADIATOR SUPPORT SEAL
5.RECOVER REFRIGERANT FROM REFRIGERATION SYSTEM
6.DRAIN ENGINE COOLANT
for 1UR-FE:
(See page Engine / Hybrid System>1UR-FE (COOLING)>COOLANT>REPLACEMENT)
for 3UR-FE:
(See page Engine / Hybrid System>3UR-FE (COOLING)>COOLANT>REPLACEMENT)
for 1VD-FTV:
(See page Engine / Hybrid System>1VD-FTV (COOLING)>COOLANT>REPLACEMENT)
7. PRECAUTION
- NOTICE:
-
After turning the ignition switch off, waiting time may be required before disconnecting the cable from the battery terminal. Therefore, make sure to read the disconnecting the cable from the battery terminal notice before proceeding with work (See page General>INTRODUCTION>REPAIR INSTRUCTION>PRECAUTION).
8.DISCONNECT CABLE FROM NEGATIVE BATTERY TERMINAL
- CAUTION:
-
Wait at least 90 seconds after disconnecting the cable from the negative (-) battery terminal to disable the SRS system.
- NOTICE:
-
When disconnecting the cable, some systems need to be initialized after the cable is reconnected (See page General>INTRODUCTION>REPAIR INSTRUCTION>INITIALIZATION).
58574A
9.REMOVE REAR FLOOR MAT REAR SUPPORT PLATE
w/ Sliding Roof:
(See page Vehicle Interior>INTERIOR PANELS / TRIM>ROOF HEADLINING (w/ Sliding Roof)>REMOVAL)
w/o Sliding Roof:
(See page Vehicle Interior>INTERIOR PANELS / TRIM>ROOF HEADLINING (w/o Sliding Roof)>REMOVAL)
67918E
10.REMOVE REAR DOOR SCUFF PLATE LH
w/ Sliding Roof:
(See page Vehicle Interior>INTERIOR PANELS / TRIM>ROOF HEADLINING (w/ Sliding Roof)>REMOVAL)
w/o Sliding Roof:
(See page Vehicle Interior>INTERIOR PANELS / TRIM>ROOF HEADLINING (w/o Sliding Roof)>REMOVAL)
64910J
11.REMOVE TONNEAU COVER ASSEMBLY (w/ Tonneau Cover)
71845B
12.REMOVE REAR SEAT COVER CAP (w/ Rear No. 2 Seat)
w/ Sliding Roof:
(See page Vehicle Interior>INTERIOR PANELS / TRIM>ROOF HEADLINING (w/ Sliding Roof)>REMOVAL)
w/o Sliding Roof:
(See page Vehicle Interior>INTERIOR PANELS / TRIM>ROOF HEADLINING (w/o Sliding Roof)>REMOVAL)
62520P
13.REMOVE FRONT QUARTER TRIM PANEL ASSEMBLY LH
w/ Sliding Roof:
Remove the front quarter trim panel (See page Vehicle Interior>INTERIOR PANELS / TRIM>ROOF HEADLINING (w/ Sliding Roof)>REMOVAL).
w/o Sliding Roof:
Remove the front quarter trim panel (See page Vehicle Interior>INTERIOR PANELS / TRIM>ROOF HEADLINING (w/o Sliding Roof)>REMOVAL).
88790E
14.DISCONNECT AIR CONDITIONER TUBE AND ACCESSORY ASSEMBLY
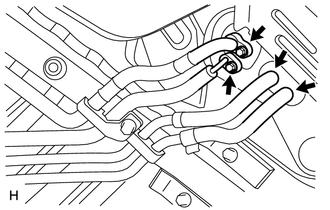
Using pliers, grip the claws of the clips and slide the 2 clips.
Disconnect the heater water inlet hose and heater water outlet hose.
Remove the 2 bolts.
Disconnect the air conditioner tube and accessory assembly.
- NOTICE:
- ·
Do not use a screwdriver or similar tool to disconnect the tube.
·Seal the openings of the disconnected parts using vinyl tape to prevent moisture and foreign matter from entering them.
Remove the 2 O-rings from the air conditioner tube and accessory assembly.
88566R
15.REMOVE REAR ROOF NO. 1 AIR DUCT
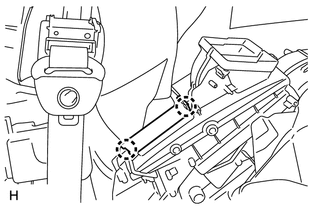
Detach the 2 claws and remove the cooler plate.
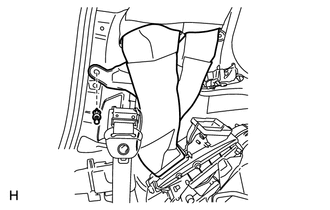
Remove the clip and duct.
87030A
16.REMOVE REAR COOLING UNIT ASSEMBLY
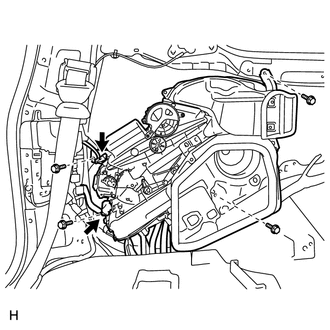
Disconnect the 2 connectors.
Remove the 4 bolts and rear cooling unit.