3UR-FE ENGINE MECHANICAL ENGINE ASSEMBLY REMOVAL
PROCEDURE

 1.DISCHARGE FUEL SYSTEM PRESSURE
2. PRECAUTION
- NOTICE:
-
After turning the engine switch off, waiting time may be required before disconnecting the cable from the battery terminal. Therefore, make sure to read the disconnecting the cable from the battery terminal notice before proceeding with work (See page General>INTRODUCTION>REPAIR INSTRUCTION>PRECAUTION).
3.DISCONNECT CABLE FROM NEGATIVE BATTERY TERMINAL
- NOTICE:
-
When disconnecting the cable, some systems need to be initialized after the cable is reconnected (See page General>INTRODUCTION>REPAIR INSTRUCTION>INITIALIZATION).
53292A
4.REMOVE UPPER RADIATOR SUPPORT SEAL
53111
5.REMOVE RADIATOR GRILLE
52119A
6.REMOVE FRONT BUMPER COVER
32917
7.REMOVE TRANSMISSION OIL COOLER AIR DUCT
53294C
8.DISCONNECT RADIATOR SIDE DEFLECTOR LH
53301
9.REMOVE HOOD SUB-ASSEMBLY
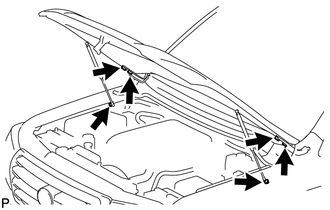
Remove the 2 hood support bolts and disconnect the hood supports.
- CAUTION:
-
Remove the hood support assembly while supporting the hood by hand.
Remove the 4 bolts and hood.
55781E
10.REMOVE COWL TOP VENTILATOR LOUVER SUB-ASSEMBLY
53737B
11.REMOVE FRONT FENDER APRON SEAL LH
53739A
12.REMOVE FRONT FENDER APRON SEAL REAR LH
53736G
13.REMOVE FRONT FENDER APRON SEAL FRONT RH
53738A
14.REMOVE FRONT FENDER APRON SEAL REAR RH
53806
15.REMOVE FRONT FENDER SPLASH SHIELD SUB-ASSEMBLY LH
53805
16.REMOVE FRONT FENDER SPLASH SHIELD SUB-ASSEMBLY RH
51405A
17.REMOVE NO. 1 ENGINE UNDER COVER SUB-ASSEMBLY
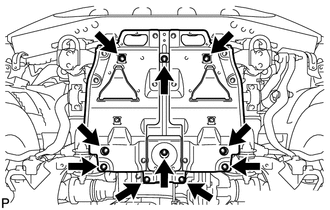
Remove the 10 bolts and No. 1 engine under cover.
51442
18.REMOVE NO. 2 ENGINE UNDER COVER
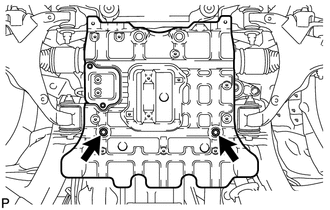
Remove the 2 bolts and No. 2 engine under cover.
51440
19.REMOVE OIL PAN PROTECTOR ASSEMBLY
20.DRAIN ENGINE OIL
21.DRAIN ENGINE COOLANT
11209
22.REMOVE V-BANK COVER SUB-ASSEMBLY
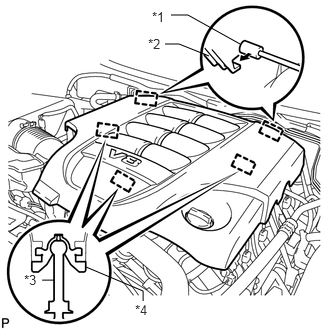
Raise the front of the V-bank cover to detach the 3 pins. Then remove the 2 V-bank cover hooks from the bracket, and remove the V-bank cover.
| *1 | Bracket |
| *2 | Hook |
| *3 | Pin |
| *4 | Grommet |
17880
23.REMOVE AIR CLEANER HOSE ASSEMBLY
17700
24.REMOVE AIR CLEANER ASSEMBLY
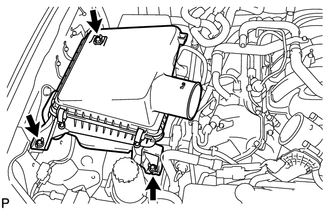
Remove the 3 bolts and air cleaner.
16571C
25.REMOVE NO. 1 RADIATOR HOSE
16572D
26.REMOVE NO. 2 RADIATOR HOSE
16711
27.REMOVE FAN SHROUD
16400
28.REMOVE RADIATOR ASSEMBLY
23801P
29.DISCONNECT FUEL MAIN AND RETURN HOSE
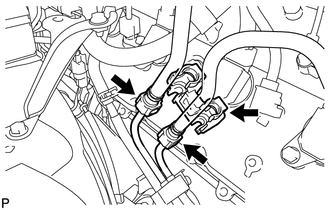
Remove the fuel pipe clamp.
Disconnect the fuel main and return hoses (See page Engine / Hybrid System>3UR-FE (FUEL)>FUEL SYSTEM>PRECAUTION).
30.DISCONNECT WIRE HARNESS AND HOSE
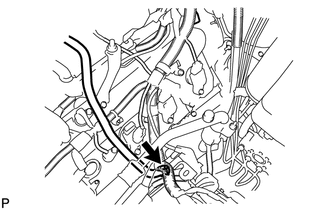
Disconnect the purge line hose.
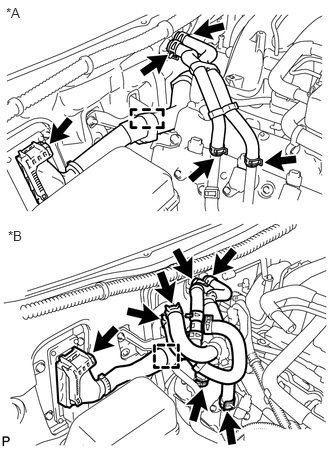
Remove the heater hose.
Disconnect the clamp and ECM connector.
| *A | w/o Rear Heater |
| *B | w/ Rear Heater |
- HINT:
-
Refer to the following procedures to disconnect the ECM connector (See page Engine / Hybrid System>3UR-FE (ENGINE CONTROL)>ECM>REMOVAL).
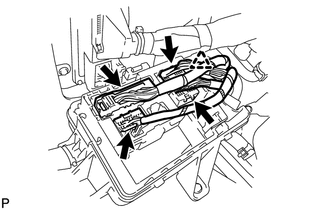
Disconnect the 4 connectors and clamp from the connector holder block.
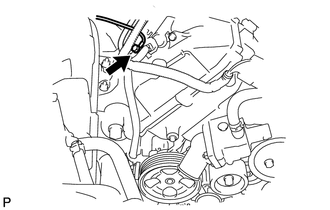
Remove the bolt and disconnect the ground wire.
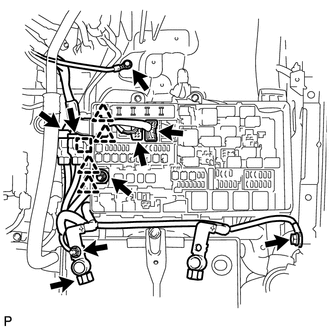
Remove the nut and disconnect the wire from the positive (+) battery cable.
Disconnect the cable from the positive (+) battery terminal.
Remove the bolt and disconnect the ground wire from the body.
Remove the bolt and disconnect the ground wire from the bracket.
Remove the nut and disconnect the wire and 2 clips from the engine room junction block.
Disconnect the 2 connectors and 2 clips from the engine room junction block.
Disconnect the 2 connectors and clamp.
88320
31.DISCONNECT COOLER COMPRESSOR ASSEMBLY
44310
32.DISCONNECT VANE PUMP ASSEMBLY
27020
33.REMOVE GENERATOR ASSEMBLY
17430
34.REMOVE TAILPIPE ASSEMBLY
17420
35.REMOVE CENTER EXHAUST PIPE ASSEMBLY
17450B
36.REMOVE FRONT NO. 2 EXHAUST PIPE ASSEMBLY
17410
37.REMOVE FRONT EXHAUST PIPE ASSEMBLY
11452
38.REMOVE ENGINE OIL LEVEL DIPSTICK GUIDE
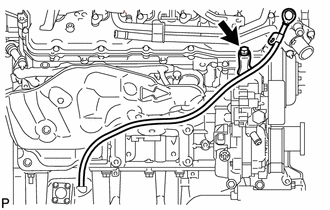
Disconnect the wire harness clamp.
Remove the dipstick.
Remove the bolt and dipstick guide.
Remove the O-ring from the dipstick guide.
37140
39.REMOVE FRONT PROPELLER SHAFT ASSEMBLY
37110
40.REMOVE REAR PROPELLER SHAFT ASSEMBLY
37117
41.REMOVE PROPELLER SHAFT HEAT INSULATOR
17119
42.REMOVE NO. 2 MANIFOLD STAY
17168
43.REMOVE NO. 2 EXHAUST MANIFOLD HEAT INSULATOR
17105
44.REMOVE EXHAUST MANIFOLD SUB-ASSEMBLY LH
17118
45.REMOVE NO. 1 MANIFOLD STAY
17167
46.REMOVE NO. 1 EXHAUST MANIFOLD HEAT INSULATOR
17104
47.REMOVE EXHAUST MANIFOLD SUB-ASSEMBLY RH
28192
48.REMOVE STARTER COVER
28100
49.REMOVE STARTER ASSEMBLY
35000
50.REMOVE AUTOMATIC TRANSMISSION ASSEMBLY
12371
51.REMOVE REAR NO. 1 ENGINE MOUNTING INSULATOR
- HINT:
-
Only perform this procedure when replacement of the engine mounting insulator is necessary.
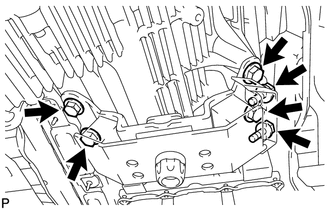
Remove the 2 bolts and front engine mounting insulator RH.
Remove the 4 bolts and rear engine mounting insulator from the transmission.
32101
52.REMOVE DRIVE PLATE AND RING GEAR SUB-ASSEMBLY
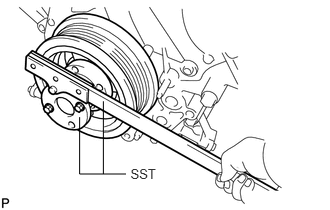
Using SST, hold the crankshaft.
- SST
- 09213-70011
09330-00021
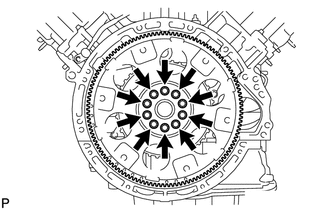
Remove the 10 bolts, rear drive plate spacer, drive plate and crankshaft angle sensor rotor.
32907A
53.DISCONNECT OIL COOLER PIPE ASSEMBLY
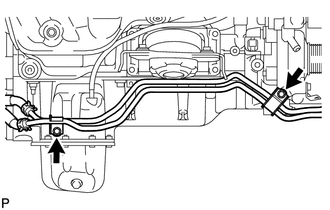
Remove the 2 bolts and disconnect the oil cooler pipe.
54.REMOVE WATER PIPE AND HOSE SUB-ASSEMBLY
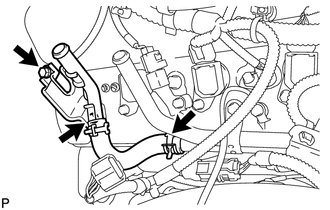
Remove the 2 bolts and disconnect the hose. Then remove the water pipe and hose.
55.REMOVE ENGINE ASSEMBLY
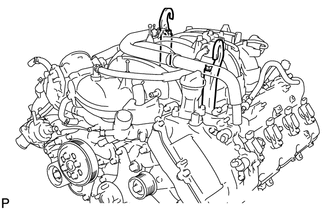
Install 2 engine hangers with 2 bolts as shown in the illustration.
- Torque:
- 43 N*m (438 kgf*cm, 32 ft.*lbf)
- HINT:
Engine hanger 12281-38150 Bolt 90119-14120
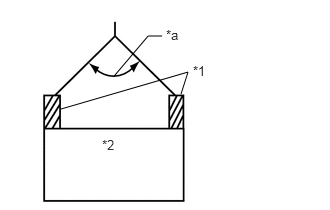
Attach an engine sling device and hang the engine with a chain block.
| *1 | Engine Hanger |
| *2 | ENGINE |
| *a | 50° or less |
- NOTICE:
-
When hanging the engine, make sure to hang the engine with the sling device's hanging angle at 50° or less. If not, the engine or engine hangers may be damaged.
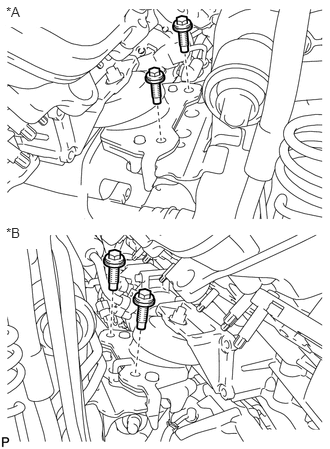
Remove the 4 engine mounting insulator bolts.
| *A | RH |
| *B | LH |
Lift the engine out from the vehicle slowly and carefully.
- NOTICE:
- ·
Make sure the engine is clear of all wiring, hoses and cables.
·With the exception of installing the engine assembly to an engine stand or removing the engine assembly from an engine stand, do not perform any work on the engine while it is suspended, as doing so is dangerous.
·Pay attention to the angle of the sling device as the engine assembly or engine hangers may be damaged or deformed if the angle is incorrect.
56.INSTALL ENGINE ON ENGINE STAND
Install the engine onto an engine stand with bolts.
Remove the 2 bolts and 2 engine hangers.
12362A
57.REMOVE FRONT ENGINE MOUNTING INSULATOR LH
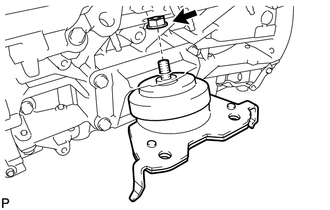
Remove the nut and mounting insulator.
12361
58.REMOVE FRONT ENGINE MOUNTING INSULATOR RH
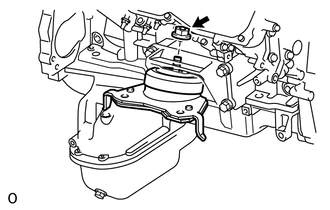
Remove the nut and mounting insulator.
12316A
59.REMOVE NO. 2 FRONT ENGINE MOUNTING BRACKET LH
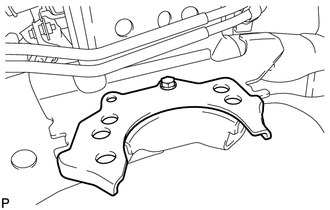
Remove the bolt and No. 2 front engine mounting bracket LH.