SUPPLEMENTAL RESTRAINT SYSTEMS CENTER AIRBAG SENSOR ASSEMBLY INSTALLATION
CAUTION / NOTICE / HINT
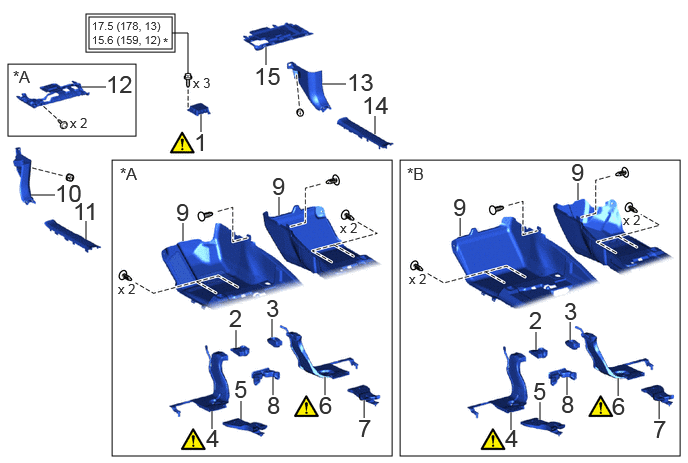
| Procedure | Part Name Code |

|

|

|
|
|---|---|---|---|---|---|
| 1 | AIRBAG ECU ASSEMBLY | 87170A | ( ) |
- | - |
| 2 | REAR NO. 2 AIR DUCT | 87212F | - | - | - |
| 3 | REAR NO. 1 AIR DUCT | 87212 | - | - | - |
| 4 | REAR NO. 4 AIR DUCT | 87212H | () |
- | - |
| 5 | REAR NO. 6 AIR DUCT | 87212K | - | - | - |
| 6 | REAR NO. 3 AIR DUCT | 87212G | () |
- | - |
| 7 | REAR NO. 5 AIR DUCT | 87212J | - | - | - |
| 8 | NO. 1 COOLER AIR DUCT | 88576C | - | - | - |
| 9 | FRONT FLOOR CARPET ASSEMBLY | 58510D | - | - | - |
| 10 | COWL SIDE TRIM BOARD LH | 62112 | - | - | - |
| 11 | FRONT DOOR SCUFF PLATE LH | 67914B | - | - | - |
| 12 | NO. 1 INSTRUMENT PANEL UNDER COVER SUB-ASSEMBLY | 55606 | - | - | - |
| 13 | COWL SIDE TRIM BOARD RH | 62111C | - | - | - |
| 14 | FRONT DOOR SCUFF PLATE RH | 67913B | - | - | - |
| 15 | NO. 2 INSTRUMENT PANEL UNDER COVER SUB-ASSEMBLY | 55607 | - | - | - |
| *A | for LHD | *B | for RHD |

|
Tightening torque for "Major areas involving basic vehicle performance such as moving/turning/stopping": N*m (kgf*cm, ft.*lbf) | * | For use with a union nut wrench |
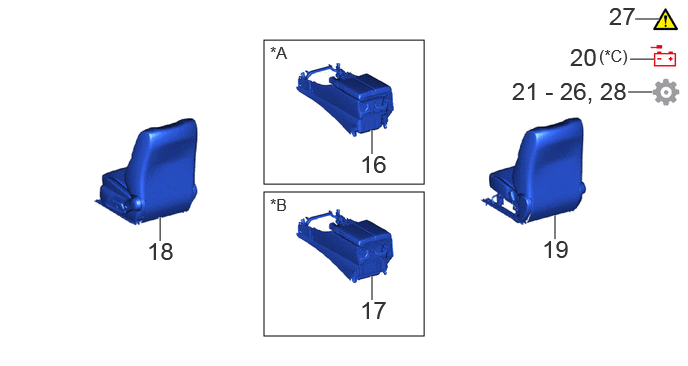
| Procedure | Part Name Code |
|
|
|
|
|---|---|---|---|---|---|
| 16 | COOLING BOX ASSEMBLY | - | - | - | - |
| 17 | REAR CONSOLE BOX SUB-ASSEMBLY | 58901A | - | - | - |
| 18 | FRONT SEAT ASSEMBLY LH | - | - | - | - |
| 19 | FRONT SEAT ASSEMBLY RH | - | - | - | - |
| 20 | CONNECT CABLE TO NEGATIVE BATTERY TERMINAL | - | () |
- | - |
| 21 | WRITE VIN/VEHICLE IDENTIFICATION NUMBER | - | - | - | () |
| 22 | ECU CONFIGURATION | - | - | - | () |
| 23 | UPDATE ECU SECURITY KEY | - | - | - | () |
| 24 | PERFORM CALIBRATION | - | - | - | () |
| 25 | PERFORM ADJUSTMENT | - | - | - | () |
| 26 | PERFORM DIAGNOSTIC SYSTEM CHECK | - | - | - | () |
| 27 | CHECK SRS WARNING LIGHT | - | () |
- | - |
| 28 | INITIALIZATION AFTER RECONNECTING BATTERY TERMINAL | - | - | - | () |
| *A | w/ Cool Box | *B | w/o Cool Box |
| *C | w/o Front Seat Side Airbag | - | - |
CAUTION / NOTICE / HINT
- HINT:
-
·
Use the same procedure for the LHD and RHD vehicles.
·The procedure listed below is for the LHD vehicles.
PROCEDURE

 89170A 1.INSTALL AIRBAG ECU ASSEMBLY
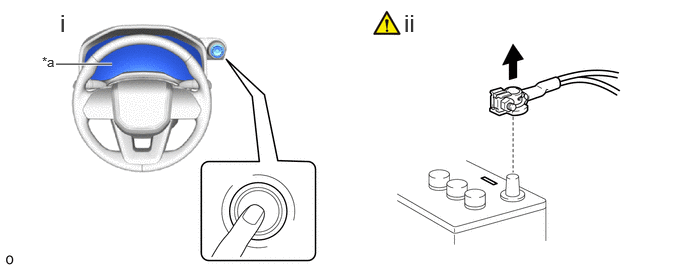
| *a | Turns off | - | - |
Check that the ignition switch is off.
Check that the cable is disconnected from the negative (-) battery terminal.
- CAUTION:
-
·
Wait at least 60 seconds after disconnecting the cable from the negative (-) battery terminal to disable the SRS system.
·If the airbag deploys for any reason, it may cause a serious accident.
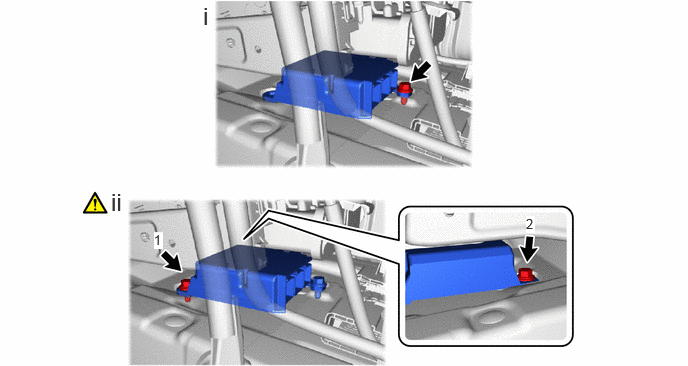
Temporarily install the bolt.
Install the 2 bolts in the order shown in the illustration.
- Torque:
- 17.5 N*m (178 kgf*cm, 13 ft.*lbf)
- NOTICE:
-
·
If the airbag ECU assembly has been dropped, or there are any cracks, dents or other defects in the case or connector, replace it with a new one.
·When installing the airbag ECU assembly, make sure that the wire harness does not interfere with or is not pinched between other parts.
·When the ignition switch is first turned to ON after the airbag ECU assembly has been replaced, make sure that no one is in the vehicle.
w/o Cool Box:

Tighten the bolt to install the airbag ECU assembly.
- Torque:
- 17.5 N*m (178 kgf*cm, 13 ft.*lbf)
w/ Cool Box:
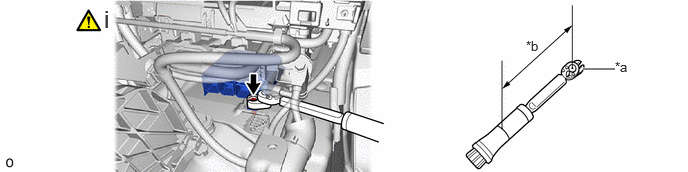
| *a | 12 mm Union Nut Wrench | *b | Torque Wrench Fulcrum Length |
Using a 12 mm union nut wrench, tighten the bolt to install the airbag ECU assembly.
- Torque:
- Specified tightening torque : 17.5 N*m (178 kgf*cm, 13 ft.*lbf)
- HINT:
-
·
Calculate the torque wrench reading when changing the fulcrum length of the torque wrench.
Click hereGeneral>INTRODUCTION>REPAIR INSTRUCTION>PRECAUTION
·When using a 12 mm union nut wrench (fulcrum length of 20 mm (0.787 in.)) + torque wrench (fulcrum length of 162 mm (6.38 in.)): 15.6 N*m (159 kgf*cm, 12 ft.*lbf)

Check that there is no looseness in the installation parts of the airbag ECU assembly.
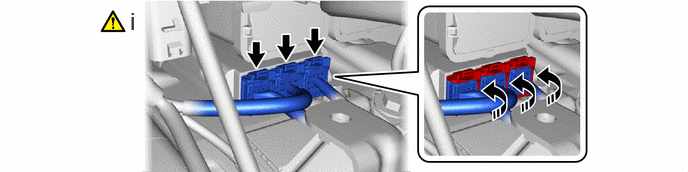

|
Push in | - | - |
Connect the 3 airbag connectors and push in the lock lever to lock the connector.
- NOTICE:
-
When connecting any airbag connector, take care not to damage the airbag wire harness.
87212F 2.INSTALL REAR NO. 2 AIR DUCT
87212 3.INSTALL REAR NO. 1 AIR DUCT
87212H 4.INSTALL REAR NO. 4 AIR DUCT
|
|
·
for LHD: Click here(
·
for RHD: Click here( |
87212K 5.INSTALL REAR NO. 6 AIR DUCT
87212G 6.INSTALL REAR NO. 3 AIR DUCT
|
|
·
for LHD: Click here(
·
for RHD: Click here( |
87212J 7.INSTALL REAR NO. 5 AIR DUCT
88576C 8.INSTALL NO. 1 COOLER AIR DUCT
58510D 9.INSTALL FRONT FLOOR CARPET ASSEMBLY
62112 10.INSTALL COWL SIDE TRIM BOARD LH
67914B 11.INSTALL FRONT DOOR SCUFF PLATE LH
55606 12.INSTALL NO. 1 INSTRUMENT PANEL UNDER COVER SUB-ASSEMBLY (for LHD)
62111C 13.INSTALL COWL SIDE TRIM BOARD RH
67913B 14.INSTALL FRONT DOOR SCUFF PLATE RH
55607 15.INSTALL NO. 2 INSTRUMENT PANEL UNDER COVER SUB-ASSEMBLY
16.INSTALL COOLING BOX ASSEMBLY (w/ Cool Box)
58901A 17.INSTALL REAR CONSOLE BOX SUB-ASSEMBLY (w/o Cool Box)
18.INSTALL FRONT SEAT ASSEMBLY LH
for Manual Seat:
Click hereVehicle Interior>SEAT>FRONT SEAT ASSEMBLY (for Manual Seat)>INSTALLATION
for Power Seat:
Click hereVehicle Interior>SEAT>FRONT SEAT ASSEMBLY (for Power Seat)>INSTALLATION
19.INSTALL FRONT SEAT ASSEMBLY RH
Use the same procedure described for the LH side.
20.CONNECT CABLE TO NEGATIVE BATTERY TERMINAL (w/o Front Seat Side Airbag)
for 1GR-FE:
for V35A-FTS:
21. WRITE VIN/VEHICLE IDENTIFICATION NUMBER
|
|
|
Click hereVehicle Interior>SUPPLEMENTAL RESTRAINT SYSTEMS>AIRBAG SYSTEM>UTILITY
22. ECU CONFIGURATION
|
|
|
Click hereGeneral>SETUP>WHEN REPLACING OR REMOVING/INSTALLING PARTS>ECU CONFIGURATION
23. UPDATE ECU SECURITY KEY
24. PERFORM CALIBRATION
25. PERFORM ADJUSTMENT
Target Adjustment (Triangle Target):
Target Adjustment (Flat Surface Target):
Driving Adjustment:
Click hereADAS / AD>ADVANCED DRIVER ASSISTANCE SYSTEM>MILLIMETER WAVE RADAR SENSOR>DRIVING ADJUSTMENT
26. PERFORM DIAGNOSTIC SYSTEM CHECK
27.CHECK SRS WARNING LIGHT
28. INITIALIZATION AFTER RECONNECTING BATTERY TERMINAL
Click hereGeneral>SETUP>WHEN DISCONNECTING OR RECONNECTING BATTERY TERMINAL>WORK PROCEDURE
- HINT:
-
When disconnecting and reconnecting the battery, there is an automatic learning function that completes learning when the respective system is used.
-
Click hereGeneral>SETUP>WHEN DISCONNECTING OR RECONNECTING BATTERY TERMINAL>AUTOMATIC LEARNING CHART