F33A-FTV ENGINE CONTROL ECD SYSTEM(w/ DPF) U010E87 Lost Communication with Reductant Control Module Missing Message U029D87 Lost Communication with NOx Sensor "A" Missing Message U029E87 Lost Communication with NOx Sensor "B" Missing Message
DESCRIPTION
The ECM sends and receives data to and from the No. 1 nitrogen oxides sensor, No. 2 nitrogen oxides sensor and urea pump control ECU via local CAN communication.
| DTC No. | Detection Item | DTC Detection Condition | Trouble Area | MIL | Note |
|---|---|---|---|---|---|
| U010E87 | Lost Communication with Reductant Control Module Missing Message | There is no communication between the ECM and urea pump control ECU. (1 trip detection logic) |
·
ECM
·
Urea pump (urea pump control ECU)
·
CAN Communication System |
Comes on | SAE Code: U010E |
| U029D87 | Lost Communication with NOx Sensor "A" Missing Message | Communication stops between the ECM and the No. 1 nitrogen oxides sensor for 1 second or more. (1 trip detection logic) |
·
No. 1 nitrogen oxides sensor
·
Harness or connector
·
ECM |
Comes on | SAE Code: U029D |
| U029E87 | Lost Communication with NOx Sensor "B" Missing Message | Communication stops between the ECM and the No. 2 nitrogen oxides sensor for 1 second or more. (1 trip detection logic) |
·
No. 2 nitrogen oxides sensor
·
Harness or connector
·
ECM |
Comes on | SAE Code: U029E |
MONITOR DESCRIPTION
The ECM stores a DTC when a communication malfunction occurs between the No. 1 nitrogen oxides sensor, No. 2 nitrogen oxides sensor, Urea pump (urea pump control ECU) and ECM.
CONFIRMATION DRIVING PATTERN
| DTC No. | DTC Detection Drive Pattern |
|---|---|
| U029D87 U029E87 |
Ignition switch ON and wait for 1 second or more. |
| U010E87 | Ignition switch ON and wait for 1.6 seconds or more. |
WIRING DIAGRAM
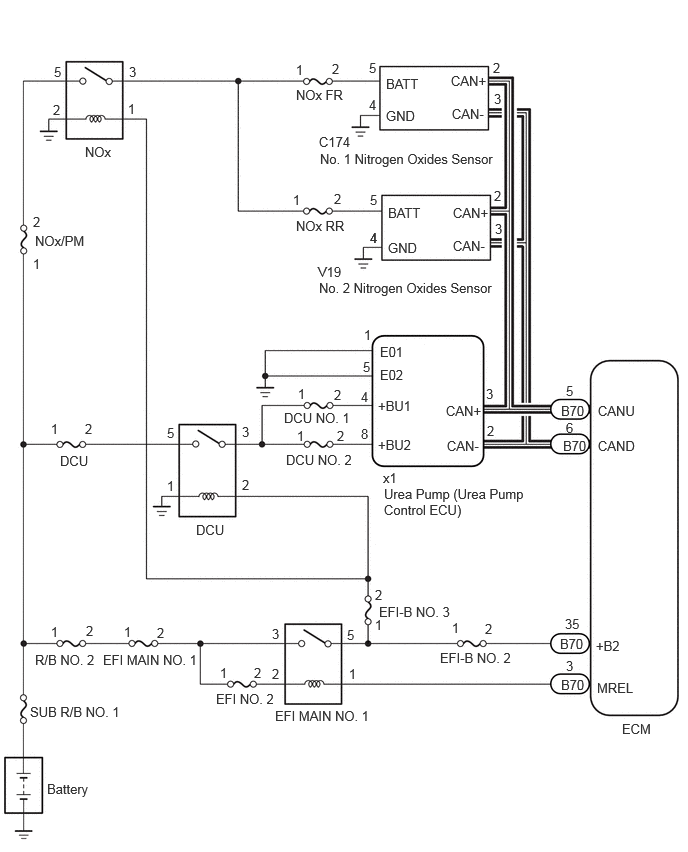
CAUTION / NOTICE / HINT
- NOTICE:
-
·
Inspect the fuses of circuits related to this system before performing the following inspection procedure.
·After replacing the ECM, the new ECM needs registration (Click here Engine / Hybrid System>F33A-FTV (ENGINE CONTROL)>ECD SYSTEM (w/ DPF)>REGISTRATION) and initialization (Click here Engine / Hybrid System>F33A-FTV (ENGINE CONTROL)>ECD SYSTEM (w/ DPF)>INITIALIZATION).
·After replacing the ECM and performing "LEARNING VALUES WRITE", select "PM Regenerate Mode" using Utility of the GTS to perform PM forced regeneration.
Click hereEngine / Hybrid System>F33A-FTV (EMISSION CONTROL)>EMISSION CONTROL SYSTEM>ON-VEHICLE INSPECTION
·After the ignition switch is turned off, there may be a waiting time before disconnecting the negative (-) battery terminal.
Click hereGeneral>SETUP>WHEN DISCONNECTING OR RECONNECTING BATTERY TERMINAL>BEFORE DISCONNECTING BATTERY
·When disconnecting and reconnecting the battery.
Click hereGeneral>SETUP>WHEN DISCONNECTING OR RECONNECTING BATTERY TERMINAL>WORK PROCEDURE
- HINT:
-
When disconnecting and reconnecting the battery, there is an automatic learning function that completes learning when the respective system is used.
-
Click hereGeneral>SETUP>WHEN DISCONNECTING OR RECONNECTING BATTERY TERMINAL>AUTOMATIC LEARNING CHART
- HINT:
-
Read freeze frame data using the GTS. Freeze frame data records the engine condition when malfunctions are detected. When troubleshooting, freeze frame data can help determine if the vehicle was moving or stationary, if the engine was warmed up or not, and other data from the time the malfunction occurred.
PROCEDURE
According to the display on the GTS, select "Health Check".
Check for currently output system DTCs.
- Result:
-
Result Proceed to DTC U010E87 is output A DTC U029D87 is output B DTC U029E87 is output C DTC U029D87 and U029E87 are output D DTC U010E87, U029D87 and U029E87 are simultaneously output E
A
B
C
D
E
Disconnect the urea pump (urea pump control ECU) connector.
Measure the resistance according to the value(s) in the table below.
- Standard Resistance:
-
Tester Connection Condition Specified Condition Click Location & Routing(x1)Location & Routingewd_type=routing;type=c;code=x1
Click Connector(x1)Body>Urea Tank Harness>Urea Pumpewd_type=component;type=c;code=x1;pinno=1,5
x1-1 (E01) - Body ground Always Below 1 Ω x1-5 (E02) - Body ground Always Below 1 Ω
- Result:
-
Proceed to OK NG
OK
NG
Disconnect the urea pump (urea pump control ECU) connector.
Turn the ignition switch to ON.
Measure the voltage according to the value(s) in the table below.
- Standard Voltage:
-
Tester Connection Condition Specified Condition Click Location & Routing(x1)Location & Routingewd_type=routing;type=c;code=x1
Click Connector(x1)Body>Urea Tank Harness>Urea Pumpewd_type=component;type=c;code=x1;pinno=4,8
x1-4 (+BU1) - Body ground Ignition switch ON 11 to 14 V x1-8 (+BU2) - Body ground Ignition switch ON 11 to 14 V
- Result:
-
Proceed to OK NG
OK
NG
Disconnect the cable from the negative (-) battery terminal and wait for at least 60 seconds.
Disconnect the urea pump (urea pump control ECU) connector.
Measure the resistance according to the value(s) in the table below.
- Standard Resistance:
-
Tester Connection Condition Specified Condition Click Location & Routing(x1)Location & Routingewd_type=routing;type=c;code=x1
Click Connector(x1)Body>Urea Tank Harness>Urea Pumpewd_type=component;type=c;code=x1;pinno=3,2,1,5
x1-3 (CAN+) - x1-2 (CAN-) Cable disconnected from negative (-) battery terminal 108 to 132 Ω x1-3 (CAN+) or x1-2 (CAN-) - Other power supply terminals Cable disconnected from negative (-) battery terminal 6 kΩ or higher x1-3 (CAN+) or x1-2 (CAN-) - Body ground and other terminals Cable disconnected from negative (-) battery terminal 200 Ω or higher x1-1 (E01) or x1-5 (E02) - Body ground and other terminals Cable disconnected from negative (-) battery terminal Below 1 Ω
- Result:
-
Proceed to OK NG
OK
NG
Click hereEngine / Hybrid System>F33A-FTV (ENGINE CONTROL)>RELAY>ON-VEHICLE INSPECTION
- Result:
-
Proceed to OK NG
OK
NG
Remove the DCU relay from the No. 4 engine room relay block and junction block assembly.
Disconnect the urea pump (urea pump control ECU) connector.
Measure the resistance according to the value(s) in the table below.
- Standard Resistance:
-
Tester Connection Condition Specified Condition Click Location & Routing(x1)Location & Routingewd_type=routing;type=c;code=x1
Click Connector(x1)Body>Urea Tank Harness>Urea Pumpewd_type=component;type=c;code=x1;pinno=4,8
DCU relay terminal 3 - x1-4 (+BU1) Always Below 1 Ω DCU relay terminal 3 - x1-8 (+BU2) Always Below 1 Ω DCU relay terminal 3 or x1-4 (+BU1) - Body ground and other terminals Always 10 kΩ or higher DCU relay terminal 3 or x1-8 (+BU2) - Body ground and other terminals Always 10 kΩ or higher
- Result:
-
Proceed to OK NG
OK
NG
Remove the DCU relay from the No. 4 engine room relay block and junction block assembly.
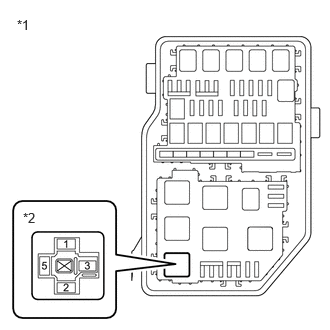
| *1 | No. 4 Engine Room Relay Block and Junction Block Assembly |
| *2 | DCU Relay |
Measure the voltage according to the value(s) in the table below.
- Standard Voltage:
-
Tester Connection Condition Specified Condition DCU relay terminal 5 - Body ground Always 11 to 14 V
- Result:
-
Proceed to OK NG
OK
NG
Remove the DCU relay from the No. 4 engine room relay block and junction block assembly.
Measure the resistance according to the value(s) in the table below.
- Standard Resistance:
-
Tester Connection Condition Specified Condition DCU relay terminal 1 - Body ground Always Below 1 Ω
- Result:
-
Proceed to OK NG
OK
NG
Remove the DCU relay from the No. 4 engine room relay block and junction block assembly.
Remove the EFI MAIN NO. 1 relay from the No. 3 engine room relay block and junction block assembly.
Measure the resistance according to the value(s) in the table below.
- Standard Resistance:
-
Tester Connection Condition Specified Condition DCU relay terminal 2 - EFI MAIN NO. 1 relay terminal 5 Always Below 1 Ω DCU relay terminal 2 or EFI MAIN NO. 1 relay terminal 5 - Body ground and other terminals Always 10 kΩ or higher
- Result:
-
Proceed to OK NG
OK
Click hereEngine / Hybrid System>F33A-FTV (ENGINE CONTROL)>ECD SYSTEM (w/ DPF)>ECM Power Source Circuit
NG
Disconnect the No. 1 nitrogen oxides sensor connector.
Turn the ignition switch to ON.
Measure the voltage according to the value(s) in the table below.
- Standard Voltage:
-
Tester Connection Condition Specified Condition Click Location & Routing(C174)Location & Routingewd_type=routing;type=c;code=C174
C174-5 (BATT) - C174-4 (GND) Ignition switch ON 11 to 14 V
- Result:
-
Proceed to OK NG
OK
NG
Disconnect the cable from the negative (-) battery terminal and wait for at least 60 seconds.
Disconnect the No. 1 nitrogen oxides sensor connector.
Measure the resistance according to the value(s) in the table below.
- Standard Resistance:
-
Tester Connection Condition Specified Condition Click Location & Routing(C174)Location & Routingewd_type=routing;type=c;code=C174
C174-2 (CAN+) - C174-3 (CAN-) Cable disconnected from negative (-) battery terminal 54 to 69 Ω C174-2 (CAN+) or C174-3 (CAN-) - Other power supply terminals Cable disconnected from negative (-) battery terminal 6 kΩ or higher C174-2 (CAN+) or C174-3 (CAN-) - Body ground and other terminals Cable disconnected from negative (-) battery terminal 200 Ω or higher C174-4 (GND) - Body ground and other terminals Cable disconnected from negative (-) battery terminal Below 1 Ω
- Result:
-
Proceed to OK NG
OK
NG
Disconnect the No. 2 nitrogen oxides sensor connector.
Turn the ignition switch to ON.
Measure the voltage according to the value(s) in the table below.
- Standard Voltage:
-
Tester Connection Condition Specified Condition Click Location & Routing(V19)Location & Routingewd_type=routing;type=c;code=V19
Click Connector(V19)Body>Differential Wire / Frame Wire>No. 2 Nitrogen Oxides Sensorewd_type=component;type=c;code=V19;pinno=5,4
V19-5 (BATT) - V19-4 (GND) Ignition switch ON 11 to 14 V
- Result:
-
Proceed to OK NG
OK
NG
Disconnect the cable from the negative (-) battery terminal and wait for at least 60 seconds.
Disconnect the No. 2 nitrogen oxides sensor connector.
Measure the resistance according to the value(s) in the table below.
- Standard Resistance:
-
Tester Connection Condition Specified Condition Click Location & Routing(V19)Location & Routingewd_type=routing;type=c;code=V19
Click Connector(V19)Body>Differential Wire / Frame Wire>No. 2 Nitrogen Oxides Sensorewd_type=component;type=c;code=V19;pinno=2,3,4
V19-2 (CAN+) - V19-3 (CAN-) Cable disconnected from negative (-) battery terminal 54 to 69 Ω V19-2 (CAN+) or V19-3 (CAN-) - Other power supply terminals Cable disconnected from negative (-) battery terminal 6 kΩ or higher V19-2 (CAN+) or V19-3 (CAN-) - Body ground and other terminals Cable disconnected from negative (-) battery terminal 200 Ω or higher V19-4 (GND) - Body ground and other terminals Cable disconnected from negative (-) battery terminal Below 1 Ω
- Result:
-
Proceed to OK NG
OK
NG
Disconnect the No. 1 nitrogen oxides sensor connector.
Disconnect the No. 2 nitrogen oxides sensor connector.
Turn the ignition switch to ON.
Measure the voltage according to the value(s) in the table below.
- Standard Voltage:
-
Tester Connection Condition Specified Condition Click Location & Routing(C174,V19)Location & Routingewd_type=routing;type=c,c;code=C174,V19
Click Connector(V19)Body>Differential Wire / Frame Wire>No. 2 Nitrogen Oxides Sensorewd_type=component;type=c;code=V19;pinno=5,4
C174-5 (BATT) - C174-4 (GND) Ignition switch ON 11 to 14 V V19-5 (BATT) - V19-4 (GND) Ignition switch ON 11 to 14 V
- Result:
-
Proceed to OK NG
OK
NG
Disconnect the cable from the negative (-) battery terminal and wait for at least 60 seconds.
Disconnect the ECM connector.
Measure the resistance according to the value(s) in the table below.
- Standard Resistance:
-
Tester Connection Condition Specified Condition Click Location & Routing(B70)Location & Routingewd_type=routing;type=c;code=B70
B70-5 (CANU) - B70-6 (CAND) Cable disconnected from negative (-) battery terminal 108 to 132 Ω B70-5 (CANU) or B70-6 (CAND) - Other power supply terminals Cable disconnected from negative (-) battery terminal 6 kΩ or higher B70-5 (CANU) or B70-6 (CAND) - Body ground and other terminals Cable disconnected from negative (-) battery terminal 200 Ω or higher
- Result:
-
Proceed to OK NG
OK
NG
Disconnect the cable from the negative (-) battery terminal and wait for at least 60 seconds.
Disconnect the No. 1 nitrogen oxides sensor connector.
Measure the resistance according to the value(s) in the table below.
- Standard Resistance:
-
Tester Connection Condition Specified Condition Click Location & Routing(C174)Location & Routingewd_type=routing;type=c;code=C174
C174-2 (CAN+) - C174-3 (CAN-) Cable disconnected from negative (-) battery terminal 54 to 69 Ω C174-2 (CAN+) or C174-3 (CAN-) - Other power supply terminals Cable disconnected from negative (-) battery terminal 6 kΩ or higher C174-2 (CAN+) or C174-3 (CAN-) - Body ground and other terminals Cable disconnected from negative (-) battery terminal 200 Ω or higher C174-4 (GND) - Body ground and other terminals Cable disconnected from negative (-) battery terminal Below 1 Ω
- Result:
-
Proceed to OK NG
OK
NG
Disconnect the cable from the negative (-) battery terminal and wait for at least 60 seconds.
Disconnect the No. 2 nitrogen oxides sensor connector.
Measure the resistance according to the value(s) in the table below.
- Standard Resistance:
-
Tester Connection Condition Specified Condition Click Location & Routing(V19)Location & Routingewd_type=routing;type=c;code=V19
Click Connector(V19)Body>Differential Wire / Frame Wire>No. 2 Nitrogen Oxides Sensorewd_type=component;type=c;code=V19;pinno=2,3,4
V19-2 (CAN+) - V19-3 (CAN-) Cable disconnected from negative (-) battery terminal 54 to 69 Ω V19-2 (CAN+) or V19-3 (CAN-) - Other power supply terminals Cable disconnected from negative (-) battery terminal 6 kΩ or higher V19-2 (CAN+) or V19-3 (CAN-) - Body ground and other terminals Cable disconnected from negative (-) battery terminal 200 Ω or higher V19-4 (GND) - Body ground and other terminals Cable disconnected from negative (-) battery terminal Below 1 Ω
- Result:
-
Proceed to OK NG
OK
NG
Inspect the NOx relay.
Click hereEngine / Hybrid System>F33A-FTV (ENGINE CONTROL)>RELAY>ON-VEHICLE INSPECTION
- Result:
-
Proceed to OK NG
OK
NG
Remove the NOX relay from the No. 4 engine room relay block and junction block assembly.
Disconnect the No. 1 nitrogen oxides sensor connector.
Disconnect the No. 2 nitrogen oxides sensor connector.
Measure the resistance according to the value(s) in the table below.
- Standard Resistance:
-
Tester Connection Condition Specified Condition Click Location & Routing(C174,V19)Location & Routingewd_type=routing;type=c,c;code=C174,V19
Click Connector(V19)Body>Differential Wire / Frame Wire>No. 2 Nitrogen Oxides Sensorewd_type=component;type=c;code=V19;pinno=5
NOX relay terminal 3 - C174-5 (BATT) Always Below 1 Ω NOX relay terminal 3 - V19-5 (BATT) Always Below 1 Ω NOX relay terminal 3 - C174-5 (BATT) - Body ground and other terminals Always 10 kΩ or higher NOX relay terminal 3 - V19-5 (BATT) - Body ground and other terminals Always 10 kΩ or higher
- Result:
-
Proceed to OK NG
OK
NG
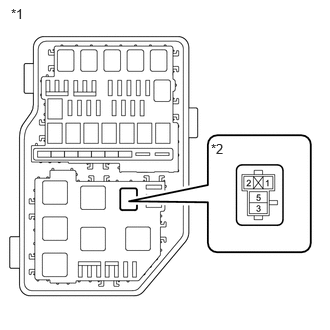
| *1 | No. 4 Engine Room Relay Block and Junction Block Assembly |
| *2 | NOX Relay |
Remove the NOX relay from the No. 4 engine room relay block and junction block assembly.
Measure the voltage according to the value(s) in the table below.
- Standard Voltage:
-
Tester Connection Condition Specified Condition NOX relay terminal 5 - Body ground Always 11 to 14 V
- Result:
-
Proceed to OK NG
OK
NG
Remove the NOX relay from the No. 4 engine room relay block and junction block assembly.
Measure the resistance according to the value(s) in the table below.
- Standard Resistance:
-
Tester Connection Condition Specified Condition NOX relay terminal 2 - Body ground Always Below 1 Ω
- Result:
-
Proceed to OK NG
OK
NG
Remove the NOX relay from the No. 4 engine room relay block and junction block assembly.
Remove the EFI MAIN NO. 1 relay from the No. 3 engine room relay block and junction block assembly.
Measure the resistance according to the value(s) in the table below.
- Standard Resistance:
-
Tester Connection Condition Specified Condition NOX relay terminal 1 - EFI MAIN NO. 1 relay terminal 5 Always Below 1 Ω NOX relay terminal 1 or EFI MAIN NO. 1 relay terminal 5 - Body ground and other terminals Always 10 kΩ or higher
- Result:
-
Proceed to OK NG
OK
Click hereEngine / Hybrid System>F33A-FTV (ENGINE CONTROL)>ECD SYSTEM (w/ DPF)>ECM Power Source Circuit
NG
Disconnect the cable from the negative (-) battery terminal and wait for at least 60 seconds.
Disconnect the ECM connector.
Measure the resistance according to the value(s) in the table below.
- Standard Resistance:
-
Tester Connection Condition Specified Condition Click Location & Routing(B70)Location & Routingewd_type=routing;type=c;code=B70
B70-5 (CANU) - B70-6 (CAND) Cable disconnected from negative (-) battery terminal 108 to 132 Ω B70-5 (CANU) or B70-6 (CAND) - Other power supply terminals Cable disconnected from negative (-) battery terminal 6 kΩ or higher B70-5 (CANU) or B70-6 (CAND) - Body ground and other terminals Cable disconnected from negative (-) battery terminal 200 Ω or higher
- Result:
-
Proceed to OK NG
OK
NG
Disconnect the cable from the negative (-) battery terminal and wait for at least 60 seconds.
Disconnect the No. 1 nitrogen oxides sensor connector.
Measure the resistance according to the value(s) in the table below.
- Standard Resistance:
-
Tester Connection Condition Specified Condition Click Location & Routing(C174)Location & Routingewd_type=routing;type=c;code=C174
C174-2 (CAN+) - C174-3 (CAN-) Cable disconnected from negative (-) battery terminal 54 to 69 Ω C174-2 (CAN+) or C174-3 (CAN-) - Other power supply terminals Cable disconnected from negative (-) battery terminal 6 kΩ or higher C174-2 (CAN+) or C174-3 (CAN-) - Body ground and other terminals Cable disconnected from negative (-) battery terminal 200 Ω or higher C174-4 (GND) - Body ground and other terminals Cable disconnected from negative (-) battery terminal Below 1 Ω
- Result:
-
Proceed to OK NG
OK
NG
Disconnect the cable from the negative (-) battery terminal and wait for at least 60 seconds.
Disconnect the No. 2 nitrogen oxides sensor connector.
Measure the resistance according to the value(s) in the table below.
- Standard Resistance:
-
Tester Connection Condition Specified Condition Click Location & Routing(V19)Location & Routingewd_type=routing;type=c;code=V19
Click Connector(V19)Body>Differential Wire / Frame Wire>No. 2 Nitrogen Oxides Sensorewd_type=component;type=c;code=V19;pinno=2,3,4
V19-2 (CAN+) - V19-3 (CAN-) Cable disconnected from negative (-) battery terminal 54 to 69 Ω V19-2 (CAN+) or V19-3 (CAN-) - Other power supply terminals Cable disconnected from negative (-) battery terminal 6 kΩ or higher V19-2 (CAN+) or V19-3 (CAN-) - Body ground and other terminals Cable disconnected from negative (-) battery terminal 200 Ω or higher V19-4 (GND) - Body ground and other terminals Cable disconnected from negative (-) battery terminal Below 1 Ω
- Result:
-
Proceed to OK NG
OK
NG
Disconnect the cable from the negative (-) battery terminal and wait for at least 60 seconds.
Disconnect the urea pump (urea pump control ECU) connector.
Measure the resistance according to the value(s) in the table below.
- Standard Resistance:
-
Tester Connection Condition Specified Condition Click Location & Routing(x1)Location & Routingewd_type=routing;type=c;code=x1
Click Connector(x1)Body>Urea Tank Harness>Urea Pumpewd_type=component;type=c;code=x1;pinno=3,2,1,5
x1-3 (CAN+) - x1-2 (CAN-) Cable disconnected from negative (-) battery terminal 108 to 132 Ω x1-3 (CAN+) or x1-2 (CAN-) - Other power supply terminals Cable disconnected from negative (-) battery terminal 6 kΩ or higher x1-3 (CAN+) or x1-2 (CAN-) - Body ground and other terminals Cable disconnected from negative (-) battery terminal 200 Ω or higher x1-1 (E01) or x1-5 (E02) - Body ground and other terminals Cable disconnected from negative (-) battery terminal Below 1 Ω
- Result:
-
Proceed to OK NG
OK
NG