Q710 HYBRID TRANSMISSION / TRANSAXLE HYBRID VEHICLE TRANSAXLE REMOVAL
CAUTION / NOTICE / HINT
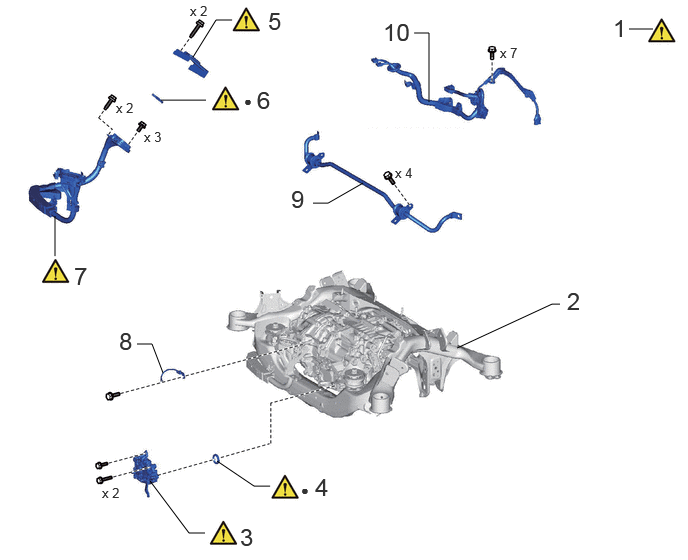
| Procedure | Part Name Code | 
|

|

|
|
|---|---|---|---|---|---|
| 1 | PRECAUTION | - | ( ) |
- | - |
| 2 | REAR SUSPENSION MEMBER SUB-ASSEMBLY | 51206A | - | - | - |
| 3 | SHIFT CONTROL ACTUATOR ASSEMBLY | 35580 | ()
|
- | - |
| 4 | SHIFT CONTROL ACTUATOR SEAL | 35563 | ()
|
- | - |
| 5 | CONNECTOR COVER | 82821T | ()
|
- | - |
| 6 | MOTOR CABLE TERMINAL CAP | G114D | ()
|
- | - |
| 7 | MOTOR CABLE | G1148 | ()
|
- | - |
| 8 | NO. 1 BOND CABLE | 82001 | - | - | - |
| 9 | REAR STABILIZER BAR | 48812 | - | - | - |
| 10 | WIRE HARNESS | - | - | - | - |
| ● | Non-reusable part | - | - |
| Procedure | Part Name Code |
|
|
|
|
|---|---|---|---|---|---|
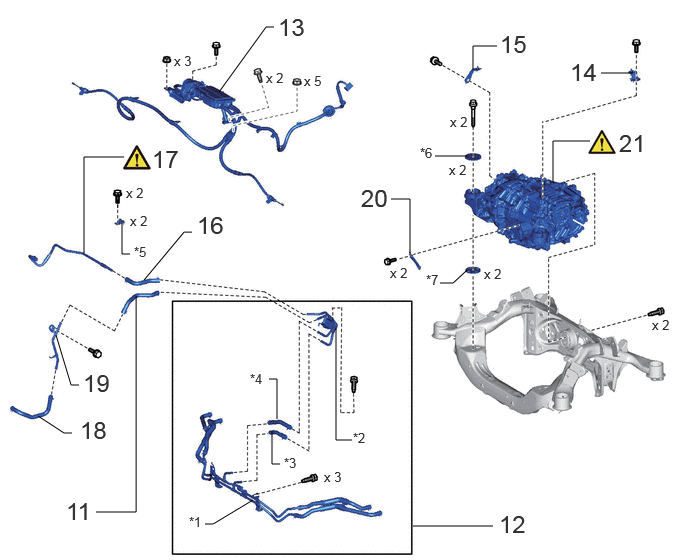
| 11 | NO. 2 OIL COOLER INLET HOSE | 32941M | - | - | - |
| 12 | OIL COOLER TUBE ASSEMBLY | - | - | - | - |
| 13 | PARKING BRAKE ACTUATOR ASSEMBLY WITH BRACKET | 46300 | - | - | - |
| 14 | NO. 3 CABLE SUPPORT BRACKET | 46453A | - | - | - |
| 15 | NO. 4 CABLE SUPPORT BRACKET | 46454A | - | - | - |
| 16 | NO. 1 OIL COOLER OUTLET HOSE | 32942G | - | - | - |
| 17 | OIL COOLER OUTLET TUBE SUB-ASSEMBLY | 32905B | ()
|
- | - |
| 18 | NO. 1 OIL COOLER INLET HOSE | 32941L | - | - | - |
| 19 | OIL COOLER INLET TUBE SUB-ASSEMBLY | 32904B | - | - | - |
| 20 | MOTOR MOUNTING STAY LH | G2318 | - | - | - |
| 21 | FCV WITH MOTOR TRANSAXLE ASSEMBLY | 30600R | ()
|
- | - |
| *1 | OIL COOLER TUBE SUB-ASSEMBLY | *2 | OIL COOLER WITHOUT HOSE TUBE SUB-ASSEMBLY |
| *3 | NO. 2 OIL COOLER INLET HOSE | *4 | NO. 2 OIL COOLER OUTLET HOSE |
| *5 | NO. 2 OIL COOLER TUBE CLAMP | *6 | UPPER MOTOR MOUNTING STOPPER |
| *7 | LOWER MOTOR MOUNTING STOPPER | - | - |
| Procedure | Part Name Code |
|
|
|
|
|---|---|---|---|---|---|
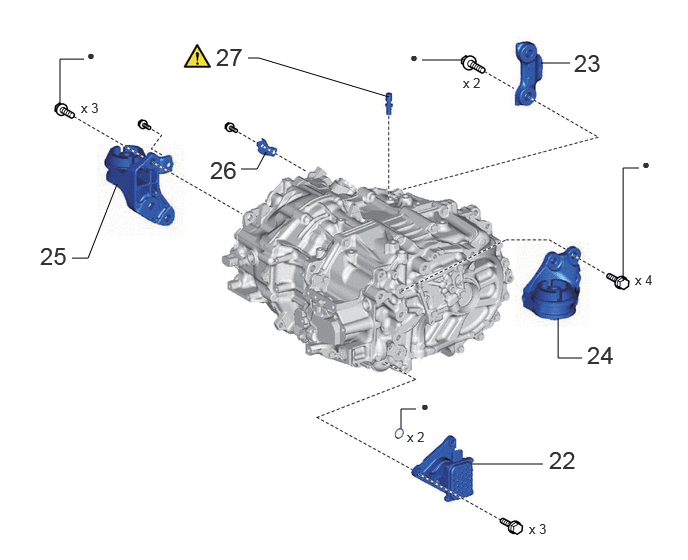
| 22 | OIL WITH MOTOR PUMP ASSEMBLY | 35300 | - | - | - |
| 23 | REAR MOTOR MOUNTING BRACKET | G2321A | - | - | - |
| 24 | MOTOR MOUNTING INSULATOR LH | G2372 | - | - | - |
| 25 | MOTOR MOUNTING INSULATOR SUB-ASSEMBLY RH | G2305A | - | - | - |
| 26 | MOTOR CABLE BRACKET | G1143 | - | - | - |
| 27 | TRANSAXLE BREATHER PLUG | 30900N | ()
|
- | - |
| ● | Non-reusable part | - | - |
CAUTION / NOTICE / HINT
The necessary procedures (adjustment, calibration, initialization, or registration) that must be performed after parts are removed and installed, or replaced during FCV with motor transaxle assembly removal/installation are shown below.
|
* The vehicle height changes because of suspension or tire replacement. |
|||
| Replaced Part or PerformedProcedure | Necessary Procedure | Effect/Inoperative Functionwhen Necessary Procedurenot Performed | Link |
| Auxiliary battery terminal isdisconnected/reconnected | Memorize steering angle neutral point | Parking assist monitor system | ()
|
| Panoramic view monitor system | ()
|
||
·
Rear disc (Including removal and installation) ·
Parking brake shoe (Including removal and installation) ·
Parking brake actuator assembly with bracket (Removed and installed) |
Parking brake bedding | Electric parking brake system | ()
|
| Suspension, tires, etc.* | ·
Measurement of ultrasonic sensor detection angle ·
Ultrasonic sensor detection angle registration |
·
Parking support brake system ·
Advanced park |
w/ Advanced Park:
( )
w/o Advanced Park: ( )
|
| Rear television camera assembly optical axis (Back camera position setting) | Parking assist monitor system | ()
|
|
·
Parking assist ECU initialization ·
Adjust sttering angle ·
Rear television camera view adjustment (for Rear camera detection system) |
Panoramic view monitor system | ()
|
|
| Perform headlight ECU sub-assembly LH initialization | Automatic headlight beam level control system | ()
|
|
| Rear wheel alignment adjustment | Electronically controlled brake system calibration | Electronically controlled brake system calibration | ()
|
- CAUTION:
- ·
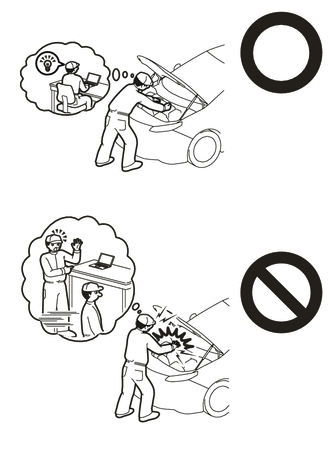
This vehicle has contains high voltage circuits standardized with orange colored wiring and connectors, so follow the instructions in this manual to perform the procedures correctly.
·If the correct procedures are not followed according to the instructions in this manual, there is a danger of electric shock from the high voltage circuits.
·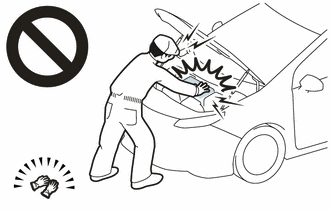
Be sure to wear insulating gloves when working on high voltage wiring or components.
·If work is performed without wearing insulating gloves, there is a danger of electric shock.
- HINT:
-
When the cable is disconnected/reconnected to the auxiliary battery terminal, systems temporarily stop operating. However, each system has a function that completes learning the first time the system is used.
- ·
Learning completes when vehicle is driven
Effect/Inoperative Function When Necessary Procedures are not Performed Necessary Procedures Link Lane tracing assist system Drive the vehicle straight ahead at 35 km/h (22 mph) or more for 5 seconds or more. ( )
Pre-collision system Adaptive high beam system
·Learning completes when vehicle is operated normally
Effect/Inoperative Function When Necessary Procedures are not Performed Necessary Procedures Link Air conditioning system After the ignition switch is turned to ON, theservo motor and expansion valve standardposition is recognized. -
PROCEDURE

 1. PRECAUTION
51206A
2.REMOVE REAR SUSPENSION MEMBER SUB-ASSEMBLY
35580
3.REMOVE SHIFT CONTROL ACTUATOR ASSEMBLY
|
|
Click here()
|
35563
4.REMOVE SHIFT CONTROL ACTUATOR SEAL
|
|
Click here()
|
82821T
5.REMOVE CONNECTOR COVER
|
|
Click here()
|
G114D
6.REMOVE MOTOR CABLE TERMINAL CAP
|
|
Click here()
|
G1148
7.REMOVE MOTOR CABLE
|
|
Click here()
|
82001
8.REMOVE NO. 1 BOND CABLE

48812
9.REMOVE REAR STABILIZER BAR
10.DISCONNECT WIRE HARNESS
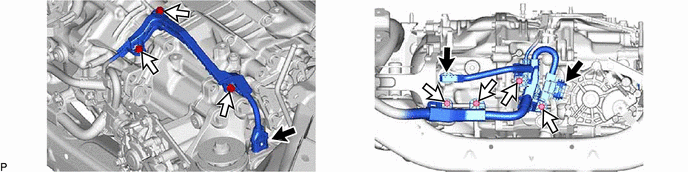

|
Wire Harness Connector | 
|
Bolt |
32941M
11.REMOVE NO. 2 OIL COOLER INLET HOSE
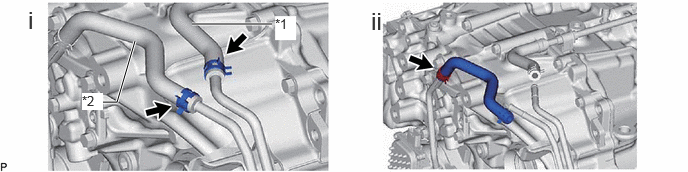
| *1 | No. 1 Oil Cooler Outlet Hose | *2 | No. 2 Oil Cooler Inlet Hose |
Slide the 2 hose clips and disconnect the No. 1 oil cooler outlet hose and No. 2 oil cooler inlet hose from the oil cooler tube assembly.
Slide the hose clip and remove the No. 2 oil cooler inlet hose from the oil cooler inlet tube sub-assembly.
12.REMOVE OIL COOLER TUBE ASSEMBLY
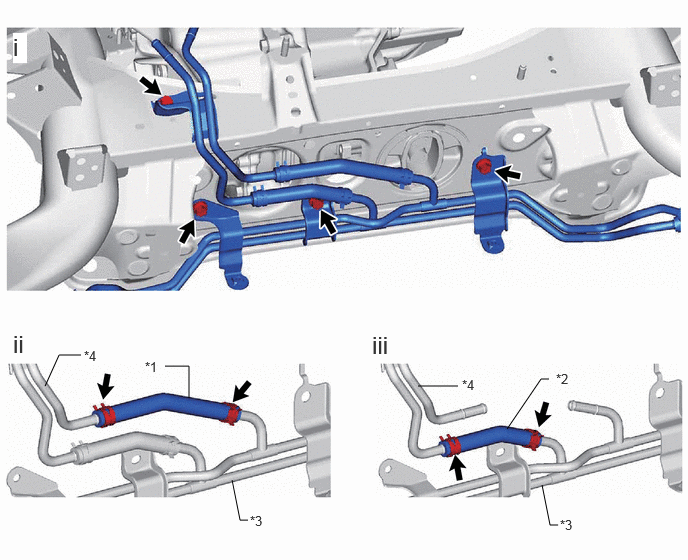
| *1 | No. 2 Oil Cooler Outlet Hose | *2 | No. 2 Oil Cooler Inlet Hose |
| *3 | Oil Cooler Tube Sub-assembly | *4 | Oil Cooler without Hose Tube Sub-assembly |
Remove the 4 bolts and oil cooler tube assembly from the rear suspension member sub-assembly.
Slide the 2 hose clips and remove the No. 2 oil cooler outlet hose from the oil cooler tube sub-assembly and oil cooler without hose tube sub-assembly.
Slide the 2 hose clips and remove the No. 2 oil cooler inlet hose from the oil cooler tube sub-assembly and oil cooler without hose tube sub-assembly.
46300
13.REMOVE PARKING BRAKE ACTUATOR ASSEMBLY WITH BRACKET
46453A
14.REMOVE NO. 3 CABLE SUPPORT BRACKET

46454A
15.REMOVE NO. 4 CABLE SUPPORT BRACKET

32942G
16.REMOVE NO. 1 OIL COOLER OUTLET HOSE

32905B
17.REMOVE OIL COOLER OUTLET TUBE SUB-ASSEMBLY
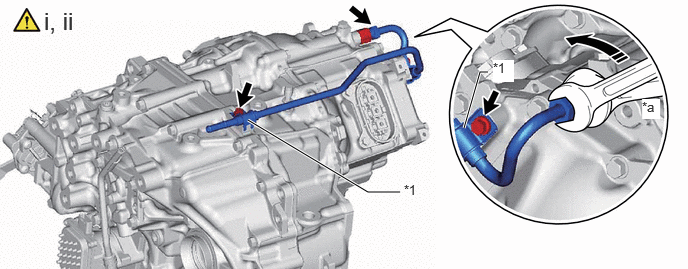
| *1 | No. 2 Oil Cooler Tube Clamp | - | - |
| *a | Hold | - | - |

|
Turn | - | - |
Loosen the flare nut of the oil cooler tube sub-assembly and disconnect the oil cooler tube sub-assembly from the union.
Remove the 2 bolts, 2 No. 2 oil cooler tube clamps and oil cooler outlet tube sub-assembly from the FCV with motor transaxle assembly.
32941L
18.REMOVE NO. 1 OIL COOLER INLET HOSE

32904B
19.REMOVE OIL COOLER INLET TUBE SUB-ASSEMBLY

G2318
20.REMOVE MOTOR MOUNTING STAY LH

30600R
21.REMOVE FCV WITH MOTOR TRANSAXLE ASSEMBLY
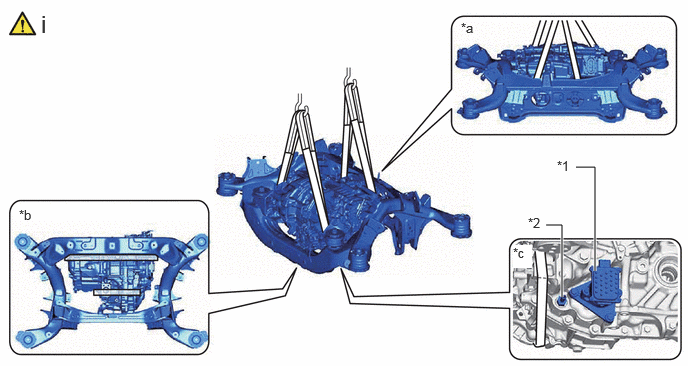
| *1 | Oil with Motor Pump Assembly | *2 | Connector Tube |
| *a | Rear Side of Vehicle | *b | Bottom Side of Vehicle |
| *c | LH Side of Vehicle | - | - |
Using an engine sling device, chain block and rope or equivalent, hold the FCV with motor transaxle assembly at the positions shown in the illustration.
- CAUTION:
-
The FCV with motor transaxle assembly is heavy. Hold it securely in place with the engine sling device, chain block and belt sling.
- NOTICE:
- ·
When removing the 2 bolts on the differential mount cushion side of the FCV with motor transaxle assembly, make sure to hold the FCV with motor transaxle assembly securely to prevent it from dropping.
·Lightly shake the FCV with motor transaxle assembly by hand to make sure it is securely held while performing work.
·Do not shake the FCV with motor transaxle assembly excessively while holding it.
·The belt sling may become deformed or damaged if it makes contact with the connector tube or oil with motor pump assembly. Therefore, be careful of the holding position.
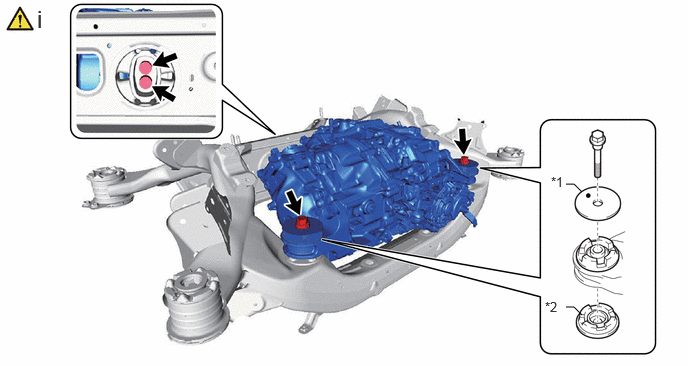
| *1 | Upper Motor Mounting Stopper | *2 | Lower Motor Mounting Stopper |
Remove the 4 bolts, 2 upper motor mounting stoppers, 2 lower motor mounting stoppers and FCV with motor transaxle assembly from the rear suspension member sub-assembly.
- NOTICE:
- ·
Do not drop the FCV with motor transaxle assembly.
·Do not damage the installation surface of the FCV with motor transaxle assembly.
35300
22.REMOVE OIL WITH MOTOR PUMP ASSEMBLY
G2321A
23.REMOVE REAR MOTOR MOUNTING BRACKET

G2372
24.REMOVE MOTOR MOUNTING INSULATOR LH

G2305A
25.REMOVE MOTOR MOUNTING INSULATOR SUB-ASSEMBLY RH

G1143
26.REMOVE MOTOR CABLE BRACKET

30900N
27.REMOVE TRANSAXLE BREATHER PLUG
|
|
|
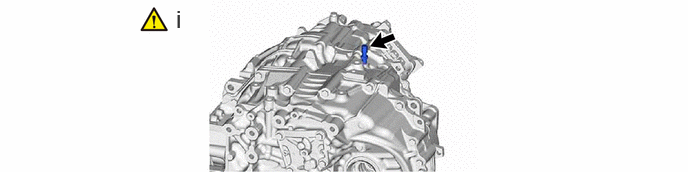
Using a 14 mm union nut wrench, remove the transaxle breather plug from the FCV with motor transaxle assembly.
- NOTICE:
-
Be careful not to damage the transaxle breather plug.