DOOR / HATCH BACK DOOR DISASSEMBLY
PROCEDURE

 1.REMOVE BACK DOOR CENTER GARNISH
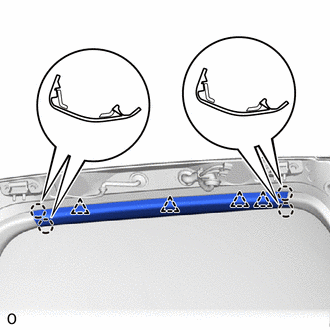
Detach the 4 claws and 4 clips and remove the back door center garnish.
2.REMOVE BACK DOOR SIDE GARNISH LH
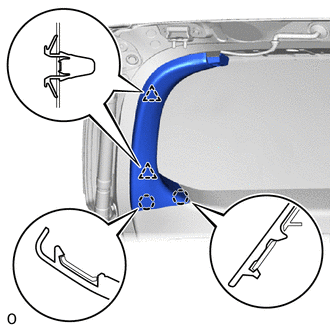
Detach the 2 claws and 2 clips and remove the back door side garnish LH.
3.REMOVE BACK DOOR SIDE GARNISH RH
- HINT:
-
Use the same procedure described for the LH side.
4.REMOVE BACK DOOR TRIM BOARD ASSEMBLY
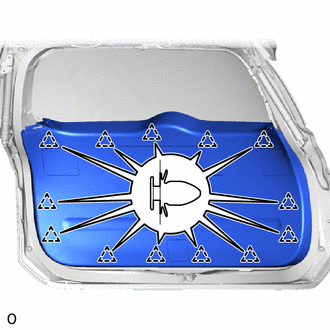
Detach the 13 clips and remove the back door trim board.
5.REMOVE BACK DOOR SERVICE HOLE COVER LH
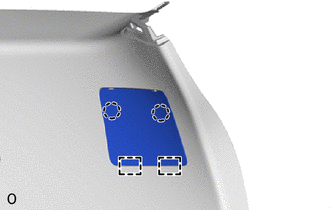
Detach the 2 claws and 2 guides and remove the back door service hole cover LH.
6.REMOVE BACK DOOR SERVICE HOLE COVER RH
- HINT:
-
Use the same procedure described for the LH side.
7.REMOVE BACK DOOR NO. 1 SERVICE HOLE COVER
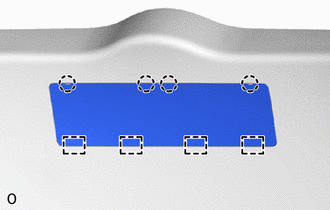
Detach the 4 claws and 4 guides and remove the back door No. 1 service hole cover.
8.REMOVE BACK DOOR NO. 2 SERVICE HOLE COVER
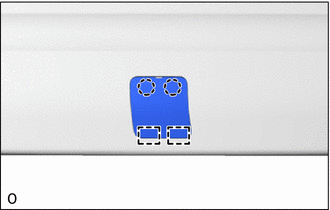
Detach the 2 claws and 2 guides and remove the back door No. 2 service hole cover.
9.REMOVE DOOR CONTROL SWITCH ASSEMBLY (w/ Power Back Door)
10.REMOVE DOOR PULL HANDLE
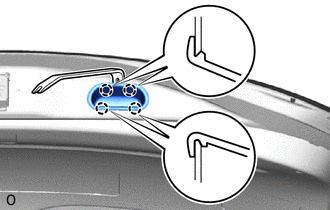
Using a moulding remover, detach the 4 claws as shown in the illustration and remove the door pull handle.
11.REMOVE BACK DOOR LOCK ASSEMBLY
12.REMOVE WIRELESS DOOR LOCK BUZZER
13.REMOVE MULTIPLEX NETWORK DOOR ECU (w/ Power Back Door)
14.REMOVE REAR WIPER ARM COVER
15.REMOVE REAR WIPER ARM AND BLADE ASSEMBLY
16.REMOVE NO. 1 REAR WIPER LINK PIVOT WASHER
17.REMOVE REAR WIPER MOTOR ASSEMBLY
18.REMOVE POWER BACK DOOR SENSOR ASSEMBLY LH (w/ Power Back Door)
19.REMOVE POWER BACK DOOR SENSOR ASSEMBLY RH (w/ Power Back Door)
- HINT:
-
Use the same procedure described for the LH side.
20.REMOVE REAR LIGHT ASSEMBLY LH
21.REMOVE REAR LIGHT ASSEMBLY RH
- HINT:
-
Use the same procedure described for the LH side.
22.REMOVE BACK DOOR GLASS CHANNEL LH
23.REMOVE BACK DOOR GLASS CHANNEL RH
- HINT:
-
Use the same procedure described for the LH side.
24.REMOVE REAR SPOILER
25.REMOVE REAR WASHER NOZZLE SUB-ASSEMBLY
26.REMOVE BACK DOOR OUTSIDE GARNISH SUB-ASSEMBLY
27.REMOVE BACK DOOR OPENER SWITCH ASSEMBLY
28.REMOVE TELEVISION CAMERA ASSEMBLY (w/ Television Camera)
29.REMOVE LICENSE PLATE LIGHT ASSEMBLY LH
30.REMOVE LICENSE PLATE LIGHT ASSEMBLY RH
- HINT:
-
Use the same procedure described for the LH side.
31.REMOVE POWER BACK DOOR UNIT ASSEMBLY SET LH (w/ Power Back Door)
32.REMOVE POWER BACK DOOR UNIT ASSEMBLY SET RH (w/ Power Back Door)
- HINT:
-
Use the same procedure described for the LH side.
33.REMOVE BACK DOOR STAY ASSEMBLY LH (w/o Power Back Door)
34.REMOVE BACK DOOR STAY ASSEMBLY RH (w/o Power Back Door)
- HINT:
-
Use the same procedure described for the LH side.
35.REMOVE BACK DOOR DAMPER STAY UPPER BRACKET LH (w/o Power Back Door)
36.REMOVE BACK DOOR DAMPER STAY UPPER BRACKET RH (w/o Power Back Door)
- HINT:
-
Use the same procedure described for the LH side.
37.REMOVE BACK DOOR DAMPER STAY LOWER BRACKET LH (w/o Power Back Door)
38.REMOVE BACK DOOR DAMPER STAY LOWER BRACKET RH (w/o Power Back Door)
- HINT:
-
Use the same procedure described for the LH side.
39.REMOVE BACK DOOR PANEL CUSHION
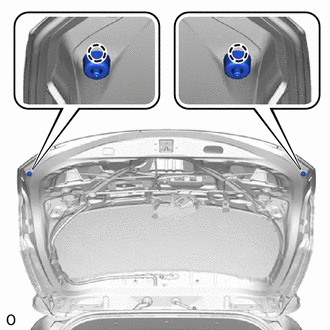
Detach the 2 clips to remove the 2 back door cushions.