EA64 MANUAL TRANSMISSION / TRANSAXLE MANUAL TRANSAXLE ASSEMBLY INSTALLATION
PROCEDURE

 12321A
1.INSTALL REAR ENGINE MOUNTING BRACKET
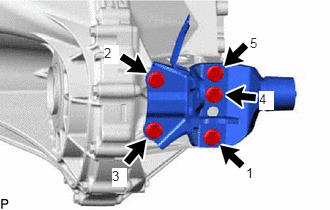
Temporarily install the rear engine mounting bracket with the 5 bolts.
Tighten the 5 bolts of the rear engine mounting bracket in the order shown in the illustration.
- Torque:
- 45 N*m (459 kgf*cm, 33 ft.*lbf)
12311A
2.INSTALL FRONT ENGINE MOUNTING BRACKET
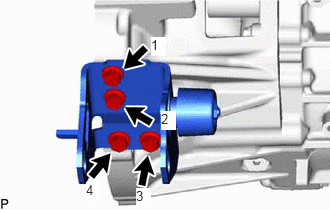
Temporarily install the front engine mounting bracket with the 4 bolts.
Tighten the 4 bolts of the front engine mounting bracket in the order shown in the illustration.
- Torque:
- 64 N*m (653 kgf*cm, 47 ft.*lbf)
12371A
3.INSTALL REAR ENGINE MOUNTING INSULATOR
4.INSTALL MANUAL TRANSAXLE ASSEMBLY
- NOTICE:
- ·
Be extremely careful that the body, clutch pipe line and radiator cooling fan do not interfere with the manual transaxle assembly when installing the manual transaxle assembly.
·When installing the manual transaxle assembly, it is necessary to move the engine assembly and manual transaxle assembly up and down, and back and forth. Therefore, continually confirm that the parts are properly supported and stable while performing this step.
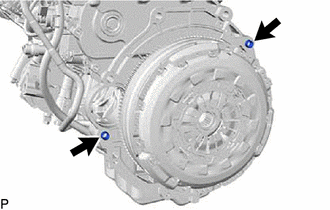
Make sure that the dowel pins are not loose, bent, damage or scratched.
While adjusting the angle of the transmission jack raise the manual transaxle assembly until it is in line with the engine assembly.
- NOTICE:
-
Be careful that the clutch pipe line does not interfere with the manual transaxle assembly.
Adjust the height and angle of the transmission jack, align the input shaft with the clutch disc, and then install the manual transaxle assembly to the engine assembly with the contact surfaces of the engine assembly and manual transaxle assembly flat against each other.
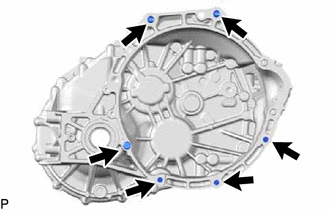
Temporarily install the manual transaxle assembly with the 6 bolts.
- NOTICE:
-
Before tightening the bolts, insert the dowel pins into the dowel holes securely so that the end face of the manual transaxle assembly fits close against the engine assembly.
Apply adhesive to the 4 bolts.
- Adhesive:
Toyota Genuine Adhesive 1324, Three Bond 1324 or equivalent
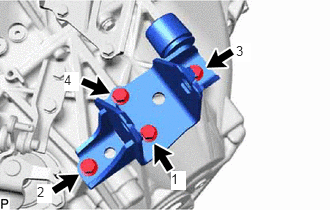
Temporarily install the engine mounting insulator LH with the 4 bolts.
Tighten the 4 bolt of the engine mounting bracket LH in the order shown in the illustration.
- Torque:
- 64 N*m (653 kgf*cm, 47 ft.*lbf)
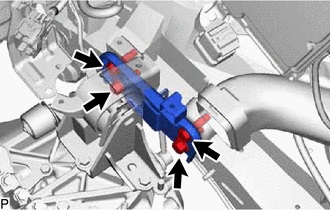
Install the engine mounting insulator LH with the 4 bolts.
- Torque:
- 95 N*m (969 kgf*cm, 70 ft.*lbf)
Slowly raise the engine assembly and transmission assembly using a transmission jack, and then align the installation positions of the engine mounting insulator LH and engine mounting bracket LH.
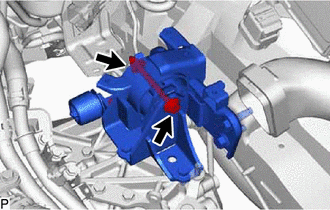
Install the nut and through bolt, and then connect the engine mounting insulator LH to the engine mounting bracket LH.
- Torque:
- 56 N*m (571 kgf*cm, 41 ft.*lbf)
17119
5.TEMPORARILY INSTALL NO. 2 MANIFOLD STAY
Temporarily install the No. 2 manifold stay with the 2 bolts and nut.
28100
6.TEMPORARILY INSTALL STARTER ASSEMBLY
Temporarily install the starter assembly with the 2 bolts.
7.TIGHTEN ENGINE AND TRANSAXLE CONNECTING BOLT
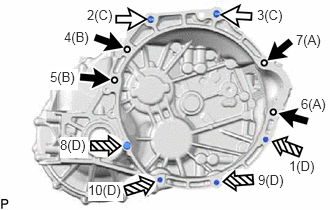

|
E14 "TORX" bolt
Bolt length 100 mm (3.94 in.) |

|
E14 "TORX" bolt
Bolt length 80 mm (3.15 in.) |

|
Hexagon Bolt
Bolt length 40 mm (1.57 in.) |
Tighten the 10 bolts in the sequence shown in the illustration.
- Torque:
- for bolt A : 64 N*m (653 kgf*cm, 47 ft.*lbf)
- for bolt B : 79 N*m (806 kgf*cm, 58 ft.*lbf)
- for bolt C : 64 N*m (653 kgf*cm, 47 ft.*lbf)
- for bolt D : 24 N*m (245 kgf*cm, 18 ft.*lbf)
Tighten the nut of the No. 2 exhaust manifold stay.
- Torque:
- 19 N*m (194 kgf*cm, 14 ft.*lbf)
12361A
8.INSTALL FRONT ENGINE MOUNTING INSULATOR
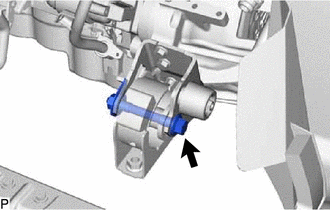
Install the front engine mounting insulator with the through bolt and nut.
- Torque:
- 145 N*m (1479 kgf*cm, 107 ft.*lbf)
57104E
9.INSTALL FRONT CROSSMEMBER SUB-ASSEMBLY
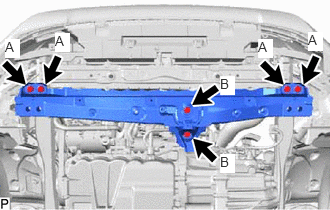
Install the front crossmember sub-assembly with the 6 bolts.
- Torque:
- for bolt A : 99 N*m (1010 kgf*cm, 73 ft.*lbf)
- for bolt B : 95 N*m (969 kgf*cm, 70 ft.*lbf)
Remove the transmission jack.
10.INSTALL FRONT SUSPENSION MEMBER
11.CONNECT WIRE HARNESS
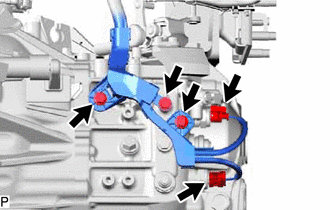
Install the 3 bolts and connect the 2 connectors.
- Torque:
- 19.1 N*m (195 kgf*cm, 14 ft.*lbf)
31470
12.CONNECT CLUTCH RELEASE CYLINDER ASSEMBLY
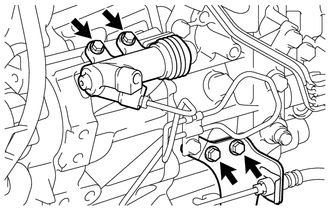
Connect the clutch release cylinder assembly and clutch flexible hose bracket with the 4 bolts.
- Torque:
- 12 N*m (122 kgf*cm, 9 ft.*lbf)
13.CONNECT GROUND CABLE
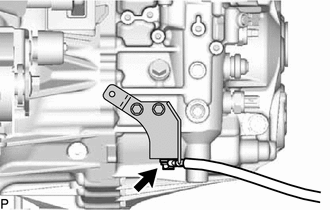
Connect the ground cable with the bolt.
- Torque:
- 8.35 N*m (85 kgf*cm, 74 in.*lbf)
31121
14.INSTALL NO. 1 CLUTCH HOUSING COVER
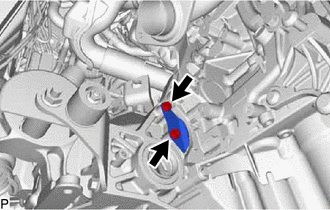
Install the No. 1 clutch housing cover with the 2 bolts.
- Torque:
- 30 N*m (306 kgf*cm, 22 ft.*lbf)
33820B
15.CONNECT TRANSAXLE CONTROL CABLE ASSEMBLY
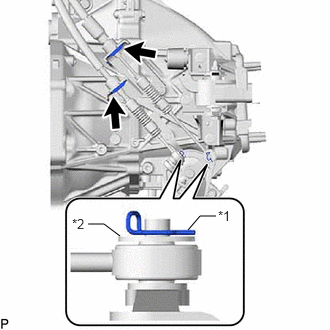
| *1 | Clip |
| *2 | Metal Washer Plate |
Connect the transaxle control cable assembly to the control cable bracket with 2 new clips.
- NOTICE:
-
Do not bend the transaxle control cable assembly more than necessary.
Connect the transaxle control cable assembly to the manual transaxle assembly and install the 2 clips.
- HINT:
-
Make sure that the metal washer plate of the shift cable facing toward the outside of the vehicle.
17360A
16.INSTALL NO. 1 AIR TUBE ASSEMBLY
17342D
17.CONNECT NO. 2 AIR HOSE
18.CONNECT COMPRESSOR OUTLET ELBOW
19.INSTALL NO. 4 WATER BY-PASS HOSE
20.CONNECT ENGINE WIRE
17771A
21.INSTALL AIR CLEANER BRACKET
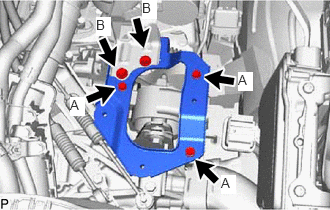
Install the air cleaner bracket with the 5 bolts.
- Torque:
- for bolt A : 7.0 N*m (71 kgf*cm, 62 in.*lbf)
- for bolt B : 17.5 N*m (178 kgf*cm, 13 ft.*lbf)
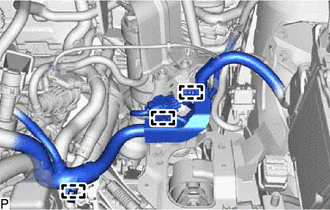
Connect the wire harness with the 3 clamps.
22.INSTALL AIR CLEANER CASE SUB-ASSEMBLY
23.INSTALL AIR CLEANER CAP SUB-ASSEMBLY WITH AIR CLEANER HOSE ASSEMBLY
24.INSTALL DRIVE SHAFT ASSEMBLY
28100
25.INSTALL STARTER ASSEMBLY
26.INSTALL EXHAUST PIPE ASSEMBLY
27.ADD ENGINE COOLANT
28.ADD MANUAL TRANSAXLE OIL
29.INSPECT FOR COOLANT LEAK
30.INSPECT FOR MANUAL TRANSAXLE OIL LEAK
31.CONNECT CABLE TO NEGATIVE BATTERY TERMINAL
- NOTICE:
-
When disconnecting the cable, some systems need to be initialized after the cable is reconnected.
-
Click hereGeneral>INTRODUCTION>REPAIR INSTRUCTION>INITIALIZATION
32.INSPECT FOR EXHAUST GAS LEAK
51444
33.INSTALL REAR ENGINE UNDER COVER LH
51443
34.INSTALL REAR ENGINE UNDER COVER RH
51442
35.INSTALL NO. 2 ENGINE UNDER COVER
51441
36.INSTALL NO. 1 ENGINE UNDER COVER
12612A
37.INSTALL NO. 1 ENGINE COVER