3UR-FE ENGINE MECHANICAL ENGINE UNIT INSTALLATION
PROCEDURE

 19100P
1.INSTALL SPARK PLUG
19500
2.INSTALL IGNITION COIL ASSEMBLY
89615
3.INSTALL KNOCK SENSOR
12215
4.INSTALL CASE SEPARATOR
Install the case separator with the 4 bolts.
- Torque:
- 10 N*m (102 kgf*cm, 7 ft.*lbf)
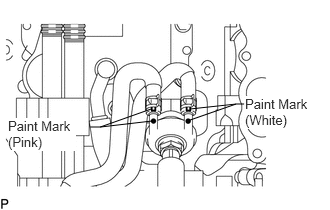
Install the No. 9 water by-pass hose and No. 10 water by-pass hose to the case separator, and slide the 2 clamps to secure the hoses.
- HINT:
-
Make sure that the color on the hose matches the color on the case separator.
82121
5.INSTALL ENGINE WIRE
Connect the 3 clamps and 4 knock sensor connectors.
17363Q
6.INSTALL NO. 3 AIR TUBE
17362
7.INSTALL NO. 2 AIR TUBE
25720
8.INSTALL ELECTRIC AIR CONTROL VALVE ASSEMBLY
16323
9.INSTALL INLET WATER HOUSING
83520
10.INSTALL OIL PRESSURE SENDER GAUGE ASSEMBLY
16603
11.INSTALL NO. 1 IDLER PULLEY SUB-ASSEMBLY
16173
12.INSTALL WATER PUMP PULLEY
16206
13.INSTALL WATER BY-PASS PIPE SUB-ASSEMBLY
17303
14.INSTALL AIR PIPE SUB-ASSEMBLY
12611
15.INSTALL NO. 1 ENGINE COVER
11212
16.INSTALL NO. 2 CYLINDER HEAD COVER
16355
17.INSTALL FRONT WATER BY-PASS JOINT
16261G
18.INSTALL NO. 1 WATER BY-PASS HOSE
16268A
19.INSTALL WATER BY-PASS PIPE HOSE (w/ Oil Cooler)
23901
20.INSTALL FUEL TUBE SUB-ASSEMBLY
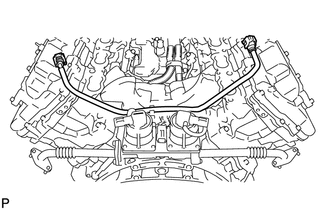
Install the fuel tube.
23902
21.INSTALL NO. 2 FUEL TUBE SUB-ASSEMBLY
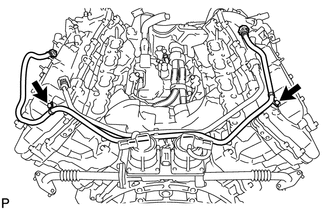
Install the No. 2 fuel tube with the 2 bolts.
- Torque:
- 10 N*m (102 kgf*cm, 7 ft.*lbf)
17111
22.INSTALL INTAKE MANIFOLD
44763A
23.INSTALL NO. 1 HOSE TO HOSE TUBE
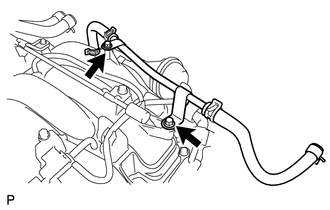
Install the No. 1 tube with the 2 bolts.
- Torque:
- 8.2 N*m (84 kgf*cm, 73 in.*lbf)
12262
24.INSTALL VENTILATION HOSE ASSEMBLY
23808
25.INSTALL NO. 2 FUEL DELIVERY PIPE SUB-ASSEMBLY
23807
26.INSTALL FUEL DELIVERY PIPE SUB-ASSEMBLY
23901
27.CONNECT FUEL TUBE SUB-ASSEMBLY
23902
28.CONNECT NO. 2 FUEL TUBE SUB-ASSEMBLY
12601B
29.INSTALL NO. 1 ENGINE COVER SUB-ASSEMBLY
12613
30.INSTALL NO. 3 ENGINE COVER
12315
31.INSTALL FRONT NO. 1 ENGINE MOUNTING BRACKET LH
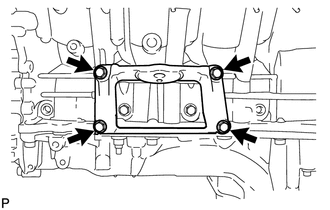
Install the mounting bracket with the 4 bolts.
- Torque:
- 35 N*m (357 kgf*cm, 26 ft.*lbf)
12311
32.INSTALL FRONT NO. 1 ENGINE MOUNTING BRACKET RH
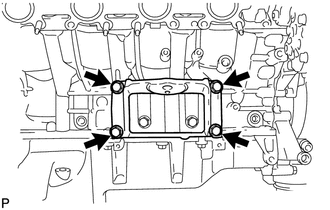
Install the mounting bracket with the 4 bolts.
- Torque:
- 35 N*m (357 kgf*cm, 26 ft.*lbf)
12362A
33.INSTALL FRONT ENGINE MOUNTING INSULATOR LH
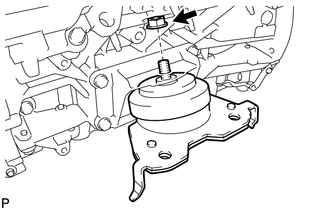
Install the mounting insulator with the nut.
- Torque:
- 72 N*m (734 kgf*cm, 53 ft.*lbf)
12361
34.INSTALL FRONT ENGINE MOUNTING INSULATOR
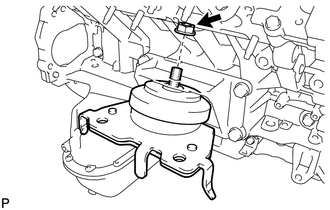
Install the mounting insulator with the nut.
- Torque:
- 72 N*m (734 kgf*cm, 53 ft.*lbf)
11415A
35.INSTALL CYLINDER BLOCK WATER DRAIN COCK PLUG
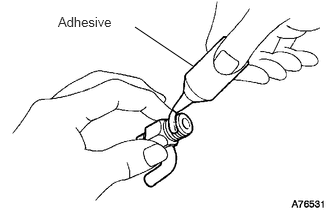
Apply adhesive to 2 or 3 threads of the drain cocks.
- Adhesive:
Toyota Genuine Adhesive 1344, Three Bond 1344 or equivalent
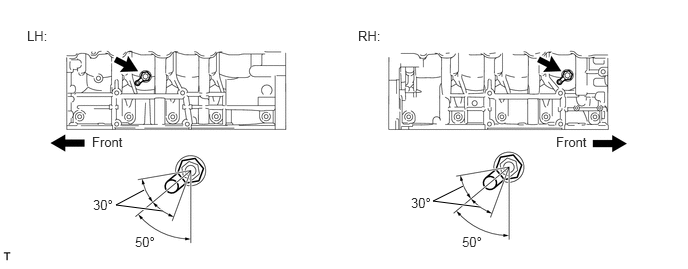
Install the water drain cocks.
- Torque:
- 30 N*m (306 kgf*cm, 22 ft.*lbf)
Further tighten the drain cocks within 360° so that the drain cock pipes are within the range shown in the illustration.
- NOTICE:
- ·
Do not rotate the drain cocks more than 1 revolution (360°) after tightening the drain cocks to the specified torque.
·Do not loosen the drain cocks to adjust them. If an adjustment is necessary, remove the drain cocks and reinstall them.
Install the water drain cock plugs to the water drain cocks.
- Torque:
- 13 N*m (133 kgf*cm, 10 ft.*lbf)
23801P
36.INSTALL NO. 1 FUEL PIPE SUB-ASSEMBLY
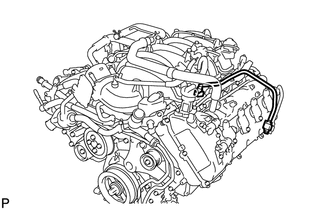
Install the No. 1 fuel pipe (See page Engine / Hybrid System>3UR-FE FUEL>FUEL SYSTEM>PRECAUTION).
37.INSTALL ENGINE WIRE
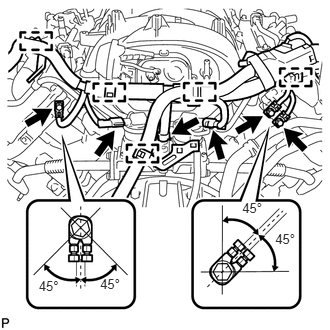
Install the engine wire.
Install the 3 bolts as shown in the illustration.
- Torque:
- 8.5 N*m (87 kgf*cm, 75 in.*lbf)
Connect the 5 clamps.
Connect the 3 connectors.
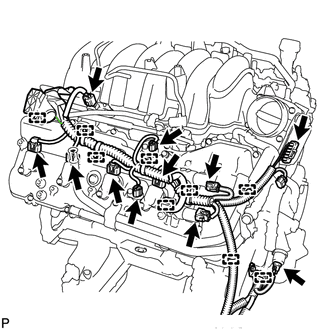
Connect the 9 clamps.
Connect the oil pressure sender gauge connector.
Connect the throttle sensor connector.
Connect the fuel injector connector.
Connect the 2 VVT sensor connectors.
Connect the 4 ignition coil connectors.
Connect the 2 camshaft timing control valve connectors.
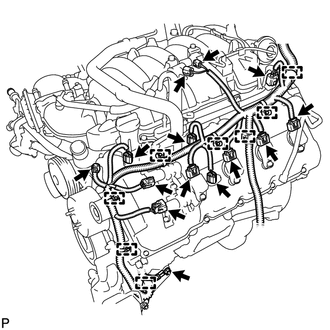
Connect the 8 clamps and install the engine wire with the bolt.
- Torque:
- 20 N*m (204 kgf*cm, 15 ft.*lbf)
Connect the fuel injector connector.
Connect the engine coolant temperature sensor connector.
Connect the purge VSV connector.
Connect the vacuum switching valve connector (for ACIS).
Connect the camshaft position sensor connector.
Connect the 2 VVT sensor connectors.
Connect the 4 ignition coil connectors.
Connect the 2 camshaft timing control valve connector.