HEATING / AIR CONDITIONING ROOM TEMPERATURE SENSOR REMOVAL
CAUTION / NOTICE / HINT
- CAUTION:
- ·
Working on 12 V vehicle electrical system.
Risk of short circuits! Risk of fire!
-Detach battery earth lead from battery.
·
Airbag unit.
Danger! Life-threatening injuries!
-All work on pyrotechnic parts may be carried out by technically experienced and appropriately trained personnel only.
-Replace any damaged part or ones that have been dropped.
-For additional information see: Safety regulations on handling components with gas generators.
Click hereVehicle Interior>SUPPLEMENTAL RESTRAINT SYSTEMS>AIRBAG SYSTEM>PRECAUTION
- NOTICE:
- ·
Electrostatic discharge.
Damage to or destruction of electrical components.
-Leave electrical components in original packaging until just before they are installed. Use the original packaging only for any return shipments. Always package removed components straight away.
-Only touch the housings of electrical components. Do not touch pins or multi-pin connectors directly.
-Antistatic work clothing and antistatic shoes (with ESD symbol).
-For additional information see:
Click hereGeneral>INTRODUCTION>REPAIR INSTRUCTION>PRECAUTION
·Scratches.
Tools and sharp-edged components can cause scratches.
-Protect working area.
-Handle tools and components carefully.
- HINT:
- ·
A wheel alignment is not necessary after the removal, installation or replacement.
·Use the same procedure for LHD and RHD vehicles.
·The procedure listed below is for the LHD vehicles.
PROCEDURE

 1.REMOVE INSTRUMENT PANEL SAFETY PAD ASSEMBLY
53681
2.REMOVE UPPER CENTER FRONT SUSPENSION BRACE
73990
3.REMOVE LOWER NO. 2 INSTRUMENT PANEL AIRBAG ASSEMBLY
73900
4.REMOVE LOWER NO. 1 INSTRUMENT PANEL AIRBAG ASSEMBLY (w/ Passenger Side Knee Airbag)
87211
5.REMOVE NO. 1 AIR DUCT
87211A
6.REMOVE NO. 2 AIR DUCT
7.REMOVE RADIO RECEIVER ASSEMBLY (w/o Navigation System)
8.REMOVE RADIO RECEIVER ASSEMBLY (w/ Navigation System)
55468C
9.REMOVE NO. 1 INSTRUMENT CLUSTER FINISH PANEL SEAL
83108
10.REMOVE METER MIRROR SUB-ASSEMBLY
45250
11.REMOVE STEERING COLUMN ASSEMBLY
55305C
12.REMOVE INSTRUMENT PANEL REINFORCEMENT SUB-ASSEMBLY
88625
13.REMOVE NO. 1 COOLER THERMISTOR
- HINT:
-
Use the same procedure for the RH side and LH side.
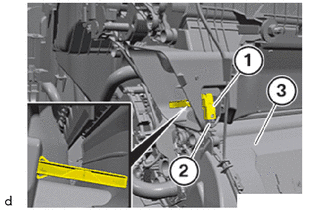
Disconnect the connector (2).
Remove the No. 1 cooler thermistor (1) from the air conditioner unit assembly (3).