SEAT FRONT SEAT ASSEMBLY(for Manual Seat) REASSEMBLY
CAUTION / NOTICE / HINT
- CAUTION:
-
Wear protective gloves. Sharp areas on the parts may injure your hands.
- HINT:
- ·
Use the same procedure for RHD and LHD vehicles.
·The procedure listed below is for LHD vehicles.
·Use the same procedure for the driver side and front passenger side.
·The procedure listed below is for the driver side.
PROCEDURE

 87501
1.INSTALL SEAT HEATER CONTROL SUB-ASSEMBLY
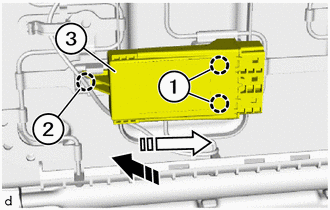

|
Install in this Direction (1) |

|
Install in this Direction (2) |
Attach the guides (1) and guide (2) to install the seat heater control sub-assembly (3) as shown in the illustration.
2.INSTALL BELT WARNING OCCUPANT DETECTION SENSOR (for Front Passenger Side)
w/o Occupant Detection ECU:
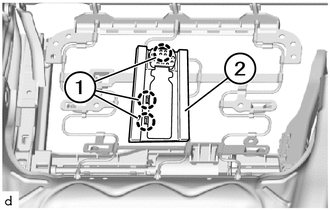
Attach the claws (1) to install the belt warning occupant detection sensor (2).
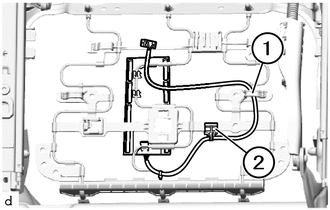
Attach the cable to the holder (1) and clamp (2).
3.INSTALL SEAT POSITION SENSOR MAGNET (w/ Seat Position Airbag Sensor)
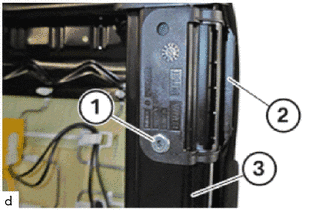
Position the seat position sensor magnet (2) on top of the front seat adjuster assembly (3).
Fasten the rivet (1).
- NOTICE:
- ·
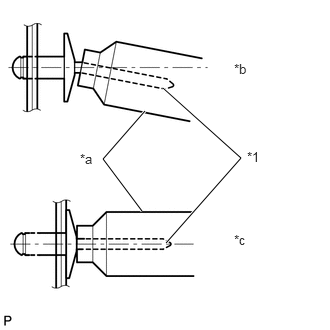 1.479,2.198 1.073,1.656 1.073,1.656 1.51,1.156 true 1.698,0.917 2.51,1.646 2.51,1.646 1.729,2.531 true 0.833,1.573 1.146,1.771 0.313,0.198 10 false *a 2.438,0.635 2.75,0.833 0.313,0.198 10 false *b 2.438,2.417 2.75,2.615 0.313,0.198 10 false *c 2.573,1.552 2.885,1.75 0.313,0.198 10 false *1
*1 Mandrel *a Riveter *b Incorrect *c Correct
Do not pry on the rivet with the riveter, as this will cause damage to the riveter and mandrel.
·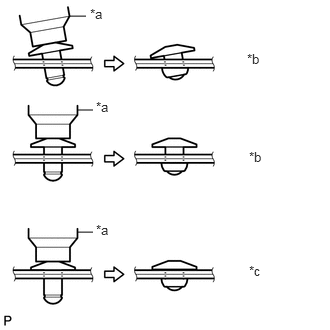 0.729,0.167 0.896,0.167 false 0.802,2.417 0.969,2.417 false 0.802,1.146 0.969,1.146 false 0.938,0.063 1.25,0.26 0.313,0.198 10 false *a 1,1.031 1.313,1.229 0.313,0.198 10 false *a 1,2.313 1.313,2.51 0.313,0.198 10 false *a 2.573,0.531 2.885,0.729 0.313,0.198 10 false *b 2.594,1.552 2.906,1.75 0.313,0.198 10 false *b 2.594,2.74 2.906,2.938 0.313,0.198 10 false *c
*a Riveter *b Incorrect *c Correct
Confirm that the rivet is seated properly against the seat position sensor magnet.
·Do not tilt the riveter when installing the seat position sensor magnet with the rivet.
·Do not leave any space between the rivet head and the seat position sensor magnet.
·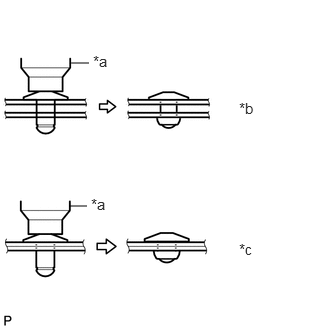 0.719,2.146 0.906,2.146 false 0.74,0.656 0.927,0.656 false 0.969,0.542 1.313,0.76 0.344,0.219 11 false *a 0.948,2.031 1.292,2.25 0.344,0.219 11 false *a 2.49,1.031 2.833,1.25 0.344,0.219 11 false *b 2.49,2.5 2.833,2.719 0.344,0.219 11 false *c
*a Riveter *b Incorrect *c Correct
Do not leave any space between the seat position sensor magnet and front seat adjuster assembly. Firmly hold the seat position sensor magnet and front seat adjuster assembly together while installing the rivet.
- HINT:
-
If the mandrel of the rivet does not come off on the first operation of the rivet gun, slide the rivet gun forward on the mandrel and operate it again.
4.INSTALL NO. 2 SEAT POSITION AIRBAG SENSOR (w/ Seat Position Airbag Sensor)
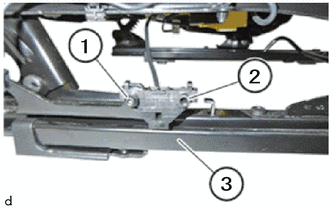
Install the No. 2 seat position airbag sensor (2) to the front seat adjuster assembly (3) from above and position it correctly.
Tighten the bolt (1).
- Torque:
- 1.3 N*m (13 kgf*cm, 12 in.*lbf)
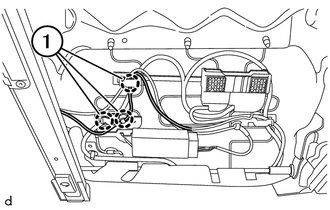
Attach the clamps (1).
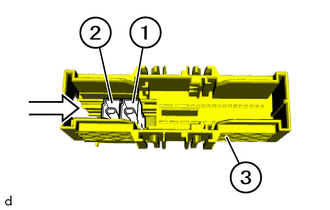

|
Install in this Direction |
Install the connectors correctly into the connector housing (3) in the sequence (1) to (2) in the direction of arrow.
71640S
5.INSTALL SEPARATE TYPE FRONT SEATBACK SPRING ASSEMBLY
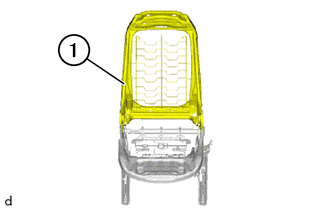
Position the separate type front seatback spring assembly (1) correctly.
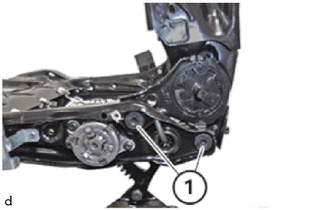
Replace the T50 bolts (1).
Tighten the T50 bolts (1).
- Torque:
- 44 N*m (449 kgf*cm, 32 ft.*lbf)
- HINT:
-
Use the same procedure for the opposite side.
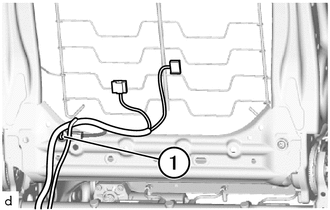
w/ Lumbar Support, w/ Back Side Adjuster:
Attach the clamp (1) to connect the front seat wire.
71071S
6.INSTALL SEPARATE TYPE FRONT SEAT CUSHION COVER
When replacing the front seat cushion heater assembly:
Click hereVehicle Interior>SEAT>FRONT SEAT CUSHION HEATER (for Manual Seat)>INSTALLATION
w/ Occupant Detection ECU:
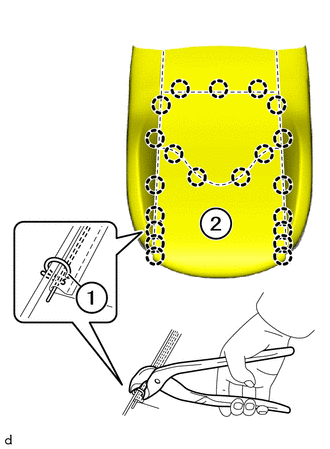
Place the separate type front seat cushion cover (2) correctly on the separate type front seat cushion pad with heater assembly.
- NOTICE:
- ·
The seat occupancy mat is bonded to the entire surface of the separate type front seat cushion pad and can only be replaced together with the separate type front seat cushion pad.
·If the seat occupancy mat or separate type front seat cushion pad is defective, both parts must always be replaced together.
·Full operability can only be guaranteed with the original replacement part.
·After fitting the separate type front seat cushion cover, enable the seat occupancy mat using the diagnosis system.
w/o Occupant Detection ECU:
Place the separate type front seat cushion cover (2) correctly on the separate type front seat cushion pad with heater assembly.
Replace the 21 hog rings (1).
Using hog ring pliers, install the separate type front seat cushion cover (2) to the separate type front seat cushion pad with heater assembly with 21 new hog rings (1).
- NOTICE:
- ·
Be careful not to damage the separate type front seat cushion cover.
·When installing the hog rings, take care to minimize wrinkles as much as possible.
·Align the center of the hog ring installation area of the separate type front seat cushion cover with the center of the separate type front seat cushion pad with heater assembly so that no wrinkles appear, and securely tighten the hog rings as shown in the illustration.
7.INSTALL SEPARATE TYPE FRONT SEAT CUSHION COVER WITH PAD
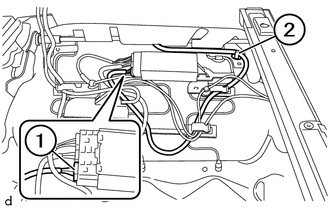
Attach the clamp (2).
Connect the connecter (1).
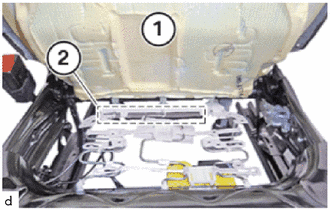
Position the separate type front seat cushion cover with pad (1) as illustrated.
Attach the separate type front seat cushion cover with pad (1) in the marked area (2).
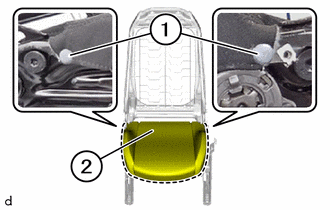
Attach the separate type front seat cushion cover with pad (2) correctly in the marked area.
Install the clips (1).
w/ Occupant Detection ECU:
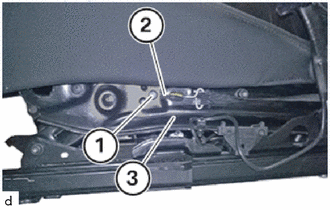
Install the cable (2) to the front seat adjuster assembly (3).
Tighten the screw (1).
- Torque:
- 7.5 N*m (76 kgf*cm, 66 in.*lbf)
71183C
8.INSTALL SEATBACK SIDE SUPPORT ADJUSTER ASSEMBLY (w/ Back Side Support Adjuster)
72760D
9.INSTALL LUMBAR SUPPORT ADJUSTER ASSEMBLY (w/ Lumbar Support)
71931
10.INSTALL FRONT SEAT HEADREST SUPPORT
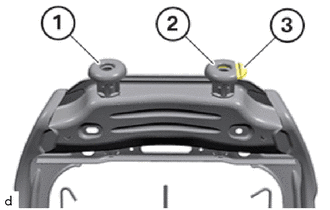
Position the front seat headrest support (2) on the left side of the vehicle.
- HINT:
- ·
The front seat headrest support (1) and (2) are not identical.
·The front seat headrest support (2) is provided with a lock button (3).
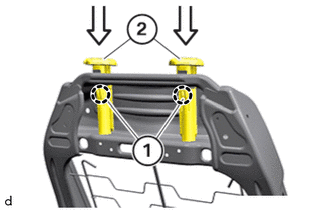
|
|
Install in this Direction |
Attach the claws (1) to install the front seat headrest supports (2).
71579
11.INSTALL FRONT SEATBACK BOARD
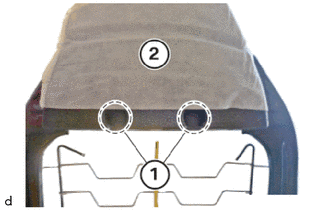
Attach the clips (1) to install the front seatback board (2).
71910A
12.INSTALL FRONT SEAT HEADREST ASSEMBLY
|
|
Install in this Direction |
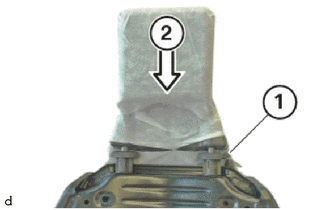
Press the lock button (1) to install the front seat headrest assembly (2) in the direction of the arrow.
71074S
13.INSTALL SEPARATE TYPE FRONT SEATBACK COVER
When replacing the front seatback heater assembly:
Click hereVehicle Interior>SEAT>FRONT SEATBACK HEATER (for Manual Seat)>INSTALLATION
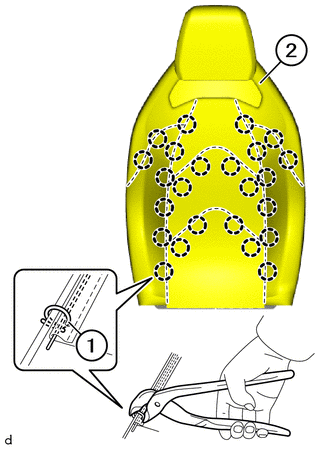
Place the separate type front seatback cover (2) correctly on the separate type front seatback pad with heater assembly.
Replace the 24 hog rings (1).
Using hog ring pliers, install the separate type front seatback cover (2) to the separate type front seatback pad with heater assembly with 24 hog rings (1).
- NOTICE:
- ·
Be careful not to damage the separate type front seatback cover.
·When installing the hog rings, take care to minimize wrinkles as much as possible.
·Align the center of the hog ring installation area of the separate type front seatback cover with the center of the separate type front seatback pad with heater assembly so that no wrinkles appear, and securely tighten the hog rings as shown in the illustration.
71842
14.INSTALL FRONT SEATBACK GARNISH
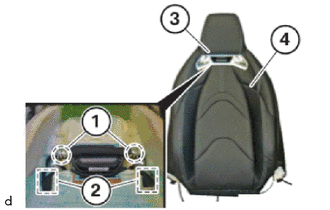
Attach the guides (2).
Attach the claws (1) to install the front seatback garnish (3) to the separate type front seatback cover with pad (4).
15.INSTALL SEPARATE TYPE FRONT SEATBACK COVER WITH PAD
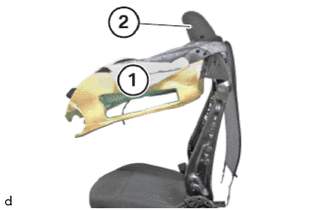
Install the separate type front seatback cover with pad (1) correctly over the front seat headrest assembly (2).
- NOTICE:
-
Handle the separate type front seatback cover with pad (1) carefully to prevent damage.
Install the separate type front seatback cover with pad (1) correctly.
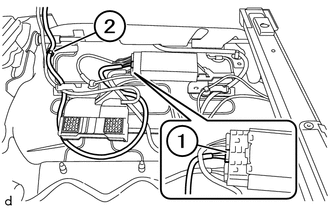
Attach the clamp (2).
Connect the connector (1).
73920A
16.INSTALL FRONT SEAT AIRBAG ASSEMBLY
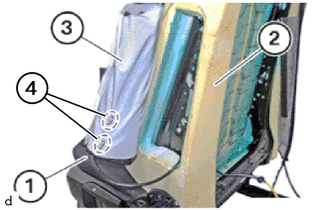
Install the front seat airbag assembly (1) carefully into the pocket of separate type front seatback cover (3).
- NOTICE:
-
Make sure that the stud bolts (4) do not damage the pocket in the separate type front seatback cover.
Position the front seat airbag assembly (1) correctly in the separate type front seatback pad (2).
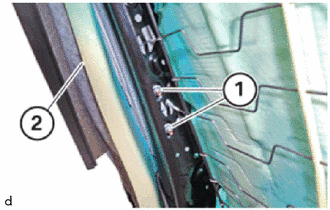
Position the separate type front seatback cover with pad (2) correctly.
Replace the nuts (1).
Tighten the nuts (1).
- Torque:
- 6.5 N*m (66 kgf*cm, 58 in.*lbf)
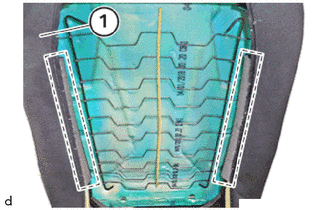
Attach the separate type front seatback cover with pad (1) correctly in the marked area.
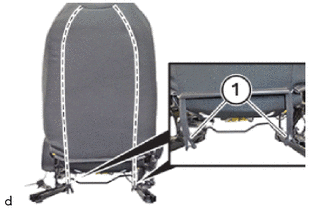
Using a special tool 0 490 472 (00 5 020), close the fasteners (1) in the marked area.
- SST
- 09300-WA180
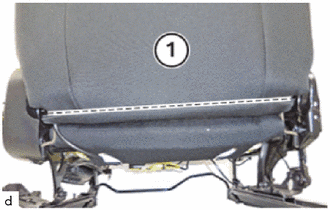
Attach the separate type front seatback cover (1) correctly in the marked area.
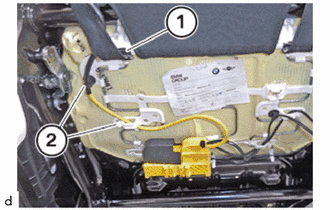
Attach the clamps (2).
Attach the separate type front seat cushion cover (1).
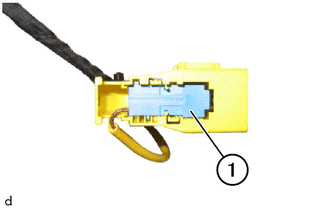
Connect the connector (1) to the connector housing.
73706A
17.INSTALL CHILD RESTRAINT SEAT ANCHOR BRACKET (w/ Bracket)
84920P
18.INSTALL FRONT LUMBAR SUPPORT POWER SEAT SWITCH (w/ Lumbar Support)
84920N
19.INSTALL FRONT SEATBACK SUPPORT POWER SEAT SWITCH (w/ Back Side Support Adjuster)
71812D
20.INSTALL FRONT SEAT CUSHION SHIELD
w/ Lumbar Support:
Connect the connector.
w/ Back Side Support Adjuster:
Connect the connector.
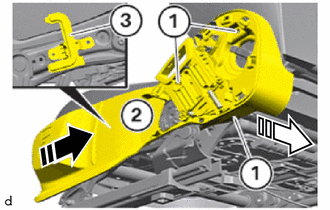
|
|
Install in this Direction (1) |
|
|
Install in this Direction (2) |
Install the front seat cushion shield (2) to the No. 2 front seat side shield bracket (3) correctly in the direction of the arrow.
Tighten the T20 screws (1).
- Torque:
- 1.5 N*m (15 kgf*cm, 13 in.*lbf)
72495
21.INSTALL VERTICAL ADJUSTING HANDLE
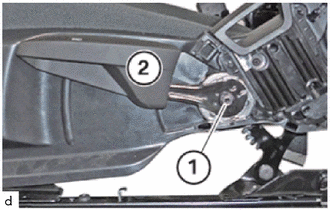
Position the vertical adjusting handle (2) correctly.
Tighten the T45 screw (1).
- Torque:
- 19.5 N*m (199 kgf*cm, 14 ft.*lbf)
22.INSTALL NO. 2 RECLINING ADJUSTER RELEASE ARM
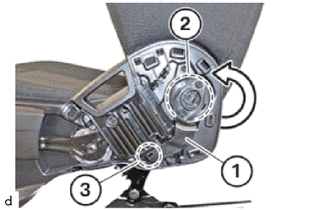
|
|
Raise in this Direction |
Attach the guide (3).
Raise the No. 2 reclining adjuster release arm (1) carefully in the direction of the arrow.
Attach the No. 2 reclining adjuster release arm (1) in the marked area (2) carefully.
71822
23.INSTALL FRONT SEAT SIDE SHIELD
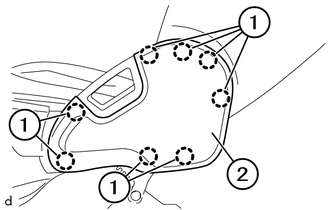
Attach the claws (1) to install the front seat side shield (2).
71862
24.INSTALL FRONT SEAT CUSHION INNER SHIELD
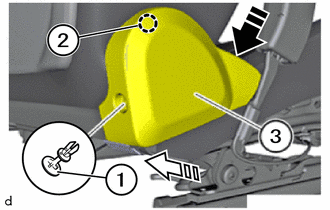
|
|
Install in this Direction (1) |
|
|
Install in this Direction (2) |
Attach the guide to install the front seat cushion inner shield (2) in the direction of the arrow.
Install the clip (1).
72044B
25.INSTALL SEAT LIFTER LEVER SUB-ASSEMBLY (w/ Back Side Support Adjuster)
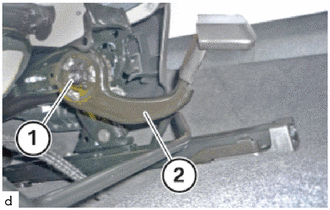
Install the seat lifter lever sub-assembly (2).
Tighten the screw (1).
- Torque:
- 19.5 N*m (199 kgf*cm, 14 ft.*lbf)
73240
26.INSTALL FRONT SEAT INNER BELT ASSEMBLY
89952
27.INSTALL OCCUPANT DETECTION ECU (w/ Occupant Detection ECU)