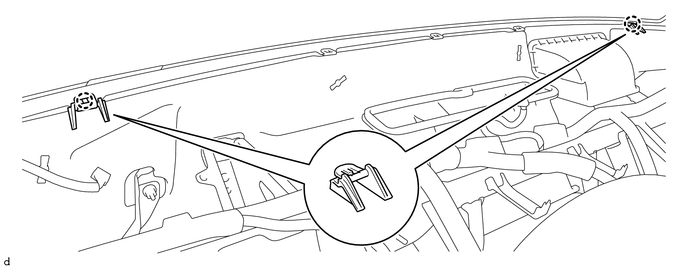
INTERIOR PANEL INSTRUMENT PANEL SAFETY PAD(for Column Shift Type) REMOVAL
PROCEDURE

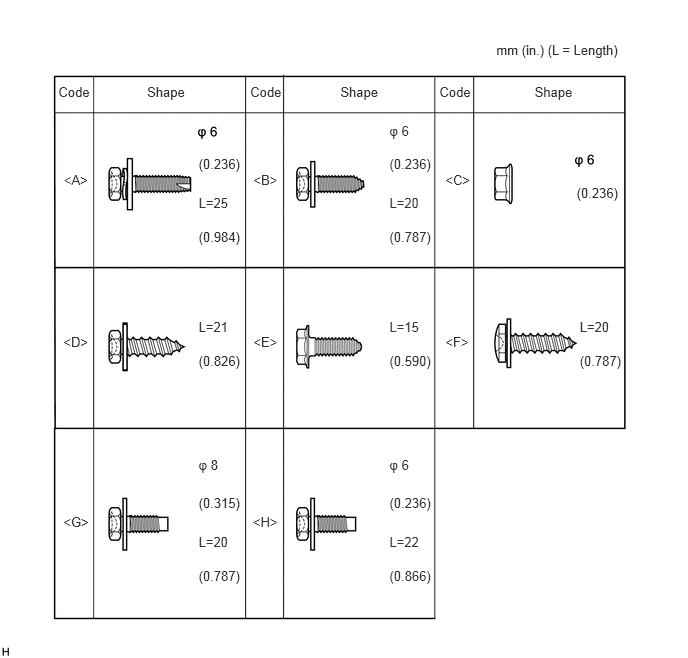
 1. TABLE OF BOLT, SCREW AND NUT
- HINT:
-
All bolts, screws and nuts relevant to installing and removing the instrument panel are shown along with their alphabet code below.
2. PRECAUTION
- NOTICE:
-
After turning the ignition switch off, waiting time may be required before disconnecting the cable from the battery terminal. Therefore, make sure to read the disconnecting the cable from the battery terminal notice before proceeding with work (See page General>INTRODUCTION>REPAIR INSTRUCTION>PRECAUTION).
3.DISCONNECT CABLE FROM NEGATIVE BATTERY TERMINAL
Disconnect the cable from the negative (-) battery terminal.
- CAUTION:
-
Wait at least 90 seconds after disconnecting the cable from the negative (-) battery terminal to disable the SRS system.
- NOTICE:
-
When disconnecting the cable, some systems need to be initialized after the cable is reconnected (See page General>INTRODUCTION>REPAIR INSTRUCTION>INITIALIZATION).
55061
4.REMOVE NO. 1 INSTRUMENT PANEL REGISTER SUB-ASSEMBLY
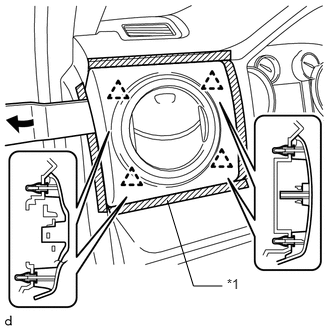
Apply protective tape as shown in the illustration.
| *1 | Protective Tape |
Using a moulding remover B, detach the 4 clips and remove the No. 1 instrument panel register sub-assembly.
55318C
5.REMOVE INSTRUMENT SIDE PANEL LH
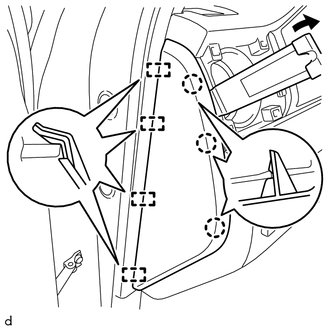
Using a moulding remover B, detach the 3 claws, 4 guides and remove the instrument side panel LH.
55479B
6.REMOVE LOWER CENTER INSTRUMENT COVER
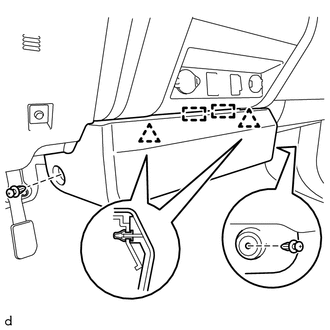
Remove the 2 clips.
Detach the 2 clips, 2 guides and remove the lower center instrument cover.
67914
7.REMOVE FRONT DOOR SCUFF PLATE LH
for Double Cab:
(See page Vehicle Interior>INTERIOR>ROOF HEADLINING(for Double Cab)>REMOVAL)
for CrewMax:
(See page Vehicle Interior>INTERIOR>ROOF HEADLINING(for CrewMax)>REMOVAL)
for Regular Cab:
(See page Vehicle Interior>INTERIOR>ROOF HEADLINING(for Regular Cab)>REMOVAL)
62112
8.REMOVE COWL SIDE TRIM BOARD LH
67913
9.REMOVE FRONT DOOR SCUFF PLATE RH
- HINT:
-
Use the same procedure described for the LH side.
62111C
10.REMOVE COWL SIDE TRIM BOARD RH
- HINT:
-
Use the same procedure described for the LH side.
55046A
11.REMOVE LOWER INSTRUMENT PANEL FINISH PANEL SUB-ASSEMBLY LH
Operate the tilt lever to fully extend and raise the steering column.
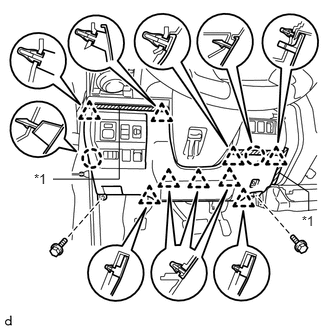
Apply protective tape as shown in the illustration.
| *1 | Protective Tape |
Remove the 2 bolts <A>.
Detach the 9 clips, 2 claws and remove the lower instrument panel finish panel sub-assembly LH.
Disconnect each connector.
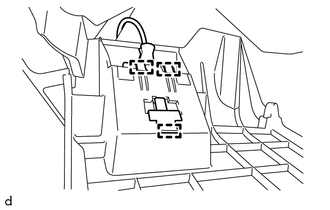
Detach the 3 hooks and disconnect the hood lock control lever from the lower instrument panel finish panel sub-assembly LH.
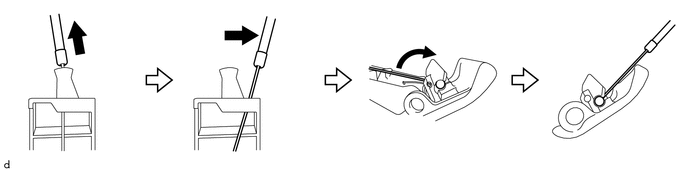
Pull and slide the hood lock control cable, rotate the hood lock control cable, and then disconnect the hood lock control cable from the hood lock control lever.
73900
12.REMOVE LOWER NO. 1 INSTRUMENT PANEL AIRBAG ASSEMBLY
55474C
13.REMOVE NO. 1 INSTRUMENT CLUSTER FINISH PANEL GARNISH
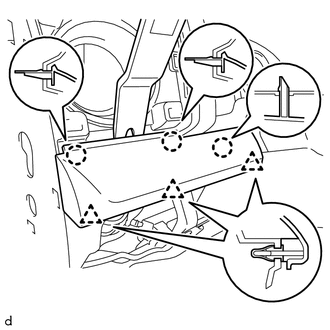
Using a moulding remover B, detach the 3 claws, 3 clips and remove the No. 1 instrument cluster finish panel garnish.
45287
14.REMOVE LOWER STEERING COLUMN COVER
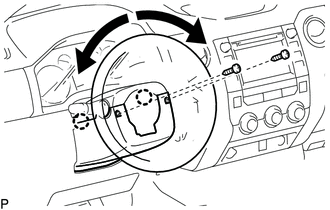
While turning the steering wheel assembly to the right and left, remove the 2 screws.
Detach the 2 claws and remove the lower steering column cover.
45286B
15.REMOVE UPPER STEERING COLUMN COVER
55447C
16.REMOVE NO. 2 SWITCH HOLE BASE
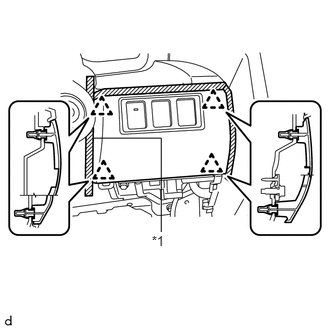
Apply protective tape as shown in the illustration.
| *1 | Protective Tape |
Detach the 4 clips and remove the No. 2 switch hole base.
Disconnect each connector.
55471A
17.REMOVE INSTRUMENT CLUSTER FINISH PANEL ORNAMENT
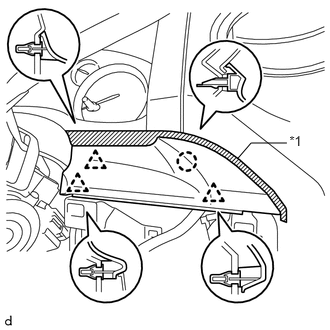
Apply protective tape as shown in the illustration.
| *1 | Protective Tape |
Detach the 3 clips, claw and remove the instrument cluster finish panel ornament.
55410C
18.REMOVE INSTRUMENT CLUSTER FINISH PANEL ASSEMBLY
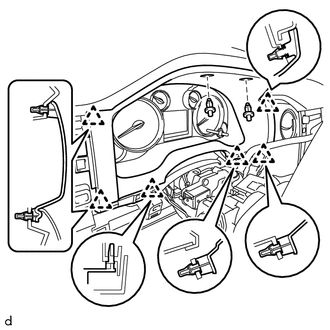
Remove the 2 clips.
Detach the 6 clips and remove the instrument cluster finish panel assembly.
83100
19.REMOVE COMBINATION METER ASSEMBLY
55607
20.REMOVE NO. 2 INSTRUMENT PANEL UNDER COVER SUB-ASSEMBLY
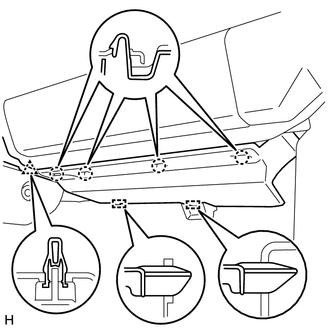
Detach the clip, 4 claws and 2 guides and remove the No. 2 instrument panel under cover sub-assembly.
55312
21.REMOVE LOWER INSTRUMENT PANEL
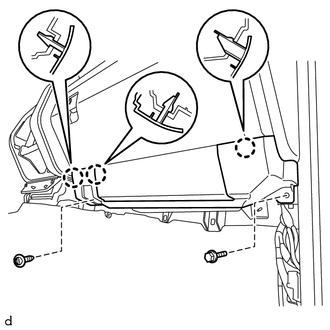
Remove the screw <D> and bolt <A>.
Detach the 3 claws and remove the lower instrument panel.
73990
22.REMOVE LOWER NO. 2 INSTRUMENT PANEL AIRBAG ASSEMBLY
55064A
23.REMOVE NO. 4 INSTRUMENT REGISTER SUB-ASSEMBLY
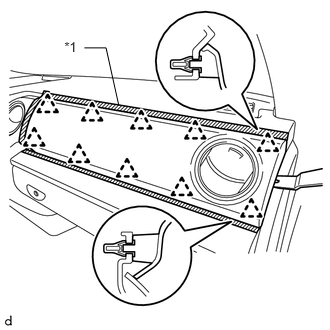
Apply protective tape as shown in the illustration.
| *1 | Protective Tape |
Using a moulding remover B, detach the 10 clips and remove the No. 4 instrument register sub-assembly.
55317A
24.REMOVE INSTRUMENT SIDE PANEL RH
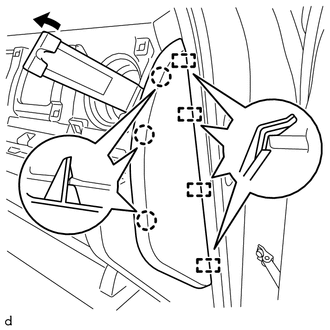
Using a moulding remover B, detach the 3 claws, 4 guides and remove the instrument side panel RH.
55045A
25.REMOVE LOWER INSTRUMENT PANEL FINISH PANEL SUB-ASSEMBLY RH
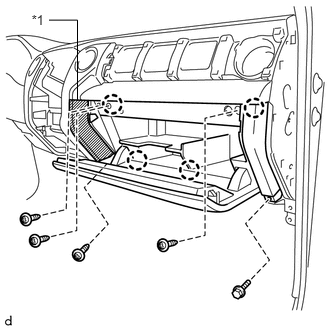
Apply protective tape as shown in the illustration.
| *1 | Protective Tape |
Remove the bolt <A> and 4 screws <F>.
Detach the 4 claws and remove the lower instrument panel finish panel sub-assembly RH.
55475A
26.REMOVE NO. 2 INSTRUMENT CLUSTER FINISH PANEL GARNISH
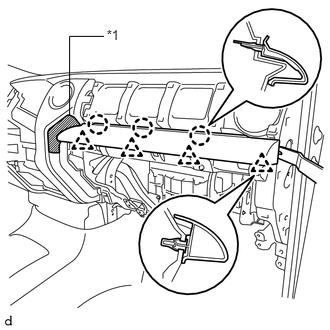
Apply protective tape as shown in the illustration.
| *1 | Protective Tape |
Using a moulding remover B, detach the 4 clips, 3 claws and remove the No. 2 instrument cluster finish panel garnish.
27.REMOVE LOWER CENTER INSTRUMENT PANEL FINISH PANEL WITH AIR CONDITIONING CONTROL ASSEMBLY
Apply protective tape as shown in the illustration.
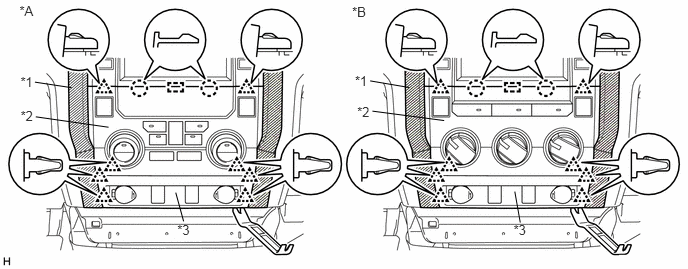
| *A | for Automatic Air Conditioning System | *B | for Manual Air Conditioning System |
| *1 | Protective Tape | *2 | Air Conditioning Control Assembly |
| *3 | Lower Center Instrument Panel Finish Panel | - | - |
Using moulding remover B, detach the 8 clips, 2 claws and guide and remove the lower center instrument panel finish panel together with the air conditioning control assembly.
Disconnect each connector.
86140A
28.REMOVE RADIO AND DISPLAY RECEIVER ASSEMBLY WITH BRACKET
55405B
29.REMOVE CENTER INSTRUMENT CLUSTER FINISH PANEL SUB-ASSEMBLY
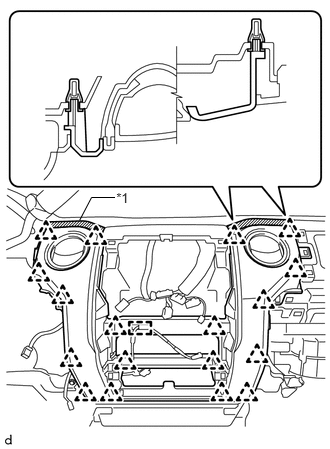
Apply protective tape as shown in the illustration.
| *1 | Protective Tape |
Detach the wire harness clamp and 18 clips and remove the center instrument cluster finish panel sub-assembly.
for 4WD:
Disconnect the connector.
62312B
30.REMOVE FRONT DOOR OPENING TRIM WEATHERSTRIP LH
for Double Cab:
(See page Vehicle Interior>INTERIOR>ROOF HEADLINING(for Double Cab)>REMOVAL)
for CrewMax:
(See page Vehicle Interior>INTERIOR>ROOF HEADLINING(for CrewMax)>REMOVAL)
for Regular Cab:
(See page Vehicle Interior>INTERIOR>ROOF HEADLINING(for Regular Cab)>REMOVAL)
62212
31.REMOVE FRONT PILLAR GARNISH LH
62311B
32.REMOVE FRONT DOOR OPENING TRIM WEATHERSTRIP RH
- HINT:
-
Use the same procedure described for the LH side.
62211
33.REMOVE FRONT PILLAR GARNISH RH
55409A
34.REMOVE INSTRUMENT PANEL SPEAKER PANEL SUB-ASSEMBLY
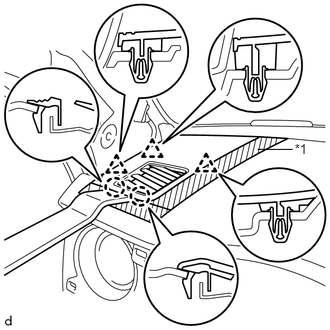
Apply protective tape as shown in the illustration.
| *1 | Protective Tape |
Using a moulding remover B, detach the 2 claws, 3 clips and remove the instrument panel speaker panel sub-assembly.
86160P
35.REMOVE FRONT NO. 2 SPEAKER ASSEMBLY LH
55409F
36.REMOVE NO. 2 INSTRUMENT PANEL SPEAKER PANEL SUB-ASSEMBLY
- HINT:
-
Use the same procedure described for the instrument panel speaker panel sub-assembly.
86160
37.REMOVE FRONT NO. 2 SPEAKER ASSEMBLY RH
55301
38.REMOVE INSTRUMENT PANEL SUB-ASSEMBLY
Operate the tilt lever to fully extend and lower the steering column.
Disconnect each connector and each wire harness clamp.
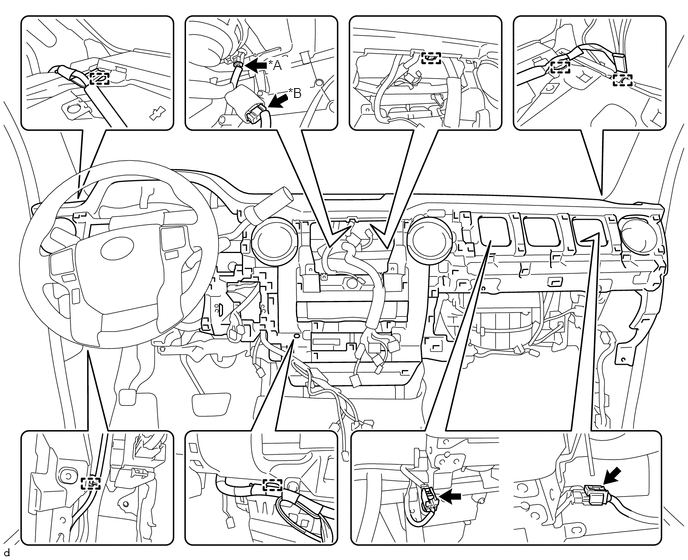
| *A | w/ Automatic Light Control System | *B | w/ Front Center Speaker |
Apply protective tape as shown in the illustration.
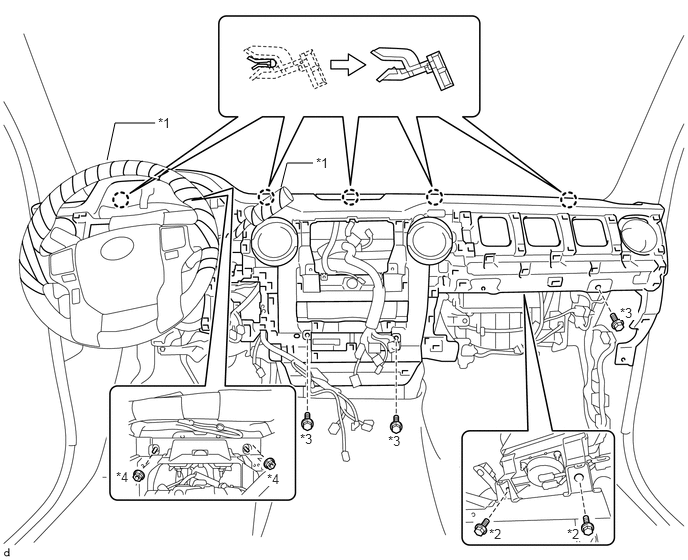
| *1 | Protective Tape | *2 | Bolt <G> |
| *3 | Bolt <B> | *4 | Nut <C> |
Remove the 2 bolts <G>.
Remove the 3 bolts <B> and 2 nuts <C>.
Detach the 5 claws and remove the instrument panel sub-assembly.
55328A
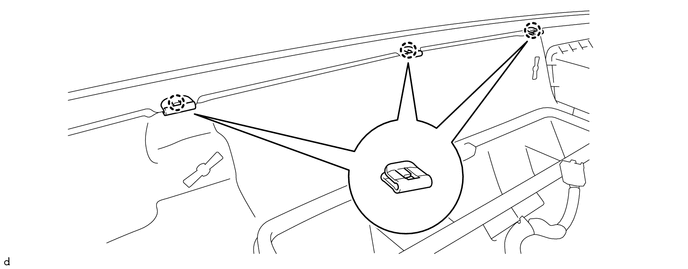
39.REMOVE NO. 3 INSTRUMENT PANEL STAY
Detach the 3 claws and remove the 3 No. 3 instrument panel stays.
55345A
40.REMOVE NO. 1 INSTRUMENT PANEL CLIP
Detach the 2 claws and remove the 2 No. 1 instrument panel clips.