FA20 ENGINE MECHANICAL CAMSHAFT REMOVAL
PROCEDURE

 1.INSTALL ENGINE STAND
2.REMOVE ENGINE HANGER
27029
3.REMOVE GENERATOR COVER
27029A
4.REMOVE BELT GENERATOR COVER
16361A
5.REMOVE FAN AND GENERATOR V BELT
27020
6.REMOVE GENERATOR ASSEMBLY
11452
7.REMOVE OIL LEVEL DIPSTICK GUIDE
16604
8.REMOVE NO. 2 IDLER PULLEY SUB-ASSEMBLY
16620
9.REMOVE V-RIBBED BELT TENSIONER ASSEMBLY
23261A
10.REMOVE INJECTOR COVER (for Bank 2)
23261A
11.REMOVE INJECTOR COVER (for Bank 1)
23807
12.REMOVE FUEL DELIVERY PIPE SUB-ASSEMBLY
12261
13.SEPARATE VENTILATION HOSE
17111
14.REMOVE INTAKE MANIFOLD
23815
15.REMOVE NO. 2 FUEL DELIVERY PIPE
23100X
16.REMOVE FUEL PUMP ASSEMBLY
13751A
17.REMOVE VALVE LIFTER
11104E
18.REMOVE PUMP DRIVE CASE ASSEMBLY
29300
19.REMOVE VACUUM PUMP ASSEMBLY (for Automatic Transmission)
11181
20.REMOVE REAR CYLINDER HEAD PLATE (for Manual Transmission)
16268
21.REMOVE NO. 1 WATER BY-PASS PIPE (for Automatic Transmission)
16268
22.REMOVE NO. 1 WATER BY-PASS PIPE (for Manual Transmission)
13471
23.REMOVE CRANKSHAFT PULLEY
11302A
24.REMOVE TIMING CHAIN OR BELT COVER OIL SEAL
25.DISCONNECT ENGINE WIRE
11302
26.REMOVE TIMING CHAIN OR BELT COVER SUB-ASSEMBLY
13506
27.REMOVE CHAIN SUB-ASSEMBLY (for Bank 1)
13506
28.REMOVE CHAIN SUB-ASSEMBLY (for Bank 2)
29. ROTATE CRANKSHAFT AND CAMSHAFT
Temporarily install the crankshaft pulley spacer and crankshaft pulley.
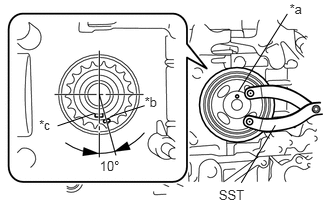
Using SST, turn the crankshaft about 200 degrees counterclockwise until the crankshaft pulley pin hole is aligned at the position shown in the illustration.
- SST
- 09960-10010 (09962-01000, 09963-01000)
| *a | Crankshaft Pulley Pin Hole |
| *b | Alignment Mark |
| *c | Crankshaft Timing Gear Key |
- NOTICE:
-
Do not turn the crankshaft counterclockwise except for a slight adjustment to correctly align the alignment mark. If not, the valves may come into contact with the piston.
- HINT:
-
At this time, the alignment mark on the crankshaft timing gear or sprocket and the crankshaft timing gear key are at the positions shown in the illustration.
Remove the crankshaft pulley and crankshaft pulley spacer.
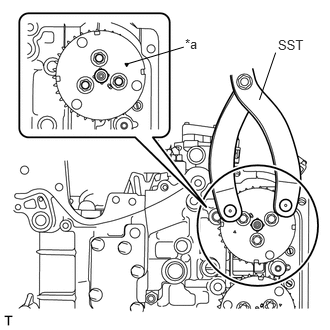
Using SST, turn the camshaft timing intake gear assembly LH approximately 180°clockwise, and align the alignment mark on the camshaft timing intake gear assembly LH to the position (zero-lift position) shown in the illustration.
| *a | Alignment Mark |
- SST
- 09960-10010 (09962-01000, 09963-00700)
- NOTICE:
-
After this work, when the intake valve and exhaust valve lift at the same time, the valve heads contact each other, causing the valve stems to bend. To avoid this, do not turn the intake camshaft LH and the exhaust camshaft LH more than the zero-lift range (the range where the camshafts can be turned lightly by hand).
13050B
30.REMOVE CAMSHAFT TIMING INTAKE GEAR ASSEMBLY RH
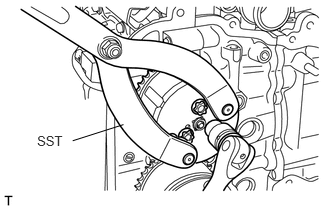
Using SST, hold the camshaft timing intake gear assembly RH and remove the 3 bolts with a "TORX" socket wrench E16.
- SST
- 09960-10010 (09962-01000, 09963-00700)
Remove the camshaft timing intake gear assembly RH.
13070
31.REMOVE CAMSHAFT TIMING EXHAUST GEAR ASSEMBLY RH
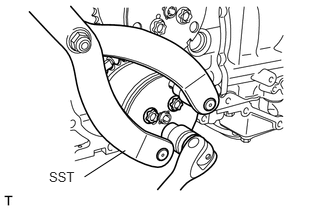
Using SST, hold the camshaft timing exhaust gear assembly RH and remove the 3 bolts with a "TORX" socket wrench E16.
- SST
- 09960-10010 (09962-01000, 09963-00700)
Remove the camshaft timing exhaust gear assembly RH.
13060B
32.REMOVE CAMSHAFT TIMING INTAKE GEAR ASSEMBLY LH
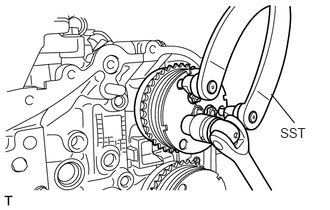
Using SST, hold the camshaft timing intake gear assembly LH and remove the 3 bolts with a "TORX" socket wrench E16.
- SST
- 09960-10010 (09962-01000, 09963-00700)
Remove the camshaft timing intake gear assembly LH.
13080
33.REMOVE CAMSHAFT TIMING EXHAUST GEAR ASSEMBLY LH
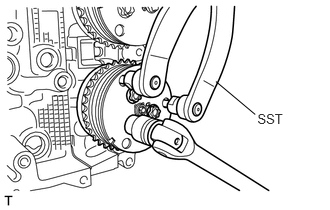
Using SST, hold the camshaft timing exhaust gear assembly LH and remove the 3 bolts with a "TORX" socket wrench E16.
- SST
- 09960-10010 (09962-01000, 09963-00700)
Remove the camshaft timing exhaust gear assembly LH.
19500
34.REMOVE IGNITION COIL ASSEMBLY (for Bank 2)
19100P
35.REMOVE SPARK PLUG (for Bank 2)
19500
36.REMOVE IGNITION COIL ASSEMBLY (for Bank 1)
19100P
37.REMOVE SPARK PLUG (for Bank 1)
89879
38.REMOVE INJECTOR DRIVER BRACKET
11201
39.REMOVE CYLINDER HEAD COVER SUB-ASSEMBLY RH
11103C
40.REMOVE CAMSHAFT HOUSING SUB-ASSEMBLY RH
11202
41.REMOVE CYLINDER HEAD COVER SUB-ASSEMBLY LH
11104A
42.REMOVE CAMSHAFT HOUSING SUB-ASSEMBLY LH
43.REMOVE CAMSHAFT CAP (for Bank 1)
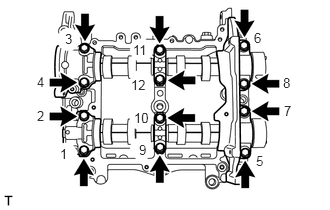
In several steps, uniformly loosen the 12 bolts in the order shown in the illustration, and remove the front camshaft cap RH, intake center camshaft cap RH, intake rear camshaft cap RH, exhaust center camshaft cap RH, and exhaust rear camshaft cap RH.
- HINT:
-
Arrange the removed parts in the correct order.
13511C
44.REMOVE CAMSHAFT RH (for Bank 1)
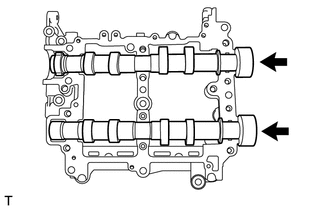
Remove the intake camshaft RH and exhaust camshaft RH from the camshaft housing sub-assembly RH.
45.REMOVE CAMSHAFT CAP (for Bank 2)
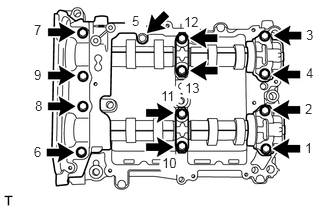
In several steps, uniformly loosen the 13 bolts in the order shown in the illustration, and remove the front camshaft cap LH, intake center camshaft cap LH, intake rear camshaft cap LH, exhaust center camshaft cap LH and exhaust rear camshaft cap LH.
- HINT:
-
Arrange the removed parts in the correct order.
13513
46.REMOVE CAMSHAFT LH (for Bank 2)
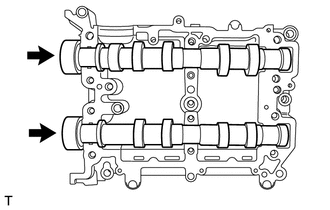
Remove the intake camshaft LH and exhaust camshaft LH from the camshaft housing sub-assembly LH.