2GR-FE LUBRICATION OIL PUMP INSTALLATION
PROCEDURE

 11301C
1.INSTALL TIMING CHAIN CASE OIL SEAL
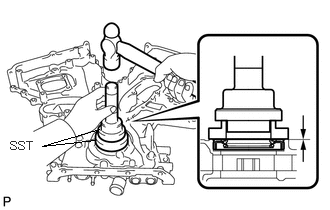
Using SST, tap in a new oil seal until its surface is flush with the timing chain case edge.
- SST
- 09223-22010
09506-35010
- NOTICE:
- ·
Keep the lip free from foreign matter.
·Do not tap on the oil seal at an angle.
·Make sure that the oil seal edge does not stick out of the timing chain case.
- HINT:
-
Tap in the oil seal so that it is positioned within 1.0 mm from the edge of the timing chain case.
Apply a light coat of MP grease to the timing chain cover oil seal lip.
11324
2.INSTALL TIMING CHAIN COVER SUB-ASSEMBLY
Apply seal packing in a continuous line to the engine unit as shown in the following illustration.
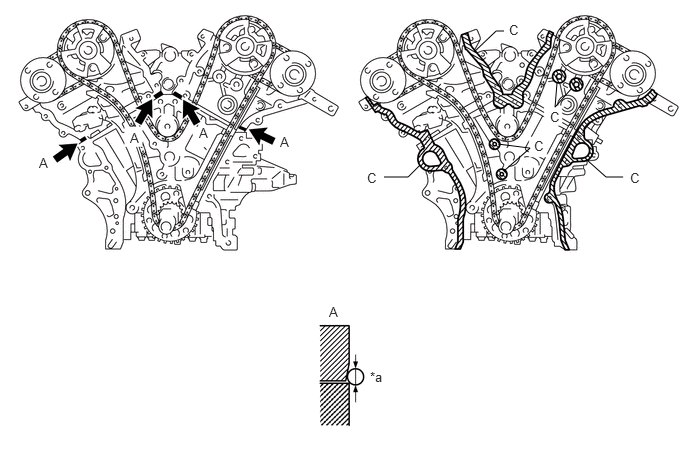
| *a | Seal Diameter: 3.0 mm or more | - | - |

|
Seal Packing | - | - |
- Seal packing:
Toyota Genuine Seal Packing Black, Three Bond 1207B or equivalent
- Seal diameter:
3.0 mm (0.118 in.)
- NOTICE:
- ·
Be sure to clean and degrease the contact surfaces, especially the surfaces indicated by C in the illustration.
·If there is oil on the contact surfaces, wipe them with an oil-free cloth before applying seal packing.
·Install the chain cover within 3 minutes.
·Do not start the engine for at least 2 hours after installing.
Apply seal packing in a continuous line to the timing chain cover as shown in the following illustration.
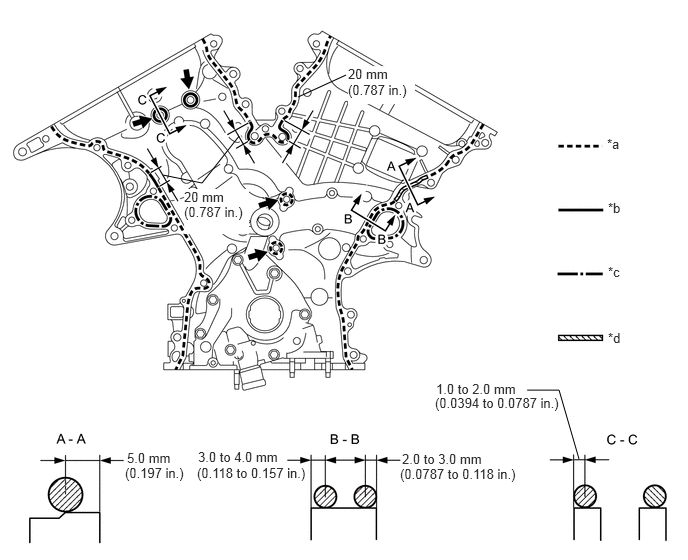
| *a | Dashed line area
(Seal packing: Toyota Genuine Seal Packing Black, Three Bond 1207B or equivalent) |
*b | Continuous line area
(Seal packing: Toyota Genuine Seal Packing Black, Three Bond 1207B or equivalent) |
| *c | Alternate long and short dashed line area
(Seal packing: Toyota Genuine Seal Packing 1282B, Three Bond 1282B or equivalent) |
*d | Diagonal line area
(Seal packing: Toyota Genuine Seal Packing Black, Three Bond 1207B or equivalent) |
|
|
Be sure to apply seal packing | - | - |
- Seal packing:
Toyota Genuine Seal Packing Black, Three Bond 1207B or equivalent
Toyota Genuine Seal Packing 1282B, Three Bond 1282B or equivalent
- NOTICE:
- ·
If there is oil on the contact surfaces, wipe them with an oil-free cloth before applying seal packing.
·Install the chain cover within 3 minutes and tighten the bolts within 15 minutes after applying seal packing.
·Do not start the engine for at least 2 hours after installing.
| Area | Seal Packing Diameter | Application Position from Inside Seal Line |
|---|---|---|
| Continuous Line Area | 4.5 mm or more (0.177 in.) | 1.0 to 2.0 mm (0.0394 to 0.0787 in.) |
| Alternate Long and Short Dashed Line Area | 3.5 mm or more (0.138 in.) | 2.0 to 3.0 mm (0.0787 to 0.118 in.) |
| Dashed Line Area | 3.5 mm or more (0.138 in.) | 3.0 to 4.0 mm (0.118 to 0.158 in.) |
| Diagonal Line Area | 6.0 mm or more (0.236 in.) | 5.0 mm (0.197 in.) |
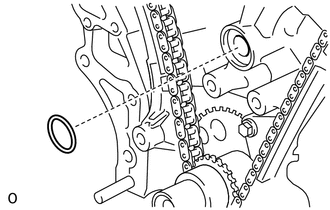
Install a new gasket.
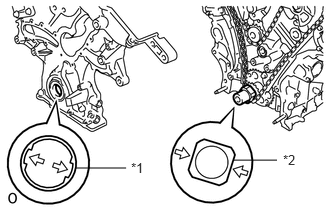
| *1 | Drive Rotor Spline |
| *2 | Crankshaft |
Align the oil pump drive rotor spline and the crankshaft as shown in the illustration. Install the spline and chain cover to the crankshaft.
Type X:
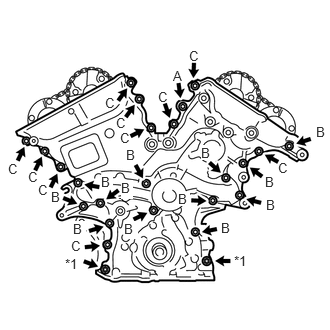
| *1 | Nut |
Temporarily tighten the timing chain cover with the 23 bolts and 2 nuts.
| Item | Length |
|---|---|
| Bolt A | 40 mm (1.57 in.) |
| Bolt B | 55 mm (2.17 in.) |
| Bolt C | 25 mm (0.984 in.) |
- NOTICE:
-
Make sure that there is no oil on the threads of bolt B and C.
Type Y:
| *1 | Nut |
Temporarily tighten the timing chain cover with the 23 bolts and 2 nuts.
| Item | Length |
|---|---|
| Bolt A | 40 mm (1.57 in.) |
| Bolt B | 55 mm (2.17 in.) |
| Bolt C | 28 mm (1.102 in.) |
- NOTICE:
-
Make sure that there is no oil on the threads of bolt B and C.
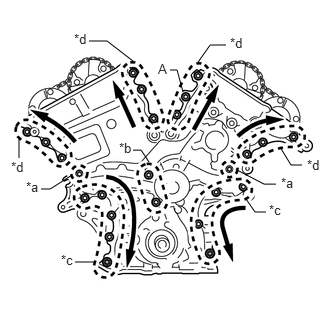
| *a | Area 1 |
| *b | Area 2 |
| *c | Area 3 |
| *d | Area 4 |
Fully tighten the bolts in this order: Area 1 and Area 2.
- Torque:
- 21 N*m (214 kgf*cm, 15 ft.*lbf)
Fully tighten the bolts and nuts in Area 3.
- Torque:
- 21 N*m (214 kgf*cm, 15 ft.*lbf)
- HINT:
-
Tighten the bolts and nuts from top to bottom as shown in the illustration.
Fully tighten the bolts in Area 4.
- Torque:
- Bolt A : 43 N*m (438 kgf*cm, 32 ft.*lbf)
- Torque:
- Except bolt A : 21 N*m (214 kgf*cm, 15 ft.*lbf)
- HINT:
-
Tighten the bolts from bottom to top as shown in the illustration.
12101
3.INSTALL OIL PAN SUB-ASSEMBLY
15104
4.INSTALL OIL STRAINER SUB-ASSEMBLY
12102A
5.INSTALL NO. 2 OIL PAN SUB-ASSEMBLY
11201
6.INSTALL CYLINDER HEAD COVER SUB-ASSEMBLY
11202
7.INSTALL CYLINDER HEAD COVER SUB-ASSEMBLY LH
16323
8.INSTALL WATER INLET HOUSING
12315
9.INSTALL NO. 1 FRONT ENGINE MOUNTING BRACKET LH
13471
10.INSTALL CRANKSHAFT PULLEY
15771
11.INSTALL NO. 1 OIL PIPE
15771M
12.INSTALL OIL PIPE
11401G
13.INSTALL CRANK POSITION SENSOR
25860A
14.INSTALL NO. 1 VACUUM SWITCHING VALVE
16173
15.INSTALL WATER PUMP PULLEY
16604
16.INSTALL NO. 2 IDLER PULLEY SUB-ASSEMBLY
11322F
17.INSTALL NO. 2 TIMING GEAR COVER
11452
18.INSTALL ENGINE OIL LEVEL DIPSTICK GUIDE
15781
19.INSTALL NO. 1 OIL COOLER BRACKET
15710
20.INSTALL OIL COOLER ASSEMBLY
16620
21.INSTALL V-RIBBED BELT TENSIONER ASSEMBLY
17105
22.INSTALL EXHAUST MANIFOLD SUB-ASSEMBLY LH
17168
23.INSTALL NO. 2 EXHAUST MANIFOLD HEAT INSULATOR
17119
24.INSTALL NO. 2 MANIFOLD STAY
12142
25.INSTALL NO. 2 ENGINE OIL LEVEL DIPSTICK GUIDE
17104
26.INSTALL EXHAUST MANIFOLD SUB-ASSEMBLY RH
19500
27.INSTALL IGNITION COIL ASSEMBLY
22267A
28.INSTALL THROTTLE BODY BRACKET
17125
29.INSTALL NO. 1 SURGE TANK STAY
17190
30.INSTALL INTAKE AIR SURGE TANK ASSEMBLY
31.INSTALL ENGINE HANGERS
32.REMOVE ENGINE STAND
32101
33.INSTALL DRIVE PLATE AND RING GEAR SUB-ASSEMBLY
30500
34.INSTALL AUTOMATIC TRANSAXLE ASSEMBLY