FRONT SUSPENSION FRONT SUSPENSION MEMBER(When Using the Engine Support Bridge) INSTALLATION
PROCEDURE

 1.INSTALL HOLE PLUG
Install 5 hole plugs to the front frame assembly.
52217E
2.INSTALL FRONT SUSPENSION MEMBER BODY MOUNTING REAR CUSHION LH
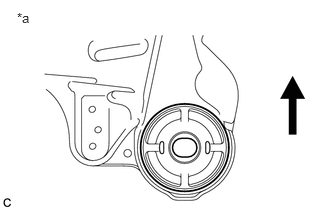
| *a | View from Underneath |

|
Front of the Vehicle |
Temporarily install a new front suspension member body mounting rear cushion LH while confirming the installation direction.
- NOTICE:
-
Position the front suspension member body mounting rear cushion LH in the correct direction.
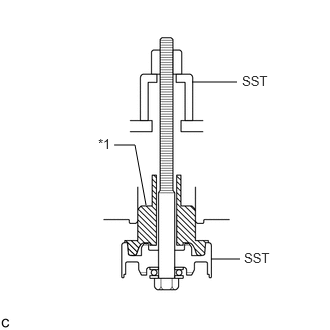
| *1 | Front Suspension Member Body Mounting Rear Cushion LH |
Install SST as shown in the illustration.
- SST
- 09830-10010 (09830-01010, 09830-01020, 09830-01030, 09830-01060)
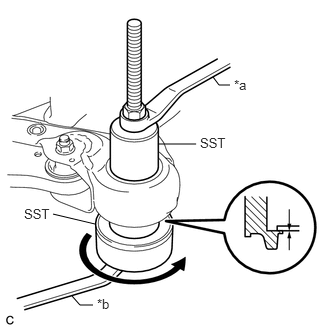
| *a | Hold |
| *b | Turn |
Using SST, install the front suspension member body mounting rear cushion LH as shown in the illustration.
- NOTICE:
-
Check that there is no clearance between the front frame assembly and the front suspension member body mounting rear cushion LH.
52215
3.INSTALL FRONT SUSPENSION MEMBER BODY MOUNTING REAR CUSHION RH
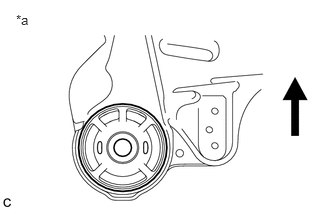
| *a | View from Underneath |
|
|
Front of the Vehicle |
Temporarily install a new front suspension member body mounting rear cushion RH while confirming the installation direction.
- NOTICE:
-
Position the front suspension member body mounting rear cushion RH in the correct direction.
Install SST using the same procedure as the front suspension member body mounting rear cushion LH.
- SST
- 09830-10010 (09830-01010, 09830-01020, 09830-01030, 09830-01060)
Using SST, install the front suspension member body mounting rear cushion RH.
- SST
- 09830-10010 (09830-01010, 09830-01020, 09830-01030, 09830-01060)
- HINT:
-
Perform the same procedure as the LH side.
52211J
4.INSTALL FRONT SUSPENSION MEMBER BODY MOUNTING FRONT CUSHION
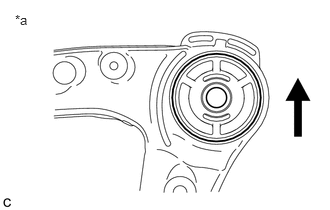
| *a | View from Underneath |
|
|
Front of the Vehicle |
Temporarily install a new front suspension member body mounting front cushion while confirming the installation direction.
- NOTICE:
-
Position the front suspension member body mounting front cushion in the correct direction.
Install SST using the same procedure as the front suspension member body mounting rear cushion LH.
- SST
- 09830-10010 (09830-01010, 09830-01020, 09830-01030, 09830-01060)
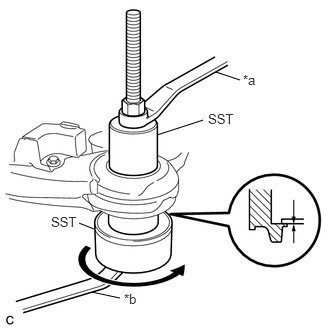
| *a | Hold |
| *b | Turn |
Using SST, install the front suspension member body mounting front cushion as shown in the illustration.
- SST
- 09830-10010 (09830-01010, 09830-01020, 09830-01030, 09830-01060)
- NOTICE:
-
Check that there is no clearance between the front frame assembly and the front suspension member body mounting front cushion.
52216B
5.INSTALL FRONT SUSPENSION MEMBER BODY MOUNTING REAR STOPPER
Install the 2 front suspension member body mounting rear stoppers to the front frame assembly.
52213A
6.INSTALL FRONT SUSPENSION MEMBER BODY MOUNTING FRONT STOPPER
Install the 2 front suspension member body mounting front stoppers to the front frame assembly.
51227B
7.INSTALL FRONT SUSPENSION MEMBER DYNAMIC DAMPER
Install the front suspension member dynamic damper to the front frame assembly with the 2 bolts.
- Torque:
- 29 N*m (296 kgf*cm, 21 ft.*lbf)
48069
8.INSTALL FRONT LOWER NO. 1 SUSPENSION ARM SUB-ASSEMBLY LH
Install the front lower arm bushing stopper to the front lower No. 1 suspension arm sub-assembly.
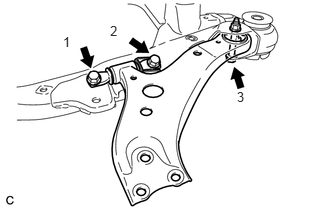
Install the front lower No. 1 suspension arm sub-assembly to the front frame assembly with the 3 bolts and nut in the order shown in the illustration.
- Torque:
- Bolt 1, 2 : 200 N*m (2039 kgf*cm, 148 ft.*lbf)
- Bolt 3 : 135 N*m (1377 kgf*cm, 100 ft.*lbf)
- NOTICE:
-
While keeping the nut from rotating, tighten the bolt.
48068
9.INSTALL FRONT LOWER NO. 1 SUSPENSION ARM SUB-ASSEMBLY RH
- HINT:
-
Perform the same procedure as the LH side.
10.INSTALL STEERING LINK ASSEMBLY
11.INSTALL FRONT STABILIZER BAR WITH FRONT STABILIZER LINK ASSEMBLY
Install the front stabilizer bar with 2 front stabilizer link assemblies to the front frame assembly.
48829A
12.INSTALL FRONT NO. 1 STABILIZER BRACKET LH
48824A
13.INSTALL FRONT NO. 1 STABILIZER BRACKET RH
- HINT:
-
Perform the same procedure as the LH side.
51100G
14.INSTALL FRONT FRAME ASSEMBLY
Slowly jack up the front frame assembly with an engine lifter using 4 attachments or equivalent tools.
- CAUTION:
- ·
The front frame assembly is a heavy component. Make sure that it is supported securely.
·Make sure to secure the front frame assembly to prevent it from dropping.
- NOTICE:
-
Use the attachments to keep the front frame assembly level.
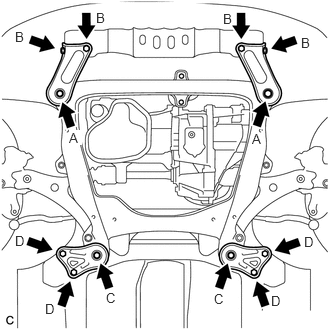
Install the frame side rail plates RH and LH with the 4 bolts and 2 nuts.
- Torque:
- A : 85 N*m (867 kgf*cm, 63 ft.*lbf)
- B : 32 N*m (326 kgf*cm, 24 ft.*lbf)
Install the front suspension member rear braces RH and LH with the 4 bolts and 2 nuts.
- Torque:
- C : 85 N*m (867 kgf*cm, 63 ft.*lbf)
- D : 32 N*m (326 kgf*cm, 24 ft.*lbf)
Connect the 2 clamps.
15.REMOVE BELT
Remove SST from the vehicle body.
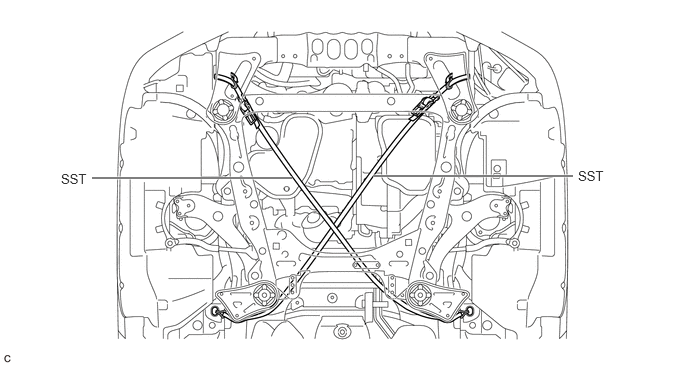
Connect the windshield washer jar assembly to the vehicle body and tighten the bolt.
- Torque:
- 5.5 N*m (56 kgf*cm, 49 in.*lbf)
Install the bolt and nut.
- Torque:
- 5.5 N*m (56 kgf*cm, 49 in.*lbf)
16.REMOVE ENGINE SUPPORT BRIDGE
Remove SST from the vehicle body.
- NOTICE:
-
Prevent SST from contacting the vehicle body or windshield.
Install the 2 hood support assemblies.
Click hereVehicle Exterior>DOOR / HATCH>HOOD SUPPORT>INSTALLATION
Engage the 2 clamps.
17.REMOVE ENGINE HANGERS
12327A
18.INSTALL NO. 2 ENGINE MOUNTING STAY RH
19.CONNECT WIRE HARNESS
12361A
20.INSTALL FRONT ENGINE MOUNTING INSULATOR
Install the front engine mounting insulator to the front frame assembly with the 3 nuts.
- Torque:
- 52 N*m (530 kgf*cm, 38 ft.*lbf)
12372A
21.INSTALL ENGINE MOUNTING INSULATOR LH
Install the engine mounting insulator LH to the front frame assembly with the 3 nuts.
- Torque:
- 87 N*m (887 kgf*cm, 64 ft.*lbf)
Install the 2 hole plugs.
12362
22.INSTALL ENGINE MOUNTING INSULATOR RH
Install the engine mounting insulator RH to the front frame assembly with the 3 nuts.
- Torque:
- 87 N*m (887 kgf*cm, 64 ft.*lbf)
Install the 2 hole plugs.
45220
23.CONNECT STEERING INTERMEDIATE SHAFT ASSEMBLY
43420
24.INSTALL FRONT DRIVE SHAFT ASSEMBLY LH
43410
25.INSTALL FRONT DRIVE SHAFT ASSEMBLY RH
- HINT:
-
Perform the same procedure as for the LH side.
48069
26.CONNECT FRONT LOWER NO. 1 SUSPENSION ARM SUB-ASSEMBLY LH
48068
27.CONNECT FRONT LOWER NO. 1 SUSPENSION ARM SUB-ASSEMBLY RH
- HINT:
-
Perform the same procedure as for the LH side.
45470
28.CONNECT TIE ROD ASSEMBLY LH
45460
29.CONNECT TIE ROD ASSEMBLY RH
- HINT:
-
Perform the same procedure as for the LH side.
48810
30.INSTALL FRONT STABILIZER LINK ASSEMBLY LH
48820B
31.INSTALL FRONT STABILIZER LINK ASSEMBLY RH
- HINT:
-
Perform the same procedure as for the LH side.
43502H
32.INSTALL FRONT AXLE SHAFT NUT LH
43501H
33.INSTALL FRONT AXLE SHAFT NUT RH
- HINT:
-
Perform the same procedure as for the LH side.
17410
34.INSTALL FRONT EXHAUST PIPE ASSEMBLY
G9019
35.INSTALL INVERTER TRAY BRACKET SUB-ASSEMBLY
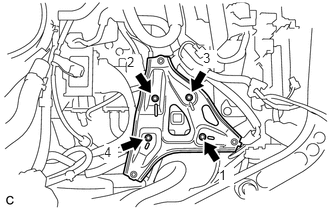
Temporarily install the inverter tray bracket sub-assembly to the body with the 4 bolts.
- HINT:
-
Temporarily tighten the bolt (1) first.
Install the 4 bolts in the order shown in the illustration.
- Torque:
- 8.0 N*m (82 kgf*cm, 71 in.*lbf)
36.INSTALL INVERTER WITH CONVERTER ASSEMBLY
37.INSPECT FOR EXHAUST GAS LEAK
12601B
38.INSTALL NO. 1 ENGINE COVER SUB-ASSEMBLY
55781E
39.INSTALL COWL TOP VENTILATOR LOUVER SUB-ASSEMBLY
53866J
40.INSTALL FRONT FENDER TO COWL SIDE SEAL RH
53867H
41.INSTALL FRONT FENDER TO COWL SIDE SEAL LH
- HINT:
-
Use the same procedure as for the RH side.
42.INSTALL FRONT WIPER ARM AND BLADE ASSEMBLY LH
43.INSTALL FRONT WIPER ARM AND BLADE ASSEMBLY RH
53737B
44.INSTALL FRONT FENDER APRON SEAL LH
53736
45.INSTALL FRONT FENDER APRON SEAL RH
51442C
46.INSTALL ENGINE UNDER COVER LH
53852K
47.INSTALL FRONT WHEEL OPENING EXTENSION PAD LH
51441C
48.INSTALL ENGINE UNDER COVER RH
53851Z
49.INSTALL FRONT WHEEL OPENING EXTENSION PAD RH
50.INSTALL FRONT WHEELS
- Torque:
- 103 N*m (1049 kgf*cm, 76 ft.*lbf)
51.INSPECT AND ADJUST FRONT WHEEL ALIGNMENT
52.CHECK FOR SPEED SENSOR SIGNAL