INTERIOR SIDE PANEL(for RHD) INSTALLATION
CAUTION / NOTICE / HINT
- HINT:
-
A bolt without a torque specification is shown in the standard bolt chart.
-
Click hereGeneral>SPECIFICATIONS>STANDARD BOLT>SPECIFIED TORQUE FOR STANDARD BOLTS
PROCEDURE

 62451C
1.INSTALL REAR ROOF SIDE RAIL GARNISH RH (w/o Rear Air Duct)
Attach the 6 clips to install the rear roof side rail garnish RH.
62451E
2.INSTALL REAR ROOF SIDE RAIL GARNISH (w/o Rear Air Duct)
Attach the 2 claws and 7 clips to install the rear roof side rail garnish.
62451B
3.INSTALL NO. 3 ROOF SIDE RAIL GARNISH RH (w/o Rear Air Duct)
Attach the 2 claws and 7 clips to install the No. 3 roof side rail garnish RH.
63375B
4.INSTALL NO. 1 ROOF HEADLINING MOULDING RH (w/o Rear Air Duct)
63377C
5.INSTALL NO. 2 ROOF HEADLINING MOULDING (w/o Rear Air Duct)
62510G
6.INSTALL NO. 1 SIDE TRIM ASSEMBLY RH
Attach the 7 clips to install the No. 1 side trim assembly RH.
Install the 4 clips.
62530A
7.INSTALL NO. 2 SIDE TRIM ASSEMBLY RH
Attach the 7 clips to install the No. 2 side trim assembly RH.
Install the 4 clips.
62550E
8.INSTALL NO. 3 SIDE TRIM ASSEMBLY RH
Attach the 7 clips to install the No. 3 side trim assembly RH.
Install the 4 clips.
62570C
9.INSTALL NO. 4 SIDE TRIM ASSEMBLY (for Long Body)
Attach the 3 clips to install the No. 4 side trim assembly.
Install the 3 clips.
62611C
10.INSTALL NO. 1 SIDE TRIM BOARD RH
Attach the 6 clips to install the No. 1 side trim board RH.
Install the 6 clips.
62612C
11.INSTALL NO. 2 SIDE TRIM BOARD RH
for Standard Body:
Attach the 3 clips to install the No. 2 side trim board RH.
Install the 3 clips.
for Long Body:
Attach the 7 clips to install the No. 2 side trim board RH.
Install the 6 clips.
62613C
12.INSTALL NO. 3 SIDE TRIM BOARD RH
Attach the 6 clips to install the No. 3 side trim board RH.
Install the 4 clips.
62614C
13.INSTALL NO. 4 SIDE TRIM BOARD RH
Attach the 4 clips to install the No. 4 side trim board RH.
Install the 2 clips.
62615C
14.INSTALL NO. 5 SIDE TRIM BOARD RH
Attach the 6 clips to install the No. 5 side trim board RH.
Install the 6 clips.
62539B
15.INSTALL NO. 5 PILLAR GARNISH RH (for Long Body)
Attach the 4 clips and 4 claws to install the No. 5 pillar garnish RH.
62538B
16.INSTALL NO. 4 PILLAR GARNISH RH
Attach the 4 clips and 4 claws to install the No. 4 pillar garnish RH.
62537B
17.INSTALL NO. 3 PILLAR GARNISH RH
Attach the 4 clips and 4 claws to install the No. 3 pillar garnish RH.
63951
18.INSTALL COOLER PIPE COVER
62413A
19.INSTALL LOWER CENTER PILLAR GARNISH RH
73210
20.CONNECT FRONT SEAT OUTER BELT ASSEMBLY RH
73233
21.INSTALL OUTER LAP BELT ANCHOR COVER
62311C
22.INSTALL FRONT DOOR OPENING TRIM WEATHERSTRIP RH
58651A
23.INSTALL FRONT DOOR NO. 1 MAT PLATE
46243
24.INSTALL PARKING BRAKE LEVER COVER
25.INSTALL FRONT SEAT ASSEMBLY
62452C
26.INSTALL REAR ROOF SIDE RAIL GARNISH LH (w/o Rear Air Duct)
Attach the 7 clips to install the rear roof side rail garnish LH.
62451E
27.INSTALL REAR ROOF SIDE RAIL GARNISH (w/o Rear Air Duct)
Attach the 2 claws and 7 clips to install the rear roof side rail garnish.
62452B
28.INSTALL NO. 3 ROOF SIDE RAIL GARNISH LH (w/o Rear Air Duct)
Attach the 2 claws and 6 clips to install the No. 3 roof side rail garnish LH.
63375D
29.INSTALL ROOF HEADLINING MOULDING (w/o Rear Air Duct)
- HINT:
-
Use the same procedure described for the RH side.
-
Click hereVehicle Interior>INTERIOR>ROOF HEADLINING>INSTALLATION
63378C
30.INSTALL NO. 3 ROOF HEADLINING MOULDING (w/o Rear Air Duct)
- HINT:
-
Use the same procedure to install the No. 2 roof headlining moulding.
-
Click hereVehicle Interior>INTERIOR>ROOF HEADLINING>INSTALLATION
62570C
31.INSTALL NO. 4 SIDE TRIM ASSEMBLY (for Long Body)
Attach the 3 clips to install the No. 4 side trim assembly.
Install the 3 clips.
62560B
32.INSTALL NO. 3 SIDE TRIM ASSEMBLY LH
Attach the 7 clips and to install the No. 3 side trim assembly LH.
Install the 4 clips.
62625C
33.INSTALL NO. 5 SIDE TRIM BOARD LH
Attach the 6 clips to install the No. 5 side trim board LH.
Install the 6 clips.
62624C
34.INSTALL NO. 4 SIDE TRIM BOARD LH
for Standard Body:
Attach the 4 clips to install the No. 4 side trim board LH.
for Long Body:
Attach the 4 clips to install the No. 4 side trim board LH.
62511R
35.INSTALL REAR BODY REAR INSIDE TRIM RH
for Double Swing Type:
Attach the 4 clips to install the rear body rear inside trim RH.
Install the 3 clips.
for Lift Up Type:
for Type A:
Attach the 4 clips to install the rear body rear inside trim RH.
Install the 3 clips.
for Type B:
Attach the 3 clips to install the rear body rear inside trim RH.
Install the 3 clips.
62512R
36.INSTALL REAR BODY REAR INSIDE TRIM LH
for Double Swing Type:
Attach the 4 clips to install the rear body rear inside trim LH.
Install the 3 clips.
for Lift Up Type:
for Type A:
Attach the 4 clips to install the rear body rear inside trim LH.
Install the 3 clips.
for Type B:
Attach the 3 clips to install the rear body rear inside trim LH.
Install the 3 clips.
62227
37.INSTALL QUARTER PILLAR COVER RH
Attach the 5 claws to install the quarter pillar cover RH.
62228
38.INSTALL LOWER QUARTER PILLAR COVER LH
Attach the 4 claws to install the lower quarter pillar cover LH.
62471D
39.INSTALL REAR UPPER PILLAR GARNISH RH
62472D
40.INSTALL REAR UPPER PILLAR GARNISH LH
- HINT:
-
Use the same procedure described for the RH side.
62487A
41.INSTALL INNER ROOF SIDE GARNISH COVER RH (for Double Swing Out Type)
62488A
42.INSTALL INNER ROOF SIDE GARNISH COVER LH (for Double Swing Out Type)
- HINT:
-
Use the same procedure described for the RH side.
64735A
43.INSTALL CENTER BACK INNER RAIL GARNISH (for Lift Up Type)
58614A
44.INSTALL NO. 4 MAT SET PLATE
Install the No. 4 mat set plate with the 5 screws.
62549B
45.INSTALL NO. 5 PILLAR GARNISH LH (for Long Body)
Attach the 4 clips and 4 claws to install the No. 5 pillar garnish LH.
62540A
46.INSTALL NO. 2 SIDE TRIM ASSEMBLY LH
Attach the 7 clips and to install the No. 2 side trim assembly LH.
Install the 4 clips.
62548B
47.INSTALL NO. 4 PILLAR GARNISH LH
Attach the 4 clips and 4 claws to install the No. 4 pillar garnish LH.
62623C
48.INSTALL NO. 3 SIDE TRIM BOARD LH
Attach the 6 clips and to install the No. 3 side trim board LH.
Install the 4 clips.
62622C
49.INSTALL NO. 2 SIDE TRIM BOARD LH
for Standard Body:
Attach the 2 clips and to install the No. 2 side trim board LH.
Install the 2 clips.
for Long Body.
Attach the 6 clips and to install the No. 2 side trim board LH.
Install the 5 clips.
61890A
50.INSTALL BACK WINDOW GLASS HAMMER ASSEMBLY (w/ Hammer)
62639A
51.INSTALL QUARTER PILLAR GARNISH LH
for Folding Type:
Attach the 6 clips and 2 claws to install the quarter pillar garnish LH.
for Glide Type:
Attach the 6 clips and 3 claws to install the quarter pillar garnish LH.
74730
52.INSTALL HAND GRIP FRAME ASSEMBLY (for Folding Type)
Install the hand grip frame assembly with the 7 bolts.
74708
53.INSTALL NO. 2 HAND GRIP FRAME SUB-ASSEMBLY (for Glide Type)
for Type A:
Install the No. 2 hand grip frame sub-assembly with the 8 bolts.
for Type B:
Install the No. 2 hand grip frame sub-assembly with the 7 bolts.
62425
54.INSTALL CENTER PILLAR GARNISH COVER
55.INSTALL REAR NO. 8 SEAT ASSEMBLY (for 4-Passenger Seat)
for Tumble Type:
Click hereVehicle Interior>SEAT>REAR SEAT ASSEMBLY (for Tumble Type 4-Passenger Seat)>INSTALLATION
for Fixed Type:
Click hereVehicle Interior>SEAT>REAR SEAT ASSEMBLY (for Fixed Type 4-Passenger Seat)>INSTALLATION
56.INSTALL REAR SEAT ASSEMBLY LH
for Single-Passenger Seat with 3 Point Type Seat Belt:
for Single-Passenger Seat without 3 Point Type Seat Belt:
57.INSTALL REAR SEAT ASSEMBLY RH
for 2-Passenger Seat with Separate Type Seatback:
for 2-Passenger Seat with Bench Type Seatback:
62515B
58.INSTALL NO. 1 SIDE TRIM BASE COVER RH
except Type B:
Attach the 4 claws and clip and install the No. 1 side trim base cover RH.
for Type B:
Attach the 2 claws and clip and install the No. 1 side trim base cover RH.
62627D
59.INSTALL SIDE TRIM COVER RH (for Type B)
Attach the 3 claws to install the side trim cover RH.
62516B
60.INSTALL NO. 2 SIDE TRIM BASE COVER RH
Attach the 5 claws and clip to install the No. 2 side trim base cover RH.
62516D
61.INSTALL NO. 3 SIDE TRIM BASE COVER RH (w/ No. 3 Side Trim Base Cover RH)
- HINT:
-
Use the same procedure described for the No. 2 side trim base cover RH.
62516E
62.INSTALL NO. 4 SIDE TRIM BASE COVER RH (w/ No. 4 Side Trim Base Cover RH)
except Type B:
- HINT:
-
Use the same procedure described for the No. 2 side trim base cover RH.
for Type B:
Attach the 3 claws and clip to install the No. 4 side trim base cover RH.
62516F
63.INSTALL NO. 5 SIDE TRIM BASE COVER RH (w/ No. 5 Side Trim Base Cover RH)
except Type B:
- HINT:
-
Use the same procedure described for the No. 2 side trim base cover RH.
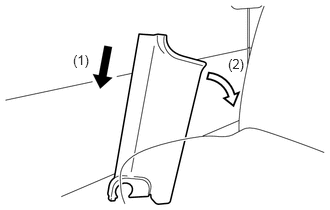
for Type B:
Temporarily install the No. 5 side trim base cover RH in the direction indicated by the arrows in the illustration.
Attach the 2 claws to install the No. 5 side trim base cover RH.
62516G
64.INSTALL NO. 6 SIDE TRIM BASE COVER RH (for Long Body, w/ No, 6 Side Trim Base Cover RH)
- HINT:
-
Use the same procedure described for the No. 2 side trim base cover RH.
62671F
65.INSTALL NO. 1 SIDE TRIM BOARD COVER RH
Attach the 5 claws and clip to install the No. 1 side trim board cover RH.
62525D
66.INSTALL NO. 1 SIDE TRIM BASE COVER LH
- HINT:
-
Use the same procedure described for the No. 1 side trim base cover RH.
62526D
67.INSTALL NO. 2 SIDE TRIM BASE COVER LH
- HINT:
-
Use the same procedure described for the No. 2 side trim base cover RH.
62526F
68.INSTALL NO. 3 SIDE TRIM BASE COVER LH (w/ No. 3 Side Trim Base Cover LH)
except Type B:
- HINT:
-
Use the same procedure described for the No. 2 side trim base cover RH.
for Type B:
- HINT:
-
Use the same procedure described for the No. 4 side trim base cover RH.
62526G
69.INSTALL NO. 4 SIDE TRIM BASE COVER LH (w/ No. 4 Side Trim Base Cover LH)
except Type B:
- HINT:
-
Use the same procedure described for the No. 2 side trim base cover RH.
for Type B:
- HINT:
-
Use the same procedure described for the No. 5 side trim base cover RH.
62672
70.INSTALL NO. 1 SIDE TRIM BOARD COVER LH
- HINT:
-
Use the same procedure described for the No. 1 side trim board cover RH.
62520G
71.INSTALL NO. 1 SIDE TRIM ASSEMBLY LH
Attach the 2 guides to install the No. 1 side trim assembly LH.
Install the 13 clips.
62540A
72.INSTALL NO. 2 SIDE TRIM ASSEMBLY LH
Attach the 9 clips to install the No. 2 side trim assembly LH.
67676
73.INSTALL FRONT SIDE TRIM BOARD COVER LH
Attach the 4 claws and 3 clips to install the front side trim board cover LH.
Install the screw.
62547B
74.INSTALL NO. 3 PILLAR GARNISH LH
73220
75.CONNECT FRONT SEAT OUTER BELT ASSEMBLY LH (w/ Rear No. 1 Seat)
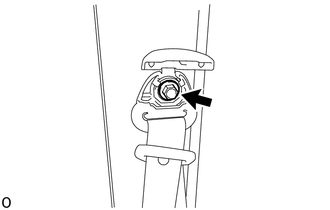
Tighten the bolt to install the front seat outer belt shoulder anchor.
- Torque:
- 42 N*m (428 kgf*cm, 31 ft.*lbf)
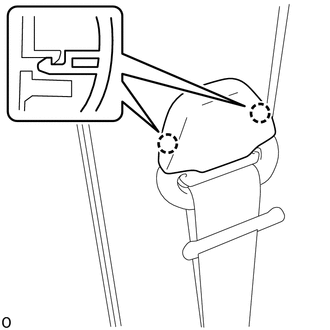
Attach the 2 claws to connect the front seat outer belt shoulder anchor cover.
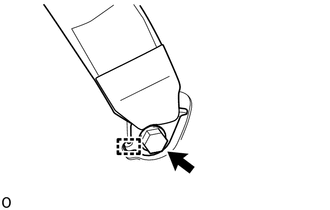
Attach the guide to install the front seat outer belt floor anchor with the bolt.
- Torque:
- 42 N*m (428 kgf*cm, 31 ft.*lbf)
Check that the front seat outer belt assembly LH is not twisted.
Install the rear seat first row and the second row.
73224
76.INSTALL FRONT SEAT BELT RETRACTOR COVER LH (w/ Rear No. 1 Seat)
62638A
77.INSTALL QUARTER PILLAR GARNISH RH
for Folding Type:
Attach the 6 clips and 2 claws to install the quarter pillar garnish RH.
for Glide Type:
Attach the 6 clips and claw to install the quarter pillar garnish RH.
74730
78.INSTALL HAND GRIP FRAME ASSEMBLY (w/ Hand Grip Frame)
62425
79.INSTALL CENTER PILLAR GARNISH COVER (w/ Hand Grip Frame)
62989
80.INSTALL CENTER DOOR LOCK COVER (for Folding Type)
Attach the 8 clips to install the center door lock cover.
62212
81.INSTALL FRONT PILLAR GARNISH LH
- HINT:
-
Use the same procedure described for the RH side.
-
Click hereVehicle Interior>INTERIOR>ROOF HEADLINING>INSTALLATION
82.INSTALL FRONT PROTECTOR ASSEMBLY RH (w/ Protector)
Install the front protector assembly with the 6 bolts.
- Torque:
- 12.5 N*m (127 kgf*cm, 9 ft.*lbf)
89910
83.INSTALL COOLER BOX ASSEMBLY (w/ Cooler Box)
84.CONNECT CABLE TO NEGATIVE BATTERY TERMINAL
- NOTICE:
-
When disconnecting the cable, some systems need to be initialized after the cable is reconnected.
-
Click hereGeneral>INTRODUCTION>REPAIR INSTRUCTION>INITIALIZATION
85.CHECK SRS WARNING LIGHT
for 2 Connector Type:
for 3 Connector Type: