2AZ-FE ENGINE MECHANICAL ENGINE UNIT REASSEMBLY
CAUTION / NOTICE / HINT
PROCEDURE

 13211
1.INSTALL PISTON
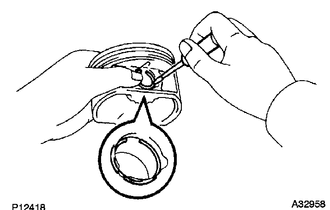
Using a screwdriver, install a new snap ring at one end of the piston pin hole.
- HINT:
-
Make sure that the end gap of the snap ring is not aligned with the pin hole cutout portion of the piston.
Gradually heat the piston up to 80 to 90°C (176 to 194°F).
for 2-piece Type:
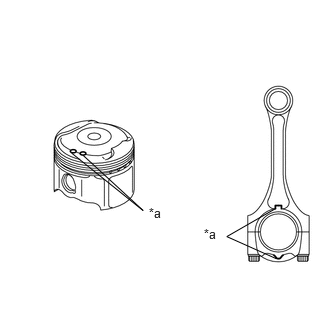
Align the front marks of the piston and connecting rod, then push in the piston pin with your thumb until the pin comes into contact with the snap ring.
- HINT:
-
Make sure that the end gap of the snap ring is not aligned with the pin hole cutout portion of the piston.
| *a | Front Mark |
for 3-piece Type:
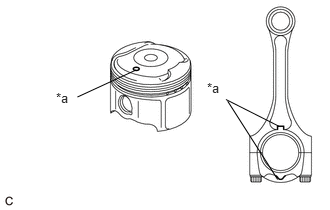
Align the front marks on the piston and connecting rod, and push in the piston with a thumb.
- HINT:
-
Make sure that the end gap of the snap ring is not aligned with the pin hole cutout portion of the piston.
| *a | Front Mark |
Using a screwdriver, install a new snap ring on the other end of the piston pin hole.
13011
2.INSTALL PISTON RING SET
for 2-piece Type:
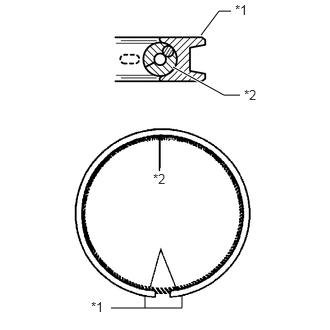
Install the expander and oil ring by hand.
- HINT:
- ·
Install the expander and oil ring so that their ring ends are at opposite sides.
·Securely install the expander to the oil ring's inner groove.
Text in Illustration *1 Oil Ring *2 Oil Ring (Expander)
for 3-piece Type:
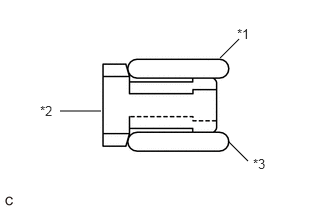
Install the oil ring expander and 2 side rails by hand.
- NOTICE:
-
When installing the upper side rail and lower side rail, the ends of the oil ring expander may overlap. If it occurs, the upper side rail or lower side rail may move out of its groove.
| *1 | Upper Side Rail |
| *2 | Oil Ring Expander |
| *3 | Lower Side Rail |
Check that the ends of the oil ring expander are not overlapping and that the upper side rail and lower side rail are securely installed into the groove.
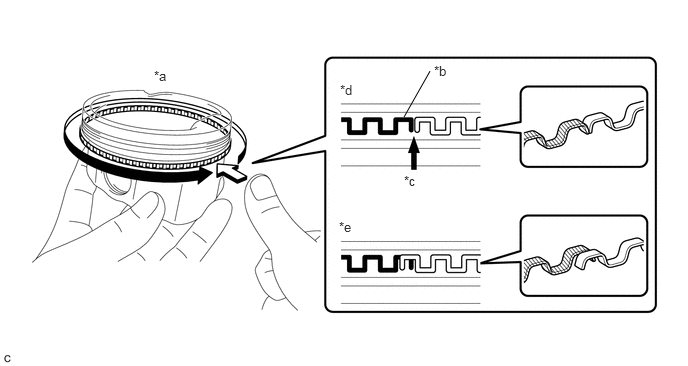
- NOTICE:
- ·
After installing the oil ring expander, upper side rail and lower side rail, press around the circumference with a finger to check that they are securely installed into the groove.
·If the oil ring expander is not securely installed into the groove, check that the ends of the oil ring expander are not overlapping.
·If the ends of the oil ring expander are overlapping, remove the upper side rail and lower side rail and realign the oil ring expander using a screwdriver.
| *a | Press around the circumference | *b | Paint (Purple or White) |
| *c | Ring End | *d | Correct |
| *e | Incorrect (Ends of the oil ring expander are overlapping) | - | - |
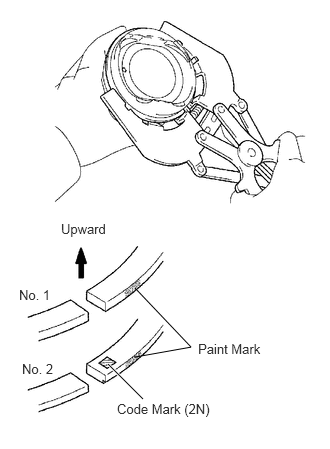
Using a piston ring expander, install the 2 compression rings with the paint marks as shown in the illustration.
- NOTICE:
-
Install the No. 2 compression ring with the code mark (2N) facing upward.
for 2-piece Type:
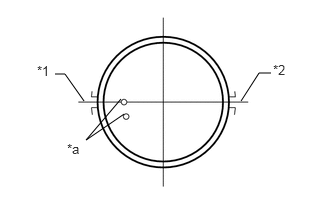
Position the piston rings so that the ring ends are as shown in the illustration.
| *1 | No. 1 Compression Ring and Oil Ring Rail |
| *2 | No. 2 Compression Ring and Oil Ring Expander |
| *a | Front Mark |
for 3-piece Type:
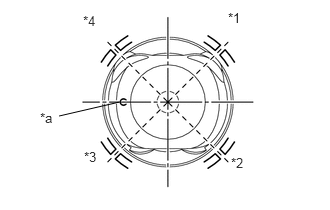
Position the piston rings so that the ring ends are as shown in the illustration.
| *1 | Lower Side Rail |
| *2 | No. 2 Compression Ring |
| *3 | Upper Side Rail |
| *4 | No. 1 Compression Ring and Oil Ring Expander |
| *a | Front Mark |
15708
3.INSTALL NO. 1 OIL NOZZLE SUB-ASSEMBLY
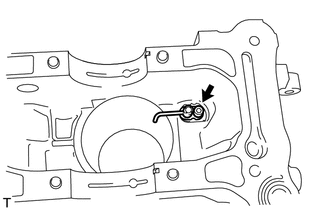
Install the 4 No. 1 oil nozzle sub-assemblies with the 4 bolts.
- Torque:
- 7.0 N*m (71 kgf*cm, 62 in.*lbf)
11711
4.INSTALL CRANKSHAFT BEARING
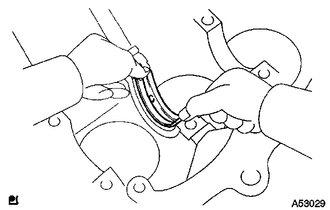
Install the crankshaft bearing onto the cylinder block.
- NOTICE:
-
Do not apply engine oil to the crankshaft bearing or its contact surface.
11721
5.INSTALL NO. 2 CRANKSHAFT BEARING
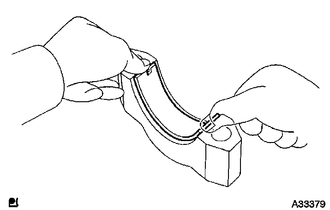
Install the No. 2 crankshaft bearing onto the bearing cap.
- NOTICE:
-
Do not apply engine oil to the No. 2 crankshaft bearing or its contact surface.
11791
6.INSTALL UPPER CRANKSHAFT THRUST WASHER
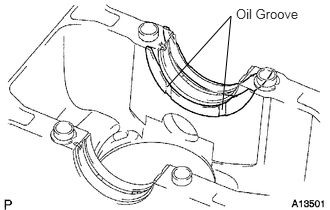
Install the 2 upper crankshaft thrust washers onto the No. 3 journal position of the cylinder block with the oil grooves facing outward.
13411
7.INSTALL CRANKSHAFT
Apply engine oil to the upper bearing, and install the crankshaft onto the cylinder block.
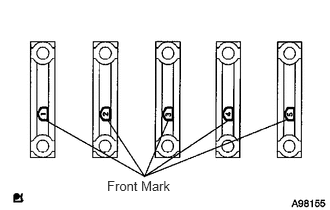
Examine the front marks and numbers, and install the bearing caps onto the cylinder block in the order shown in the illustration.
Apply a light coat of engine oil to the threads and under the heads of the bearing cap bolts.
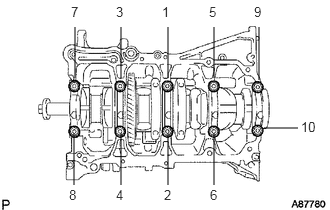
Using several steps, uniformly install and tighten the 10 bearing cap bolts in the sequence shown in the illustration.
- Torque:
- 40 N*m (408 kgf*cm, 30 ft.*lbf)
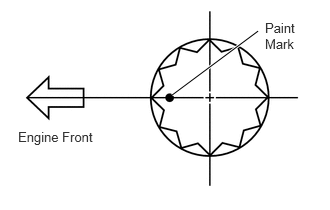
Mark the front of the bearing cap bolts with paint.
Further tighten the 10 bearing cap bolts by 90° in the same sequence.
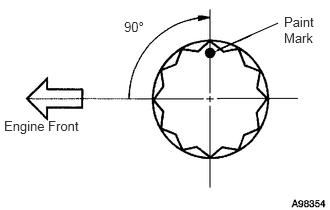
Check that the paint marks are now at a 90° angle to the front.
Check that the crankshaft turns smoothly.
13041
8.INSTALL CONNECTING ROD BEARING
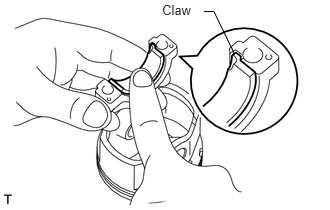
Align the connecting rod bearing claw with the oil groove of the connecting rod or connecting rod cap.
- NOTICE:
- ·
Do not apply engine oil to the contact surfaces of the connecting rod cap and connecting rod bearing.
·Do not apply engine oil to the contact surfaces of the connecting rod and connecting rod bearing.
13211
9.INSTALL PISTON WITH CONNECTING ROD
Apply engine oil to the cylinder walls, pistons, and surfaces of the connecting rod bearings.
for 2-piece Type:
Check the position of the piston ring ends.
| *1 | No. 1 Compression Ring and Oil Ring Rail |
| *2 | No. 2 Compression Ring and Oil Ring Expander |
| *a | Front Mark |
for 3-piece Type:
Check the position of the piston ring ends.
| *1 | Lower Side Rail |
| *2 | No. 2 Compression Ring |
| *3 | Upper Side Rail |
| *4 | No. 1 Compression Ring and Oil Ring Expander |
| *a | Front Mark |
Confirm that the ends of the oil ring expander are not overlapping and that the upper side rail and lower side rail are securely installed into the groove.
- NOTICE:
- ·
After installing the oil ring expander, upper side rail and lower side rail, press around the circumference with a finger to check that they are securely installed into the groove.
·If the oil ring expander is not securely installed into the groove, check that the ends of the oil ring expander are not overlapping.
·If the ends of the oil ring expander are overlapping, remove the upper side rail and lower side rail and realign the oil ring expander using a screwdriver.
| *a | Press around the circumference | *b | Paint (Purple or White) |
| *c | Ring End | *d | Correct |
| *e | Incorrect (Ends of the oil ring expander are overlapping) | - | - |
for 2-piece Type:
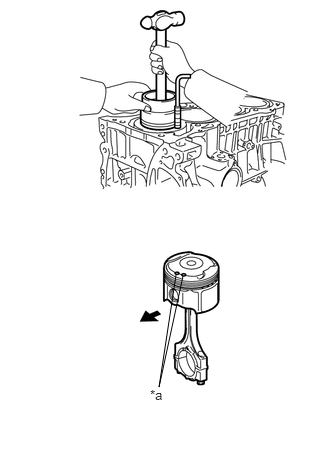
Using a hammer handle and piston ring compressor, press a piston and connecting rod into each cylinder with the front mark of the piston facing forward.
| *a | Front Mark |

|
Front |
for 3-piece Type:
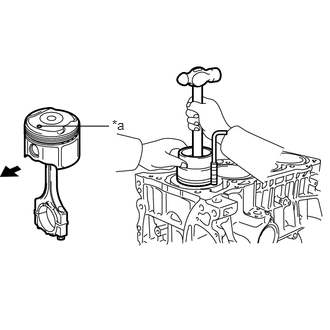
Using a hammer handle and piston ring compressor, press a piston and connecting rod into each cylinder with the front mark of the piston facing forward.
| *a | Front Mark |
|
|
Front |
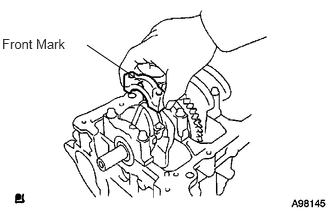
Check that the front mark of the connecting rod cap is facing in the correct direction.
- NOTICE:
-
Match the numbered connecting rod cap with the connecting rod.
Apply a light coat of engine oil to the threads and under the heads of the connecting rod bolts.
Using a 12 mm socket wrench, tighten the bolts in several passes to the specified torque.
- Torque:
- 24.5 N*m (250 kgf*cm, 18 ft.*lbf)
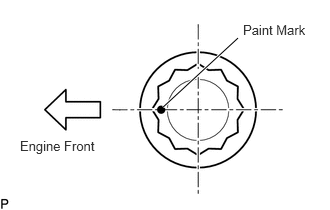
Mark the front of the connecting rod bolts with paint.
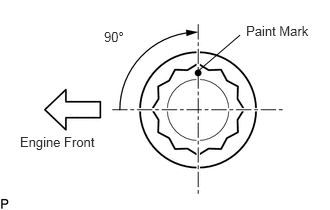
Further tighten the connecting rod bolts by 90° as shown in the illustration.
Check that the paint marks are now at a 90° angle to the front.
Check that the crankshaft turns smoothly.
11420
10.INSTALL STIFFENING CRANKCASE ASSEMBLY
Remove any old packing material and be careful not to drop any oil on the contact surfaces of the cylinder block and stiffening crankcase assembly.
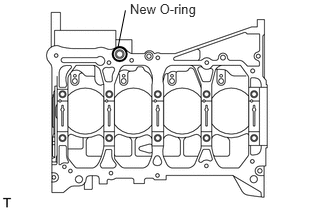
Place a new O-ring on the cylinder block as shown in the illustration.
Temporarily tighten the pulley set bolt.
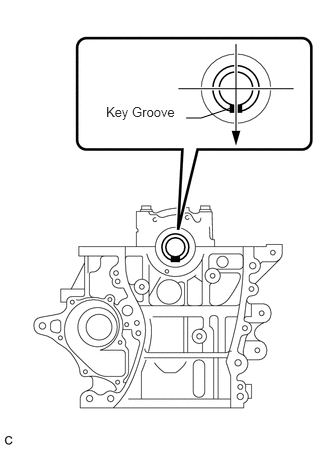
Turn the crankshaft so that the key groove is facing downward.
Apply seal packing in a continuous bead (diameter: 2.5 to 3.0 mm (0.098 to 0.118 in.)) to the places shown in the illustration.
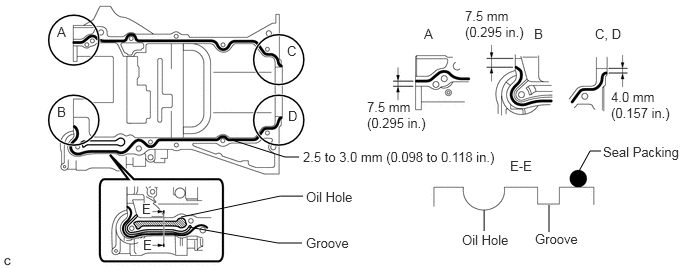
- Seal packing:
Toyota Genuine Seal Packing Black, Three bond 1207B or Equivalent
- NOTICE:
- ·
Remove any oil from the contact surface.
- ·
Ensure that no oil packing enters the oil path. The oil path has a groove to catch excess seal packing. Do not apply seal packing to the oil path side of the groove or to the groove itself, or seal packing may enter the oil path.
- ·
Install the stiffening crankcase assembly within 3 minutes and tighten the bolts within 15 minutes of applying seal packing.
·Do not add engine oil for at least 2 hours after the installation.
Install the stiffening crankcase assembly to the cylinder block.
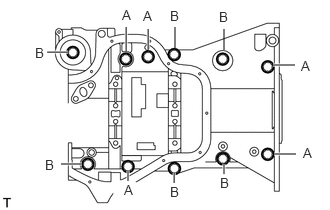
Temporarily install the stiffening crankcase assembly with the 11 bolts.
| Item | Bolt Length |
|---|---|
| Bolt A | 122 mm (4.80 in.) |
| Bolt B | 45 mm (1.77 in.) |
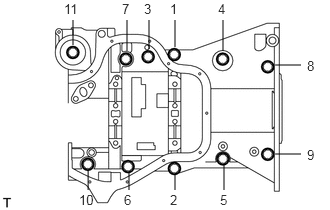
Using several steps, uniformly tighten the 11 bolts in the sequence shown in the illustration.
- Torque:
- 24 N*m (245 kgf*cm, 18 ft.*lbf)
Wipe off the excess seal packing with a clean piece of cloth.
11.INSTALL NO. 1 BALANCESHAFT BEARING
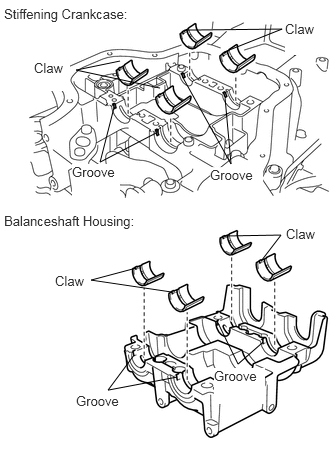
Clean each No. 1 balanceshaft bearing installation surface and inner and outer surfaces of the No. 1 balanceshaft bearing.
- NOTICE:
-
Do not apply engine oil to the No. 1 balanceshaft bearing installation surface or the outer surface of the No. 1 balanceshaft bearing.
Align the claw of the No. 1 balanceshaft bearing with the groove of the balanceshaft housing and install the 8 No. 1 balanceshaft bearings.
Apply engine oil to the inner surface of the No. 1 balanceshaft bearing.
12.INSTALL NO. 1 AND NO. 2 BALANCESHAFT
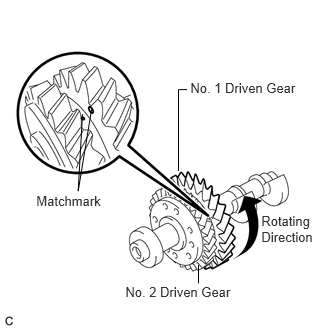
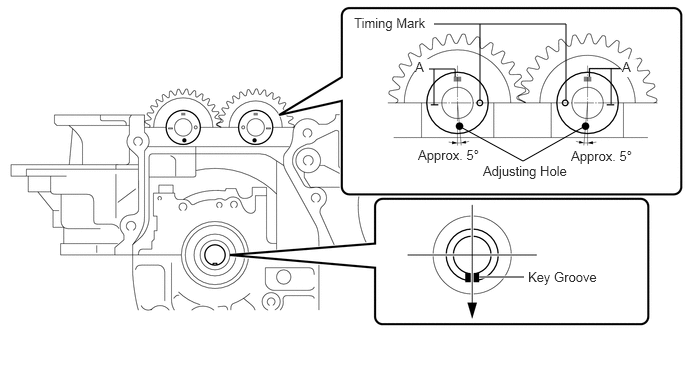
Turn the No. 1 driven gear counterclockwise until it stops, then align the matchmark of the No. 1 driven gear with that of the No. 2 driven gear.
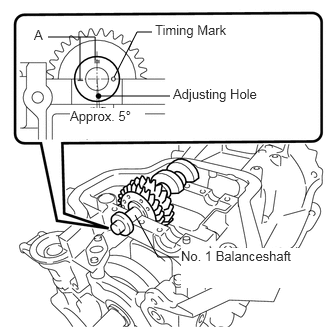
Install the No. 1 balanceshaft with the timing mark positioned as shown in the illustration. [*1]
- HINT:
-
(A) is not a timing mark.
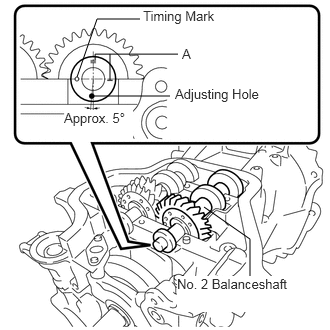
Install the No. 2 balanceshaft with the timing mark positioned as shown in the illustration.
- NOTICE:
-
Make sure that the key groove of the crankshaft and timing mark of the balanceshafts are positioned as shown in the illustration.
- HINT:
-
(A) is not a timing mark.
Apply a light coat of engine oil under the heads of the balanceshaft housing bolts.
Install the balanceshaft housing bolts.
- NOTICE:
-
The balanceshaft housing bolts are tightened in 2 progressive steps.
Step 1:
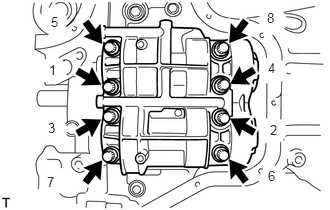
Install and uniformly tighten the 8 bolts in the order shown in the illustration.
- Torque:
- 21.6 N*m (220 kgf*cm, 16 ft.*lbf)
Step 2:
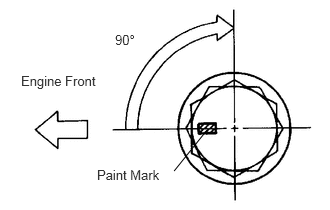
Mark the front side of each balanceshaft housing bolt head with paint.
Tighten the balanceshaft housing bolts 90° in the same order.
- NOTICE:
-
Check that the paint marks are now at a 90° angle to the front.
Turn the crankshaft 360° and check that the timing marks of the balanceshafts are positioned as shown in the illustration with the key groove of the crankshaft facing downward.
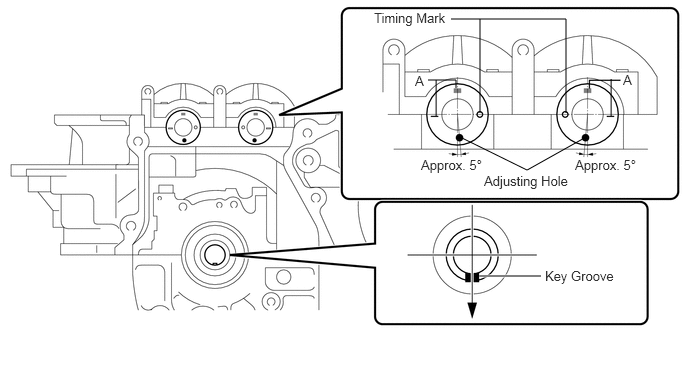
- NOTICE:
-
If the timing marks are not positioned as shown in the illustration, perform the procedure from step [*1] again.
- HINT:
-
(A) is not a timing mark.
Remove the pulley set bolt.
11401L
13.INSTALL REAR CRANKSHAFT OIL SEAL
Apply multi-purpose grease to the lip of a new rear crankshaft oil seal.
- NOTICE:
-
Keep the lip free of foreign objects.
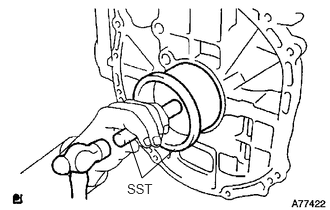
Using SST and a hammer, tap in the new rear crankshaft oil seal until its surface is flush with the rear crankshaft oil seal retainer edge.
- SST
- 09223-15030
09950-70010 (09951-07100)
- NOTICE:
- ·
Wipe any extra grease off of the crankshaft.
·Do not tap the rear crankshaft oil seal at an angle.
15678B
14.INSTALL OIL CONTROL VALVE FILTER
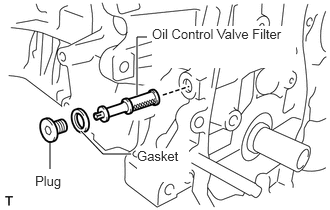
Check that there are no foreign objects on the mesh part of the oil control valve filter.
Using a 6 mm socket hexagon wrench, install a new gasket and the oil control valve filter with the plug.
- Torque:
- 30 N*m (306 kgf*cm, 22 ft.*lbf)
11415
15.INSTALL CYLINDER BLOCK WATER DRAIN COCK SUB-ASSEMBLY (w/o Oil Cooler)
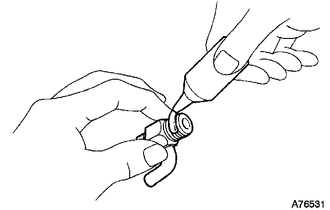
Apply adhesive to 2 or 3 threads of the cylinder block water drain cock sub-assembly.
- Adhesive:
Toyota Genuine Adhesive 1324, Three Bond 1324 or equivalent
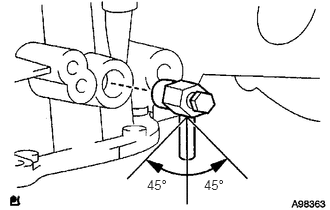
Install the drain cock as shown in the illustration.
- Torque:
- 25 N*m (255 kgf*cm, 18 ft.*lbf)
- NOTICE:
- ·
Install the cylinder block water drain cock sub-assembly within 3 minutes.
·Do not add coolant for 1 hour after installation.
·Be sure to only tighten the cylinder block water drain cock sub-assembly up to 360 degrees to position the pipe. Do not loosen the cylinder block water drain cock sub-assembly to position the pipe.
·Make sure to position the pipe within the range shown in the illustration.
11445
16.INSTALL CYLINDER BLOCK WATER JACKET SPACER
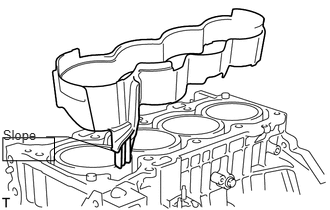
Install the water jacket spacer as shown in the illustration.
11115
17.INSTALL CYLINDER HEAD GASKET
11101
18.INSTALL CYLINDER HEAD SUB-ASSEMBLY
13050
19.INSTALL CAMSHAFT TIMING GEAR ASSEMBLY
13523
20.INSTALL NO. 2 CAMSHAFT TIMING SPROCKET
11821
21.INSTALL NO. 2 CAMSHAFT BEARING
11811
22.INSTALL NO. 1 CAMSHAFT BEARING
13511
23.INSTALL CAMSHAFT
13519
24.INSTALL OIL PUMP DRIVE GEAR
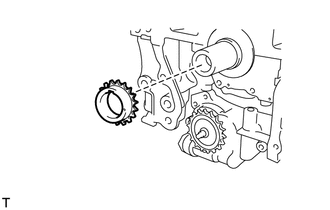
15100
25.INSTALL OIL PUMP ASSEMBLY
13507
26.INSTALL NO. 2 CHAIN SUB-ASSEMBLY
13521
27.INSTALL CRANKSHAFT TIMING SPROCKET
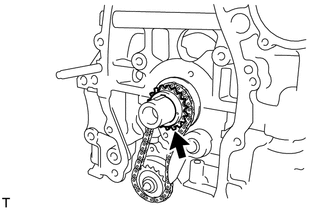
13561
28.INSTALL NO. 1 CHAIN VIBRATION DAMPER
13506
29.INSTALL CHAIN SUB-ASSEMBLY
13559
30.INSTALL CHAIN TENSIONER SLIPPER
13566B
31.INSTALL TIMING CHAIN GUIDE
19315
32.INSTALL NO. 1 CRANKSHAFT POSITION SENSOR PLATE
11301C
33.REPLACE TIMING CHAIN COVER OIL SEAL
11302
34.INSTALL TIMING CHAIN COVER SUB-ASSEMBLY
16620
35.INSTALL V-RIBBED BELT TENSIONER ASSEMBLY
13540
36.INSTALL NO. 1 CHAIN TENSIONER ASSEMBLY
12101
37.INSTALL OIL PAN SUB-ASSEMBLY
12101A
38.INSTALL OIL PAN DRAIN PLUG
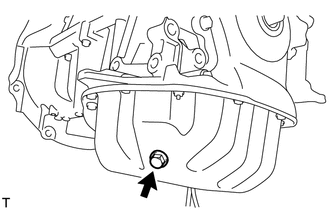
Place a new gasket on the oil pan drain plug, then install it onto the oil pan.
- Torque:
- 40 N*m (408 kgf*cm, 30 ft.*lbf)
13471
39.INSTALL CRANKSHAFT PULLEY
40.INSTALL ENGINE OIL COOLER (w/ Oil Cooler)
Clean the oil cooler contact surface on the engine.
Install a new O-ring to the oil cooler.
Apply a light coat of engine oil on the threads and under the head of the oil cooler union.
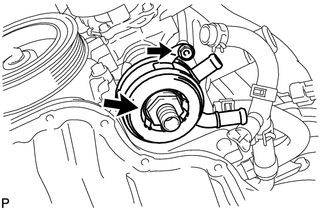
Install the oil cooler with the plate washer, oil cooler union and nut.
- Torque:
- 79 N*m (806 kgf*cm, 58 ft.*lbf)
for oil cooler union
- 9.0 N*m (92 kgf*cm, 80 in.*lbf)
for nut
15601
41.INSTALL OIL FILTER SUB-ASSEMBLY
11101J
42.INSTALL CAMSHAFT TIMING OIL CONTROL VALVE ASSEMBLY
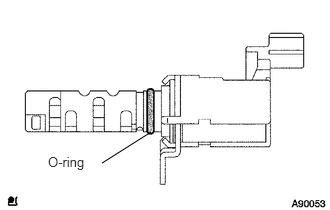
Apply a light coat of engine oil to a new O-ring, then install it onto the camshaft timing oil control valve assembly.
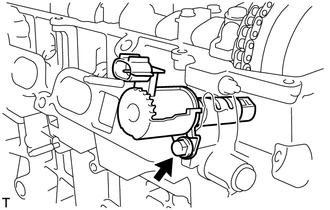
Install the camshaft timing oil control valve assembly with the bolt.
- Torque:
- 9.0 N*m (92 kgf*cm, 80 in.*lbf)
16100
43.INSTALL WATER PUMP ASSEMBLY
16173
44.INSTALL WATER PUMP PULLEY
11301K
45.INSTALL CRANKSHAFT POSITION SENSOR
46.SET NO. 1 CYLINDER TO TDC/COMPRESSION
47.INSPECT AND ADJUST VALVE CLEARANCE
11213
48.INSTALL CYLINDER HEAD COVER GASKET
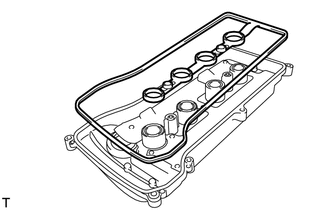
Install the gasket onto the cylinder head cover sub-assembly.
11201
49.INSTALL CYLINDER HEAD COVER SUB-ASSEMBLY
12204
50.INSTALL VENTILATION VALVE SUB-ASSEMBLY
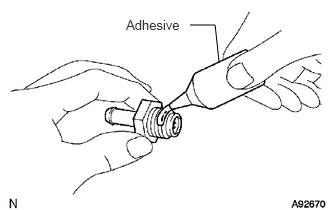
Apply adhesive to the threads of the ventilation valve sub-assembly.
- Adhesive:
Toyota Genuine Adhesive 1324, Three Bond 1324 or equivalent
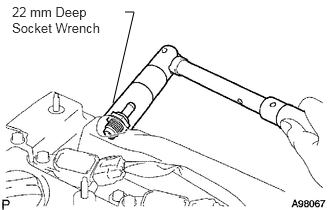
Using a 22 mm deep socket wrench, install the ventilation valve sub-assembly.
- Torque:
- 19 N*m (194 kgf*cm, 14 ft.*lbf)
12108
51.INSTALL OIL FILLER CAP SUB-ASSEMBLY
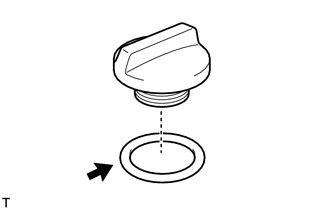
Install the gasket to the cap.
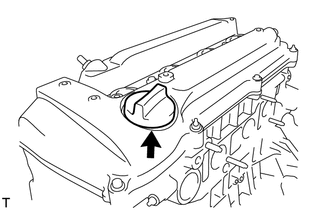
Install the oil filler cap sub-assembly.
19100P
52.INSTALL SPARK PLUG
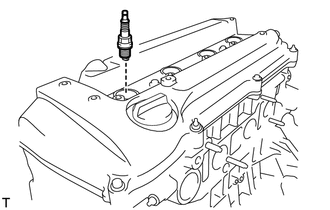
- Torque:
- 19 N*m (194 kgf*cm, 14 ft.*lbf)
19500
53.INSTALL IGNITION COIL ASSEMBLY
11102A
54.INSTALL CAMSHAFT POSITION SENSOR
89422
55.INSTALL ENGINE COOLANT TEMPERATURE SENSOR
83530
56.INSTALL OIL PRESSURE SWITCH
57.INSTALL RADIO SETTING CONDENSER
89615
58.INSTALL KNOCK SENSOR
59.INSTALL UNION BOLT (w/ Oil Cooler)
Apply adhesive to the threads of the union bolt.
- Adhesive:
Toyota Genuine Adhesive 1324, Three Bond 1324 or equivalent
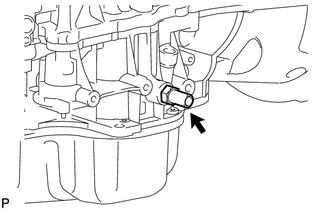
Install the union bolt.
- Torque:
- 25 N*m (255 kgf*cm, 18 ft.*lbf)
15777B
60.INSTALL OIL COOLER PIPE (w/ Oil Cooler)
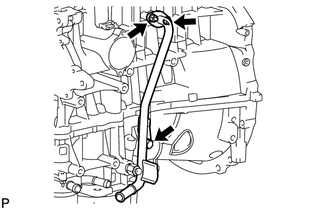
Install a new gasket and the oil cooler pipe with the bolt and 2 nuts.
- Torque:
- 9.0 N*m (92 kgf*cm, 80 in.*lbf)
15777
61.CONNECT NO. 3 WATER BY-PASS HOSE (w/ Oil Cooler)
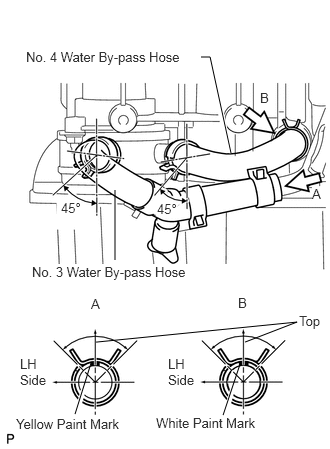
Connect the No. 3 water by-pass hose to the oil cooler.
15777C
62.CONNECT NO. 4 WATER BY-PASS HOSE (w/ Oil Cooler)
Connect the No. 4 water by-pass hose to the oil cooler.
16268
63.INSTALL NO. 1 WATER BY-PASS PIPE
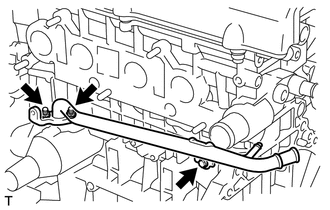
Install a new gasket and the No. 1 water by-pass pipe with the bolt and 2 nuts.
- Torque:
- 9.0 N*m (92 kgf*cm, 80 in.*lbf)
16279G
64.INSTALL NO. 4 WATER BY-PASS PIPE (w/ Oil Cooler)
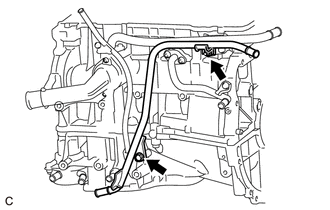
for CVT:
Install the No. 4 water by-pass pipe with the bolt and nut.
- Torque:
- 9.0 N*m (92 kgf*cm, 80 in.*lbf)
16331A
65.INSTALL THERMOSTAT
16321
66.INSTALL WATER INLET
25051
67.INSTALL EXHAUST MANIFOLD CONVERTER SUB-ASSEMBLY
17167
68.INSTALL NO. 1 EXHAUST MANIFOLD HEAT INSULATOR
17139
69.INSTALL NO. 2 MANIFOLD STAY
17118
70.INSTALL MANIFOLD STAY
11452
71.INSTALL ENGINE OIL LEVEL DIPSTICK GUIDE
15301
72.INSTALL ENGINE OIL LEVEL DIPSTICK
16631A
73.INSTALL IDLER PULLEY BRACKET