INTERIOR PANEL LOWER INSTRUMENT PANEL INSTALLATION
PROCEDURE

 55312
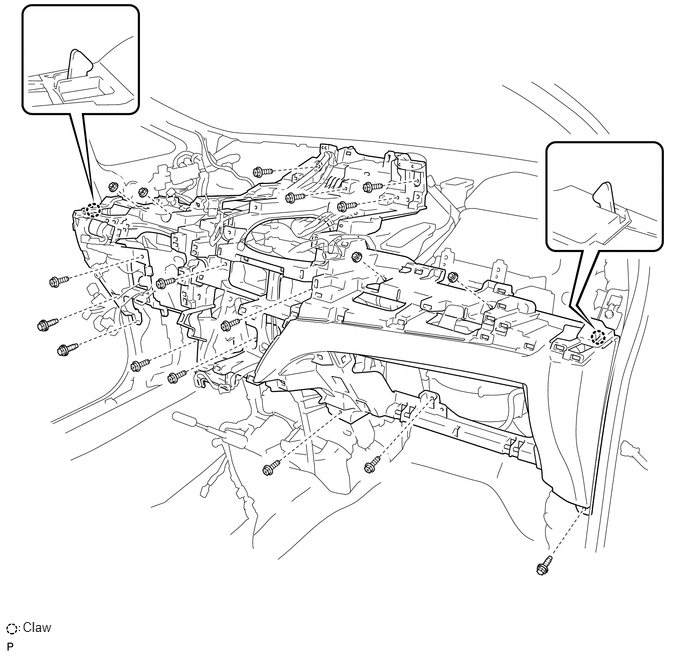
1.INSTALL INSTRUMENT PANEL LOWER
Install the 3 bolts, 11 screws and 4 nuts to install the instrument panel lower.
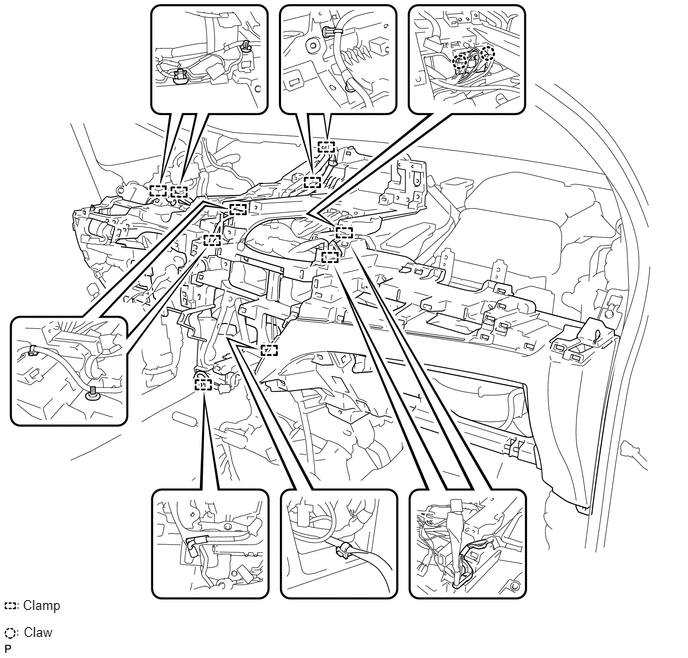
Connect each connector and each clamp.
86860
2.INSTALL NAVIGATION ANTENNA ASSEMBLY (w/ Navigation System)
83100
3.INSTALL COMBINATION METER ASSEMBLY
Engage the 2 claws.
Install the combination meter assembly with the 4 screws.
Connect the connector.
55401E
4.INSTALL INSTRUMENT PANEL SAFETY PAD SUB-ASSEMBLY (w/o Knee Airbag)
Install the instrument panel safety pad sub-assembly with the bolt.
55400
5.INSTALL INSTRUMENT PANEL SAFETY PAD ASSEMBLY (w/o Knee Airbag)
Install the instrument panel safety pad assembly with the 2 bolts.
73900
6.INSTALL DRIVER SIDE KNEE AIRBAG ASSEMBLY (w/ Knee Airbag)
33560
7.INSTALL SHIFT LOCK CONTROL UNIT ASSEMBLY
for LHD with U241E (See page Drivetrain>U241E (AUTOMATIC TRANSMISSION / TRANSAXLE)>SHIFT LEVER(for LHD)>INSTALLATION)
for RHD with U241E (See page Drivetrain>U241E (AUTOMATIC TRANSMISSION / TRANSAXLE)>SHIFT LEVER(for RHD)>INSTALLATION)
for LHD with U660E (See page Drivetrain>U660E (AUTOMATIC TRANSMISSION / TRANSAXLE)>SHIFT LEVER(for LHD)>INSTALLATION)
for RHD with U660E (See page Drivetrain>U660E (AUTOMATIC TRANSMISSION / TRANSAXLE)>SHIFT LEVER(for RHD)>INSTALLATION)
for LHD with K112 (See page Drivetrain>K112 (CVT)>SHIFT LEVER(for LHD)>INSTALLATION)
for RHD with K112 (See page Drivetrain>K112 (CVT)>SHIFT LEVER(for RHD)>INSTALLATION)
33820B
8.CONNECT TRANSMISSION CONTROL CABLE ASSEMBLY
for LHD with U241E (See page Drivetrain>U241E (AUTOMATIC TRANSMISSION / TRANSAXLE)>SHIFT LEVER(for LHD)>INSTALLATION)
for RHD with U241E (See page Drivetrain>U241E (AUTOMATIC TRANSMISSION / TRANSAXLE)>SHIFT LEVER(for RHD)>INSTALLATION)
for LHD with U660E (See page Drivetrain>U660E (AUTOMATIC TRANSMISSION / TRANSAXLE)>SHIFT LEVER(for LHD)>INSTALLATION)
for RHD with U660E (See page Drivetrain>U660E (AUTOMATIC TRANSMISSION / TRANSAXLE)>SHIFT LEVER(for RHD)>INSTALLATION)
for LHD with K112 (See page Drivetrain>K112 (CVT)>SHIFT LEVER(for LHD)>INSTALLATION)
for RHD with K112 (See page Drivetrain>K112 (CVT)>SHIFT LEVER(for RHD)>INSTALLATION)
55900A
9.INSTALL HEATER CONTROL AND ACCESSORY (for LHD)
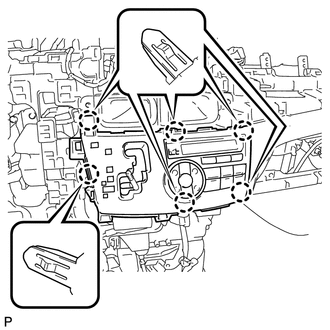
Connect each connector.
Engage the 6 claws to install the heater control and accessory.
55433B
10.INSTALL NO. 2 INSTRUMENT PANEL FINISH PANEL LOWER (for LHD)
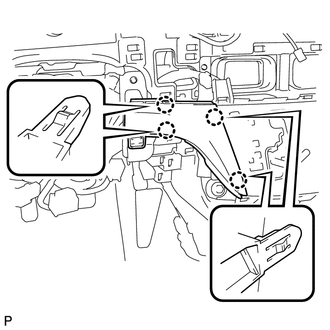
Engage the 4 claws to install the No. 2 instrument panel finish panel lower.
55475B
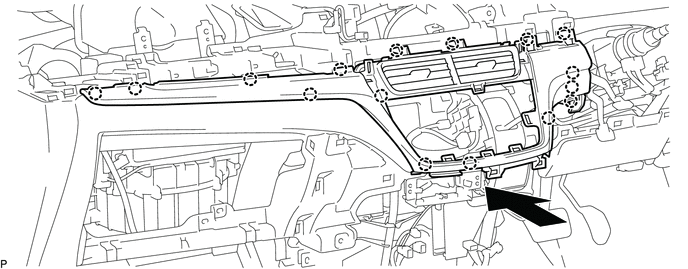
11.INSTALL CENTER INSTRUMENT CLUSTER FINISH PANEL GARNISH (for RHD)
Engage the 16 claws to install the center instrument cluster finish panel garnish as shown in the illustration.
55434B
12.INSTALL INSTRUMENT PANEL FINISH PANEL LOWER CENTER
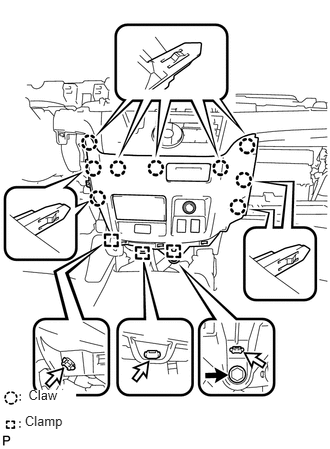
Engage the 3 clamps and 9 claws to install the instrument panel finish panel lower center.
Install the bolt.
58533C
13.INSTALL FLOOR CARPET COVER CENTER RH
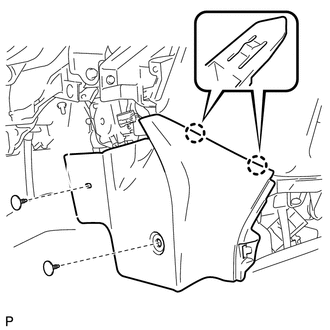
Engage the 2 claws.
Install the floor carpet cover center RH with the 2 clips.
58534E
14.INSTALL FLOOR CARPET COVER CENTER LH
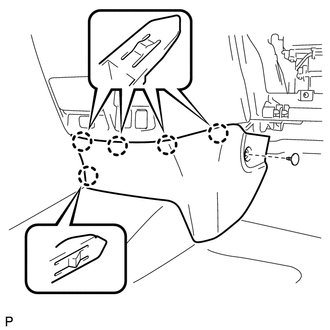
Engage the 5 claws.
Install the floor carpet cover center LH with a clip.
55432B
15.INSTALL INSTRUMENT PANEL FINISH PANEL LOWER (w/ Knee Airbag)
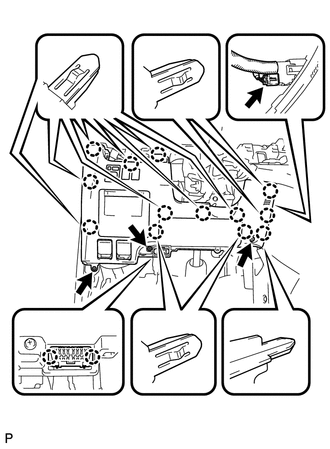
Connect each connector.
Install the duct to the room temperature sensor.
Connect the hood lock control lever cable and fuel lid open lever cable.
Engage the 13 claws.
Install the instrument panel finish panel lower with the 3 bolts.
55432B
16.INSTALL INSTRUMENT PANEL FINISH PANEL LOWER (w/o Knee Airbag)
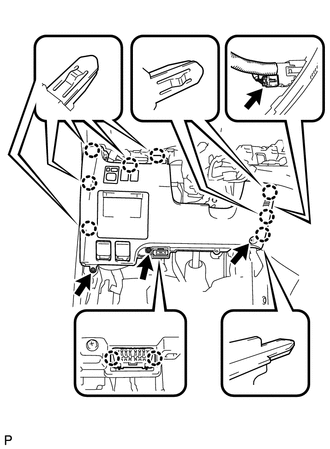
Connect the connector.
Install the duct to the room temperature sensor.
Connect the hood lock control lever cable and fuel lid open lever cable.
Engage the 8 claws.
Install the instrument panel finish panel lower with the 3 bolts.
55606
17.INSTALL NO. 1 INSTRUMENT PANEL UNDER COVER SUB-ASSEMBLY
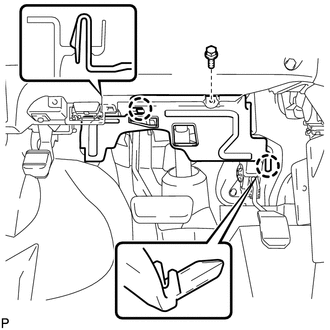
Engage the guide and 2 claws.
Install the No. 1 instrument panel under cover sub-assembly with the screw.
55446A
18.INSTALL NO. 1 SWITCH HOLE BASE
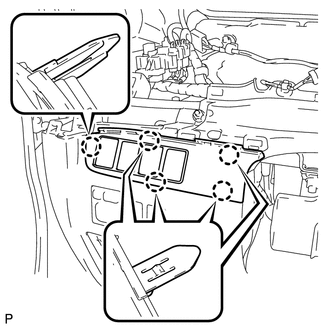
Connect each connector.
Engage the 5 claws to install the No. 1 switch hole base.
55474B
19.INSTALL INSTRUMENT CLUSTER FINISH PANEL GARNISH (for LHD)
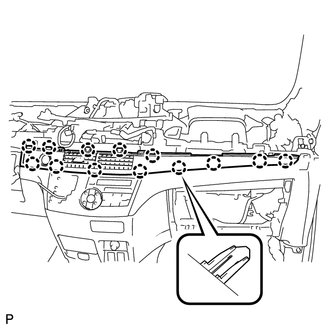
Connect the connector.
Engage the 13 claws to install the instrument cluster finish panel garnish.
89340A
20.INSTALL CLEARANCE WARNING ECU ASSEMBLY (w/ Clearance Sonar)
55607
21.INSTALL NO. 2 INSTRUMENT PANEL UNDER COVER SUB-ASSEMBLY
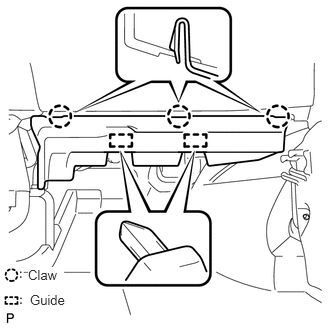
Engage the 3 claws and 2 guides to install the No. 2 instrument panel under cover sub-assembly.
62112
22.INSTALL COWL SIDE TRIM BOARD LH
62111C
23.INSTALL COWL SIDE TRIM BOARD RH
- HINT:
-
Use the same procedures described for the LH side.
67914B
24.INSTALL FRONT DOOR SCUFF PLATE LH
67913B
25.INSTALL FRONT DOOR SCUFF PLATE RH
- HINT:
-
Use the same procedures described for the LH side.
33504F
26.INSTALL SHIFT LEVER KNOB SUB-ASSEMBLY (for LHD)
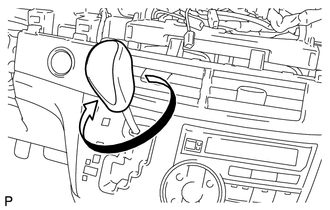
Turn the shift lever knob sub-assembly clockwise to install the shift lever knob sub-assembly.
55302A
27.INSTALL UPPER INSTRUMENT PANEL SUB-ASSEMBLY
28800
28.CONNECT CABLE FROM NEGATIVE BATTERY TERMINAL
29.CHECK SRS WARNING LIGHT
28800
30.PERFORM INITIALIZATION
(See page General>INTRODUCTION>REPAIR INSTRUCTION>INITIALIZATION)
- NOTICE:
-
Certain systems need to be initialized after disconnecting and reconnecting the cable from the negative (-) battery terminal.