INTERIOR PANEL UPPER INSTRUMENT PANEL INSTALLATION
PROCEDURE

 55302A
1.INSTALL UPPER INSTRUMENT PANEL
Connect the wire.
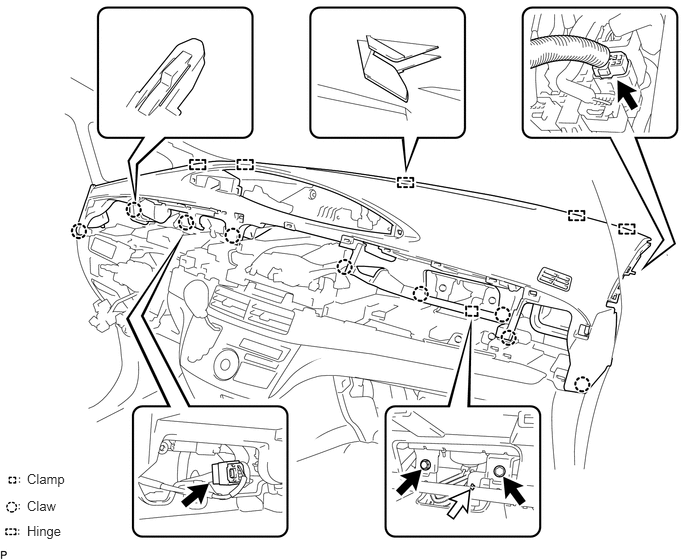
Engage the 9 claws and 5 guides.
Install the 2 bolts the passenger airbag.
- Torque:
- 20 N*m (204 kgf*cm, 15 ft.*lbf)
Connect the connectors and clamps, and install to upper instrument panel.
2.CONNECT FRONT PASSENGER AIRBAG CONNECTOR
55550
3.INSTALL GLOVE COMPARTMENT DOOR ASSEMBLY
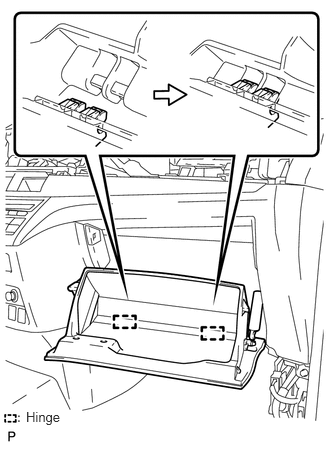
Position the glove compartment door assembly horizontally and engage the 2 hinges.
- NOTICE:
-
Engaging the hinges from above causes the hinges to be deformed. Be sure to install the glove compartment door horizontally.
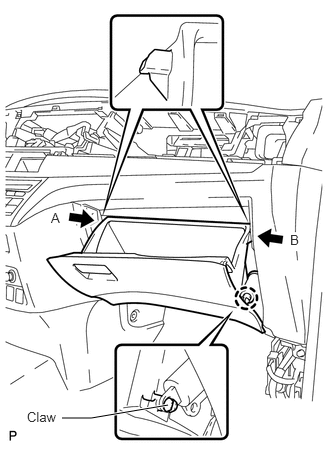
Bend parts A and B in the directions indicated by the arrows in the illustration to engage the 2 stoppers.
Engage the claw of the glove compartment door stopper to connect the glove compartment door stopper, and install the glove compartment door assembly.
62212
4.INSTALL FRONT PILLAR GARNISH LH (w/o Curtain Shield Airbag)
62212
5.INSTALL FRONT PILLAR GARNISH LH (w/ Curtain Shield Airbag)
62226
6.INSTALL FRONT PILLAR GARNISH LOWER LH
62211
7.INSTALL FRONT PILLAR GARNISH RH (w/o Curtain Shield Airbag)
62211
8.INSTALL FRONT PILLAR GARNISH RH (w/ Curtain Shield Airbag)
62225A
9.INSTALL FRONT PILLAR GARNISH LOWER RH
55042B
10.INSTALL NO. 2 INSTRUMENT PANEL BOX DOOR SUB-ASSEMBLY (for LHD)
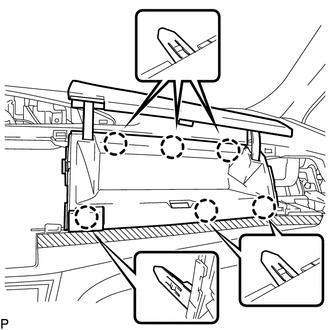
Engage the 6 claws to install the box door.
55660
11.INSTALL NO. 2 INSTRUMENT PANEL REGISTER ASSEMBLY (for LHD)
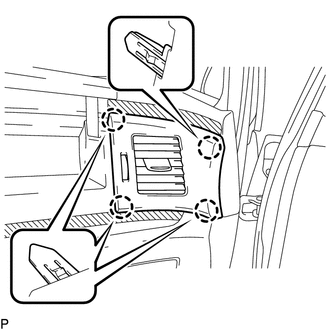
Engage the 4 claws to install the register.
55042B
12.INSTALL NO. 2 INSTRUMENT PANEL BOX DOOR SUB-ASSEMBLY (for RHD)
Engage the 10 claws to install the No. 2 instrument panel box door sub-assembly.
55041B
13.INSTALL NO. 1 INSTRUMENT PANEL BOX DOOR SUB-ASSEMBLY (for LHD)
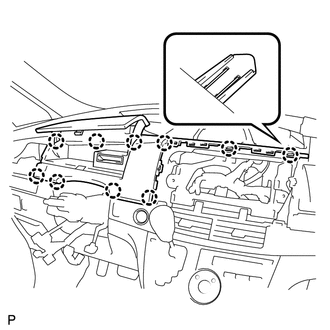
Engage the 10 claws to install the box door.
55650
14.INSTALL NO. 1 INSTRUMENT PANEL REGISTER ASSEMBLY (for LHD)
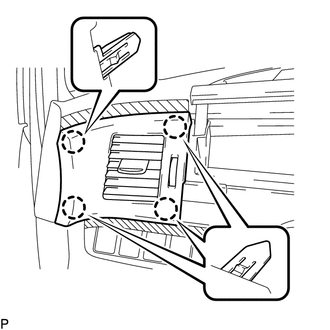
Engage the 4 claws to install the register.
55041B
15.INSTALL NO. 1 INSTRUMENT PANEL BOX DOOR SUB-ASSEMBLY (for RHD)
Connect the connector.
Engage the 13 claws to install the No. 1 instrument panel box door sub-assembly.
16.INSTALL TURN SIGNAL SWITCH ASSEMBLY WITH SPIRAL CABLE (for LHD)
45286
17.INSTALL STEERING COLUMN COVER (for LHD)
45100
18.INSTALL STEERING WHEEL ASSEMBLY (for LHD)
19.INSTALL TURN SIGNAL SWITCH ASSEMBLY WITH SPIRAL CABLE (for RHD)
45286
20.INSTALL STEERING COLUMN COVER (for RHD)
45100
21.INSTALL STEERING WHEEL ASSEMBLY (for RHD)
45130
22.INSTALL STEERING PAD ASSEMBLY (for LHD)
45186
23.INSTALL NO. 2 STEERING WHEEL LOWER COVER (for LHD)
45187
24.INSTALL NO. 3 STEERING WHEEL LOWER COVER (for LHD)
45130
25.INSTALL STEERING PAD ASSEMBLY (for RHD)
45187
26.INSTALL LOWER NO. 3 STEERING WHEEL COVER (for RHD)
45186
27.INSTALL LOWER NO. 2 STEERING WHEEL COVER (for RHD)
55522B
28.INSTALL RADIO TUNER OPENING COVER (w/o Radio Receiver)
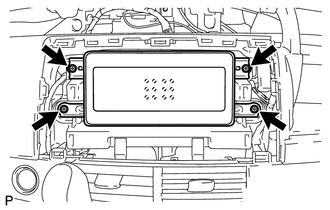
Install the opening cover with the 4 screws.
29.INSTALL RADIO RECEIVER ASSEMBLY WITH BRACKET (for Radio Receiver Type)
30.INSTALL NAVIGATION RECEIVER ASSEMBLY WITH BRACKET (for Navigation Receiver Type)
55414A
31.INSTALL INSTRUMENT CLUSTER FINISH PANEL END (for LHD)
w/o Navigation System:
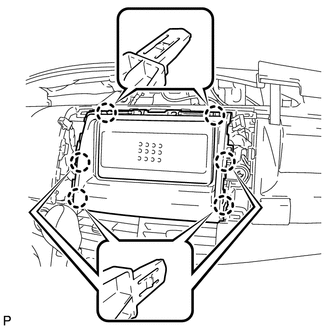
Engage the 6 claws to install the panel end.
55420A
32.INSTALL INSTRUMENT CLUSTER FINISH PANEL CENTER ASSEMBLY (for LHD)
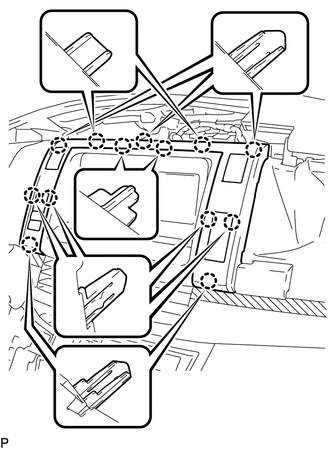
Engage the 13 claws to install the panel center and then connect the connectors.
55414A
33.INSTALL INSTRUMENT CLUSTER FINISH PANEL END (for RHD)
Engage the 2 claws.
Install the instrument cluster finish panel end with the 2 screws.
34.INSTALL CENTER INSTRUMENT CLUSTER FINISH PANEL ASSEMBLY (for RHD)
Connect each connector.
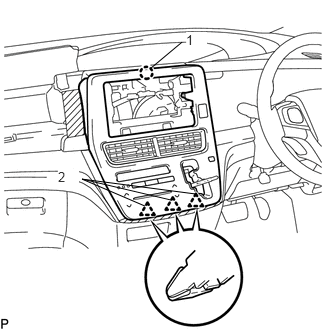
Align and insert the claw and 3 clips in the order as shown in the illustration.
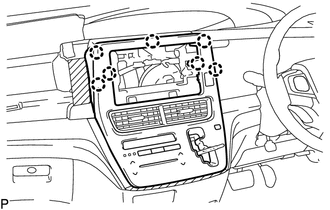
Engage the 7 claws.
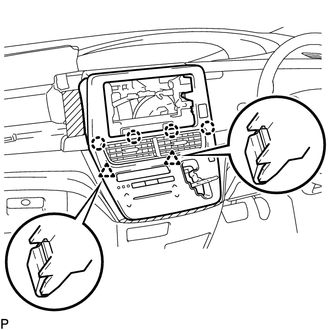
Engage the 4 claws and 2 clips.
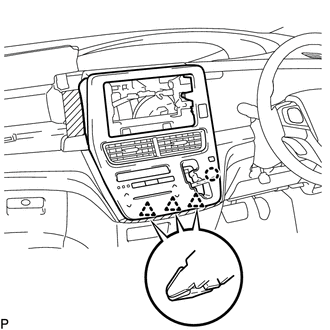
Engage the claw and 3 clips to install the center instrument cluster finish panel assembly.
Move the shift lever to P.
33504F
35.INSTALL SHIFT LEVER KNOB SUB-ASSEMBLY (for RHD)
for U241E: (See page Drivetrain>U241E (AUTOMATIC TRANSMISSION / TRANSAXLE)>SHIFT LEVER(for RHD)>INSTALLATION)
for U660E: (See page Drivetrain>U660E (AUTOMATIC TRANSMISSION / TRANSAXLE)>SHIFT LEVER(for RHD)>INSTALLATION)
for K112: (See page Drivetrain>K112 (CVT)>SHIFT LEVER(for RHD)>INSTALLATION)
55404C
36.INSTALL INSTRUMENT CLUSTER FINISH PANEL SUB-ASSEMBLY
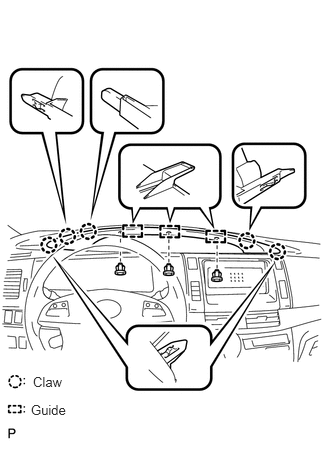
Engage the 5 claws and 3 guides to install the finish panel.
Install the 3 clips.
37.CONNECT CABLE TO NEGATIVE BATTERY TERMINAL
38.CHECK SRS WARNING LIGHT
39.PERFORM INITIALIZATION
Perform initialization (See page General>INTRODUCTION>REPAIR INSTRUCTION>INITIALIZATION).
- NOTICE:
-
Certain systems need to be initialized after disconnecting and reconnecting the cable from the negative (-) battery terminal.