INTERIOR ROOF HEADLINING REMOVAL
PROCEDURE

 1.DISCONNECT CABLE FROM NEGATIVE BATTERY TERMINAL
- CAUTION:
-
Wait at least 90 seconds after disconnecting the cable from the negative (-) battery terminal to disable the SRS system.
- NOTICE:
-
When disconnecting the cable, some systems need to be initialized after the cable is reconnected (See page General>INTRODUCTION>REPAIR INSTRUCTION>INITIALIZATION).
67914B
2.REMOVE FRONT DOOR SCUFF PLATE LH
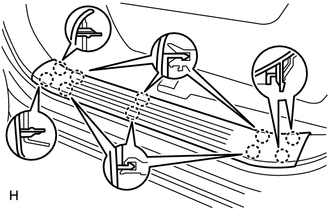
Using a screwdriver, detach the 10 claws and remove the scuff plate.
- HINT:
-
Tape the screwdriver tip before use.
67913B
3.REMOVE FRONT DOOR SCUFF PLATE RH
- HINT:
-
Use the same procedures described for the LH side.
62112
4.REMOVE COWL SIDE TRIM BOARD LH
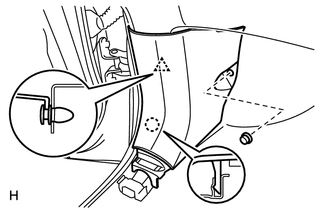
Remove the cap nut.
Using a screwdriver, detach the claw.
- HINT:
-
Tape the screwdriver tip before use.
Using a clip remover, detach the clip and remove the trim board.
62111C
5.REMOVE COWL SIDE TRIM BOARD RH
- HINT:
-
Use the same procedures described for the LH side.
62312C
6.REMOVE FRONT DOOR OPENING TRIM WEATHERSTRIP LH
62311C
7.REMOVE FRONT DOOR OPENING TRIM WEATHERSTRIP RH
62226
8.REMOVE FRONT PILLAR GARNISH LOWER LH
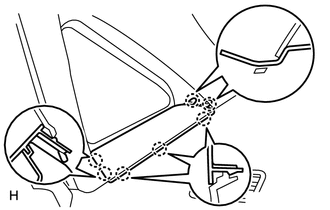
Detach the 7 claws and remove the garnish.
62225A
9.REMOVE FRONT PILLAR GARNISH LOWER RH
Detach the 7 claws and remove the garnish.
62212
10.REMOVE FRONT PILLAR GARNISH LH (w/o Curtain Shield Airbag)
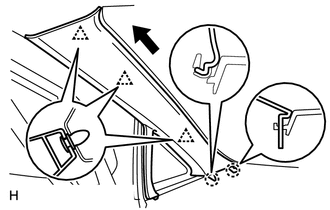
Using a clip remover, detach the 3 clips.
Pull the garnish in the direction indicated by the arrow in the illustration to detach the 2 claws. Then remove the garnish.
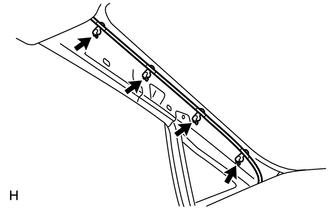
Using a clip remover, remove the 4 wire harness clamps.
62212
11.REMOVE FRONT PILLAR GARNISH LH (w/ Curtain Shield Airbag)
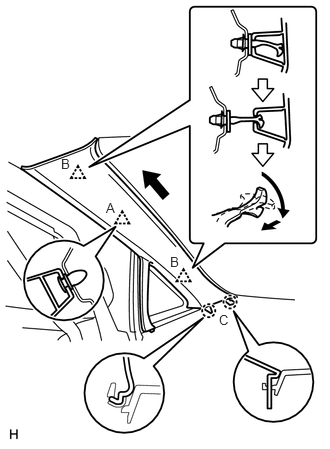
Detach the clip labeled A from the vehicle body. Pull the pillar garnish so that the base of the 2 clips labeled B detach. Then pull until the tips of the 2 clips labeled B lock in the pillar garnish's holes.
Using needle-nose pliers, rotate the 2 clips labeled B 90°. Then pull the pillar garnish to release the tips of the 2 clips labeled B from the pillar garnish.
Pull the pillar garnish in the direction indicated by the arrow in the illustration to detach the 2 claws labeled C.
Remove the 2 clips labeled B from the vehicle body.
Using a clip remover, remove the 4 wire harness clamps.
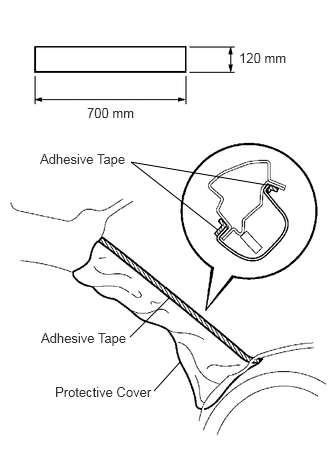
Thoroughly cover the airbag with cloth or nylon of 700 mm (27.56 in.) x 120 mm (4.72 in.) and fix the ends of the cover in place with adhesive tape, as shown in the illustration.
- NOTICE:
-
Cover the curtain shield airbag with a protective cover as soon as the front pillar garnish is removed.
62211
12.REMOVE FRONT PILLAR GARNISH RH (w/o Curtain Shield Airbag)
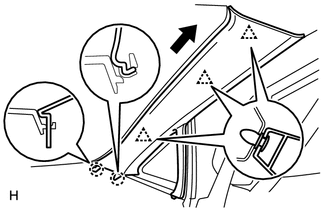
Using a clip remover, detach the 3 clips.
Pull the garnish in the direction indicated by the arrow in the illustration to detach the 2 claws. Then remove the garnish.
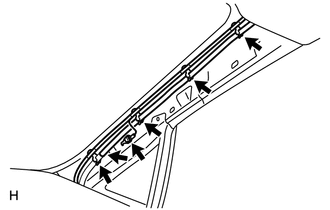
Disconnect the washer hose.
Remove the bolt and disconnect the ground wire.
Using a clip remover, remove the 4 antenna cord clamps.
62211
13.REMOVE FRONT PILLAR GARNISH RH (w/ Curtain Shield Airbag)
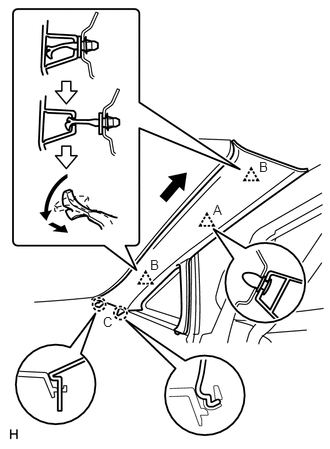
Detach the clip labeled A from the vehicle body. Pull the pillar garnish so that the base of the 2 clips labeled B detach. Then pull until the tips of the 2 clips labeled B lock in the pillar garnish's holes.
Using needle-nose pliers, rotate the 2 clips labeled B 90°. Then pull the pillar garnish to release the tips of the 2 clips labeled B from the pillar garnish.
Pull the pillar garnish in the direction indicated by the arrow in the illustration to detach the 2 claws labeled C.
Remove the 2 clips labeled B from the vehicle body.
Disconnect the washer hose.
Remove the bolt and disconnect the ground wire.
Using a clip remover, remove the 4 antenna cord clamps.
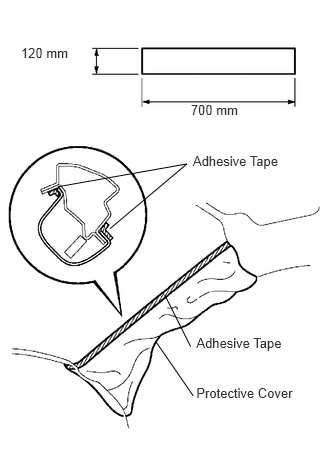
Thoroughly cover the airbag with cloth or nylon of 700 mm (27.56 in.) x 120 mm (4.72 in.) and fix the ends of the cover in place with adhesive tape, as shown in the illustration.
- NOTICE:
-
Cover the curtain shield airbag with a protective cover as soon as the front pillar garnish is removed.
67918D
14.REMOVE REAR DOOR SCUFF PLATE LH
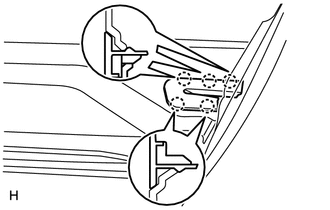
Detach the 5 claws and remove the plate.
67911A
15.REMOVE REAR DOOR SCUFF PLATE RH
Detach the 5 claws and remove the plate.
67918E
16.REMOVE REAR DOOR SCUFF PLATE LH
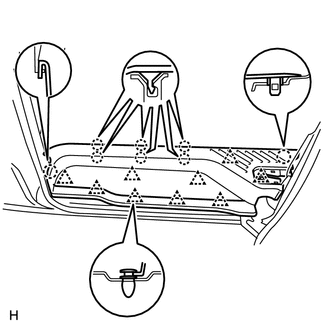
Using a screwdriver, detach the 8 claws.
- HINT:
-
Tape the screwdriver tip before use.
Using a clip remover, detach the 9 clips and remove the scuff plate.
67917C
17.REMOVE REAR DOOR SCUFF PLATE RH
- HINT:
-
Use the same procedures described for the LH side.
67872A
18.REMOVE NO. 1 SLIDE DOOR WEATHERSTRIP LH
67871E
19.REMOVE NO. 1 SLIDE DOOR WEATHERSTRIP RH
62414A
20.REMOVE CENTER PILLAR GARNISH LOWER LH
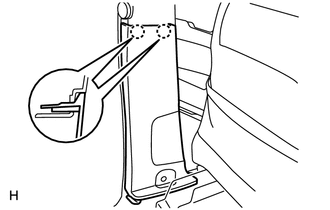
Disconnect the front seat outer belt's floor anchor.
Remove the anchor cover.
Remove the bolt and disconnect the floor anchor.
Detach the 2 claws and remove the garnish.
62413A
21.REMOVE CENTER PILLAR GARNISH LOWER RH
- HINT:
-
Use the same procedures described for the LH side.
74617A
22.REMOVE ASSIST GRIP PLUG
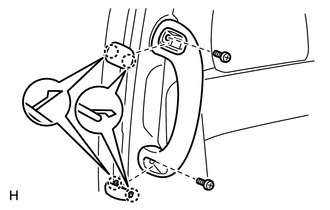
Using a screwdriver, detach the 4 claws and remove the 2 assist grip plugs.
- HINT:
-
Tape the screwdriver tip before use.
74603C
23.REMOVE ASSIST GRIP SUB-ASSEMBLY
Remove the 2 screws and assist grip.
62412
24.REMOVE CENTER PILLAR GARNISH LH
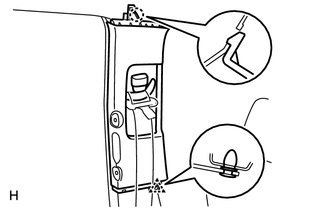
Using a clip remover, detach the clip.
Detach the claw and remove the garnish.
62411
25.REMOVE CENTER PILLAR GARNISH RH
- HINT:
-
Use the same procedures described for the LH side.
64420A
26.REMOVE LUGGAGE ROOM BOX LID ASSEMBLY (for Tumble Seat Type, Manual Stowing Seat Type)
72137E
27.REMOVE NO. 1 SEAT TRACK COVER (for Tumble Seat Type LH Side)
28.REMOVE REAR NO. 2 SEAT ASSEMBLY LH (for Tumble Seat Type LH Side)
72137E
29.REMOVE NO. 1 SEAT TRACK COVER (for Tumble Seat Type RH Side)
30.REMOVE REAR NO. 2 SEAT ASSEMBLY RH (for Tumble Seat Type RH Side)
79236B
31.REMOVE NO. 2 SEAT LEG COVER LH (for Power Stowing Seat Type LH Side)
79384
32.REMOVE NO. 3 SEAT LEG COVER REAR LH (for Power Stowing Seat Type LH Side)
79273A
33.REMOVE NO. 2 SEAT HINGE COVER (for Power Stowing Seat Type LH Side)
34.REMOVE REAR NO. 2 SEAT ASSEMBLY LH (for Power Stowing Seat Type LH Side)
79040
35.REMOVE NO. 3 SEAT LEG ASSEMBLY LH (for Power Stowing Seat Type LH Side)
79236A
36.REMOVE NO. 2 SEAT LEG COVER (for Power Stowing Seat Type RH Side)
79374
37.REMOVE NO. 3 SEAT LEG COVER REAR RH (for Power Stowing Seat Type RH Side)
79273
38.REMOVE NO. 2 SEAT HINGE COVER (for Power Stowing Seat Type RH Side)
39.REMOVE REAR NO. 2 SEAT ASSEMBLY RH (for Power Stowing Seat Type RH Side)
79030
40.REMOVE NO. 3 SEAT LEG ASSEMBLY RH (for Power Stowing Seat Type RH Side)
79384
41.REMOVE NO. 3 SEAT LEG COVER REAR LH (for Manual Stowing Seat Type LH Side)
79236B
42.REMOVE NO. 2 SEAT LEG COVER LH (for Manual Stowing Seat Type LH Side)
79236A
43.REMOVE NO. 2 SEAT LEG COVER (for Manual Stowing Seat Type LH Side)
79273A
44.REMOVE NO. 2 SEAT HINGE COVER (for Manual Stowing Seat Type LH Side)
45.REMOVE REAR NO. 2 SEAT ASSEMBLY LH (for Manual Stowing Seat Type LH Side)
72906
46.REMOVE 3RD SEAT LINK SUB-ASSEMBLY LH (for Manual Stowing Seat Type LH Side)
79374
47.REMOVE NO. 3 SEAT LEG COVER REAR RH (for Manual Stowing Seat Type RH Side)
79236B
48.REMOVE NO. 2 SEAT LEG COVER LH (for Manual Stowing Seat Type RH Side)
79236A
49.REMOVE NO. 2 SEAT LEG COVER (for Manual Stowing Seat Type RH Side)
79273A
50.REMOVE NO. 2 SEAT HINGE COVER (for Manual Stowing Seat Type RH Side)
51.REMOVE REAR NO. 2 SEAT ASSEMBLY RH (for Manual Stowing Seat Type RH Side)
72905
52.REMOVE 3RD SEAT LINK SUB-ASSEMBLY RH (for Manual Stowing Seat Type RH Side)
67881A
53.REMOVE BACK DOOR WEATHERSTRIP
67935
54.REMOVE BACK DOOR SCUFF PLATE
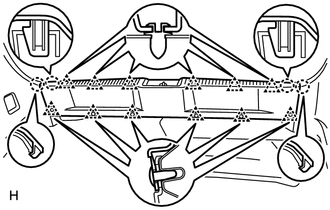
Using a clip remover, remove the 6 clips.
Using a clip remover, detach the 6 clips.
Detach the 4 claws and remove the scuff plate.
67939D
55.REMOVE BACK DOOR GARNISH CENTER (for Manual Stowing Seat Type, Power Stowing Seat Type)
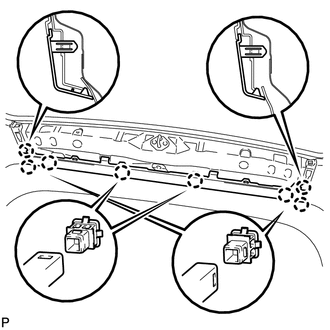
for Type A:
Using a screwdriver, detach the 8 claws and remove the garnish.
- HINT:
-
Tape the screwdriver tip before use.
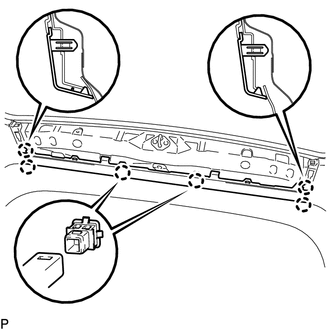
for Type B:
Using a screwdriver, detach the 6 claws and remove the garnish.
- HINT:
-
Tape the screwdriver tip before use.
58625D
56.REMOVE REAR FLOOR NO. 1 MAT PLATE (for Tumble Seat Type, Manual Stowing Seat Type)
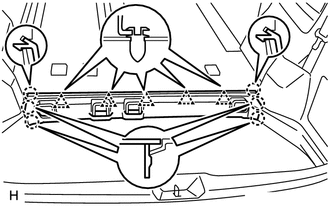
Using a screwdriver, detach the 6 claws.
- HINT:
-
Tape the screwdriver tip before use.
Using a clip remover, detach the 5 clips and remove the plate.
58625D
57.REMOVE REAR FLOOR NO. 1 MAT PLATE (for Power Stowing Seat Type)
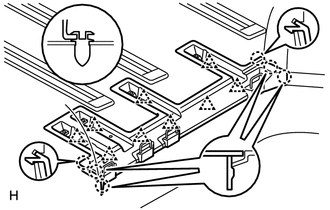
Using a screwdriver, detach the 6 claws.
- HINT:
-
Tape the screwdriver tip before use.
Using a clip remover, detach the 9 clips and remove the plate.
66311B
58.REMOVE ROPE HOOK
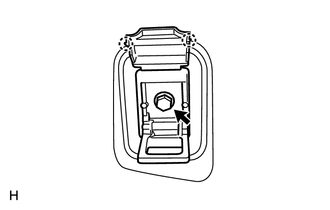
Using a screwdriver, detach the 2 claws of the cover.
- HINT:
-
Tape the screwdriver tip before use.
Remove the bolt and hook.
64735G
59.REMOVE DECK TRIM SIDE SERVICE HOLE COVER LH
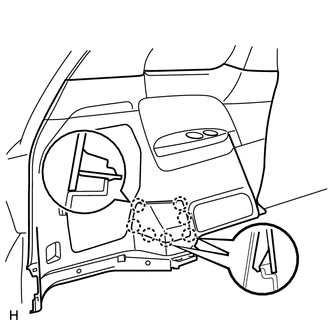
Detach the 7 claws and remove the cover.
64735F
60.REMOVE DECK TRIM SIDE SERVICE HOLE COVER RH
Detach the 7 claws and remove the cover.
64766
61.REMOVE QUARTER TRIM JACK COVER SUB-ASSEMBLY (for LH Side)
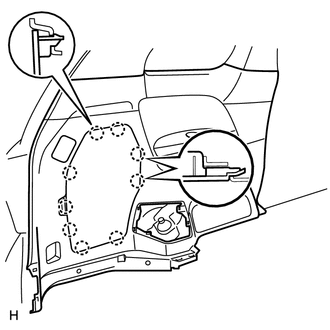
Using a screwdriver, detach the 9 claws and remove the cover.
- HINT:
-
Tape the screwdriver tip before use.
64740A
62.REMOVE DECK TRIM SIDE PANEL ASSEMBLY LH (for Captain Seat Type)
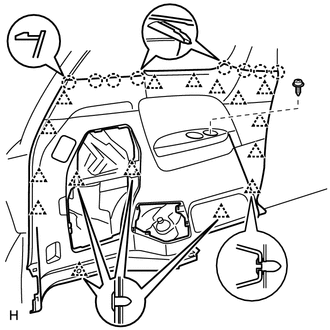
Disconnect the rear No. 2 seat outer belt's floor anchor.
Remove the bolt and disconnect the floor anchor.
Remove the screw.
Using a clip remover, remove the 4 clips.
Using a screwdriver, detach the 8 claws.
- HINT:
-
Tape the screwdriver tip before use.
Using a clip remover, detach the 12 clips and remove the trim board.
for Power Stowing Seat Type:
Disconnect the fold seat switch connector.
64740A
63.REMOVE DECK TRIM SIDE PANEL ASSEMBLY LH (for Except Captain Seat Type)
Disconnect the rear No. 1 seat outer belt's floor anchor.
Remove the bolt and disconnect the floor anchor.
Disconnect the rear No. 2 seat outer belt's floor anchor.
Remove the bolt and disconnect the floor anchor.
Remove the screw.
Using a clip remover, remove the 4 clips.
Using a screwdriver, detach the 8 claws.
- HINT:
-
Tape the screwdriver tip before use.
Using a clip remover, detach the 12 clips and remove the trim board.
64730B
64.REMOVE DECK TRIM SIDE PANEL ASSEMBLY RH (for Captain Seat Type)
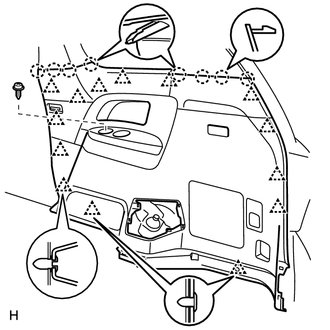
Disconnect the rear No. 2 seat outer belt's floor anchor.
Remove the bolt and disconnect the floor anchor.
Remove the screw.
Using a clip remover, remove the 2 clips.
Using a screwdriver, detach the 8 claws.
- HINT:
-
Tape the screwdriver tip before use.
Using a clip remover, detach the 12 clips and remove the trim board.
Disconnect the 3 connectors.
64730B
65.REMOVE DECK TRIM SIDE PANEL ASSEMBLY RH (for Except Captain Seat Type)
Disconnect the rear No. 1 seat outer belt's floor anchor.
Remove the bolt and disconnect the floor anchor.
Disconnect the rear No. 2 seat outer belt's floor anchor.
Remove the bolt and disconnect the floor anchor.
Remove the screw.
Using a clip remover, remove the 2 clips.
Using a screwdriver, detach the 8 claws.
- HINT:
-
Tape the screwdriver tip before use.
Using a clip remover, detach the 12 clips and remove the trim board.
Disconnect the 3 connectors.
62639A
66.REMOVE QUARTER PILLAR GARNISH LH (for Captain Seat Type)
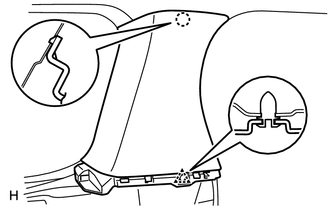
Using a clip remover, detach the clip.
Detach the claw and remove the garnish.
62639A
67.REMOVE QUARTER PILLAR GARNISH LH (for Except Captain Seat Type)
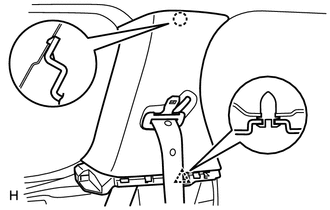
Using a clip remover, detach the clip.
Disconnect the rear No. 1 seat outer belt's shoulder anchor.
Detach the claw and remove the garnish.
62638A
68.REMOVE QUARTER PILLAR GARNISH RH (for Captain Seat Type)
- HINT:
-
Use the same procedures described for the LH side.
62638A
69.REMOVE QUARTER PILLAR GARNISH RH (for Except Captain Seat Type)
- HINT:
-
Use the same procedures described for the LH side.
62472A
70.REMOVE INNER ROOF SIDE GARNISH LH
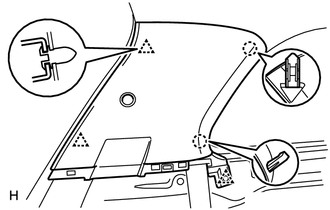
Disconnect the rear No. 2 seat outer belt's shoulder anchor.
Using a screwdriver, detach the 2 claws and open the seat belt anchor cover.
- HINT:
-
Tape the screwdriver tip before use.
Remove the bolt and disconnect the shoulder anchor.
Using a clip remover, detach the 3 clips.
Detach the 2 claws and remove the garnish.
62471A
71.REMOVE INNER ROOF SIDE GARNISH RH
- HINT:
-
Use the same procedures described for the LH side.
62452C
72.REMOVE REAR ROOF SIDE RAIL GARNISH LH
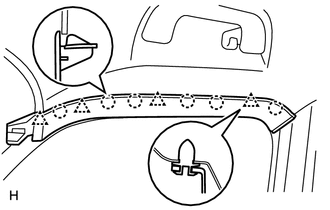
Using a clip remover, detach the 4 clips.
Detach the 6 claws and remove the garnish.
62451C
73.REMOVE REAR ROOF SIDE RAIL GARNISH RH
- HINT:
-
Use the same procedures described for the LH side.
88566A
74.REMOVE NO. 1 COOLER AIR DUCT
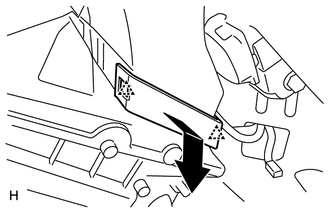
Detach the 2 claws and remove the plate.
Remove the air duct.
73139B
75.REMOVE SEAT BELT ANCHOR COVER
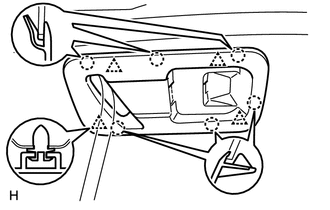
Using a clip remover, detach the 4 clips.
Detach the 6 claws and remove the cover.
74320
76.REMOVE VISOR ASSEMBLY LH
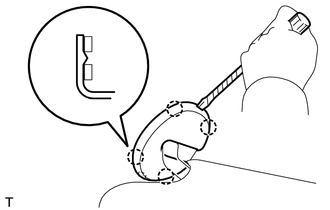
Using a screwdriver, detach the 4 claws and remove the visor bracket cover.
- HINT:
-
Tape the screwdriver tip before use.
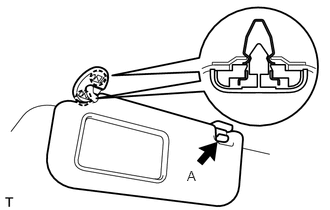
Remove portion A from the visor holder.
Detach the 2 claws and remove the visor.
74310
77.REMOVE VISOR ASSEMBLY RH
- HINT:
-
Use the same procedures described for the LH side.
74348
78.REMOVE VISOR HOLDER
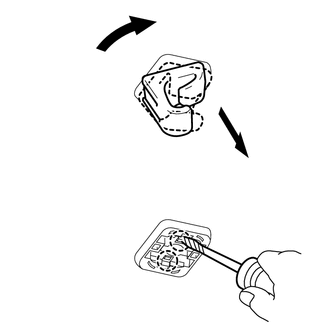
Rotate the tip of the visor holder and pull it out downward.
Using a screwdriver, detach the 2 claws and remove the holder.
- HINT:
-
Tape the screwdriver tip before use.
87820A
79.REMOVE INNER REAR CONVERSATION MIRROR ASSEMBLY
81260A
80.REMOVE MAP LIGHT ASSEMBLY
84010A
81.REMOVE COOLER CONTROL SWITCH SUB-ASSEMBLY
86295
82.REMOVE TELEVISION BASE (w/ Television Display)
86680A
83.REMOVE TELEVISION DISPLAY ASSEMBLY (w/ Television Display)
74612
84.REMOVE ASSIST GRIP COVER
- HINT:
-
Use the same procedure for the other assist grip cover.
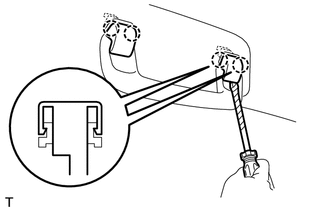
Using a screwdriver, detach the 4 claws and remove the 2 assist grip covers.
- HINT:
-
Tape the screwdriver tip before use.
74610A
85.REMOVE ASSIST GRIP SUB-ASSEMBLY
- HINT:
-
Use the same procedure for the other assist grip.
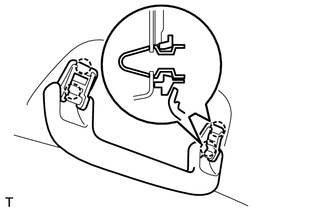
Detach the 4 claws and remove the assist grip.
63310
86.REMOVE ROOF HEADLINING ASSEMBLY
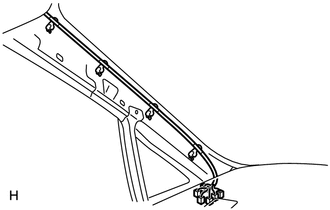
Disconnect the 6 roof wire connectors.
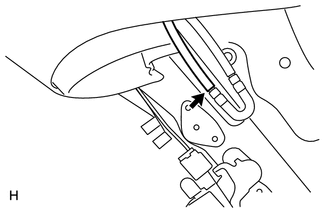
Disconnect the washer hose.
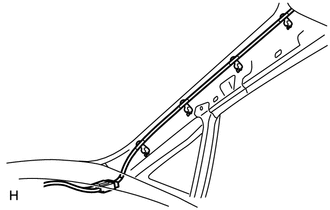
Disconnect the antenna cord connector from the front pillar RH.
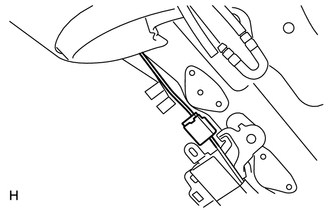
Disconnect the antenna cord connector from the rear pillar RH.
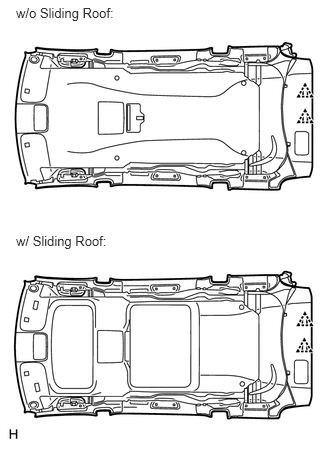
Using a clip remover, detach the 2 clips.
Detach the hooks and remove the headlining.
81250
87.REMOVE ROOM NO. 2 LIGHT ASSEMBLY
81290
88.REMOVE ROOM NO. 3 LIGHT ASSEMBLY
81340
89.REMOVE VANITY LIGHT ASSEMBLY
86160Q
90.REMOVE ROOF SPEAKER ASSEMBLY
86101
91.REMOVE NO. 2 ANTENNA CORD SUB-ASSEMBLY
82171
92.REMOVE ROOF NO. 1 WIRE
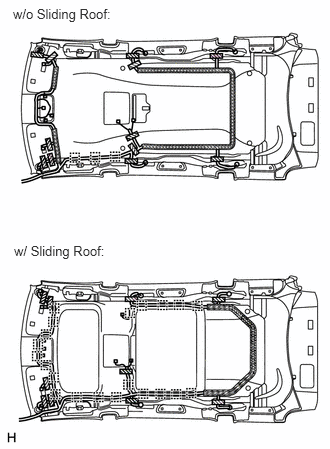
Only when replacing the roof headlining:
Remove the washer hose.
w/o Sliding Roof:
Detach the 7 wire harness clamps and remove the tape.
Remove the double-sided tape and roof wire.
w/ Sliding Roof:
Detach the 21 wire harness clamps and remove the tape.
Remove the double-sided tape and roof wire.
63341
93.REMOVE ROOF NO. 1 SILENCER PAD (w/o Sliding Roof)
Remove the silencer pad.
63342
94.REMOVE ROOF NO. 2 SILENCER PAD (w/o Sliding Roof)
Remove the 3 silencer pads.
95.REMOVE FASTENER HOOK (w/o Sliding Roof)
Remove the 7 hooks.