Home › ENGINE › 1GR-FE ENGINE MECHANICAL › ENGINE ASSEMBLY

ENGINE ASSEMBLY > INSTALLATION

for Preparation Click here


HINT:
Perform "Inspection After Repairs" after replacing the engine assembly (Click here).


1. INSTALL ENGINE WIRE
  1. Connect the connectors to the engine.

  1. Engage the clamps to the engine.

  1. Install the ground wire onto the bank 1 camshaft housing with the 2 bolts.

    Torque:
    8.0 N*m{ 82 kgf*cm , 71 in.*lbf }

  1. Install the ground wire onto the bank 1 cylinder head cover with the bolt.

    Torque:
    8.0 N*m{ 82 kgf*cm , 71 in.*lbf }


2. INSTALL ENGINE HANGER
  1. Install the 2 engine hangers with the 4 bolts.

    Torque:
    33 N*m{ 337 kgf*cm , 24 ft.*lbf }


3. INSTALL ENGINE ASSEMBLY
  1. Attach the engine sling device and hang the engine with a chain block.

  1. Lower the engine into the engine compartment carefully.


    A245609E01
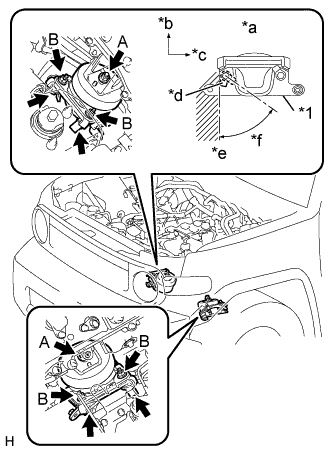
  1. Install the 2 front engine mounting insulators with the 6 nuts and 4 bolts.
    Text in Illustration 
    *1
    Mounting Bracket RH
    *a
    Front View of Mounting Bracket RH
    *b
    Top of Vehicle
    *c
    Front of Vehicle
    *d
    Claw
    *e
    Edge of Mounting Bracket RH
    *f
    Clip Installation Range

    Torque:
    for nut A:
    72 N*m{ 734 kgf*cm , 53 ft.*lbf }
    for nut B:
    40 N*m{ 408 kgf*cm , 30 ft.*lbf }

    NOTICE:
    For the rear bolt on the RH side only, make sure to install it so that the claw does not protrude past the edge of the mounting bracket.
  1. Remove the 4 bolts and 2 engine hangers.

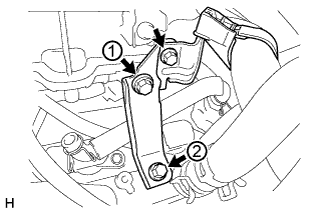
  1. Install the fuel pipe clamp with the bolt.

    Torque:
    9.0 N*m{ 92 kgf*cm , 80 in.*lbf }

  1. Install the wire harness clamp with the bolt.

    Torque:
    8.0 N*m{ 82 kgf*cm , 71 in.*lbf }


4. INSTALL FLYWHEEL SUB-ASSEMBLY (for Manual Transmission)
  1. Using SST, hold the crankshaft.

    SST
    09213-54015   (91651-60855)
    09330-00021  

  1. Temporarily install the flywheel with the 8 new bolts.

  1. Install and tighten the 8 mounting bolts uniformly in several steps.

    Torque:
    30 N*m{ 306 kgf*cm , 22 ft.*lbf }

  1. Mark the top of the bolts with paint.

  1. Tighten the 8 bolts 90° in the same sequence.

  1. Check that the paint marks are now at a 90° angle to the top.


5. INSTALL DRIVE PLATE AND RING GEAR SUB-ASSEMBLY (for Automatic Transmission)
  1. Using SST, hold the crankshaft.

    SST
    09213-54015   (91651-60855)
    09330-00021  


    A227952E01
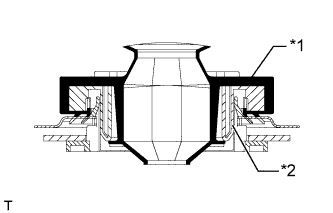
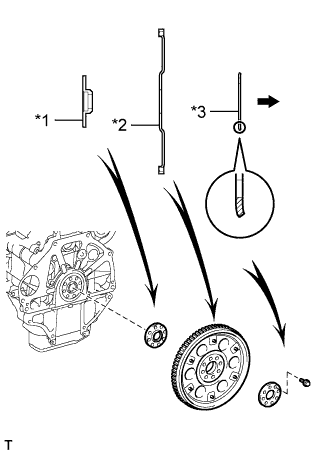
  1. Install the front drive plate spacer, drive plate and ring gear and rear drive plate spacer onto the crankshaft.
    Text in Illustration 
    *1
    Front Drive Plate Spacer
    *2
    Drive Plate and Ring Gear
    *3
    Rear Drive Plate Spacer
    V100135
    Transmission Side

    NOTICE:
    As the front drive plate spacer, drive plate and ring gear and rear drive plate spacer are not reversible, be sure to install it in the direction shown in the illustration.


    A057108
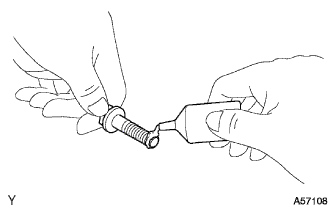
  1. Apply adhesive to the 2 or 3 end threads of the bolts.

    Adhesive:
    Toyota Genuine Adhesive 1324, Three Bond 1324 or the equivalent.


    A224777E01
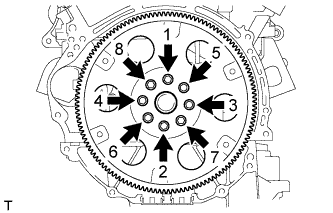
  1. Uniformly install and tighten the 8 bolts in several steps in the sequence shown in the illustration.

    Torque:
    83 N*m{ 846 kgf*cm , 61 ft.*lbf }

    NOTICE:
    Do not start the engine for at least 1 hour after installing.


6. INSTALL CLUTCH DISC ASSEMBLY (for Manual Transmission)


C135774
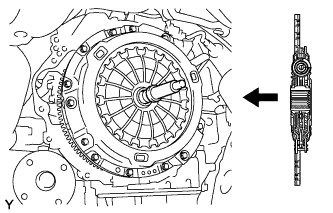
  1. Insert SST into the clutch disc assembly, then insert them into the flywheel sub-assembly.

    SST
    09301-00220  

    NOTICE:
    Insert the clutch disc assembly in the correct orientation.


7. INSTALL CLUTCH COVER ASSEMBLY (for Manual Transmission)


C135776E01
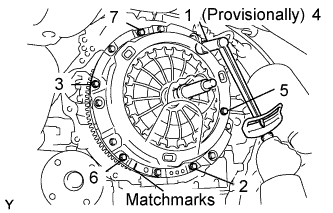
  1. Align the matchmarks on the clutch cover assembly and flywheel sub-assembly.

  1. Following the procedures shown in the illustration, tighten the 6 bolts, in the order starting with the bolt located near the knock pin on the top.

    Torque:
    19 N*m{ 195 kgf*cm , 14 ft.*lbf }

    HINT:
    1. Following the order in the illustration, uniformly tighten the bolts.
    2. Move SST up and down, right and left lightly, after checking that the disc is in the center, and tighten the bolts.


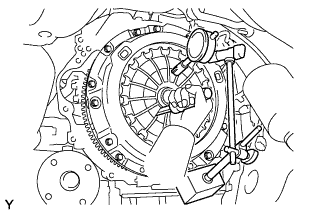
8. INSPECT AND ADJUST CLUTCH COVER ASSEMBLY (for Manual Transmission)


C135777
  1. Using a dial indicator with roller instrument, check the diaphragm spring tip alignment.

    Maximum non-alignment:
    0.5 mm (0.020 in.)

    If the alignment is not as specified, adjust the diaphragm spring tip alignment using SST.
    SST
    09333-00013  


9. INSTALL MANUAL TRANSMISSION UNIT ASSEMBLY (for Manual Transmission)
(Click here)


10. INSTALL AUTOMATIC TRANSMISSION ASSEMBLY (for Automatic Transmission)
(Click here for 2WD)
(Click here for 4WD)


11. CONNECT ENGINE WIRE (for Automatic Transmission 4WD)
  1. Install the wire harness clamp bracket with the bolt.

    Torque:
    8.0 N*m{ 82 kgf*cm , 71 in.*lbf }

  1. Connect the front differential connector and clamp.


12. CONNECT ENGINE WIRE (for 2WD)


A226129E01
  1. Engage the grommet to the wire harness support.
    Text in Illustration 
    *1
    Grommet
    *2
    Wire Harness Support

  1. Pass the wire harness into the vehicle and install the wire harness support.

  1. Install the ground wire with the bolt and connect the connector.

    Torque:
    8.5 N*m{ 87 kgf*cm , 75 in.*lbf }

  1. Connect the 3 connectors and clamp to the air conditioning unit.

  1. Connect the 6 connectors to the ECM.


13. CONNECT ENGINE WIRE (for 4WD)


A226129E01
  1. Engage the grommet to the wire harness support.
    Text in Illustration 
    *1
    Grommet
    *2
    Wire Harness Support

  1. Pass the wire harness into the vehicle and install the wire harness support.

  1. Install the ground wire with the bolt and connect the connector.

    Torque:
    8.5 N*m{ 87 kgf*cm , 75 in.*lbf }

  1. Connect the 3 connectors and clamp to the air conditioning unit.

  1. Connect the 6 connectors to the ECM.

  1. Connect the connector to the four wheel drive control ECU.


14. INSTALL GLOVE COMPARTMENT DOOR ASSEMBLY


    B133856
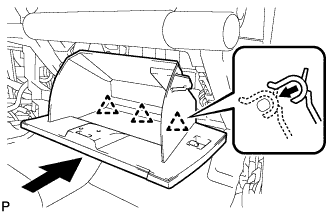
  1. Install the glove compartment door assembly with the 3 hinges while holding it horizontal.


    B133854E01
  1. Slightly flex the upper part of the glove compartment door assembly, and install the glove compartment door assembly.

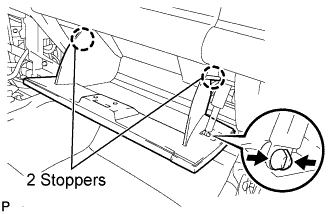
  1. Install the glove compartment door stoppers onto the glove compartment door.


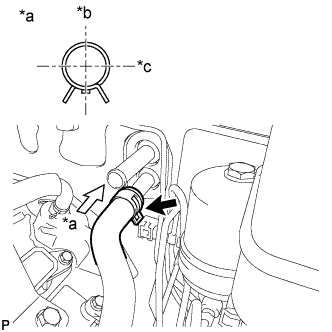
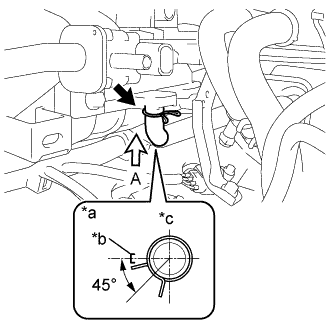
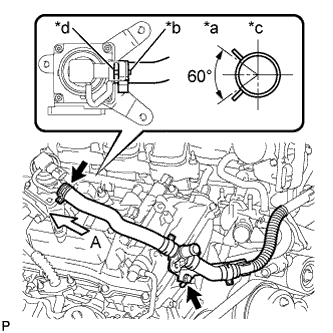
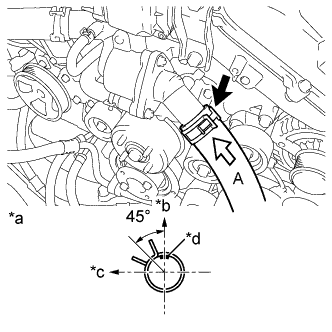
15. CONNECT OUTLET HEATER WATER HOSE


A225912E01
  1. Connect the outlet heater water hose.
    Text in Illustration 
    *a
    View A
    *b
    Top of Vehicle
    *c
    LH of Vehicle

    HINT:
    The direction of the hose clamp is indicated in the illustration.


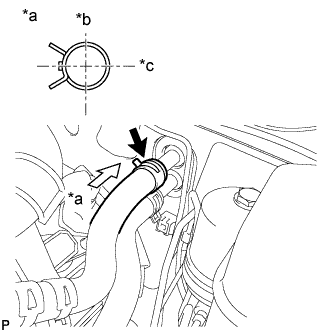
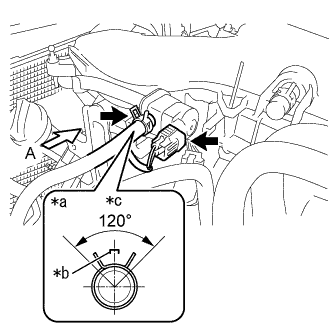
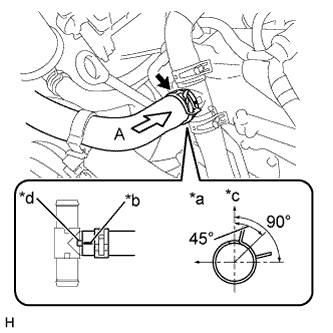
16. CONNECT INLET HEATER WATER HOSE


A225911E01
  1. Connect the inlet heater water hose.
    Text in Illustration 
    *a
    View A
    *b
    Top of Vehicle
    *c
    LH of Vehicle

    HINT:
    The direction of the hose clamp is indicated in the illustration.


17. CONNECT NO. 2 FUEL PIPE SUB-ASSEMBLY
  1. Connect the No. 2 fuel pipe (Click here).

  1. Install the No. 2 fuel pipe clamp.


18. CONNECT NO. 1 FUEL PIPE SUB-ASSEMBLY
  1. Connect the No. 1 fuel pipe (Click here).

  1. Install the No. 1 fuel pipe clamp.


19. INSTALL VANE PUMP ASSEMBLY
  1. Install the vane pump with the 2 bolts.

    Torque:
    43 N*m{ 438 kgf*cm , 32 ft.*lbf }

  1. Connect the 2 clamps and vane pump connector.


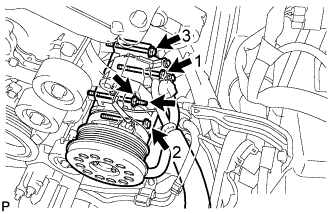
20. INSTALL COOLER COMPRESSOR ASSEMBLY


A225903E01
  1. Temporarily install the cooler compressor with the 3 bolts.

  1. Using a E8 "TORX" socket wrench, install the stud bolt.

    Torque:
    10 N*m{ 102 kgf*cm , 7 ft.*lbf }

  1. Install the nut.

    Torque:
    25 N*m{ 250 kgf*cm , 18 ft.*lbf }

  1. Fully tighten the 3 bolts in the order shown in the illustration.

    Torque:
    25 N*m{ 250 kgf*cm , 18 ft.*lbf }

  1. Install the suction hose with the bolt.

    Torque:
    7.8 N*m{ 80 kgf*cm , 69 in.*lbf }


21. INSTALL GENERATOR ASSEMBLY
  1. Install the generator bracket to the generator with the bolt.

    Torque:
    20 N*m{ 204 kgf*cm , 15 ft.*lbf }

  1. Install the generator with the 2 bolts.

    Torque:
    43 N*m{ 438 kgf*cm , 32 ft.*lbf }

  1. Install the generator bracket with the bolt.

    Torque:
    20 N*m{ 204 kgf*cm , 15 ft.*lbf }

  1. Attach the wire harness clamp.

  1. Install the wire harness with the 2 bolts.

    Torque:
    8.0 N*m{ 82 kgf*cm , 71 in.*lbf }

  1. Connect the generator connector to the generator.

  1. Install the generator wire with the nut.

    Torque:
    9.8 N*m{ 100 kgf*cm , 87 in.*lbf }

  1. Close the terminal cap.


22. INSTALL WIRING HARNESS CLAMP BRACKET
  1. Install the wiring harness clamp bracket with the bolt.

    Torque:
    8.0 N*m{ 82 kgf*cm , 71 in.*lbf }

  1. Connect the clamp.


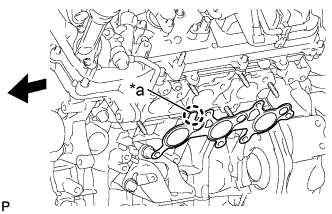
23. INSTALL EXHAUST MANIFOLD TO HEAD GASKET LH


    A222094E02
  1. Install a new exhaust manifold to head gasket LH to the cylinder head sub-assembly.
    Text in Illustration 
    *a
    Protrusion
    V100135
    Front of Vehicle

    NOTICE:
    Install the exhaust manifold to head gasket LH with its protrusion facing towards the front of the vehicle.


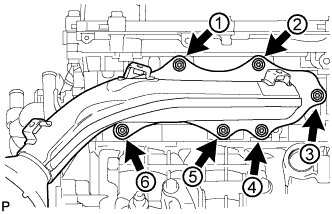
24. INSTALL EXHAUST MANIFOLD SUB-ASSEMBLY LH (w/ Secondary Air Injection System)
  1. Temporarily install the exhaust manifold sub-assembly LH to the cylinder head sub-assembly with the 6 new nuts.


    A222092E01
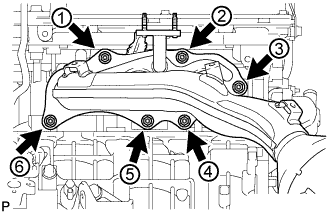
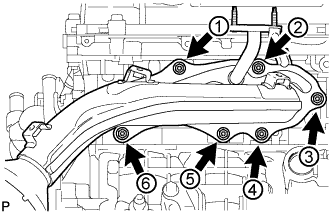
  1. Install and uniformly tighten the 6 nuts in several steps in the sequence shown in the illustration.

    Torque:
    21 N*m{ 214 kgf*cm , 15 ft.*lbf }

  1. Connect the air fuel ratio sensor connector.


25. INSTALL EXHAUST MANIFOLD SUB-ASSEMBLY LH (w/o Secondary Air Injection System)
  1. Temporarily install the exhaust manifold sub-assembly LH to the cylinder head sub-assembly with the 6 new nuts.


    A222093E02
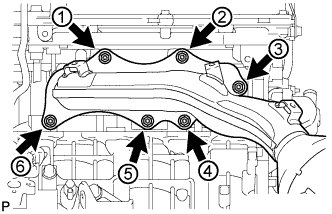
  1. Install and uniformly tighten the 6 nuts in several steps in the sequence shown in the illustration.

    Torque:
    21 N*m{ 214 kgf*cm , 15 ft.*lbf }

  1. Connect the air fuel ratio sensor connector.


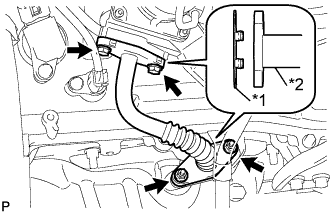
26. INSTALL NO. 2 AIR TUBE (w/ Secondary Air Injection System)


    A226792E03
  1. Install 2 new gaskets to the No. 2 air tube.
    Text in Illustration 
    *1
    New Gasket
    *2
    No. 2 Air Tube

  1. Install the No. 2 air tube to the No. 2 emission control valve set and exhaust manifold sub-assembly LH with the 2 bolts and 2 nuts.

    Torque:
    10 N*m{ 102 kgf*cm , 7 ft.*lbf }


27. INSTALL NO. 2 EXHAUST MANIFOLD HEAT INSULATOR
  1. Install the No. 2 exhaust manifold heat insulator to the exhaust manifold sub-assembly LH with the 3 bolts.

    Torque:
    13 N*m{ 133 kgf*cm , 10 ft.*lbf }


28. INSTALL NO. 2 MANIFOLD STAY
  1. Install the No. 2 manifold stay to the exhaust manifold sub-assembly LH with the 3 bolts.

    Torque:
    40 N*m{ 408 kgf*cm , 30 ft.*lbf }


29. INSTALL EXHAUST MANIFOLD TO HEAD GASKET RH


    A222094E02
  1. Install a new exhaust manifold to head gasket LH to the cylinder head sub-assembly.
    Text in Illustration 
    *a
    Protrusion
    V100135
    Front of Vehicle

    NOTICE:
    Install the exhaust manifold to head gasket LH with its protrusion facing towards the front of the vehicle.


30. INSTALL EXHAUST MANIFOLD SUB-ASSEMBLY RH (w/ Secondary Air Injection System)
  1. Temporarily install the exhaust manifold sub-assembly RH to the cylinder head sub-assembly with the 6 new nuts.


    A222089E01
  1. Install and uniformly tighten the 6 nuts in several steps in the sequence shown in the illustration.

    Torque:
    21 N*m{ 214 kgf*cm , 15 ft.*lbf }

  1. Connect the air fuel ratio sensor connector.


31. INSTALL EXHAUST MANIFOLD SUB-ASSEMBLY RH (w/o Secondary Air Injection System)
  1. Temporarily install the exhaust manifold sub-assembly RH to the cylinder head sub-assembly with the 6 new nuts.


    A222090E02
  1. Install and uniformly tighten the 6 nuts in several steps in the sequence shown in the illustration.

    Torque:
    21 N*m{ 214 kgf*cm , 15 ft.*lbf }

  1. Connect the air fuel ratio sensor connector.


32. INSTALL AIR TUBE (w/ Secondary Air Injection System)


    A226791E03
  1. Install 2 new gaskets to the air tube.
    Text in Illustration 
    *1
    New Gasket
    *2
    Air Tube

  1. Install the air tube to the emission control valve set and exhaust manifold sub-assembly RH with the 2 bolts and 2 nuts.

    Torque:
    10 N*m{ 102 kgf*cm , 7 ft.*lbf }


33. INSTALL NO. 1 EXHAUST MANIFOLD HEAT INSULATOR
  1. Install the No. 1 exhaust manifold heat insulator to the exhaust manifold sub-assembly RH with the 3 bolts.

    Torque:
    13 N*m{ 133 kgf*cm , 10 ft.*lbf }


34. INSTALL MANIFOLD STAY
  1. Install the manifold stay to the exhaust manifold sub-assembly RH with the 3 bolts.

    Torque:
    40 N*m{ 408 kgf*cm , 30 ft.*lbf }


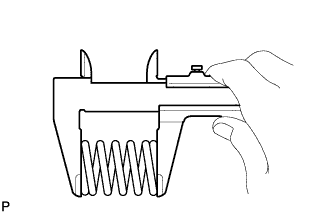
35. INSTALL FRONT EXHAUST PIPE ASSEMBLY


    A128853
  1. Using vernier calipers, measure the free length of the compression spring.

    Minimum free length:
    40.5 mm (1.594 in.)

    If the free length is less that the minimum, replace the compression spring.

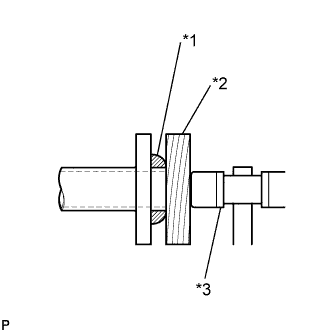
  1. By hand, insert a new gasket into the rear flange of the front exhaust pipe assembly.


    A128852E02
  1. Using a plastic-faced hammer, place a wooden block against the gasket and gradually tap in the gasket all the way to the edge of the front exhaust pipe assembly flange.
    Text in Illustration 
    *1
    Gasket
    *2
    Wooden Block
    *3
    Plastic-faced Hammer

    NOTICE:
    1. Make sure that the gasket is in the correct direction when installing.
    2. Do not reuse the removed gasket.
    3. When installing the front exhaust pipe assembly, do not use the center exhaust pipe assembly to press in the gasket.

  1. Install a new gasket to the front flange of the front exhaust pipe assembly.

  1. Install the front exhaust pipe assembly to the exhaust manifold sub-assembly RH with 2 new nuts.

    Torque:
    54 N*m{ 554 kgf*cm , 40 ft.*lbf }

  1. Connect the front exhaust pipe assembly to the center exhaust pipe assembly with the 2 bolts and the 2 compression springs.

    Torque:
    43 N*m{ 438 kgf*cm , 32 ft.*lbf }

  1. Connect the heated oxygen sensor connector.


36. INSTALL FRONT NO. 2 EXHAUST PIPE ASSEMBLY
  1. Install the 2 new gaskets to the front No. 2 exhaust pipe assembly.

  1. Connect the exhaust pipe support and install the front No. 2 exhaust pipe assembly.

  1. Connect the front No. 2 exhaust pipe assembly to the exhaust manifold sub-assembly LH with 2 new nuts.

    Torque:
    54 N*m{ 554 kgf*cm , 40 ft.*lbf }

  1. Connect the front No. 2 exhaust pipe assembly to the front exhaust pipe assembly with the 2 bolts.

    Torque:
    48 N*m{ 489 kgf*cm , 35 ft.*lbf }

  1. Connect the heated oxygen sensor connector.


37. INSTALL EXHAUST PIPE STOPPER BRACKET (for 4WD)
  1. Install the exhaust pipe stopper bracket to the frame sub-assembly with the 2 bolts.

    Torque:
    19 N*m{ 194 kgf*cm , 14 ft.*lbf }


38. INSTALL INTAKE AIR SURGE TANK


    A244714
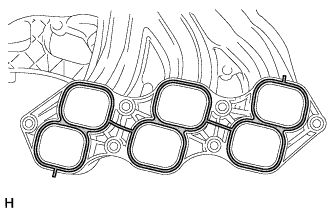
  1. Install a new air surge tank to intake manifold gasket to the intake air surge tank.

  1. Using an 8 mm socket hexagon wrench, temporarily install the intake air surge tank to the intake manifold with the 4 bolts and 2 nuts.


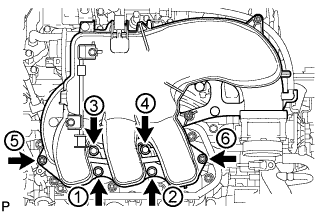
    A221465E07
  1. Using an 8 mm socket hexagon wrench, install and uniformly tighten the 4 bolts and 2 nuts in several steps in the sequence shown in the illustration.

    Torque:
    28 N*m{ 286 kgf*cm , 21 ft.*lbf }


    A221460E03
  1. Install the throttle body bracket to the intake air surge tank with the 2 bolts in the order shown in the illustration.

    Torque:
    21 N*m{ 214 kgf*cm , 15 ft.*lbf }


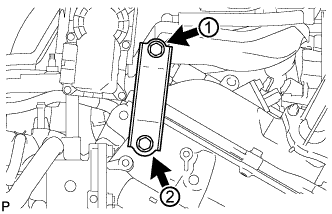
    A221462E02
  1. Install the No. 1 surge tank stay to the intake air surge tank with the 2 bolts in the order shown in the illustration.

    Torque:
    21 N*m{ 214 kgf*cm , 15 ft.*lbf }

  1. Engage the clamp and connect the wire harness to the No. 1 surge tank stay.


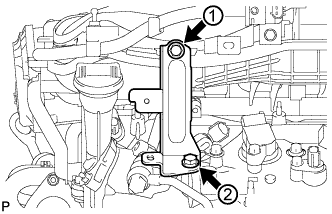
    A244712E01
  1. Install the No. 2 surge tank stay to the intake air surge tank with the 2 bolts in the order shown in the illustration.

    Torque:
    21 N*m{ 214 kgf*cm , 15 ft.*lbf }

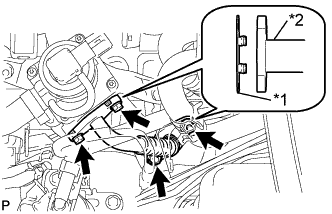
  1. Connect the wire harness clamp bracket to the No. 2 surge tank stay with the bolt.

    Torque:
    8.0 N*m{ 82 kgf*cm , 71 in.*lbf }


    A171130E01
  1. Connect the No. 1 ventilation hose to the intake air surge tank with the hose clip.
    Text in Illustration 
    *a
    View A
    *b
    Hose Paint Mark
    *c
    Front of Vehicle

    HINT:
    Make sure the No. 1 ventilation hose and hose clip are facing the directions shown in the illustration.


    A171131E01
  1. Connect the No. 1 fuel vapor feed hose to the vacuum switching valve with the hose clip.
    Text in Illustration 
    *a
    View A
    *b
    Hose Paint Mark
    *c
    Upper of Vehicle

    HINT:
    Make sure the No. 1 fuel vapor feed hose and hose clip are facing the directions shown in the illustration.

  1. Connect the No. 1 vacuum switching valve connector.

  1. Connect the 2 clamps of the heater water hose to the intake air surge tank.


    A244689E01
  1. Connect the No. 4 water by-pass hose and No. 5 water by-pass hose to the water inlet housing with the 2 clips.
    Text in Illustration 
    *a
    View A
    *b
    Hose Paint Mark
    *c
    Front of Vehicle

    HINT:
    Make sure the No. 4 water by-pass hose, the No. 5 water by-pass hose and the 2 hose clips are facing the directions shown in the illustration.

  1. Connect the throttle with motor body assembly connector.


39. INSTALL AIR HOSE ASSEMBLY (w/ Secondary Air Injection System)


    A226132E02
  1. Install the air hose assembly to the No. 2 emission control valve set with the hose clip.
    Text in Illustration 
    *a
    View A
    *b
    Hose Paint Mark
    *c
    Upper of Vehicle
    *d
    Protrusion of No. 2 Emission Control Valve Set

    HINT:
    1. Align the paint mark of the air hose assembly with the protrusion of the No. 2 emission control valve set as shown in the illustration.
    2. Make sure the hose clip is facing in the direction shown in the illustration.

  1. Connect the air hose assembly to the timing chain cover sub-assembly and No. 1 surge tank stay with the 2 bolts.

    Torque:
    10 N*m{ 102 kgf*cm , 7 ft.*lbf }


    A226131E02
  1. Connect the air hose assembly to the No. 1 emission control valve set with the hose clip.
    Text in Illustration 
    *a
    View A
    *b
    Hose Paint Mark
    *c
    Upper of Vehicle
    *d
    Protrusion of No. 1 Emission Control Valve Set

    HINT:
    1. Align the paint mark of the air hose assembly with the protrusion of the No. 1 emission control valve set as shown in the illustration.
    2. Make sure the hose clip is facing in the direction shown in the illustration.

  1. Connect the air hose assembly to the timing chain cover sub-assembly with the bolt.

    Torque:
    10 N*m{ 102 kgf*cm , 7 ft.*lbf }


40. CONNECT NO. 1 AIR INJECTION SYSTEM HOSE (w/ Secondary Air Injection System)


    A244711E01
  1. Connect the No. 1 air injection system hose to the air hose assembly with the hose clip.
    Text in Illustration 
    *a
    View A
    *b
    Hose Paint Mark
    *c
    Upper of Vehicle
    *d
    Protrusion of Air Hose Assembly

    HINT:
    1. Align the paint mark of the No. 1 air injection system hose with the protrusion of the air hose assembly as shown in the illustration.
    2. Make sure the hose clip is facing in the direction shown in the illustration.


41. INSTALL AIR CLEANER CASE SUB-ASSEMBLY
  1. Install the air cleaner case sub-assembly with the 3 bolts.


42. INSTALL AIR CLEANER FILTER ELEMENT SUB-ASSEMBLY


43. INSTALL AIR CLEANER CAP AND HOSE


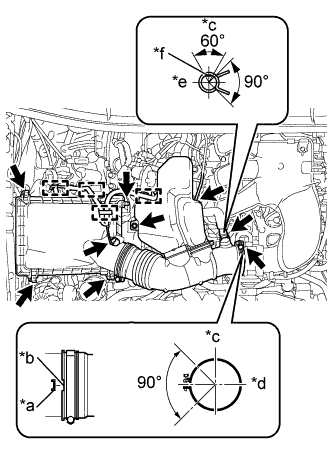
    A227195E01
  1. Install the air cleaner cap with the 4 hinges.

  1. Install the No. 1 air cleaner hose with the clamp.

    Torque:
    5.0 N*m{ 51 kgf*cm , 44 in.*lbf }

    Text in Illustration 
    *a
    Protrusion
    *b
    Groove
    *c
    Top
    *d
    Front
    *e
    RH
    *f
    Paint mark of the hose

  1. Install the bolt.

    Torque:
    5.0 N*m{ 51 kgf*cm , 44 in.*lbf }

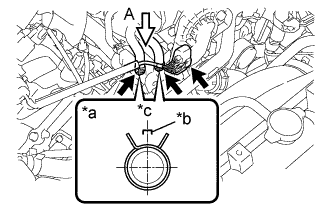
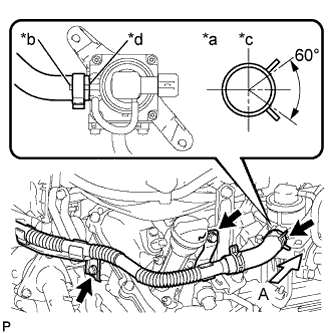
  1. Connect the ventilation hose and vacuum hose.

    HINT:
    The direction of the hose clamp is indicated in the illustration.

  1. Engage the 4 wire harness clamps.

  1. Connect the MAF meter connector.


44. INSTALL RADIATOR ASSEMBLY
  1. Install the radiator assembly to the vehicle with the 4 bolts.

    Torque:
    18 N*m{ 184 kgf*cm , 13 ft.*lbf }


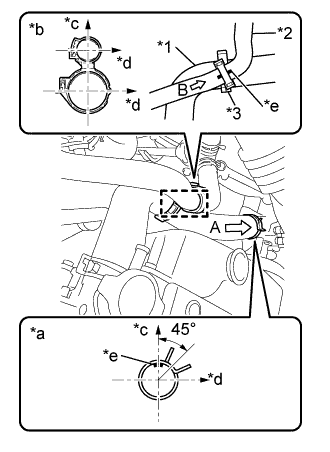
45. CONNECT NO. 1 RADIATOR HOSE


    A287964E01
  1. Connect the No. 1 radiator hose to the water inlet housing with the hose clip.
    Text in Illustration 
    *1
    No. 1 Radiator Hose
    *2
    No. 1 Air Injection System Hose
    *3
    Hose Clamp
    *a
    View A
    *b
    View B
    *c
    Upper Side
    *d
    Front Side
    *e
    Hose Paint Mark

  1. Install a new hose clamp to the No. 1 radiator hose and the No. 1 air injection system hose at the location shown in the illustration.

    HINT:
    Perform the installation with the hose clamp at the correct angle.


46. CONNECT NO. 2 RADIATOR HOSE


    A287971E01
  1. Connect the No. 2 radiator hose to the water inlet with thermostat with the hose clip.
    Text in Illustration 
    *a
    View A
    *b
    Upper Side
    *c
    Front Side
    *d
    Hose Paint Mark

    HINT:
    Perform the installation with the hose clip at the correct angle.


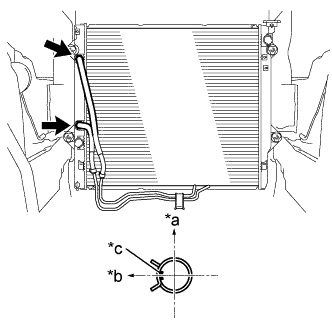
47. CONNECT OIL COOLER HOSE (for Automatic Transmission)


    A289100E01
  1. Connect the 2 oil cooler hoses to the radiator assembly with the 2 hose clips.
    Text in Illustration 
    *a
    Upper Side
    *b
    LH Side
    *c
    Hose Paint Mark

    HINT:
    Perform the installation with the hose clip at the correct angle.


48. INSTALL FAN SHROUD
  1. Install the fan pulley to the engine water pump assembly.

  1. Place the fan shroud together with the fan and fluid coupling assembly between the radiator assembly and engine.

    NOTICE:
    Be careful not to damage the radiator core.


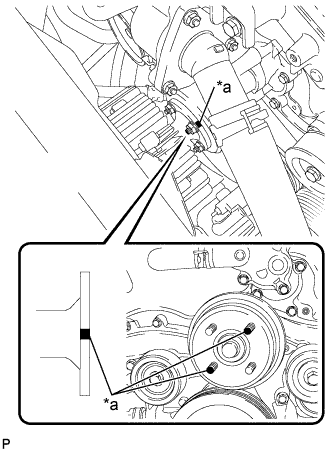
    A226673E01
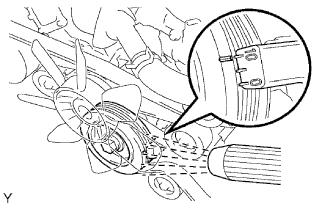
  1. Align the paint marks of the same color (pink to pink and black to black) on the stud bolts of the engine water pump assembly and the outer flange of the fan and fluid coupling assembly, and assemble the parts.
    Text in Illustration 
    *a
    Paint Mark

  1. Temporarily install the fan and fluid coupling assembly to the engine water pump assembly with the 4 nuts. Tighten the nuts as much as possible by hand.


    A287972E01
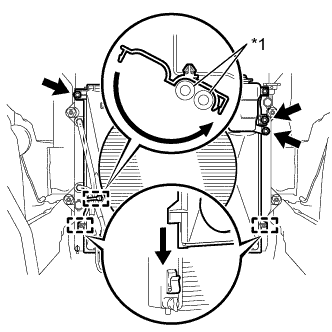
  1. Engage the 2 guides of the fan shroud to the radiator assembly as shown in the illustration.

  1. Install the fan shroud to the radiator assembly with the 2 bolts.

    Torque:
    5.0 N*m{ 51 kgf*cm , 44 in.*lbf }

  1. Install the radiator reserve tank assembly to the radiator assembly with the bolt.

    Torque:
    5.0 N*m{ 51 kgf*cm , 44 in.*lbf }

  1. Connect the 2 oil cooler hoses to the hose clamp and engage the clamp.
    Text in Illustration 
    *1
    Oil Cooler Hose


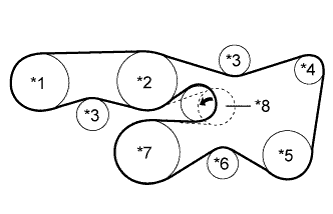
    A225650E01
  1. Set the fan and generator V belt onto every part.
    Text in Illustration 
    *1
    Vane Pump Assembly
    *2
    Engine Water Pump Assembly
    *3
    No. 2 Idler Pulley Sub-Assembly
    *4
    Generator Assembly
    *5
    Cooler Compressor Assembly
    *6
    No. 1 Idler Pulley Sub-Assembly
    *7
    Crankshaft Pulley
    *8
    V-ribbed Belt Tensioner Assembly

  1. While turning the V-ribbed belt tensioner assembly counterclockwise, remove the pin.

    NOTICE:
    Make sure that the fan and generator V belt is properly set to each pulley.

  1. Check that the belt fits properly in the ribbed grooves.

    HINT:
    Make sure to check by hand that the belt has not slipped out of the grooves on the bottom of the pulley.

  1. Tighten the 4 nuts of the fan and fluid coupling assembly.

    Torque:
    21 N*m{ 214 kgf*cm , 15 ft.*lbf }

  1. Connect the radiator reserve tank hose to the radiator assembly.


49. INSTALL BATTERY TRAY


50. INSTALL BATTERY


51. INSTALL BATTERY HOLD DOWN CLAMP
  1. Install the battery hold down clamp and tighten the 2 nuts.

    Torque:
    6.0 N*m{ 61 kgf*cm , 53 in.*lbf }


52. INSTALL HOOD SUB-ASSEMBLY
  1. Install the hood sub-assembly to the 2 hinges with the 4 bolts.

    Torque:
    18 N*m{ 184 kgf*cm , 13 ft.*lbf }

  1. Connect the windshield washer hose to the hood sub-assembly.


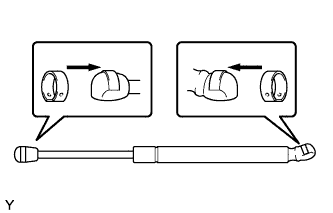
53. INSTALL HOOD SUPPORT


B135982
  1. Install the 2 stop rings onto the hood support.

  1. Install the hood support.


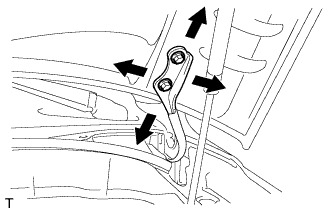
54. ADJUST HOOD SUB-ASSEMBLY


B135977
  1. Adjust the hood position.

    1. Loosen the 4 hinge bolts on the hood side.

    2. Move the hood and adjust the clearance between the hood and front fender. Make sure that the clearance is within the standard range.

      Standard(A):
      4.0 to 7.0 mm (0.157 to 0.276 in.)

    3. Tighten the hood side hinge bolts after the adjustment.

      Torque:
      13 N*m{ 133 kgf*cm , 10 ft.*lbf }


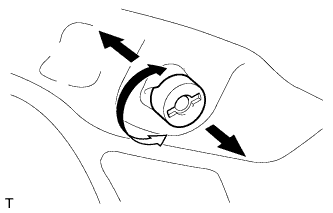
    B135976
  1. Adjust the cushion rubber so that the heights of the hood and the fender are equal.

    1. Raise or lower the hood front end by turning the cushion rubber. Make sure that the clearance is within the standard range.

      HINT:
      Raise or lower the cushion rubber by turning it.


    B135978
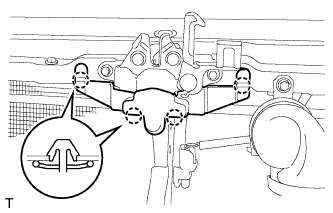
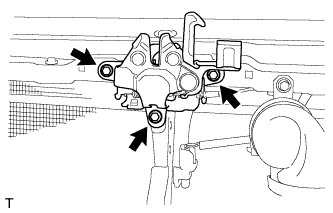
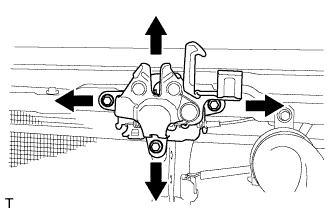
  1. Adjust the hood lock.

    1. Disengage the 4 claws and remove the hood lock release lever protector.


    2. B135979
    3. Loosen the 3 bolts.


    4. B135980
    5. Adjust the hood lock position so that the striker can enter it smoothly.


    6. B135979
    7. Tighten the 3 bolts after the adjustment.

      Torque:
      8.0 N*m{ 82 kgf*cm , 71 in.*lbf }


    8. B135978
    9. Engage the 4 claws and install the hood lock release lever protector.


55. CONNECT CABLE TO NEGATIVE BATTERY TERMINAL

Torque:
5.4 N*m{ 55 kgf*cm , 48 in.*lbf }

NOTICE:
When disconnecting the cable, some systems need to be initialized after the cable is reconnected (Click here).


56. ADD ENGINE COOLANT
  1. Tighten the cylinder block drain cock plug.

    Torque:
    13 N*m{ 133 kgf*cm , 10 ft.*lbf }

  1. Tighten the radiator drain cock plug by hand.

  1. Remove the vinyl hose from the radiator drain cock of the radiator assembly.

  1. Add engine coolant.

    Standard Capacity:
    Item
    Specified Condition
    for Automatic Transmission
    9.8 liters (10.4 US qts, 8.6 Imp. qts)
    for Manual Transmission
    9.4 liters (9.9 US qts, 8.3 Imp. qts)

    NOTICE:
    Do not substitute plain water for engine coolant.

    HINT:
    1. TOYOTA vehicles are filled with TOYOTA SLLC at the factory. In order to avoid damage to the engine cooling system and other technical problems, only use TOYOTA SLLC or similar high quality ethylene glycol based non-silicate, non-amine, non-nitrite, non-borate coolant with long-life hybrid organic acid technology (coolant with long-life hybrid organic acid technology consists of a combination of low phosphates and organic acids).
    2. Press the No. 1 radiator hose and No. 2 radiator hose several times by hand, and then check the engine coolant level. If the engine coolant level is low, add engine coolant.


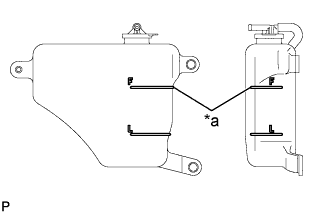
    A220212E03
  1. Slowly pour engine coolant into the radiator reservoir until it reaches the Full line.
    Text in Illustration 
    *a
    Full Line

  1. Install the radiator reserve tank cap sub-assembly.

  1. Install the radiator cap sub-assembly.*1

  1. Start the engine and stop it immediately.*2

  1. Allow approximately 10 seconds to pass, and then remove the radiator cap sub-assembly and check the engine coolant level. If the engine coolant level has decreased, add engine coolant.*3

  1. Repeat steps *1, *2 and *3 until the engine coolant level does not decrease.

    HINT:
    Be sure to perform this step while the engine is cold, as air in the No. 1 radiator hose will flow into the radiator assembly if the engine is warmed up and the thermostat opens.

  1. Install the radiator cap sub-assembly.*4

  1. Set the air conditioning as follows.*5
    Item
    Condition
    Fan speed
    Any setting except off
    Temperature
    Toward WARM
    Air conditioning switch
    Off

  1. Start the engine, warm it up until the thermostat opens, and then continue to run the engine for several minutes to circulate the engine coolant.*6

    CAUTION:
    1. Wear protective gloves. Hot areas on the parts may injure your hands.
    2. Be careful of the fan.
    3. Be careful as the engine, radiator assembly and radiator hoses are hot and can cause burns.

    NOTICE:
    1. Immediately after starting the engine, if the radiator reservoir becomes empty, perform the following: 1) stop the engine, 2) wait until the engine coolant has cooled down, and 3) add engine coolant until the engine coolant is filled to the Full line.
    2. Do not start the engine when there is no engine coolant in the radiator reservoir.
    3. Pay attention to the needle of the engine coolant temperature receiver gauge. Make sure that the needle does not show an abnormally high temperature.
    4. If there is not enough engine coolant, the engine may burn out or overheat.

    HINT:
    1. Press the No. 1 radiator hose and No. 2 radiator hose several times by hand to bleed air while warming up the engine.
    2. The thermostat opening timing can be confirmed by pressing the No. 2 radiator hose by hand and checking when the engine coolant starts to flow inside the hose.

  1. Stop the engine, wait until the engine coolant cools down to ambient temperature, and then remove the radiator cap sub-assembly and check the engine coolant level.*7

    CAUTION:
    Do not remove the radiator cap sub-assembly while the engine and radiator assembly are still hot. Pressurized, hot engine coolant and steam may be released and cause serious burns.

  1. If the engine coolant level has decreased, add engine coolant and warm up the engine until the thermostat opens.*8


    A220212E03
  1. If the engine coolant level has not decreased, check that the engine coolant level in the radiator reservoir is at the Full line.
    If the engine coolant level is below the Full line, repeat steps *4 through *8.
    If the engine coolant level is above the Full line, drain engine coolant until the engine coolant level reaches the Full line.
    Text in Illustration 
    *a
    Full Line

  1. Install the service hole cover to the engine under cover.


57. ADD ENGINE OIL


  1. Add fresh oil.

    NOTICE:
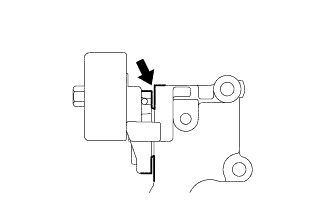
    A308107
    Do not allow engine oil to adhere to the moving parts of the belt tensioner, as this may cause malfunctions.
    If engine oil is on the location indicated by the arrow, replace the belt tensioner.


    Standard Engine Oil (for USA, Canada):

    Oil grade
    Oil Viscosity (SAE)
    ILSAC GF-5 multigrade engine oil
    0W-20


    Standard Engine Oil (for Mexico):

    Oil grade
    Oil Viscosity (SAE)
    API grade SL "Energy- Conserving", SM "Energy- Conserving", SN "Resource-Conserving", or ILSAC multigrade engine oil
    0W-20
    5W-20
    5W-30
    10W-30
    API grade SL, SM or SN multigrade engine oil
    15W-40
    20W-50


    Standard Oil Capacity:

    Item
    Specified Condition
    Drain and refill without oil filter change
    5.7 liters (6.0 US qts, 5.0 Imp. qts)
    Drain and refill with oil filter change
    6.1 liters (6.4 US qts, 5.4 Imp. qts)
    Dry fill
    6.9 liters (7.3 US qts, 6.1 Imp. qts)

  1. Install the oil filler cap.


58. PERFORM INITIALIZATION (for Automatic Transmission)
(Click here for 2WD)
(Click here for 4WD)


59. INSPECT FOR COOLANT LEAK

CAUTION:
To avoid being burned, do not remove the radiator reservoir cap while the engine and radiator are still hot. Thermal expansion may cause hot engine coolant and steam to blow out from the radiator.

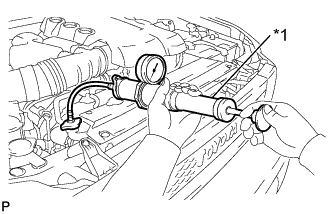
  1. Fill the radiator with engine coolant, and then attach a radiator cap tester.

  1. Warm up the engine.


    A220211E01
  1. Using the radiator cap tester, increase the pressure inside the radiator to 123 kPa (1.3 kgf/cm2, 18 psi), and then check that the pressure does not drop.
    If the pressure drops, check the hoses, radiator and water pump for leakage. If there are no signs or traces of external engine coolant leakage, check the heater core, cylinder block and head.
    Text in Illustration 
    *1
    Radiator Cap Tester


60. INSPECT FOR ENGINE OIL LEAK
  1. Start the engine. Make sure that there are no oil leaks from the area that was worked on.


61. INSPECT FOR FUEL LEAK
  1. Connect the Techstream to the DLC3.

  1. Turn the ignition switch to ON.

    NOTICE:
    Do not start the engine.

  1. Turn the Techstream on.

  1. Enter the following menus: Powertrain / Engine and ECT / Active Test / Control the Fuel Pump Speed / ON.

  1. Check fuel pump operation.

    1. Check for pressure in the fuel inlet tube from the fuel line. Check that the sound of fuel flowing in the fuel tank can be heard.
      If there is no sound, check the integration relay, fuel pump, ECM and wiring connector.


62. INSPECT FOR EXHAUST GAS LEAK

HINT:
Perform "Inspection After Repairs" after repairing gas leaks in the exhaust system (Click here).


63. INSTALL RADIATOR GRILLE
  1. Engage the 5 clips and install the radiator grille.

  1. Install the 2 screws.

    Torque:
    3.0 N*m{ 31 kgf*cm , 27 in.*lbf }

  1. Install the 2 clips.


64. INSTALL UPPER RADIATOR SUPPORT SEAL


    A226651
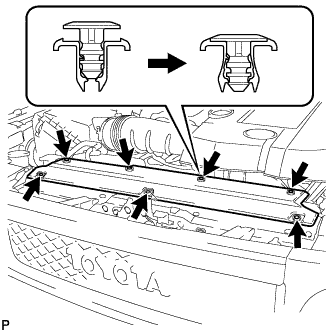
  1. Engage the 7 clips and install the upper radiator support seal to the fan shroud.


65. INSTALL FRONT FENDER SPLASH SHIELD REAR RH
  1. Install the front fender rear splash shield RH to the front fender apron sub-assembly RH with the 5 clips.


66. INSTALL FRONT FENDER APRON SEAL RH
  1. Install the front fender apron seal RH to the front fender apron sub-assembly RH with the 4 clips.


67. REMOVE FRONT FENDER REAR SPLASH SHIELD LH
  1. Install the front fender rear splash shield LH to the front fender apron sub-assembly LH with the 5 clips.


68. INSTALL FRONT FENDER APRON SEAL LH
  1. Install the front fender apron seal LH to the front fender apron sub-assembly LH with the 5 clips.


69. INSTALL REAR ENGINE UNDER COVER ASSEMBLY
  1. Install the rear engine under cover assembly to the frame with the 4 bolts.

    Torque:
    29 N*m{ 296 kgf*cm , 21 ft.*lbf }


70. INSTALL NO. 1 ENGINE UNDER COVER SUB-ASSEMBLY
  1. Hook the No. 1 engine under cover sub-assembly to the frame.

  1. Install the 4 bolts to the No. 1 engine under cover sub-assembly.

    Torque:
    29 N*m{ 296 kgf*cm , 21 ft.*lbf }


71. CHECK ENGINE OIL LEVEL
  1. Warm up the engine, then stop the engine and wait for 5 minutes.

  1. Check that the engine oil level is between the low level and full level marks on the dipstick.
    If low, check for leakage and add oil up to the full level mark.

    NOTICE:
    Do not fill engine oil above the full level mark.

    HINT:
    A certain amount of engine oil will be consumed while driving. In the following situations, oil consumption may increase, and engine oil may need to be refilled in between oil maintenance intervals.
    1. When the engine is new, for example directly after purchasing the vehicle or after replacing the engine.
    2. If low quality oil or oil of an inappropriate viscosity is used.
    3. When driving at high engine speed or with a heavy load, (when towing, or), when driving while accelerating or decelerating frequently.
    4. When leaving the idling for a long time, or when driving frequently through heavy traffic.
    When judging the amount of oil consumption, keep in mind that the oil may have become diluted, making it difficult to judge the true level accurately.


72. INSPECT IGNITION TIMING

NOTICE:
  1. Turn all electrical systems off.
  1. Perform the inspection when the cooling fan motor is turned off.

  1. Warm up the engine.

  1. When using the intelligent tester:

    1. Connect the intelligent tester to the DLC3.

    2. Enter the following menus: Powertrain / Engine and ECT / Data List / All Data / IGN Advance.

    3. Inspect the ignition timing during idling.

      Standard ignition timing:
      8 to 12° BTDC idling (transmission in neutral and A/C switch off)

    4. Check that the ignition timing advances immediately when the engine speed is increased.


    A206183E05
  1. When not using the intelligent tester:
    Text in Illustration 
    *a
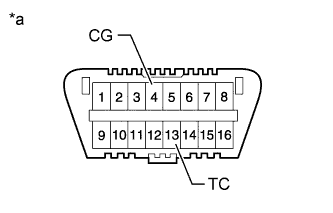
    Front view of DLC3:

    1. Using SST, connect terminals 13 (TC) and 4 (CG) of the DLC3.

      SST
      09843-18040  

      NOTICE:
      Be sure not to improperly connect the terminals. This may damage the engine.


    2. A225898
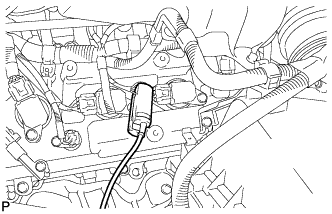
    3. Connect the tester probe of a timing light to the wire of the ignition coil connector for the No. 1 cylinder.

      NOTICE:
      1. Use a timing light that detects primary signals.
      1. After the inspection, be sure to wrap the wire harness with tape.


    4. A076316E01
    5. Inspect the ignition timing during idling.

      Standard ignition timing:
      8 to 12° BTDC idling (transmission in neutral and A/C switch off)

    6. Remove SST from the DLC3.

    7. Inspect the ignition timing during idling.

      Standard ignition timing:
      7 to 24° BTDC idling (transmission in neutral and A/C switch off)

    8. Disconnect the timing light from the engine.


73. INSPECT ENGINE IDLING SPEED

NOTICE:
  1. Turn all the electrical systems off.
  1. Perform the inspection when the cooling fan motor is turned off.

  1. Warm up the engine.

  1. When using the intelligent tester:

    1. Connect the intelligent tester to the DLC3.

    2. Enter the following menus: Powertrain / Engine and ECT / Data List / All Data / Engine Speed.

    3. Inspect the engine idling speed.

      Standard idling speed:
      650 to 750 rpm (transmission in neutral and A/C switch off)


    A206183E06
  1. When not using the intelligent tester:
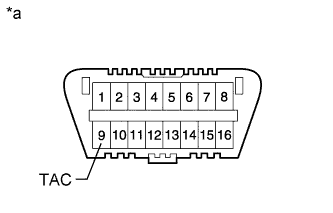
    Text in Illustration 
    *a
    Front view of DLC3:

    1. Connect SST to terminal 9 (TAC) of the DLC3.

      SST
      09843-18030  

    2. Race the engine at 2500 rpm for approximately 90 seconds.

    3. Inspect the engine idling speed.

      Standard idling speed:
      650 to 750 rpm (transmission in neutral and A/C switch off)


74. INSPECT COMPRESSION
  1. Warm up and stop the engine.

  1. Remove the 6 spark plugs (Click here).

  1. Disconnect the 6 fuel injector connectors.

  1. Inspect the cylinder compression pressure.

    1. Insert a compression gauge into the spark plug hole (Procedure "A").

    2. While cranking the engine, measure the compression pressure (Procedure "B").

      Compression pressure:
      1400 kPa (14.3 kgf/cm2, 203 psi) or higher

      Minimum pressure:
      1100 kPa (11.2 kgf/cm2, 160 psi) or less

      Difference between each cylinder:
      100 kPa (1.0 kgf/cm2, 15 psi)

      HINT:
      1. Use a fully-charged battery so that the engine speed can be increased to 250 rpm or more.
      2. Measure the compression in as short a time as possible.

    3. Repeat procedures "A" and "B" for each cylinder.

    4. If the cylinder compression is low, pour a small amount of engine oil into the cylinder through the spark plug hole and repeat procedures "A" and "B" for cylinders with low compression.

      1. If adding oil increases the compression, the piston rings and/or cylinder bore may be worn or damaged.
      2. If pressure stays low, a valve may be stuck or seated improperly, or there may be leakage from the gasket.

  1. Connect the 6 injector connectors.

  1. Install the 6 spark plugs (Click here).


75. INSPECT CO/HC

HINT:
This check is to determine whether or not the idle CO/HC concentration complies with regulations.

  1. Start the engine.

  1. Run the engine at 2500 rpm for approximately 180 seconds.

  1. Insert the CO/HC meter testing probe at least 40 cm (1.31 ft) into the tailpipe during idling.

  1. Immediately check the CO/HC concentration during idling and/or at 2500 rpm.

    HINT:
    When carrying out the 2 tests (idling and 2500 rpm), the measurement orders are prescribed by the applicable local regulations.

  1. If the CO/HC concentration does not comply with regulations, perform troubleshooting in the order given below.

    1. Check the A/F sensor operation (Click here) and heated oxygen sensor operation (Click here).

    2. See the table below for possible causes, and then inspect and correct the corresponding causes if necessary.

      CO
      HC
      Symptom
      Causes
      Normal
      High
      Rough idling
      1. Faulty ignition:
        1. Incorrect timing
        2. Plugs are contaminated or shorted, or plug gaps are incorrect
      2. Incorrect valve clearance
      3. Leaky intake and exhaust valves
      4. Leaky cylinders
      Low
      High
      Rough idling
      (Fluctuating HC reading)
      1. Vacuum leaks:
        1. Ventilation hoses
        2. Intake manifold
        3. Throttle body
      2. Lean mixture causing misfire
      High
      High
      Rough idle
      (Black smoke from exhaust)
      1. Restricted air filter
      2. Plugged PCV valve
      3. Faulty SFI system:
        1. Faulty pressure regulator
        2. Defective engine coolant temperature sensor
        3. Faulty mass air flow meter
        4. Faulty ECM
        5. Faulty injectors
        6. Faulty throttle position sensor


76. INSTALL V-BANK COVER
  1. Engage the 2 hooks and install the V-bank cover to the No. 1 V-bank cover bracket.
  1. Align the 2 V-bank cover grommets with the 2 pins and press down on the V-bank cover to engage the pins.


77. INSPECT AND ADJUST FRONT WHEEL ALIGNMENT
(Click here)