Power Slide Door LH does not Operate When Satellite Switch is Pressed
Circuit diagnosis · Vehicles built Oct 2014 – Dec 2016
Versions by build date: Oct 2014 – Dec 2016 from Jan 2017
DESCRIPTION
The door control relay assembly controls the power slide door and activates the slide motor assembly.- HINT:
- Before using this flowchart, perform the self-diagnostic mode inspection (Click here) and make sure no code is output.
WIRING DIAGRAM
(Click here)INSPECTION PROCEDURE
- NOTICE:
- Inspect the fuses for circuits related to this system before performing the following inspection procedure.
| 1. CHECK BASIC FUNCTIONS |

When the engine is running, (1) to (5) are required for the power slide door to operate.
The battery voltage is 11 V or more.
The vehicle's speed is less than 3 km/h (1 mph) and the shift lever is moved to the P position.
The power slide door main switch is turned ON (the button is not pushed).
The slide door is unlocked (the position switch is ON).
An open circuit in the power slide door sensor assembly is not detected.
When the engine is not running, (1) to (4) are required for the power slide door to operate.
The battery voltage is 11 V or more.
The power slide door main switch is turned ON (the button is not pushed).
The slide door is unlocked (the position switch is ON).
An open circuit in the power slide door sensor assembly is not detected.
- HINT:
- For the inside handle, the power slide door can operate only when the child lock is OFF.
- For the outside handle, the power slide door can operate even when the child lock is ON.
- For the inside handle, the power slide door can operate only when the child lock is OFF.
Check that the power slide door malfunctions.
Result Result
Proceed to
Nothing operates or moves
A
Motor is emitting sounds but slide door does not move (lock is released but door does not open)
B
|
|
||||

| A | |
 |
| 2. CHECK HARNESS AND CONNECTOR (DOOR CONTROL RELAY ASSEMBLY - BATTERY AND BODY GROUND) |
Disconnect the door control relay assembly connectors.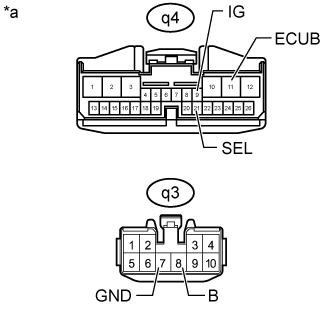

Measure the resistance according to the value(s) in the table below.
- Standard Resistance:
Tester Connection
Condition
Specified Condition
q3-7 (GND) - Body ground
Always
Below 1 Ω
q4-21 (SEL) - Body ground
Always
Below 1 Ω
Measure the voltage according to the value(s) in the table below.
- Standard Voltage:
Tester Connection
Condition
Specified Condition
q3-8 (B) - Body ground
Always
11 to 14 V
q4-9 (IG) - Body ground
Ignition switch ON
11 to 14 V
q4-9 (IG) - Body ground
Ignition switch off
Below 1 V
q4-11 (ECUB) - Body ground
Always
11 to 14 V
| *a |
Front view of wire harness connector (to Door Control Relay Assembly) |
|
|
||||

| OK | |
|
| 3. INSPECT NO. 2 REAR DOOR WIRE |
Disconnect the oq1 and po2 No. 2 rear door wire connectors.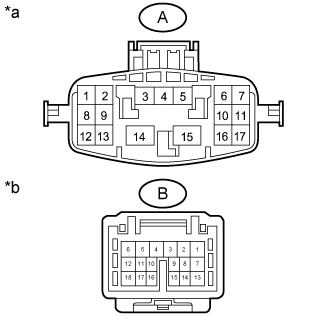
Measure the resistance according to the value(s) in the table below.
- Standard resistance:
Tester Connection
Condition
Specified Condition
A-3 - B-6
Always
Below 1 Ω
A-15 - B-7
Always
Below 1 Ω
A-1 - B-3
Always
Below 1 Ω
Text in Illustration *a
No. 2 Rear Door Wire
(Door Control Relay Assembly Side)
*b
No. 2 Rear Door Wire
(Door Opening Relay Side)
|
|
||||
| OK | |
|
| 4. CHECK HARNESS AND CONNECTOR (DOOR OPENING RELAY - BATTERY AND BODY GROUND) |
Disconnect the door opening relay connector.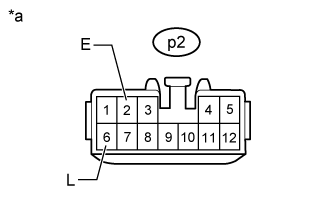
Measure the resistance according to the value(s) in the table below.
- Standard Resistance:
Tester Connection
Condition
Specified Condition
p2-2 (E) - Body ground
Always
Below 1 Ω
Measure the voltage according to the value(s) in the table below.
- Standard Voltage:
Tester Connection
Condition
Specified Condition
p2-6 (L) - Body ground
Always
11 to 14 V
| *a |
Front view of wire harness connector (to Door Opening Relay) |
|
|
||||
| OK | |
|
| 5. INSPECT POWER SLIDE DOOR MAIN SWITCH |
Remove the power slide door main switch (Click here).
Inspect the power slide door main switch (Click here).
|
|
||||
| OK | |
|
| 6. CHECK HARNESS AND CONNECTOR (POWER SLIDE DOOR MAIN SWITCH - DOOR CONTROL RELAY ASSEMBLY AND BODY GROUND) |
Disconnect the I29 power slide door main switch connector.
Disconnect the q4 door control relay assembly connector.
Measure the resistance according to the value(s) in the table below.
- Standard Resistance:
Tester Connection
Condition
Specified Condition
I29-9 - q4-17 (MSW)
Always
Below 1 Ω
I29-6 - Body ground
Always
Below 1 Ω
I29-9 or q4-17 (MSW) - Body ground
Always
10 kΩ or higher
|
|
||||
| OK | |
|
| 7. INSPECT AUTO SLIDE DOOR CONTROL SWITCH ASSEMBLY |
Remove the auto slide door control switch assembly (Click here).
Inspect the auto slide door control switch assembly (Click here).
|
|
||||
| OK | |
|
| 8. CHECK HARNESS AND CONNECTOR (AUTO SLIDE DOOR CONTROL SWITCH ASSEMBLY - DOOR CONTROL RELAY ASSEMBLY AND BODY GROUND) |
Disconnect the I28 auto slide door control switch assembly connector.
Disconnect the q4 door control relay assembly connector.
Measure the resistance according to the value(s) in the table below.
- Standard Resistance:
Tester Connection
Condition
Specified Condition
I28-4 - q4-16 (DSW)
Always
Below 1 Ω
I28-1 - Body ground
Always
Below 1 Ω
I28-4 or q4-16 (DSW) - Body ground
Always
10 kΩ or higher
|
|
||||
| OK | |
|
| 9. CHECK HARNESS AND CONNECTOR (SLIDE DOOR MOTOR ASSEMBLY - DOOR CONTROL RELAY ASSEMBLY) |
Disconnect the q1 slide door motor assembly connector.
Disconnect the q4 door control relay assembly connector.
Measure the resistance according to the value(s) in the table below.
- Standard Resistance:
Tester Connection
Condition
Specified Condition
q1-1 (DSG) - q4-2 (DSG)
Always
Below 1 Ω
q1-2 (DS2) - q4-23 (DS2)
Always
Below 1 Ω
q1-3 (DSV) - q4-3 (DSV)
Always
Below 1 Ω
q1-4 (DS1) - q4-24 (DS1)
Always
Below 1 Ω
q1-1 (DSG) or q4-2 (DSG) - Body ground
Always
10 kΩ or higher
q1-2 (DS2) or q4-23 (DS2) - Body ground
Always
10 kΩ or higher
q1-3 (DSV) or q4-3 (DSV) - Body ground
Always
10 kΩ or higher
q1-4 (DS1) or q4-24 (DS1) - Body ground
Always
10 kΩ or higher
|
|
||||
| OK | |
|
| 10. INSPECT SLIDE DOOR LOCK RELEASE MOTOR ASSEMBLY |
Remove the slide door lock release motor assembly (Click here).
Inspect the slide door lock release motor assembly (Click here).
|
|
||||
| OK | |
|
| 11. CHECK HARNESS AND CONNECTOR (SLIDE DOOR LOCK RELEASE MOTOR ASSEMBLY - DOOR OPENING RELAY) |
Disconnect the p3 slide door lock release motor assembly connector.
Disconnect the p2 door opening relay connector.
Measure the resistance according to the value(s) in the table below.
- Standard Resistance:
Tester Connection
Condition
Specified Condition
p3-1 (E) - p2-10 (E)
Always
Below 1 Ω
p3-2 (LS2) - p2-12 (P/W)
Always
Below 1 Ω
p3-3 (L-) - p2-10 (E)
Always
Below 1 Ω
p3-4 (ANRL) - p2-5 (SIG)
Always
Below 1 Ω
p3-5 (UL) - p2-1 (UL2)
Always
Below 1 Ω
p3-6 (UL3) - p2-3 (UL1)
Always
Below 1 Ω
p3-1 (E) or p2-10 (E) - Body ground
Always
10 kΩ or higher
p3-2 (LS2) or p2-12 (P/W) - Body ground
Always
10 kΩ or higher
p3-3 (L-) or p2-10 (E) - Body ground
Always
10 kΩ or higher
p3-4 (ANRL) or p2-5 (SIG) - Body ground
Always
10 kΩ or higher
p3-5 (UL) or p2-1 (UL2) - Body ground
Always
10 kΩ or higher
p3-6 (UL3) or p2-3 (UL1) - Body ground
Always
10 kΩ or higher
|
|
||||
| OK | |
|
| 12. CHECK HARNESS AND CONNECTOR (DOOR CONTROL RELAY ASSEMBLY - DOOR OPENING RELAY) |
Disconnect the q4 door control relay assembly connector.
Disconnect the p2 door opening relay connector.
Measure the resistance according to the value(s) in the table below.
- Standard Resistance:
Tester Connection
Condition
Specified Condition
q4-12 (RACT) - p2-4 (CSW)
Always
Below 1 Ω
q4-12 (RACT) - p2-11 (DWN)
Always
Below 1 Ω
q4-12 (RACT) or p2-4 (CSW) - Body ground
Always
10 kΩ or higher
q4-12 (RACT) or p2-11 (DWN) - Body ground
Always
10 kΩ or higher
|
|
||||
| OK | |
|
| 13. REPLACE DOOR OPENING RELAY |
Temporarily replace the door opening relay with a new or normally functioning one (Click here).
| NEXT | |
|
| 14. CHECK OPERATION |
Check the operation of the power slide door function (Click here).
- OK:
- Power slide door function operates normally.
|
|
||||
| OK | ||
 |
||
| ||
| 15. INSPECT SLIDE DOOR MOTOR ASSEMBLY |
Remove the slide door motor assembly (Click here).
Inspect the slide door motor assembly (Click here).
|
|
||||
| OK | |
|
| 16. CHECK HARNESS AND CONNECTOR (DOOR CONTROL RELAY ASSEMBLY - SLIDE DOOR MOTOR ASSEMBLY) |
Disconnect the q3 and q4 door control relay assembly connectors.
Disconnect the q1 and q5 slide door motor assembly connectors.
Measure the resistance according to the value(s) in the table below.
- Standard Resistance:
Tester Connection
Condition
Specified Condition
q3-2 (CL+) - q5-5 (CL+)
Always
Below 1 Ω
q3-6 (CL-) - q5-4 (CL-)
Always
Below 1 Ω
q4-2 (DSG) - q1-1 (DSG)
Always
Below 1 Ω
q4-3 (DSV) - q1-3 (DSV)
Always
Below 1 Ω
q4-23 (DS2) - q1-2 (DS2)
Always
Below 1 Ω
q4-24 (DS1) - q1-4 (DS1)
Always
Below 1 Ω
q3-2 (CL+) or q5-5 (CL+) - Body ground
Always
10 kΩ or higher
q3-6 (CL-) or q5-4 (CL-) - Body ground
Always
10 kΩ or higher
q4-2 (DSG) or q1-1 (DSG) - Body ground
Always
10 kΩ or higher
q4-3 (DSV) or q1-3 (DSV) - Body ground
Always
10 kΩ or higher
q4-23 (DS2) or q1-2 (DS2) - Body ground
Always
10 kΩ or higher
q4-24 (DS1) or q1-4 (DS1) - Body ground
Always
10 kΩ or higher
|
|
||||
| OK | ||
|
||
| ||