1GD-FTV INTAKE / EXHAUST EXHAUST MANIFOLD W/ TURBOCHARGER INSTALLATION
PROCEDURE

 1.INSTALL STUD BOLT
- NOTICE:
-
If a stud bolt is deformed or its threads are damaged, replace it.
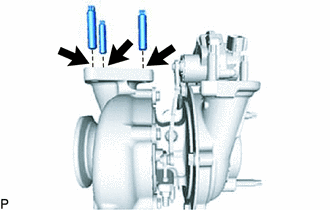
Using an E10 "TORX" socket wrench, install the 3 stud bolts at the positions shown in the illustration.
- Torque:
- 14.7 N*m (150 kgf*cm, 11 ft.*lbf)
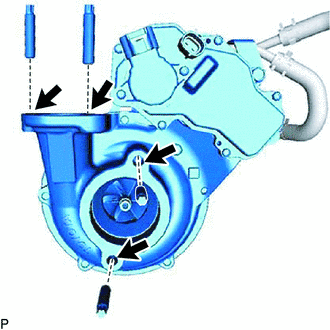
Using an E8 "TORX" socket wrench, install the 4 stud bolts at the positions shown in the illustration.
- Torque:
- 10 N*m (102 kgf*cm, 7 ft.*lbf)
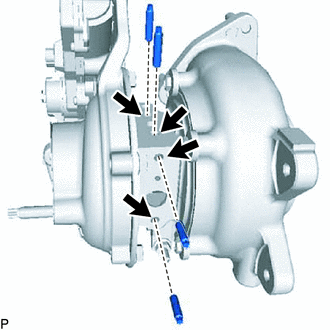
Using an E5 "TORX" socket wrench, install the 4 stud bolts at the positions shown in the illustration.
- Torque:
- 5.5 N*m (56 kgf*cm, 49 in.*lbf)
17275
2.INSTALL COMPRESSOR OUTLET ELBOW
except Cold Area Specification Vehicles:
Install the hose clamp with the bolt.
- Torque:
- 10 N*m (102 kgf*cm, 7 ft.*lbf)
Install a new gasket.
Install a new gasket and the compressor outlet elbow with the 2 nuts.
- Torque:
- 21 N*m (214 kgf*cm, 15 ft.*lbf)
17274
3.INSTALL COMPRESSOR INLET ELBOW
for Water Cooled Compressor Housing Turbocharger:
Install a new gasket to the compressor inlet elbow.
Using an E8 "TORX" socket wrench, install a new gasket and the compressor inlet elbow with the stud bolt.
- Torque:
- 10 N*m (102 kgf*cm, 7 ft.*lbf)
Install the compressor inlet elbow to the turbocharger sub-assembly with the 2 nuts.
- Torque:
- 21 N*m (214 kgf*cm, 15 ft.*lbf)
Install the compressor inlet elbow stay with the 2 bolts.
- Torque:
- 21 N*m (214 kgf*cm, 15 ft.*lbf)
16027
4.INSTALL NO. 1 TURBO WATER PIPE SUB-ASSEMBLY
Install a new gasket.
Temporarily install the turbo water pipe sub-assembly with the bolt and 2 nuts.
Tighten the bolt and 2 nuts.
- Torque:
- 13 N*m (133 kgf*cm, 10 ft.*lbf)
Connect the No. 1 turbo water hose and No. 2 turbo water hose to the No. 1 turbo water pipe sub-assembly and slide the 2 hose clips to secure the hoses.
15407
5.TEMPORARILY INSTALL TURBO OIL INLET PIPE SUB-ASSEMBLY
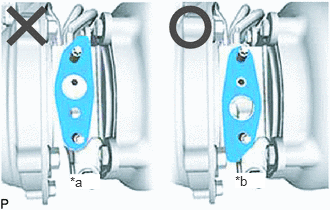
| *a | NG |
| *b | OK |
Install a new gasket as shown in the illustration.
- NOTICE:
-
Do not install the gasket upside down.
Temporarily install the turbo oil inlet pipe sub-assembly with the 2 nuts.
17141
6.TEMPORARILY INSTALL EXHAUST MANIFOLD WITH TURBOCHARGER SUB-ASSEMBLY
Install 2 new gaskets to the exhaust manifold and turbocharger sub-assembly.
Temporarily install the exhaust manifold to turbocharger sub-assembly with 3 new nuts.
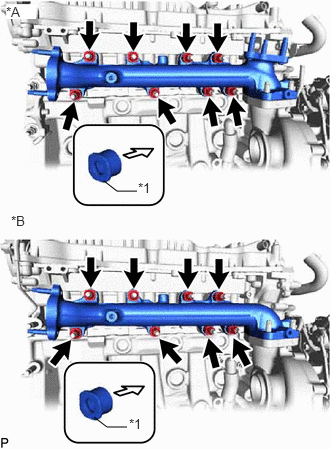
| *A | w/ DPF |
| *B | w/o DPF |
| *1 | Collar |

|
Engine Side |
Temporarily install the exhaust manifold with turbocharger sub-assembly, 8 collars and the 8 plate washers to the cylinder head sub-assembly with 8 new nuts.
- NOTICE:
-
Make sure that the side of the collar with the smaller diameter faces the exhaust manifold.
Install a new gasket on the union bolt side to turbo oil inlet pipe sub-assembly.
Temporarily install the union bolt.
15474
7.INSTALL TURBO OIL OUTLET PIPE
Install a new gasket to the turbo oil outlet pipe.
- NOTICE:
-
The claws of the gasket must face the turbo oil outlet pipe.
Install the turbo oil outlet pipe with the 2 bolts.
- Torque:
- 12 N*m (122 kgf*cm, 9 ft.*lbf)
Connect the turbo oil outlet hose to the turbo oil outlet pipe, turbo oil inlet pipe and slide the 2 hose clips to secure the hoses.
17293
8.TEMPORARILY INSTALL TURBOCHARGER STAY
Temporarily install the turbocharger stay to the turbocharger sub-assembly, with 3 bolts and nut.
17141
9.TIGHTEN EXHAUST MANIFOLD WITH TURBOCHARGER SUB-ASSEMBLY
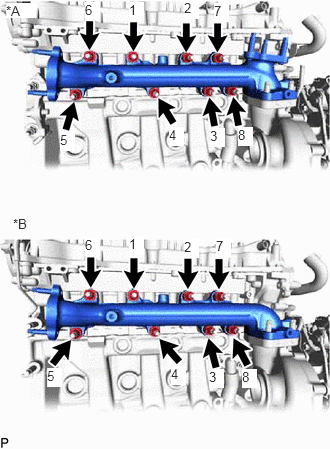
| *A | w/ DPF |
| *B | w/o DPF |
Tighten the exhaust manifold with turbocharger sub-assembly, to the cylinder head sub-assembly with 8 nuts.
- Torque:
- 40 N*m (408 kgf*cm, 30 ft.*lbf)
- HINT:
-
Tighten the nuts in the order shown in the illustration.
Tighten the turbocharger sub-assembly, to the exhaust manifold with the 3 nuts.
- Torque:
- 73 N*m (744 kgf*cm, 54 ft.*lbf)
Tighten the 2 nuts and then union bolt of the turbo oil inlet pipe sub-assembly.
- Torque:
- for nut : 13 N*m (133 kgf*cm, 10 ft.*lbf)
- for union bolt : 36 N*m (367 kgf*cm, 27 ft.*lbf)
- NOTICE:
-
If the connecting part of the union bolt gasket is cracked, remove the connecting part.
17293
10.TIGHTEN TURBOCHARGER STAY
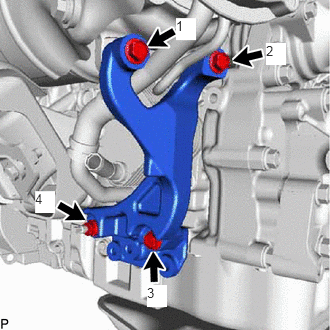
Tighten the 3 bolts and nut of the turbocharger stay in the order shown in the illustration.
- Torque:
- 24 N*m (245 kgf*cm, 18 ft.*lbf)
87101
11.INSTALL NO. 1 VISCOUS HEATER BRACKET SUB-ASSEMBLY (w/ Viscous Heater)
Temporarily install the No. 1 viscous heater bracket sub-assembly with 4 bolts.
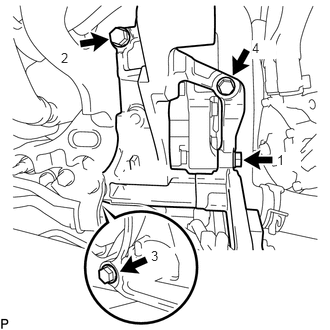
Tighten the 4 bolts and of the No. 1 viscous heater bracket sub-assembly in the order shown in the illustration.
- Torque:
- 24.5 N*m (250 kgf*cm, 18 ft.*lbf)
Connect the wire harness with the bolt.
- Torque:
- 13 N*m (133 kgf*cm, 10 ft.*lbf)
12.INSTALL WIRE HARNESS CLAMP BRACKET (for Manual Transmission)
Connect the wire harness with the bolt.
- Torque:
- 30 N*m (306 kgf*cm, 22 ft.*lbf)
13.INSTALL OIL COOLER TUBE BRACKET AND WIRE HARNESS CLAMP BRACKET (for Automatic Transmission)
Connect the wire harness with the bolt.
- Torque:
- 30 N*m (306 kgf*cm, 22 ft.*lbf)
Connect the oil cooler tube bracket with the bolt.
- Torque:
- 13.5 N*m (138 kgf*cm, 10 ft.*lbf)
25601
14.INSTALL NO. 1 EGR PIPE SUB-ASSEMBLY (w/ EGR System)
25601
15.INSTALL EGR PIPE WITH COOLER SUB-ASSEMBLY (for Laminated EGR Pre-cooler)
25617
16.INSTALL EGR HOLE COVER PLATE (w/o EGR System)
Using an E8 "TORX" socket wrench, install the 2 new stud bolts.
- Torque:
- 10 N*m (102 kgf*cm, 7 ft.*lbf)
Install a new gasket and the EGR hole cover plate with the 2 new nuts.
- Torque:
- 29 N*m (296 kgf*cm, 21 ft.*lbf)
16284
17.CONNECT TURBO WATER HOSE
Connect the No. 1 turbo water hose and No. 2 turbo water hose to the water outlet sub-assembly, engine water pump assembly and slide the 2 hose clips to secure the hoses.
- NOTICE:
-
The turbocharger sub-assembly may be damaged if the No. 1 turbo water hose and No. 2 turbo water hose are connected to the wrong locations.
16268
18.INSTALL NO. 1 WATER BY-PASS PIPE
19.CONNECT WATER BY-PASS HOSE (for Water Cooled Compressor Housing Turbochager)
Connect the No. 4 turbo water hose to the turbocharger sub-assembly and No. 1 turbo water pipe sub-assembly and slide the 2 hose clips to secure the hoses.
Connect the No. 21 water by-pass hose to the turbocharger sub-assembly and No. 1 water by-pass pipe and slide the 2 hose clips to secure the hoses.
12261
20.INSTALL PCV HOSE (except Cold Area Specification Vehicles)
Attach the clamp and install the PCV hose.
Slide the 2 hose clips to secure the hoses.
12229
21.INSTALL PCV PIPE (for Cold Area Specification Vehicles)
Connect the PCV pipe to the compressor inlet elbow, cylinder head cover sub-assembly and slide the 2 hose clips to secure the hoses.
Install the PCV pipe with the bolt to the compressor outlet elbow.
- Torque:
- 10 N*m (102 kgf*cm, 7 ft.*lbf)
Connect the No. 19 water by-pass hose to the compressor inlet elbow and slide the hose clip to secure the hoses.
Install the No. 20 water by-pass hose to the PCV pipe and No. 1 water by-pass pipe, and slide the 2 hose clips to secure the hoses.
16279
22.INSTALL NO. 3 WATER BY-PASS PIPE
Connect the 2 water hoses to the oil cooler assembly and No. 2 water by-pass pipe, and slide the 2 hose clips to secure the hoses.
Install the No. 3 water by-pass pipe with the bolt.
- Torque:
- 21 N*m (214 kgf*cm, 15 ft.*lbf)
for Cold Area Specification Vehicles:
Install the water hose to the compressor inlet elbow and No. 3 water by-pass pipe, and slide the 2 hose clips to secure the hoses.
87120G
23.INSTALL VISCOUS HEATER WITH MAGNET CLUTCH ASSEMBLY (w/ Viscous Heater)
24.INSTALL WATER HOSE SUB-ASSEMBLY (w/ Viscous Heater)
17701
25.INSTALL AIR CLEANER CASE SUB-ASSEMBLY
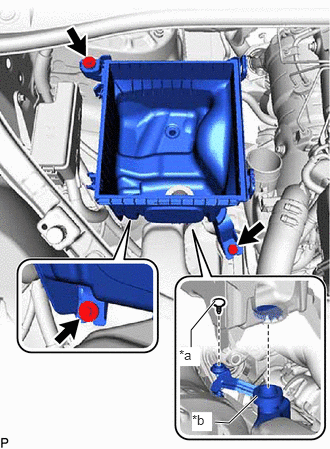
| *a | Pin |
| *b | Duct |
Install the air cleaner case sub-assembly with the 3 bolts.
- Torque:
- 5.0 N*m (51 kgf*cm, 44 in.*lbf)
- HINT:
-
Make sure to attach the pin and duct of the air cleaner case sub-assembly.
17801
26.INSTALL AIR CLEANER FILTER ELEMENT SUB-ASSEMBLY
Install the air cleaner filter element sub-assembly to the air cleaner case sub-assembly.
17705
27.INSTALL AIR CLEANER CAP SUB-ASSEMBLY WITH AIR CLEANER HOSE
Attach the 2 guides to install the air cleaner cap sub-assembly with air cleaner hose to the air cleaner case sub-assembly.
Attach the 2 air cleaner cap clamps.
Tighten the hose clamp.
- Torque:
- 4.0 N*m (41 kgf*cm, 35 in.*lbf)
Connect the mass air flow meter connector.
Attach the wire harness clamp.
16711
28.INSTALL FAN SHROUD
16470
29.INSTALL RADIATOR RESERVOIR
44360
30.CONNECT VANE PUMP OIL RESERVOIR ASSEMBLY
16571C
31.INSTALL NO. 1 RADIATOR HOSE
17303T
32.INSTALL AIR PIPE SUB-ASSEMBLY
25761B
33.CONNECT NO. 1 VACUUM TRANSMITTING HOSE
17030
34.INSTALL AIR HOSE ASSEMBLY
17751
35.INSTALL NO. 1 AIR CLEANER INLET
53106B
36.INSTALL RADIATOR COVER SUB-ASSEMBLY
25051
37.INSTALL EXHAUST MANIFOLD CONVERTER SUB-ASSEMBLY (w/ EGR Cooler)
17291
38.INSTALL TURBINE OUTLET ELBOW (w/o EGR Cooler)
39.INSTALL NO. 2 EXHAUST PIPE SUPPORT STAY (w/o EGR Cooler)
17271
40.INSTALL NO. 1 TURBO INSULATOR (w/o EGR Cooler)
17167
41.INSTALL NO. 1 EXHAUST MANIFOLD HEAT INSULATOR (w/o EGR Cooler)
42.ADD ENGINE OIL
43.ADD ENGINE COOLANT
44.INSPECT FOR COOLANT LEAK
45.INSPECT FOR OIL LEAK
46.INSPECT ENGINE OIL LEVEL
47.INSPECT FOR EXHAUST GAS LEAK
51405A
48.INSTALL NO. 1 ENGINE UNDER COVER ASSEMBLY
52618
49.INSTALL LOWER FRONT BUMPER ABSORBER
51406A
50.INSTALL NO. 2 ENGINE UNDER COVER SUB-ASSEMBLY (w/ No. 2 Engine Under Cover Sub-assembly)
12601B
51.INSTALL NO. 1 ENGINE COVER SUB-ASSEMBLY
52.PERFORM INITIALIZATION
w/ Urea SCR System:
Click hereEngine / Hybrid System>1GD-FTV (ENGINE CONTROL)>ECD SYSTEM (w/ Urea SCR System)>INITIALIZATION
w/ EGR Cooler:
Click hereEngine / Hybrid System>1GD-FTV (ENGINE CONTROL)>ECD SYSTEM (w/ EGR Cooler)>INITIALIZATION
w/o EGR Cooler:
Click hereEngine / Hybrid System>1GD-FTV (ENGINE CONTROL)>ECD SYSTEM (w/o EGR Cooler)>INITIALIZATION