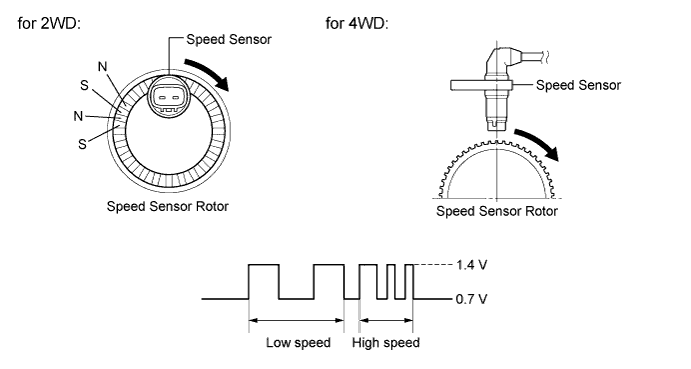
DTC C1415 Rear Speed Sensor RH Output Malfunction |
DTC C1416 Rear Speed Sensor LH Output Malfunction |
| DTC Code | DTC Detection Condition | Trouble Area |
| C1415 C1416 | Any of the following is detected:
|
|
| 1.CHECK HARNESS AND CONNECTOR (MOMENTARY INTERRUPTION) |
Using Techstream, check for any momentary interruption in the wire harness and connector corresponding to the DTC (Click here).
| Tester Display | Measurement Item/Range | Normal Condition | Diagnostic Note |
| RR Speed Open | RR speed sensor open detection / ERROR or NORMAL | ERROR: Momentary interruption NORMAL: Normal | - |
| RL Speed Open | RL speed sensor open detection / ERROR or NORMAL | ERROR: Momentary interruption NORMAL: Normal | - |
|
| ||||
| OK | |
 |
| 2.READ VALUE ON TECHSTREAM (REAR SPEED SENSOR) |
Turn the ignition switch off.
Connect Techstream to the DLC3.
Start the engine.
Select the Data List mode on Techstream (Click here).
| Tester Display | Measurement Item/Range | Normal Condition | Diagnostic Note |
| RR Wheel Speed | RR wheel speed sensor reading / min.: 0 km/h (0 mph), max.: 326 km/h (202 mph) | Actual wheel speed | Similar speed as indicated on speedometer |
| RL Wheel Speed | RL wheel speed sensor reading /min.: 0 km/h (0 mph), max.: 326 km/h (202 mph) | Actual wheel speed | Similar speed as indicated on speedometer |
Check that there is no difference between the speed value output from the speed sensor displayed on Techstream and the speed value displayed on the speedometer when driving the vehicle.
|
| ||||
| OK | |
|
| 3.RECONFIRM DTC |
Turn the ignition switch off.
Clear the DTCs (Click here).
Start the engine.
Drive the vehicle at a speed of 40 km/h (25 mph) or more for at least 60 seconds.
Check if the same DTC is recorded (Click here).
| Result | Proceed to |
| DTCs (C1415 and C1416) are not output | A |
| DTCs (C1415 and/or C1416) are output | B |
|
| ||||
| A | ||
 | ||
| ||
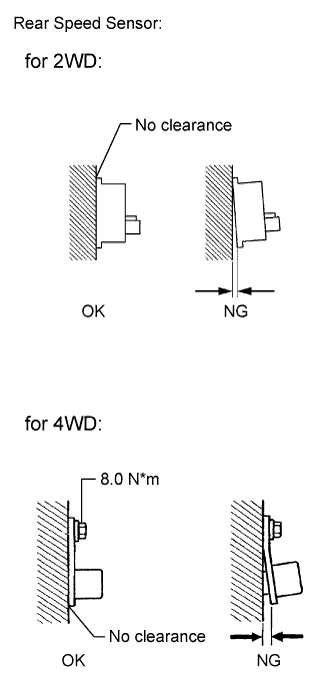
| 4.CHECK REAR SPEED SENSOR INSTALLATION |
 |
Turn the ignition switch off.
Check the speed sensor installation (for 2WD).
Check the speed sensor installation (for 4WD).
| Result | Proceed to |
| OK (for 4WD) | A |
| OK (for 2WD) | B |
| NG (for 2WD) | C |
| NG (for 4WD) | D |
|
| ||||
|
| ||||
|
| ||||
| A | |
|
| 5.CHECK REAR SPEED SENSOR TIP |
Remove the rear speed sensor (Click here).
Check the speed sensor tip.
|
| ||||
| OK | |
|
| 6.CHECK REAR SPEED SENSOR ROTOR |
Remove the rear speed sensor rotor (Click here).
Check the speed sensor rotor.
| Result | Proceed to |
| NG | A |
| OK | B |
|
| ||||
| A | ||
| ||
| ||
| 7.CHECK HARNESS AND CONNECTOR (SKID CONTROL SENSOR WIRE) |
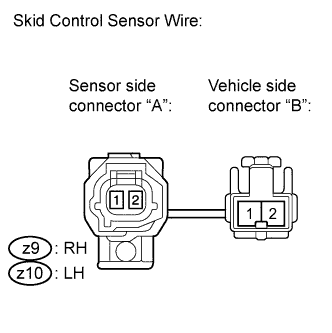 |
Make sure that there is no looseness at the locking part and the connecting part of the connectors.
Disconnect the skid control sensor wire.
Measure the resistance according to the value(s) in the table below.
| Tester Connection | Condition | Specified Condition |
| z9 ("A"-2) - z9 ("B"-1) | Always | Below 1 Ω |
| z9 ("A"-2) - z9 ("B"-2) | Always | 10 kΩ or higher |
| z9 ("A"-2) - Body ground | Always | 10 kΩ or higher |
| z9 ("A"-1) - z9 ("B"-2) | Always | Below 1 Ω |
| z9 ("A"-1) - z9 ("B"-1) | Always | 10 kΩ or higher |
| z9 ("A"-1) - Body ground | Always | 10 kΩ or higher |
| Tester Connection | Condition | Specified Condition |
| z10 ("A"-2) - z10 ("B"-1) | Always | Below 1 Ω |
| z10 ("A"-2) - z10 ("B"-2) | Always | 10 kΩ or higher |
| z10 ("A"-2) - Body ground | Always | 10 kΩ or higher |
| z10 ("A"-1) - z10 ("B"-2) | Always | Below 1 Ω |
| z10 ("A"-1) - z10 ("B"-1) | Always | 10 kΩ or higher |
| z10 ("A"-1) - Body ground | Always | 10 kΩ or higher |
|
| ||||
| OK | |
|
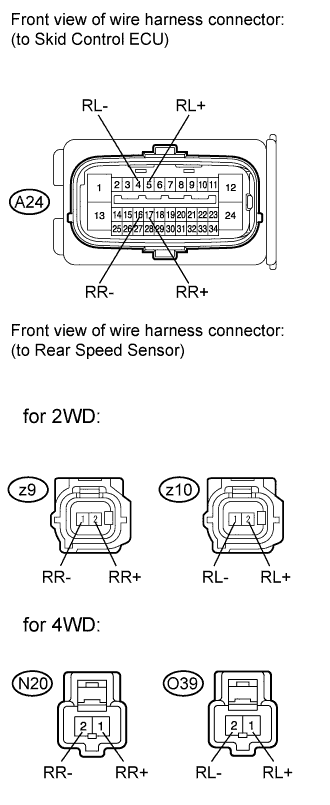
| 8.CHECK HARNESS AND CONNECTOR (SKID CONTROL ECU - REAR SPEED SENSOR) |
 |
Install the rear speed sensor and the rear speed sensor rotor.
Reconnect the skid control sensor wire (for 2WD).
Make sure that there is no looseness at the locking part and the connecting part of the connectors.
Disconnect the skid control ECU connector and the rear speed sensor connector.
Measure the resistance according to the value(s) in the table below.
| Tester Connection | Condition | Specified Condition |
| A24-17 (RR+) - z9-2 (RR+) | Always | Below 1 Ω |
| A24-17 (RR+) - Body ground | Always | 10 kΩ or higher |
| A24-16 (RR-) - z9-1 (RR-) | Always | Below 1 Ω |
| A24-16 (RR-) - Body ground | Always | 10 kΩ or higher |
| Tester Connection | Condition | Specified Condition |
| A24-17 (RR+) - N20-1 (RR+) | Always | Below 1 Ω |
| A24-17 (RR+) - Body ground | Always | 10 kΩ or higher |
| A24-16 (RR-) - N20-2 (RR-) | Always | Below 1 Ω |
| A24-16 (RR-) - Body ground | Always | 10 kΩ or higher |
| Tester Connection | Condition | Specified Condition |
| A24-5 (RL+) - z10-2 (RL+) | Always | Below 1 Ω |
| A24-5 (RL+) - Body ground | Always | 10 kΩ or higher |
| A24-4 (RL-) - z10-1 (RL-) | Always | Below 1 Ω |
| A24-4 (RL-) - Body ground | Always | 10 kΩ or higher |
| Tester Connection | Condition | Specified Condition |
| A24-5 (RL+) - O39-1 (RL+) | Always | Below 1 Ω |
| A24-5 (RL+) - Body ground | Always | 10 kΩ or higher |
| A24-4 (RL-) - O39-2 (RL-) | Always | Below 1 Ω |
| A24-4 (RL-) - Body ground | Always | 10 kΩ or higher |
|
| ||||
| OK | |
|
| 9.INSPECT SKID CONTROL ECU (SENSOR INPUT) |
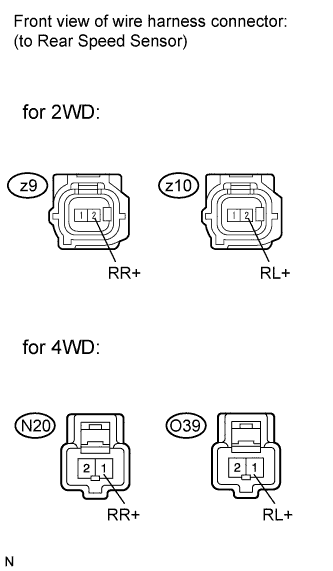 |
Reconnect the skid control ECU connector.
Turn the ignition switch on (IG).
Measure the voltage according to the value(s) in the table below.
| Tester Connection | Switch Condition | Specified Condition |
| z9-2 (RR+) - Body ground | Ignition switch on (IG) | 8 to 14 V |
| Tester Connection | Switch Condition | Specified Condition |
| N20-1 (RR+) - Body ground | Ignition switch on (IG) | 8 to 14 V |
| Tester Connection | Switch Condition | Specified Condition |
| z10-2 (RL+) - Body ground | Ignition switch on (IG) | 8 to 14 V |
| Tester Connection | Switch Condition | Specified Condition |
| O39-1 (RL+) - Body ground | Ignition switch on (IG) | 8 to 14 V |
| Result | Proceed to |
| OK (for 2WD) | A |
| OK (for 4WD) | B |
| NG | C |
|
| ||||
|
| ||||
| A | ||
| ||
| ||

