FRONT SUSPENSION FRONT SUSPENSION MEMBER(When Using the Engine Support Bridge for 2GR-FKS) INSTALLATION
PROCEDURE

 1.INSTALL HOLE PLUG
Install the 10 hole plugs to the front frame assembly.
- HINT:
-
There are 2 different shapes of hole plug.
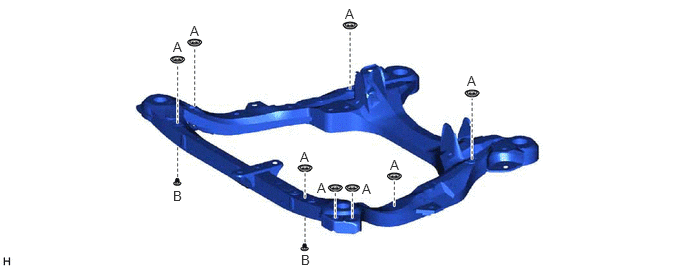
52217E
2.INSTALL FRONT SUSPENSION MEMBER BODY MOUNTING REAR CUSHION LH
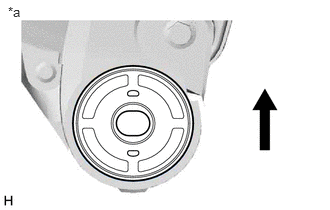
| *a | View from Underneath |

|
Front of the Vehicle |
Temporarily install a new front suspension member body mounting rear cushion LH while confirming the installation direction.
- NOTICE:
-
Position the front suspension member body mounting rear cushion LH in the correct direction.
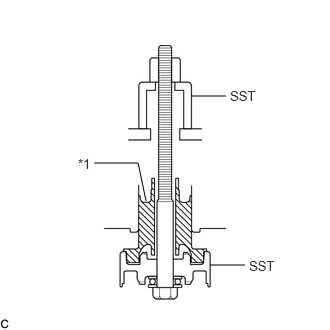
| *1 | Front Suspension Member Body Mounting Rear Cushion LH |
Install SST as shown in the illustration.
- SST
- 09830-10010 (09830-01010, 09830-01020, 09830-01030, 09830-01060)
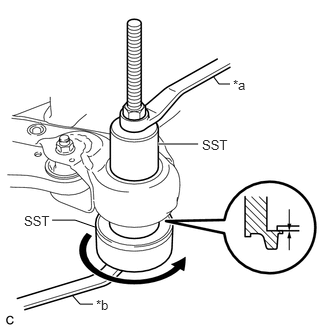
| *a | Hold |
| *b | Turn |
Using SST, install the front suspension member body mounting rear cushion LH as shown in the illustration.
- NOTICE:
-
Check that there is no clearance between the front frame assembly and the front suspension member body mounting rear cushion LH.
52215
3.INSTALL FRONT SUSPENSION MEMBER BODY MOUNTING REAR CUSHION RH
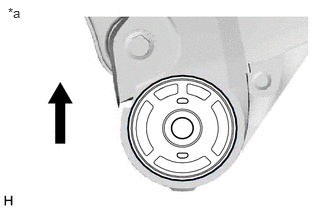
| *a | View from Underneath |
|
|
Front of the Vehicle |
Temporarily install a new front suspension member body mounting rear cushion RH while confirming the installation direction.
- NOTICE:
-
Position the front suspension member body mounting rear cushion RH in the correct direction.
Install SST using the same procedure as for the front suspension member body mounting rear cushion LH.
- SST
- 09830-10010 (09830-01010, 09830-01020, 09830-01030, 09830-01060)
Using SST, install the front suspension member body mounting rear cushion RH.
- SST
- 09830-10010 (09830-01010, 09830-01020, 09830-01030, 09830-01060)
- HINT:
-
Perform the same procedure as for the LH side.
52211J
4.INSTALL FRONT SUSPENSION MEMBER BODY MOUNTING FRONT CUSHION
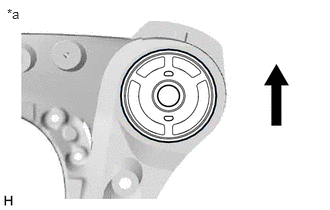
| *a | View from Underneath |
|
|
Front of the Vehicle |
Temporarily install a new front suspension member body mounting front cushion while confirming the installation direction.
- NOTICE:
-
Position the front suspension member body mounting front cushion in the correct direction.
Install SST using the same procedure as for the front suspension member body mounting rear cushion LH.
- SST
- 09830-10010 (09830-01010, 09830-01020, 09830-01030, 09830-01060)
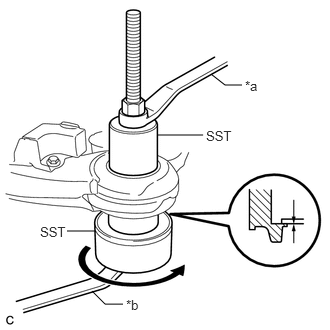
| *a | Hold |
| *b | Turn |
Using SST, install each front suspension member body mounting front cushion as shown in the illustration.
- SST
- 09830-10010 (09830-01010, 09830-01020, 09830-01030, 09830-01060)
- NOTICE:
-
Check that there is no clearance between the front frame assembly and the front suspension member body mounting front cushion.
52216B
5.INSTALL FRONT SUSPENSION MEMBER BODY MOUNTING REAR STOPPER
Install the 2 front suspension member body mounting rear stoppers to the front frame assembly.
52213A
6.INSTALL FRONT SUSPENSION MEMBER BODY MOUNTING FRONT STOPPER
Install the 2 front suspension member body mounting front stoppers to the front frame assembly.
51229B
7.INSTALL NO. 2 FRAME CROSSMEMBER DYNAMIC DAMPER
for 2WD:
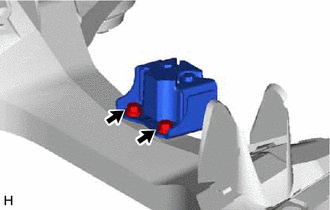
Install the No. 2 frame crossmember dynamic damper to the front frame assembly with the 2 bolts.
- Torque:
- 29 N*m (296 kgf*cm, 21 ft.*lbf)
for AWD:
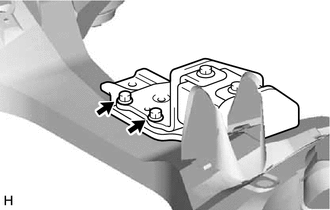
Install the No. 2 frame crossmember dynamic damper to the front frame assembly with the 2 bolts.
- Torque:
- 29 N*m (296 kgf*cm, 21 ft.*lbf)
48069
8.INSTALL FRONT LOWER NO. 1 SUSPENSION ARM SUB-ASSEMBLY LH
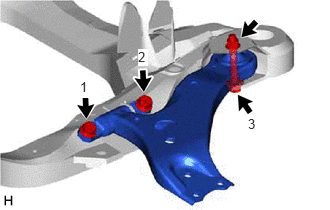
Install the front lower No. 1 suspension arm sub-assembly LH to the front frame assembly with the 3 bolts and nut in the order shown in the illustration.
- Torque:
- Bolt (1), (2) : 200 N*m (2039 kgf*cm, 148 ft.*lbf)
- Bolt (3) : 135 N*m (1377 kgf*cm, 100 ft.*lbf)
- NOTICE:
-
Because the nut has its own stopper, do not turn the nut. Tighten the bolt with the nut secured.
48068
9.INSTALL FRONT LOWER NO. 1 SUSPENSION ARM SUB-ASSEMBLY RH
- HINT:
-
Perform the same procedure as for the LH side.
10.INSTALL STEERING LINK ASSEMBLY (for 2WD)
Install the steering link assembly to the front frame assembly with the 2 bolts and 2 nuts.
- Torque:
- 70 N*m (714 kgf*cm, 52 ft.*lbf)
- NOTICE:
- ·
Make sure to tighten the bolts starting from the steering link assembly pinion shaft side.
·Keep the nut from rotating while turning the bolt because the nut has its own stopper.
11.INSTALL FRONT STABILIZER BAR WITH FRONT STABILIZER LINK ASSEMBLY (for 2WD)
Install the front stabilizer bar with 2 front No. 2 stabilizer brackets, 2 front No. 1 stabilizer bar bushings and 2 front stabilizer link assemblies to the front frame assembly.
48829A
12.INSTALL FRONT NO. 1 STABILIZER BRACKET LH (for 2WD)
Install the front No. 1 stabilizer bracket LH to the front frame assembly with the 2 bolts.
- Torque:
- 29 N*m (296 kgf*cm, 21 ft.*lbf)
48824A
13.INSTALL FRONT NO. 1 STABILIZER BRACKET RH (for 2WD)
- HINT:
-
Perform the same procedure as for the LH side.
51100G
14.INSTALL FRONT FRAME ASSEMBLY
Slowly jack up the front frame assembly with an engine lifter using 4 attachments or equivalent tools.
- CAUTION:
-
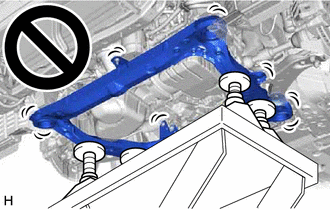
- ·
The front frame assembly is a very heavy component. Make sure that it is supported securely.
·If the front frame assembly is not securely supported, it may drop, resulting in serious injury.
- NOTICE:
-
Use attachments to keep the front frame assembly level.
Install the front frame assembly to the vehicle body.
|
|
Bolt |

|
Nut |
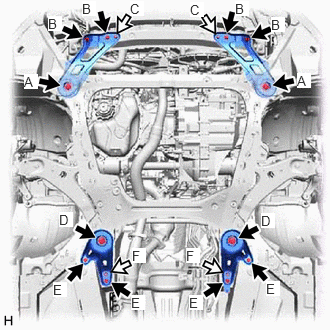
Install the frame side rail plate sub-assembly RH and frame side rail plate sub-assembly LH with the 6 bolts and 2 nuts.
- Torque:
- Bolt (A) : 85 N*m (867 kgf*cm, 63 ft.*lbf)
- Bolt (B) : 32 N*m (326 kgf*cm, 24 ft.*lbf)
- Nut (C) : 32 N*m (326 kgf*cm, 24 ft.*lbf)
Install the front suspension member bracket sub-assembly RH and front suspension member bracket sub-assembly LH with the 6 bolts and 2 nuts.
- Torque:
- Bolt (D) : 85 N*m (867 kgf*cm, 63 ft.*lbf)
- Bolt (E) : 32 N*m (326 kgf*cm, 24 ft.*lbf)
- Nut (F) : 32 N*m (326 kgf*cm, 24 ft.*lbf)
Lower the engine lifter.
15.REMOVE BELT
for 2WD: Click hereDrivetrain>UA80E (AUTOMATIC TRANSMISSION / TRANSAXLE)>AUTOMATIC TRANSAXLE ASSEMBLY(When Using the Engine Support Bridge)>INSTALLATION
for AWD: Click hereDrivetrain>UA80F (AUTOMATIC TRANSMISSION / TRANSAXLE)>AUTOMATIC TRANSAXLE ASSEMBLY(When Using the Engine Support Bridge)>INSTALLATION
16.REMOVE ENGINE SUPPORT BRIDGE
for 2WD: Click hereDrivetrain>UA80E (AUTOMATIC TRANSMISSION / TRANSAXLE)>AUTOMATIC TRANSAXLE ASSEMBLY(When Using the Engine Support Bridge)>INSTALLATION
for AWD: Click hereDrivetrain>UA80F (AUTOMATIC TRANSMISSION / TRANSAXLE)>AUTOMATIC TRANSAXLE ASSEMBLY(When Using the Engine Support Bridge)>INSTALLATION
17.REMOVE ENGINE HANGERS
for 2WD: Click hereDrivetrain>UA80E (AUTOMATIC TRANSMISSION / TRANSAXLE)>AUTOMATIC TRANSAXLE ASSEMBLY(When Using the Engine Support Bridge)>INSTALLATION
for AWD: Click hereDrivetrain>UA80F (AUTOMATIC TRANSMISSION / TRANSAXLE)>AUTOMATIC TRANSAXLE ASSEMBLY(When Using the Engine Support Bridge)>INSTALLATION
12361
18.CONNECT FRONT ENGINE MOUNTING INSULATOR ASSEMBLY
Connect the front engine mounting insulator assembly to the front frame assembly with the 3 nuts.
- Torque:
- 58 N*m (591 kgf*cm, 43 ft.*lbf)
Install the hole plug.
12372A
19.CONNECT ENGINE MOUNTING INSULATOR LH
Connect the engine mounting insulator LH to the front frame assembly with the 3 nuts.
- Torque:
- 99 N*m (1010 kgf*cm, 73 ft.*lbf)
Install the 2 hole plugs.
12362
20.CONNECT ENGINE MOUNTING INSULATOR RH
Connect the engine mounting insulator RH to the front frame assembly with the 3 nuts.
- Torque:
- 99 N*m (1010 kgf*cm, 73 ft.*lbf)
Install the 2 hole plugs.
12380
21.CONNECT REAR ENGINE MOUNTING INSULATOR ASSEMBLY
Connect the rear engine mounting insulator assembly to the front frame assembly with the 2 nuts.
- Torque:
- 58 N*m (591 kgf*cm, 43 ft.*lbf)
Install the 2 hole plugs.
32971
22.CONNECT TRANSMISSION OIL THERMOSTAT
Connect the transmission oil thermostat to the front frame assembly with the 2 bolts.
- Torque:
- 19.5 N*m (199 kgf*cm, 14 ft.*lbf)
23.INSTALL STEERING LINK ASSEMBLY (for AWD)
24.INSTALL FRONT STABILIZER BAR WITH FRONT STABILIZER LINK ASSEMBLY (for AWD)
48829A
25.INSTALL FRONT NO. 1 STABILIZER BRACKET LH (for AWD)
Install the front No. 1 stabilizer bracket LH to the front frame assembly with the 2 bolts.
- Torque:
- 29 N*m (296 kgf*cm, 21 ft.*lbf)
48824A
26.INSTALL FRONT NO. 1 STABILIZER BRACKET RH (for AWD)
- HINT:
-
Perform the same procedure as for the LH side.
48069
27.CONNECT FRONT LOWER NO. 1 SUSPENSION ARM SUB-ASSEMBLY LH
48068
28.CONNECT FRONT LOWER NO. 1 SUSPENSION ARM SUB-ASSEMBLY RH
- HINT:
-
Perform the same procedure as for the LH side.
45470
29.CONNECT TIE ROD ASSEMBLY LH
45460
30.CONNECT TIE ROD ASSEMBLY RH
- HINT:
-
Perform the same procedure as for the LH side.
45220
31.CONNECT STEERING INTERMEDIATE SHAFT ASSEMBLY
48810
32.CONNECT FRONT STABILIZER LINK ASSEMBLY LH
48820B
33.CONNECT FRONT STABILIZER LINK ASSEMBLY RH
- HINT:
-
Perform the same procedure as for the LH side.
37100
34.TEMPORARILY TIGHTEN PROPELLER WITH CENTER BEARING SHAFT ASSEMBLY (for AWD)
37100
35.FULLY TIGHTEN PROPELLER WITH CENTER BEARING SHAFT ASSEMBLY (for AWD)
17410
36.INSTALL FRONT EXHAUST PIPE ASSEMBLY
17584B
37.INSTALL NO. 1 EXHAUST PIPE SUPPORT BRACKET (for Lower Side)
17403
38.INSTALL FRONT NO. 3 EXHAUST PIPE SUB-ASSEMBLY
39.INSTALL WIRE HARNESS CLAMP BRACKET
for 2WD: Click hereDrivetrain>UA80E (AUTOMATIC TRANSMISSION / TRANSAXLE)>AUTOMATIC TRANSAXLE ASSEMBLY(When Using the Engine Support Bridge)>INSTALLATION
for AWD: Click hereDrivetrain>UA80F (AUTOMATIC TRANSMISSION / TRANSAXLE)>AUTOMATIC TRANSAXLE ASSEMBLY(When Using the Engine Support Bridge)>INSTALLATION
17176
40.INSTALL AIR SURGE TANK TO INTAKE MANIFOLD GASKET
17190
41.INSTALL INTAKE AIR SURGE TANK ASSEMBLY
25860
42.CONNECT PURGE VALVE (PURGE VSV)
12261
43.CONNECT VENTILATION HOSE
47220D
44.INSTALL BRAKE MASTER CYLINDER RESERVOIR ASSEMBLY (for LHD)
82121
45.CONNECT ENGINE WIRE
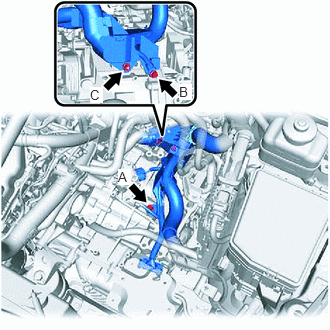
Connect the engine wire to the automatic transaxle case sub-assembly with the 2 bolts and nut.
- Torque:
- Bolt (A) : 25.5 N*m (260 kgf*cm, 19 ft.*lbf)
- Bolt (B) : 19.1 N*m (195 kgf*cm, 14 ft.*lbf)
- Nut (C) : 8.5 N*m (87 kgf*cm, 75 in.*lbf)
28800
46.INSTALL BATTERY
22271
47.INSTALL THROTTLE BODY GASKET
22030
48.INSTALL THROTTLE BODY WITH MOTOR ASSEMBLY
17700
49.INSTALL AIR CLEANER ASSEMBLY WITH AIR CLEANER HOSE
17750A
50.INSTALL INLET AIR CLEANER ASSEMBLY
53295E
51.INSTALL COOL AIR INTAKE DUCT SEAL
53298E
52.INSTALL RADIATOR SIDE SEAL RH
53299D
53.INSTALL RADIATOR SIDE DEFLECTOR SEAL LH
55701J
54.INSTALL OUTER COWL TOP PANEL SUB-ASSEMBLY
for LHD: Click hereSuspension>FRONT SUSPENSION>FRONT SHOCK ABSORBER>INSTALLATION
for RHD: Click hereSuspension>FRONT SUSPENSION>FRONT SHOCK ABSORBER>INSTALLATION
55.INSTALL WINDSHIELD WIPER MOTOR AND LINK ASSEMBLY
56.CONNECT CABLE TO NEGATIVE BATTERY TERMINAL
- NOTICE:
-
When disconnecting the cable, some systems need to be initialized after the cable is reconnected.
-
Click hereGeneral>INTRODUCTION>REPAIR INSTRUCTION>INITIALIZATION
57.ADD ENGINE COOLANT
58.INSPECT FOR COOLANT LEAK
59. WARM UP ENGINE
60.INSPECT FOR EXHAUST GAS LEAK
61.INSPECT AND ADJUST TRANSFER OIL (for AWD)
53737B
62.INSTALL FRONT FENDER APRON SEAL LH
53736
63.INSTALL FRONT FENDER APRON SEAL RH
53876A
64.INSTALL FRONT FENDER LINER LH
53875A
65.INSTALL FRONT FENDER LINER RH
58166
66.INSTALL FRONT FLOOR COVER LH
51442
67.INSTALL NO. 2 ENGINE UNDER COVER
51441
68.INSTALL NO. 1 ENGINE UNDER COVER
11209
69.INSTALL V-BANK COVER SUB-ASSEMBLY
70.INSTALL FRONT WHEELS
- Torque:
- 103 N*m (1050 kgf*cm, 76 ft.*lbf)
71.INSPECT AND ADJUST FRONT WHEEL ALIGNMENT
72.CHECK FOR SPEED SENSOR SIGNAL