2GR-FKS ENGINE MECHANICAL CYLINDER HEAD GASKET INSTALLATION
PROCEDURE

 11116
1.INSTALL NO. 2 CYLINDER HEAD GASKET
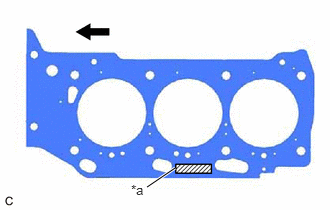
| *a | Lot No. |

|
Front of Engine |
Place a new No. 2 cylinder head gasket on the cylinder block sub-assembly as shown in the illustration.
- NOTICE:
- ·
Remove any oil from the contact surfaces.
·Make sure to install the No. 2 cylinder head gasket in the correct direction.
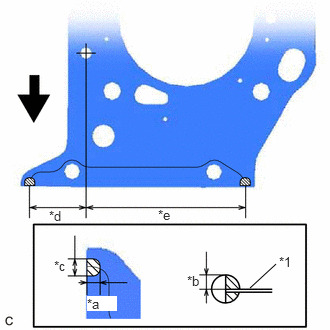
| *1 | No. 2 Cylinder Head Gasket |
| *a | 5.0 to 7.0 mm (0.197 to 0.276 in.) |
| *b | 3.0 to 5.0 mm (0.118 to 0.197 in.) |
| *c | 7.0 to 9.0 mm (0.276 to 0.354 in.) |
| *d | 38.2 mm (1.50 in.) |
| *e | 110.0 mm (4.33 in.) |
|
|
Front of Engine |

|
Seal Packing |
Apply seal packing to the No. 2 cylinder head gasket as shown in the illustration.
- Seal Packing:
Toyota Genuine Seal Packing Black, Three Bond 1207B or equivalent
- NOTICE:
- ·
Remove any oil from the contact surfaces.
·Install the No. 2 cylinder head gasket within 3 minutes and tighten the cylinder head set bolts within 15 minutes of applying seal packing.
11102
2.INSTALL CYLINDER HEAD LH
11115
3.INSTALL CYLINDER HEAD GASKET
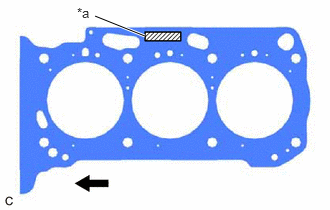
| *a | Lot No. |
|
|
Front of Engine |
Place a new cylinder head gasket on the cylinder block sub-assembly as shown in the illustration.
- NOTICE:
- ·
Remove any oil from the contact surfaces.
·Make sure to install the cylinder head gasket in the correct direction.
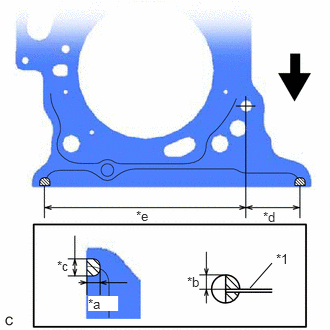
| *1 | Cylinder Head Gasket |
| *a | 5.0 to 7.0 mm (0.197 to 0.276 in.) |
| *b | 3.0 to 5.0 mm (0.118 to 0.197 in.) |
| *c | 7.0 to 9.0 mm (0.276 to 0.354 in.) |
| *d | 38.5 mm (1.52 in.) |
| *e | 144.0 mm (5.67 in.) |
|
|
Front of Engine |
|
|
Seal Packing |
Apply seal packing to the cylinder head gasket as shown in the illustration.
- Seal Packing:
Toyota Genuine Seal Packing Black, Three Bond 1207B or equivalent
- NOTICE:
- ·
Remove any oil from the contact surfaces.
·Install the cylinder head gasket within 3 minutes and tighten the cylinder head set bolts within 15 minutes of applying seal packing.
11101
4.INSTALL CYLINDER HEAD SUB-ASSEMBLY
16331
5.INSTALL WATER OUTLET
13716
6.INSTALL VALVE STEM CAP
13750
7.INSTALL VALVE LASH ADJUSTER ASSEMBLY
13801
8.INSTALL NO. 1 VALVE ROCKER ARM SUB-ASSEMBLY
13561
9.INSTALL NO. 1 CHAIN VIBRATION DAMPER
13562
10.INSTALL NO. 2 CHAIN VIBRATION DAMPER
82219A
11.INSTALL SENSOR WIRE
13053
12.INSTALL NO. 3 CAMSHAFT SUB-ASSEMBLY
13054
13.INSTALL NO.4 CAMSHAFT SUB-ASSEMBLY
14.INSTALL CAMSHAFT BEARING CAP (for Bank 2)
13050
15.SET CAMSHAFT TIMING GEAR ASSEMBLY, CAMSHAFT TIMING EXHAUST GEAR ASSEMBLY AND NO. 2 CHAIN SUB-ASSEMBLY (for Bank 2)
16.TEMPORARILY INSTALL CAMSHAFT TIMING GEAR BOLT (for Intake Side of Bank 2)
17.TEMPORARILY INSTALL CAMSHAFT TIMING GEAR BOLT (for Exhaust Side of Bank 2)
11104A
18.INSTALL CAMSHAFT HOUSING SUB-ASSEMBLY LH
19.TIGHTEN CAMSHAFT TIMING GEAR BOLT (for Intake Side of Bank 2)
20.TIGHTEN CAMSHAFT TIMING GEAR BOLT (for Exhaust Side of Bank 2)
13511
21.INSTALL CAMSHAFT
13512
22.INSTALL NO. 2 CAMSHAFT
23.INSTALL CAMSHAFT BEARING CAP (for Bank 1)
13050
24.SET CAMSHAFT TIMING GEAR ASSEMBLY, CAMSHAFT TIMING EXHAUST GEAR ASSEMBLY AND NO. 2 CHAIN SUB-ASSEMBLY (for Bank 1)
25.TEMPORARILY INSTALL CAMSHAFT TIMING GEAR BOLT (for Intake Side of Bank 1)
26.TEMPORARILY INSTALL CAMSHAFT TIMING GEAR BOLT (for Exhaust Side of Bank 1)
11103
27.INSTALL CAMSHAFT HOUSING SUB-ASSEMBLY
28.TIGHTEN CAMSHAFT TIMING GEAR BOLT (for Intake Side of Bank 1)
29.TIGHTEN CAMSHAFT TIMING GEAR BOLT (for Exhaust Side of Bank 1)
13560A
30.INSTALL NO. 3 CHAIN TENSIONER ASSEMBLY
13550
31.INSTALL NO. 2 CHAIN TENSIONER ASSEMBLY
13506
32.INSTALL CHAIN SUB-ASSEMBLY
13559
33.INSTALL CHAIN TENSIONER SLIPPER
13540
34.INSTALL NO. 1 CHAIN TENSIONER ASSEMBLY
35.INSPECT VALVE TIMING
11310
36.INSTALL TIMING CHAIN COVER ASSEMBLY
11301C
37.INSTALL TIMING CHAIN CASE OIL SEAL
12101
38.INSTALL OIL PAN SUB-ASSEMBLY
Install 2 new oil pan gaskets to the timing chain cover assembly.
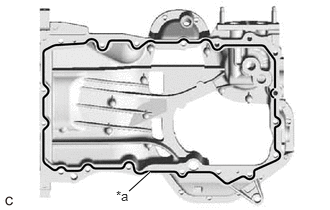
| *a | Seal Packing |
Apply seal packing in a continuous line as shown in the illustration.
- Seal Packing:
Toyota Genuine Seal Packing Black, Three Bond 1207B or equivalent
- Seal Packing Diameter:
3.0 to 4.0 mm (0.118 to 0.157 in.)
- NOTICE:
- ·
Remove any oil from the contact surfaces.
·Install the oil pan sub-assembly within 3 minutes of applying seal packing.
·Do not start the engine for at least 2 hours after installation.
Install the oil pan sub-assembly with the 16 bolts and 2 nuts in the order shown in the illustration.
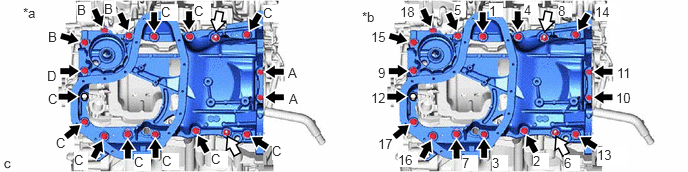
| *a | Torque | *b | Bolt and Nut Tightening Order |
|
|
Bolt | 
|
Nut |
- Torque:
- Bolt (A) : 10 N*m (102 kgf*cm, 7 ft.*lbf)
- Bolt (B), (C), (D) : 21 N*m (214 kgf*cm, 15 ft.*lbf)
- Nut : 21 N*m (214 kgf*cm, 15 ft.*lbf)
- Bolt Length:
Item Length Bolt (A) 16 mm (0.630 in.) Bolt (B) 45 mm (1.77 in.) Bolt (C) 25 mm (0.984 in.) Bolt (D) 70 mm (2.76 in.)
|
|
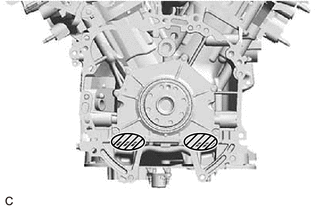
Wipe off the Seal Packing |
Wipe off any excess seal packing with a clean piece of cloth.
- NOTICE:
-
Do not allow seal packing to contact the No. 1 crankshaft position sensor plate.
15104
39.INSTALL OIL STRAINER SUB-ASSEMBLY
12102A
40.INSTALL NO. 2 OIL PAN SUB-ASSEMBLY
15767
41.INSTALL OIL COOLER PIPE
15710
42.INSTALL OIL COOLER ASSEMBLY
11193
43.INSTALL SPARK PLUG TUBE GASKET
11202
44.INSTALL CYLINDER HEAD COVER SUB-ASSEMBLY LH
11201
45.INSTALL CYLINDER HEAD COVER SUB-ASSEMBLY
82219A
46.INSTALL SENSOR WIRE
19312
47.INSTALL CRANKSHAFT POSITION SENSOR PROTECTOR
15370
48.INSTALL CAMSHAFT TIMING OIL CONTROL SOLENOID ASSEMBLY (for Intake Side of Bank 2)
15370
49.INSTALL CAMSHAFT TIMING OIL CONTROL SOLENOID ASSEMBLY (for Exhaust Side of Bank 2)
15370
50.INSTALL CAMSHAFT TIMING OIL CONTROL SOLENOID ASSEMBLY (for Exhaust Side of Bank 1)
15370
51.INSTALL CAMSHAFT TIMING OIL CONTROL SOLENOID ASSEMBLY (for Intake Side of Bank 1)
16031
52.INSTALL WATER INLET WITH THERMOSTAT SUB-ASSEMBLY
16261
53.CONNECT WATER BY-PASS HOSE
12315
54.INSTALL FRONT NO. 1 ENGINE MOUNTING BRACKET LH
13471
55.INSTALL CRANKSHAFT PULLEY
16587
56.INSTALL RADIATOR PIPE CLAMP
57.INSTALL WIRE HARNESS CLAMP BRACKET
12585
58.INSTALL NO. 5 CYLINDER BLOCK INSULATOR
11452
59.INSTALL ENGINE OIL LEVEL DIPSTICK GUIDE
16173
60.INSTALL WATER PUMP PULLEY
16620
61.INSTALL V-RIBBED BELT TENSIONER ASSEMBLY
16604
62.INSTALL NO. 2 IDLER PULLEY SUB-ASSEMBLY
88310
63.INSTALL COMPRESSOR ASSEMBLY WITH PULLEY
27020
64.INSTALL GENERATOR ASSEMBLY
16361A
65.INSTALL V-RIBBED BELT
29300
66.INSTALL VACUUM PUMP ASSEMBLY
19500
67.INSTALL IGNITION COIL ASSEMBLY
89615
68.INSTALL KNOCK CONTROL SENSOR
69.INSTALL ENGINE HANGERS
70.REMOVE ENGINE ASSEMBLY FROM ENGINE STAND