MAINTENANCE ENGINE GENERAL MAINTENANCE
CAUTION / NOTICE / HINT
- HINT:
-
Perform these procedures after the engine has cooled down.
PROCEDURE

 1.INSPECT TIMING BELT
- HINT:
-
This is for vehicles often used in excessively dusty conditions. Inspect for cracks on the timing belt or abnormal wear on the timing pulley. Then, remove sand and dust in the timing belt cover.
| Type | See procedure |
|---|---|
| 1KD-FTV (w/o Glow Plug Controller) | ( ) |
| 1KD-FTV (w/ Glow Plug Controller) | ()
|
| 2KD-FTV (w/ DPF) | ()
|
| 2KD-FTV (w/o DPF) | ()
|
2.REPLACE TIMING BELT
| Type | See procedure |
|---|---|
| 1KD-FTV (w/o Glow Plug Controller) | ()
|
| 1KD-FTV (w/ Glow Plug Controller) | ()
|
| 2KD-FTV (w/ DPF) | ()
|
| 2KD-FTV (w/o DPF) | ()
|
3.INSPECT TIMING BELT PULLEY
- HINT:
-
This is for vehicles often used in excessively dusty conditions. Inspect for cracks on the timing belt or abnormal wear on the timing pulley. Then, remove sand and dust in the timing belt cover.
| Type | See procedure |
|---|---|
| 1KD-FTV (w/o Glow Plug Controller) | ()
|
| 1KD-FTV (w/ Glow Plug Controller) | ()
|
| 2KD-FTV (w/ DPF) | ()
|
| 2KD-FTV (w/o DPF) | ()
|
4.CLEAN TIMING BELT COVER (for 1KD-FTV, 2KD-FTV)
- HINT:
-
This is for vehicles often used in excessively dusty conditions. Inspect for cracks on the timing belt or abnormal wear on the timing pulley. Then, remove sand and dust in the timing belt cover.
Remove the timing belt cover.
Check that the timing belt cover is not dirty.
If cleaning a timing belt cover, blow compressed air to clean it.
Reinstall the timing belt cover.
5.INSPECT VALVE CLEARANCE (for 1GR-FE, 1KD-FTV, 2KD-FTV)
| Type | See procedure |
|---|---|
| 1GR-FE | ()
|
| 1KD-FTV (w/o Glow Plug Controller) | ()
|
| 1KD-FTV (w/ Glow Plug Controller) | ()
|
| 2KD-FTV (w/ DPF) | ()
|
| 2KD-FTV (w/o DPF) | ()
|
6.INSPECT DRIVE BELT
| Type | See procedure |
|---|---|
| 1GR-FE | ()
|
| 1KD-FTV | ()
|
| 2KD-FTV | ()
|
| 2TR-FE | ()
|
| 2TR-FBE | ()
|
7.REPLACE ENGINE OIL AND OIL FILTER
| Type | See procedure |
|---|---|
| 1GR-FE | ()
|
| 1KD-FTV | ()
|
| 2KD-FTV | ()
|
| 2TR-FE | ()
|
| 2TR-FBE | ()
|
8.INSPECT COOLING AND HEATER SYSTEM
Check that the radiator, condenser and/or intercooler is not blocked with leaves, dirt or insects, and clean them if necessary. Also check the hose connection for the installation condition, corrosion, etc.
9.INSPECT ENGINE COOLANT
| Type | See procedure |
|---|---|
| 1GR-FE | ()
|
| 1KD-FTV | ()
|
| 2KD-FTV | ()
|
| 2TR-FE | ()
|
| 2TR-FBE | ()
|
10.REPLACE ENGINE COOLANT
| Type | See procedure |
|---|---|
| 1GR-FE | ()
|
| 1KD-FTV | ()
|
| 2KD-FTV | ()
|
| 2TR-FE | ()
|
| 2TR-FBE | ()
|
11.INSPECT OIL COOLER HOSE AND CONNECTIONS (for 1GR-FE)
Check the oil cooler hoses for cracks, leakage, loose connections and deformation.
12.INSPECT EXHAUST PIPES AND MOUNTINGS
Visually check the pipes, hangers and connections for severe corrosion, leaks or damage.
13.REPLACE SPARK PLUGS (for 1GR-FE, 2TR-FE, 2TR-FBE)
| Type | See procedure |
|---|---|
| 1GR-FE | ()
|
| 2TR-FE | ()
|
| 2TR-FBE | ()
|
14.INSPECT BATTERY
| Type | See procedure |
|---|---|
| 1GR-FE | ()
|
| 1KD-FTV | ()
|
| 2KD-FTV | ()
|
| 2TR-FE | ()
|
| 2TR-FBE | ()
|
15.INSPECT WATER SEDIMENT ACCUMULATOR
| Type | See procedure |
|---|---|
| 1KD-FTV (w/o Glow Plug Controller) | ()
|
| 1KD-FTV (w/ Glow Plug Controller) | ()
|
| 2KD-FTV (w/ DPF) | ()
|
| 2KD-FTV (w/o DPF) | ()
|
16.REPLACE FUEL SENDER GAUGE (for 2TR-FBE, Fuel Main Tank)
Replace the fuel sender gauge (See page Engine / Hybrid System>2TR-FBE FUEL>FUEL SENDER GAUGE ASSEMBLY(for Fuel Main Tank)>REMOVAL).
17.CLEAN FUEL PUMP SUCTION FILTER (for 2TR-FBE, Fuel Main Tank)
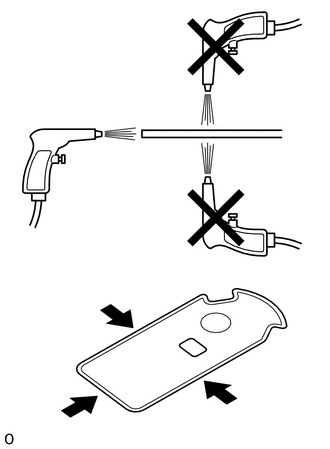
| *a | CORRECT |
| *b | INCORRECT |
Remove the fuel pump.
While keeping the air gun parallel to the face of the suction filter, blow compressed air to clean the suction filter.
- NOTICE:
-
Do not blow compressed air directly onto the face of the suction filter, as this will only make clogs worse.
18.REPLACE FUEL FILTER (for 1GR-FE, 1KD-FTV, 2TR-FE, 2TR-FBE)
| Type | See procedure |
|---|---|
| 1GR-FE | ()
|
| 1KD-FTV (w/ Secondary Fuel Filter) | ()
|
| 2TR-FE | ()
|
| 2TR-FBE (for Fuel Main Tank) | ()
|
| 2TR-FBE (for Fuel Sub Tank) | No. 2 fuel tube sub-assembly (Fuel filter assembly)
( )
|
19.INSPECT AIR FLOW METER (for 1KD-FTV (for i-ART), 1KD-FTV (for DPF), 1KD-FTV (w/ EGR Cooler), 2KD-FTV (for DPF), 2KD-FTV (w/ EGR Cooler))
Blow air to the sensor intermittently for approximately 30 seconds.
20.INSPECT AIR CLEANER FILTER
Remove the air cleaner filter.
Visually check that the air cleaner filter is not excessively damaged or oily. If necessary, replace the air cleaner filter with a new one.
If cleaning an air cleaner filter element, blow compressed air to clean it.
Reinstall the air cleaner filter.
21.INSPECT FUEL TANK CAP GASKET
| Type | See procedure |
|---|---|
| 1GR-FE | ()
|
| 1KD-FTV | ()
|
| 2KD-FTV | ()
|
| 2TR-FE | ()
|
| 2TR-FBE | ()
|
22.INSPECT FUEL LINES, FUEL LINE CONNECTIONS, FUEL TANK VAPOR VENT SYSTEM HOSES AND FUEL TANK BAND
Visually check the fuel lines and hoses for cracks, leakage, loose connections and deformation. Also, visually check the tank band for looseness.
23.INSPECT CHARCOAL CANISTER (for 1GR-FE, 2TR-FE, 2TR-FBE)
| Type | See procedure |
|---|---|
| 1GR-FE | ()
|
| 2TR-FE | ()
|
| 2TR-FBE | ()
|