R151F MANUAL TRANSMISSION / TRANSAXLE MANUAL TRANSMISSION ASSEMBLY INSTALLATION
PROCEDURE

 1.INSTALL TRANSFER ASSEMBLY
31236B 2.INSTALL RELEASE FORK SUPPORT
31230 3.INSTALL CLUTCH RELEASE BEARING ASSEMBLY
31126 4.INSTALL CLUTCH RELEASE FORK BOOT
5.INSTALL WIRE HARNESS CLAMP BRACKET
Install the wire harness clamp bracket with the bolt.
- Torque:
- 30 N*m (306 kgf*cm, 22 ft.*lbf)
6.INSTALL MANUAL TRANSMISSION WITH TRANSFER
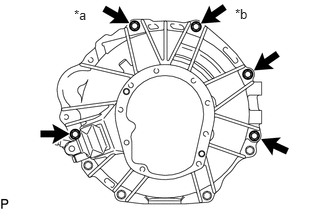
| *a | Tighten Together with Wire Harness Bracket |
| *b | Tighten Together with Transmission Breather Clamp |
Install the manual transmission with transfer with the 5 bolts.
- Torque:
- 71.6 N*m (730 kgf*cm, 53 ft.*lbf)
7.CONNECT WIRE HARNESS
Connect the connectors and clamps, and then connect the wire harness to the manual transmission assembly.
12371 8.INSTALL REAR ENGINE MOUNTING INSULATOR
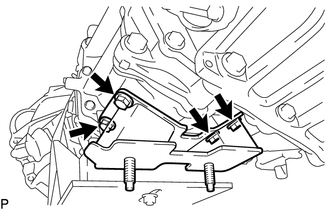
Install the rear engine mounting insulator to the manual transmission with the 4 bolts.
- Torque:
- 59 N*m (602 kgf*cm, 44 ft.*lbf)
51203 9.INSTALL NO. 2 FRAME CROSSMEMBER
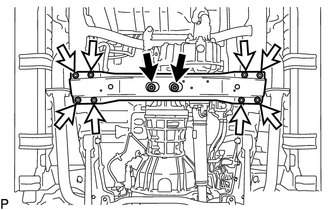

|
Nut |

|
Bolt |
Temporarily install the No. 2 frame crossmember with the 8 bolts and 2 nuts.
Tighten the 8 bolts and 2 nuts.
- Torque:
- for Nut : 74 N*m (755 kgf*cm, 55 ft.*lbf)
- for Bolt : 46 N*m (469 kgf*cm, 34 ft.*lbf)
10.INSTALL FRONT STABILIZER BRACKET LH
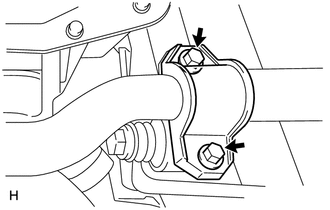
Install the front stabilizer bracket LH with the 2 bolts.
- Torque:
- 29.7 N*m (303 kgf*cm, 22 ft.*lbf)
11.INSTALL FRONT STABILIZER BRACKET RH
- HINT:
-
Use the same procedures described for the LH side.
33119 12.INSTALL STIFFENER PLATE LH
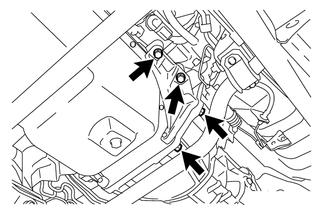
Install the stiffener plate LH with the 4 bolts.
- Torque:
- 68.7 N*m (701 kgf*cm, 51 ft.*lbf)
33118 13.INSTALL STIFFENER PLATE RH
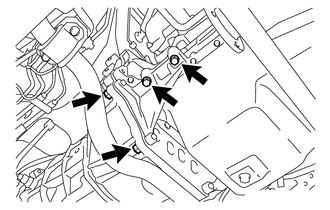
Install the stiffener plate RH with the 4 bolts.
- Torque:
- 68.7 N*m (701 kgf*cm, 51 ft.*lbf)
31470 14.INSTALL CLUTCH RELEASE CYLINDER ASSEMBLY
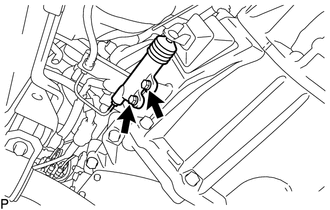
Install the clutch release cylinder assembly with the 2 bolts.
- Torque:
- 11.7 N*m (119 kgf*cm, 9 ft.*lbf)
37110 15.INSTALL REAR PROPELLER SHAFT ASSEMBLY
37140 16.INSTALL FRONT PROPELLER SHAFT ASSEMBLY
17.ADD TRANSFER OIL
18.ADD MANUAL TRANSMISSION OIL
51447C 19.INSTALL TRANSFER CASE PROTECTOR
Install the transfer case protector to the No. 2 frame crossmember with the 3 bolts.
- Torque:
- 18 N*m (184 kgf*cm, 13 ft.*lbf)
36409C 20.INSTALL FRONT DRIVE SHIFT VACUUM HOSE
Connect the 2 front drive shift vacuum hoses to the diaphragm cylinder assembly, and slide the clamp to secure it.
33530F 21.INSTALL TRANSMISSION SHIFT LEVER ASSEMBLY
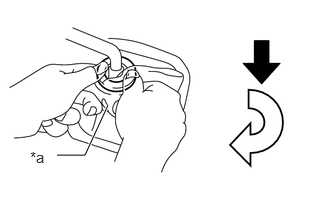
| *a | Cloth or Equivalent |
|
|
Down |
|
|
Clockwise |
Cover the transmission shift lever cap with a cloth or equivalent.
While pressing down on the transmission shift lever cap, turn it clockwise to install the transmission shift lever.
22.INSTALL TRANSFER SHIFT LEVER ASSEMBLY
16711 23.INSTALL FAN SHROUD
16571 24.INSTALL RADIATOR HOSE INLET
88310A 25.INSTALL NO. 1 V BELT (w/ Air Conditioning System)
16470 26.INSTALL RADIATOR RESERVOIR ASSEMBLY
17705 27.INSTALL AIR CLEANER CAP AND HOSE SUB-ASSEMBLY
28.ADD ENGINE COOLANT
29.INSPECT FOR ENGINE COOLANT LEAK
51442 30.INSTALL NO. 2 ENGINE UNDER COVER
31.CONNECT CABLE TO NEGATIVE BATTERY TERMINAL
32.PERFORM DIAGNOSTIC SYSTEM CHECK
33.CHECK SRS WARNING LIGHT