1HZ ENGINE MECHANICAL ENGINE ASSEMBLY INSTALLATION
PROCEDURE

 1.INSTALL FRONT ENGINE MOUNTING INSULATOR
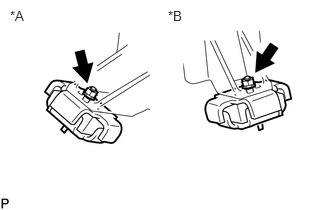
| *A | for RH Side |
| *B | for LH Side |
Install the front engine mounting insulator RH and front engine mounting insulator LH to the 2 mounting brackets with a new 2 nut.
- Torque:
- 83 N*m (846 kgf*cm, 61 ft.*lbf)
- NOTICE:
-
Do not reuse the removed nut.
2.REMOVE ENGINE STAND
Attach an engine sling device and hang the engine with a chain block.
Lift the engine and remove it from the engine stand.
Place the engine onto a work bench.
3.INSTALL ENGINE ASSEMBLY
Attach an engine sling device and hang the engine with a chain block.
Slowly lower the engine into the engine compartment.
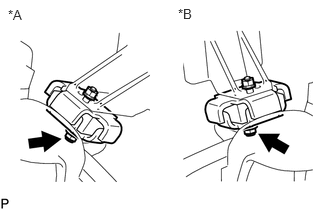
| *A | for RH Side |
| *B | for LH Side |
Install 2 new front engine support spacers and 2 new nuts to the front engine mounting insulator RH and front engine mounting insulator LH.
- Torque:
- for RH side : 74 N*m (755 kgf*cm, 55 ft.*lbf)
- for LH side : 87 N*m (887 kgf*cm, 64 ft.*lbf)
- NOTICE:
-
·
The torque of the nut that connects the front engine mounting insulator to the body is different for the front engine mounting insulator RH and engine mounting insulator LH.
·Do not reuse the removed 2 front engine support spacers and 2 nuts.
11355 4.INSTALL REAR END PLATE
13405 5.INSTALL FLYWHEEL SUB-ASSEMBLY
31250 6.INSTALL CLUTCH DISC ASSEMBLY
31210 7.INSTALL CLUTCH COVER ASSEMBLY
31210 8.INSPECT AND ADJUST CLUTCH COVER ASSEMBLY
9.INSTALL MANUAL TRANSMISSION WITH TRANSFER
37110 10.INSTALL PROPELLER SHAFT ASSEMBLY
37140 11.INSTALL FRONT PROPELLER SHAFT ASSEMBLY
44775E 12.INSTALL WAY TO CONNECTOR HOSE
Install the way to connector hose to the No. 2 vacuum hose connector and vacuum reservoir connector tube, and slide the 2 clamps to secure it.
13.INSTALL OUTLET HEATER WATER HOSE
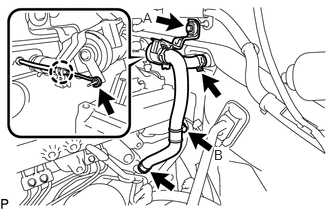
w/o Rear Heater:
Install the outlet heater water hose to the intake manifold and body with the 2 bolts.
- Torque:
- for bolt A : 5.0 N*m (51 kgf*cm, 44 in.*lbf)
- for bolt B : 17.5 N*m (178 kgf*cm, 13 ft.*lbf)
Connect the outlet heater water hose from the heater unit and heater pipe, and slide the 2 clamps to secure the hoses.
Connect the water valve cable to the water valve assembly and attach the claw.
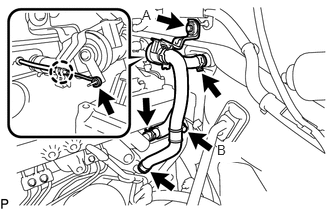
w/ Rear Heater:
Install the outlet heater water hose to the intake manifold and body with the 2 bolts.
- Torque:
- for bolt A : 5.0 N*m (51 kgf*cm, 44 in.*lbf)
- for bolt B : 17.5 N*m (178 kgf*cm, 13 ft.*lbf)
Connect the outlet heater water hose from the heater unit and heater pipe, and slide the 2 clamps to secure the hoses.
Connect the water valve cable to the water valve assembly and attach the claw.
Connect the rear inlet heater water hose to the cylinder head sub-assembly, and slide the clamp to secure the hoses.
14.INSTALL INLET HEATER WATER HOSE
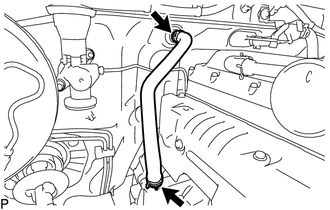
w/o Rear Heater:
Install the inlet heater water hose to the heater unit and heater pipe, and slide the 2 clamps to secure the hoses.
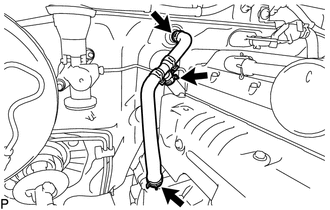
w/ Rear Heater:
Install the inlet heater water hose to the heater unit and heater pipe, and slide the 2 clamps to secure the hoses.
Connect the rear outlet heater water hose to the No. 2 heater water hose connector, and slide the clamp to secure the hoses.
17410 15.INSTALL FRONT EXHAUST PIPE ASSEMBLY
28100 16.INSTALL STARTER ASSEMBLY
17.CONNECT FUEL HOSE
Connect the 2 fuel hoses to the injection pump, and slide the 2 clamps to secure the hoses.
18.CONNECT CONNECTOR AND HOSE
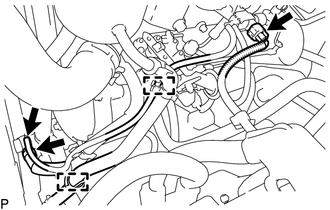
Connect the union to connector tube hose to the vacuum pump assembly, and slide the clamp to secure the hoses.
Connect the vacuum hose to the clamp and vacuum pump assembly.
Connect the 2 clamps to the vacuum hose and power steering tube.
Connect the connector to the vacuum switching valve.
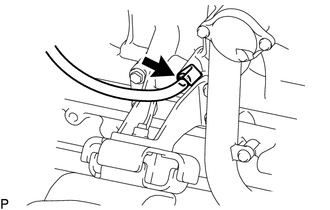
for LHD 2 Battery:
Connect the ground cable to the cylinder block with the bolt.
- Torque:
- 39 N*m (398 kgf*cm, 29 ft.*lbf)
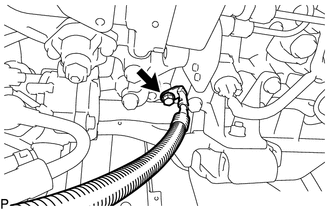
Connect the battery to ground cable to the cylinder block with the bolt.
- Torque:
- 35 N*m (357 kgf*cm, 26 ft.*lbf)
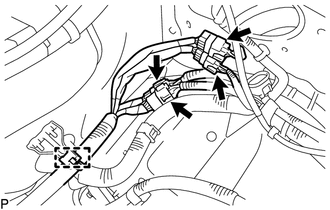
Disconnect the clamp and 4 connectors.
44310 19.CONNECT VANE PUMP ASSEMBLY
Connect the vane pump assembly to the timing gear case with the 2 nuts.
- Torque:
- 29 N*m (296 kgf*cm, 21 ft.*lbf)
44360 20.CONNECT VANE PUMP OIL RESERVOIR ASSEMBLY
Connect the vane pump oil reservoir assembly to the intake manifold with the 3 bolts.
- Torque:
- 18 N*m (184 kgf*cm, 13 ft.*lbf)
27020 21.INSTALL GENERATOR ASSEMBLY
88320 22.CONNECT COOLER COMPRESSOR ASSEMBLY (w/ Air Conditioning System)
Connect the cooler compressor assembly to the No. 1 compressor mounting bracket with the 4 bolts.
- Torque:
- 24 N*m (245 kgf*cm, 18 ft.*lbf)
Connect the connector to the cooler compressor assembly.
16400 23.INSTALL RADIATOR ASSEMBLY
16701 24.INSTALL FAN SHROUD SUB-ASSEMBLY
16572D 25.INSTALL NO. 2 RADIATOR HOSE
16571C 26.INSTALL NO. 1 RADIATOR HOSE
16361A 27.INSTALL FAN AND GENERATOR V BELT
88310A 28.INSTALL NO. 1 V BELT (w/ Air Conditioning System)
16470 29.INSTALL RADIATOR RESERVOIR ASSEMBLY
53111 30.INSTALL RADIATOR GRILLE
78410 31.CONNECT THROTTLE CONTROL CABLE ASSEMBLY
Connect the throttle control cable assembly to the accelerator link assembly and accelerator control cable bracket sub-assembly, and tighten the nut.
32.INSTALL AIR CLEANER CASE
Install the air cleaner case to the body with the 2 bolts and nut.
- Torque:
- 18 N*m (184 kgf*cm, 13 ft.*lbf)
w/ Precleaner:
Tighten the hose clamp bolt to the precleaner.
17801 33.INSTALL AIR CLEANER FILTER ELEMENT SUB-ASSEMBLY
17705 34.INSTALL AIR CLEANER CAP AND HOSE SUB-ASSEMBLY
Install the air cleaner cap and hose sub-assembly to the air cleaner case and intake pipe with the nut.
Tighten the hose clamp bolt to the intake pipe.
Connect the 3 clamps to the air cleaner case.
Connect the throttle control cable assembly to the air cleaner cap and hose sub-assembly.
35.BLEED AIR FROM FUEL SYSTEM
36.CONNECT CABLE FROM NEGATIVE BATTERY TERMINAL
37.ADD ENGINE OIL
38.ADD ENGINE COOLANT
39.ADD MANUAL TRANSMISSION OIL
40.INSPECT FOR FUEL LEAK
41.INSPECT FOR OIL LEAK
42.INSPECT FOR COOLANT LEAK
43.INSPECT EXHAUST GAS LEAK
44.INSPECT ENGINE OIL LEVEL
45.CHECK ENGINE COOLANT LEVEL IN RESERVOIR
46.ADJUST ENGINE IDLE SPEED AND MAXIMUM ENGINE SPEED
47.ADJUST AIR CONDITIONER IDLE-UP SETTING SPEED (w/ Air Conditioning System)
51442 48.INSTALL NO. 2 ENGINE UNDER COVER
53301 49.INSTALL HOOD SUB-ASSEMBLY
Install the hood sub-assembly with the 4 bolts.
- Torque:
- 20 N*m (204 kgf*cm, 15 ft.*lbf)
Connect the washer hose.