AXLE AND DIFFERENTIAL REAR AXLE HUB INSTALLATION
CAUTION / NOTICE / HINT
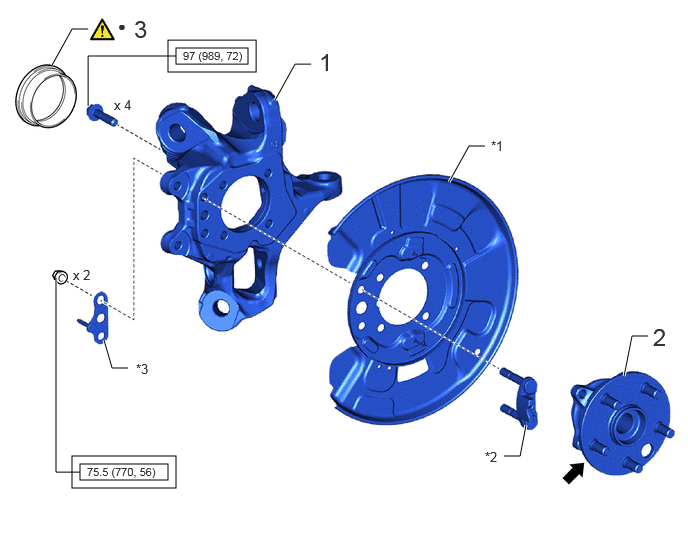
| Procedure | Part Name Code | 
|

|

|
|
|---|---|---|---|---|---|
| 1 | REAR AXLE CARRIER SUB-ASSEMBLY LH | 42305 | - | - | - |
| 2 | REAR AXLE HUB AND BEARING ASSEMBLY LH | 42450B | - | - | - |
| 3 | REAR NO. 1 WHEEL BEARING DUST DEFLECTOR LH | 42451B | ( ) |
- | - |
| *1 | PARKING BRAKE PLATE | *2 | PARKING BRAKE ANCHOR BLOCK SUB-ASSEMBLY |
| *3 | CABLE SUPPORT BRACKET | - | - |

|
Tightening torque for "Major areas involving basic vehicle performance such as moving/turning/stopping": N*m (kgf*cm, ft.*lbf) | ● | Non-reusable part |

|
TOYOTA Body Grease W | - | - |
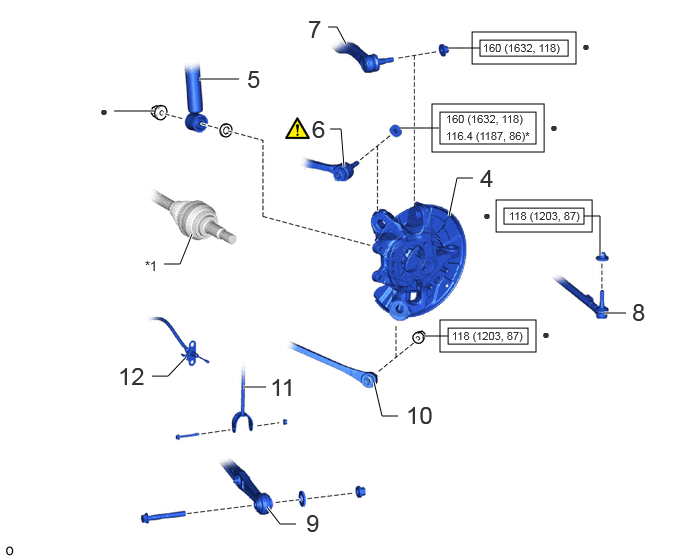
| Procedure | Part Name Code |
|
|
|
|
|---|---|---|---|---|---|
| 4 | REAR AXLE ASSEMBLY | - | - | - | - |
| 5 | TEMPORARILY INSTALL REAR SHOCK ABSORBER ASSEMBLY LH | 48540 | - | - | - |
| 6 | REAR NO. 1 SUSPENSION ARM ASSEMBLY LH | 48720A | ()
|
- | - |
| 7 | REAR UPPER CONTROL ARM ASSEMBLY LH | 48790 | - | - | - |
| 8 | TOE CONTROL LINK SUB-ASSEMBLY LH | 48706B | - | - | - |
| 9 | TEMPORARILY INSTALL REAR NO. 2 SUSPENSION ARM ASSEMBLY LH | 48740F | - | - | - |
| 10 | LOWER CONTROL ARM ASSEMBLY LH | 48730 | - | - | - |
| 11 | TEMPORARILY INSTALL REAR STABILIZER LINK ASSEMBLY LH | 48840A | - | - | - |
| 12 | PARKING BRAKE | - | - | - | - |
| *1 | REAR DRIVE SHAFT ASSEMBLY LH | - | - |
|
|
Tightening torque for "Major areas involving basic vehicle performance such as moving/turning/stopping": N*m (kgf*cm, ft.*lbf) | * | For use with ball joint lock nut wrench |
| ● | Non-reusable part | - | - |
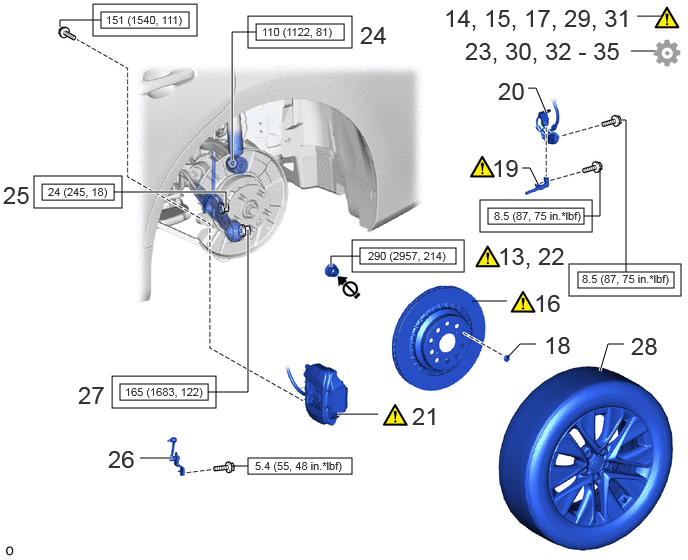
| Procedure | Part Name Code |
|
|
|
|
|---|---|---|---|---|---|
| 13 | TEMPORARILY INSTALL REAR AXLE SHAFT NUT LH | 42312B | ()
|
- | - |
| 14 | INSPECT REAR AXLE HUB BEARING LOOSENESS | - | ()
|
- | - |
| 15 | INSPECT REAR AXLE HUB RUNOUT | - | ()
|
- | - |
| 16 | REAR DISC LH | 42432 | ()
|
- | - |
| 17 | PARKING BRAKE SHOE CLEARANCE | - | ()
|
- | - |
| 18 | PARKING BRAKE SHOE ADJUSTING HOLE PLUG | 42491 | - | - | - |
| 19 | REAR SPEED SENSOR LH | 89546 | ()
|
- | - |
| 20 | REAR SKID CONTROL SENSOR WIRE LH | 89516P | - | - | - |
| 21 | REAR DISC BRAKE CYLINDER ASSEMBLY LH | 47850 | ()
|
- | - |
| 22 | REAR AXLE SHAFT NUT LH | 42312B | - | - | - |
| 23 | STABILIZE SUSPENSION | - | - | - | ()
|
| 24 | FULLY TIGHTEN REAR SHOCK ABSORBER ASSEMBLY LH | 48540 | - | - | - |
| 25 | FULLY TIGHTEN REAR STABILIZER LINK ASSEMBLY LH | 48840A | - | - | - |
| 26 | REAR HEIGHT CONTROL SENSOR SUB-ASSEMBLY LH | 89408C | - | - | - |
| 27 | FULLY TIGHTEN REAR NO. 2 SUSPENSION ARM ASSEMBLY LH | 48740F | - | - | - |
| 28 | REAR WHEEL | - | - | - | - |
| 29 | CONNECT CABLE TO NEGATIVE AUXILIARY BATTERY TERMINAL | - | ()
|
- | - |
| 30 | INSPECT AND ADJUST REAR WHEEL ALIGNMENT | - | - | - | - |
| 31 | CHECK FOR SPEED SENSOR SIGNAL | - | ()
|
- | - |
| 32 | ADJUST HEADLIGHT AIMING | - | - | - | ()
|
| 33 | ADJUST PARKING BRAKE | - | - | - | ()
|
| 34 | INITIALIZATION AFTER RECONNECTING BATTERY TERMINAL | - | - | - | ()
|
| 35 | PERFORM INITIALIZATION | - | - | - | ()
|
|
|
Tightening torque for "Major areas involving basic vehicle performance such as moving/turning/stopping": N*m (kgf*cm, ft.*lbf) | 
|
N*m (kgf*cm, ft.*lbf): Specified torque |

|
Do not apply lubricants to the threaded parts | ● | Non-reusable part |
CAUTION / NOTICE / HINT
- NOTICE:
- ·
When using a vise, place aluminum plates between the part and vise.
·When using a vise, do not overtighten it.
- HINT:
- ·
Use the same procedure for the RH and LH side.
·The following procedure is for the LH side.
PROCEDURE

 42305
1.INSTALL REAR AXLE CARRIER SUB-ASSEMBLY LH
- Torque:
- 75.5 N*m (770 kgf*cm, 56 ft.*lbf)
42450B
2.INSTALL REAR AXLE HUB AND BEARING ASSEMBLY LH
- Torque:
- 97 N*m (989 kgf*cm, 72 ft.*lbf)
42451B
3.INSTALL REAR NO. 1 WHEEL BEARING DUST DEFLECTOR LH
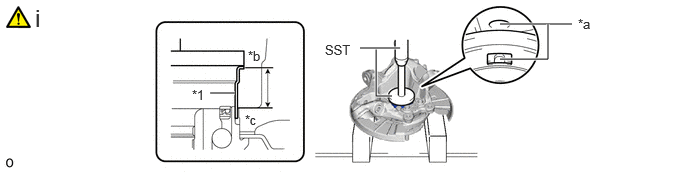
| *1 | No. 1 Rear Wheel Bearing Dust Deflector LH | *a | Align |
| *b | No. 1 Rear Wheel Bearing Dust Deflector LH End Face | *c | Rear Axle Hub Bearing Outer Race End Face |
Using SST and a press, press a new No. 1 rear wheel bearing dust deflector LH into the rear axle carrier while checking the sensor installation hole position.
- SST
- 09950-70010 (09951-07150)
09951-01000
- Standard Length:
23.3 to 23.9 mm (0.918 to 0.940 in.)
- NOTICE:
-
Align the installation hole of the No. 1 rear wheel bearing dust deflector LH with the installation hole of the speed sensor on the rear axle carrier.
4.INSTALL REAR AXLE ASSEMBLY
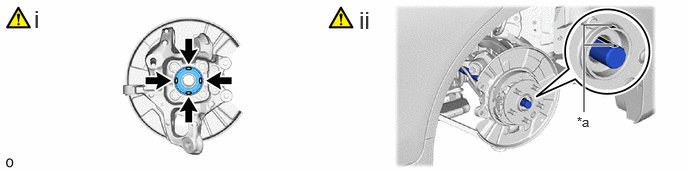
| *a | Matchmark | - | - |
|
|
TOYOTA Body Grease W | - | - |
Apply TOYOTA body grease W to the entire contact surface between the rear drive shaft assembly and rear axle hub sub-assembly surface or only apply 0.1 to 0.3 g (0.00353 to 0.0105 oz.) of TOYOTA body grease W to the 4 areas on the axle hub bearing shown in the illustration.
Align the rear axle assembly with the matchmark and install it to the rear drive shaft assembly.
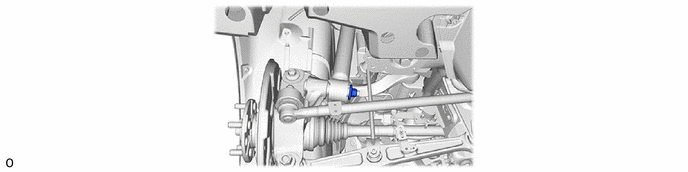
48540
5.TEMPORARILY INSTALL REAR SHOCK ABSORBER ASSEMBLY LH
48720A
6.CONNECT REAR NO. 1 SUSPENSION ARM ASSEMBLY LH
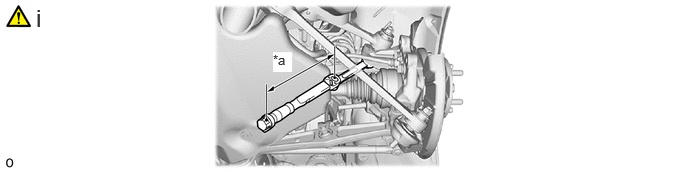
| *a | Torque Wrench Fulcrum Length | - | - |
Using a ball joint lock nut wrench, connect the No. 1 rear suspension arm assembly LH with a new nut.
- Torque:
- Specified tightening torque : 160 N*m (1632 kgf*cm, 118 ft.*lbf)
- HINT:
- ·
Calculate the torque wrench reading when changing the fulcrum length of the torque wrench.
Click hereGeneral>INTRODUCTION>REPAIR INSTRUCTION>PRECAUTION
·When using a ball joint lock nut wrench (fulcrum length of 150 mm (5.906 in.)) + torque wrench (fulcrum length of 400 mm (15.748 in.)): 116.4 N*m (1187 kgf*cm, 86 ft.*lbf)
48790
7.CONNECT REAR UPPER CONTROL ARM ASSEMBLY LH
- Torque:
- 160 N*m (1632 kgf*cm, 118 ft.*lbf)
48706B
8.CONNECT TOE CONTROL LINK SUB-ASSEMBLY LH
- Torque:
- 118 N*m (1203 kgf*cm, 87 ft.*lbf)
48740F
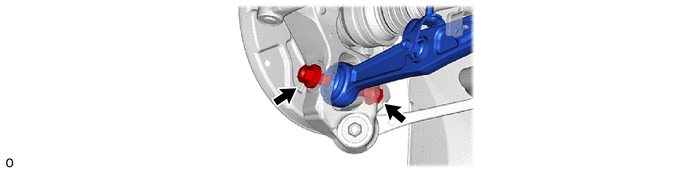
9.TEMPORARILY INSTALL REAR NO. 2 SUSPENSION ARM ASSEMBLY LH
48730
10.CONNECT LOWER CONTROL ARM ASSEMBLY LH
- Torque:
- 118 N*m (1203 kgf*cm, 87 ft.*lbf)
48840A
11.TEMPORARILY INSTALL REAR STABILIZER LINK ASSEMBLY LH
12.INSTALL PARKING BRAKE
42312B
13.TEMPORARILY INSTALL REAR AXLE SHAFT NUT LH
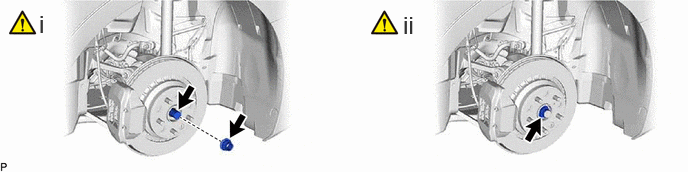
Clean the threaded parts on the drive shaft and axle shaft nut LH using a non-residue solvent.
- NOTICE:
- ·
Be sure to perform this work for a new drive shaft.
·Keep the threaded parts free of oil and foreign objects.
Using a 32 mm socket wrench, while applying the brakes, temporarily install the rear axle shaft nut.
- Torque:
- 290 N*m (2957 kgf*cm, 214 ft.*lbf)
- NOTICE:
-
Do not stake the rear axle shaft nut LH.
- HINT:
-
Stake the rear axle shaft nut LH after checking for looseness and runout on the rear axle hub and bearing assembly.
14.INSPECT REAR AXLE HUB BEARING LOOSENESS
|
|
Click here()
|
15.INSPECT REAR AXLE HUB RUNOUT
|
|
Click here()
|
42432
16.INSTALL REAR DISC LH
|
|
Click here()
|
17.ADJUST PARKING BRAKE SHOE CLEARANCE
|
|
Click here()
|
42491
18.INSTALL PARKING BRAKE SHOE ADJUSTING HOLE PLUG
89546
19.INSTALL REAR SPEED SENSOR LH
|
|
Click here()
|
89516P
20.CONNECT REAR SKID CONTROL SENSOR WIRE LH
- Torque:
- 8.5 N*m (87 kgf*cm, 75 in.*lbf)
47850
21.CONNECT REAR DISC BRAKE CYLINDER ASSEMBLY LH
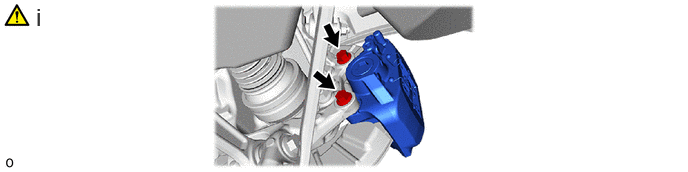
Install the rear disc brake cylinder assembly LH to the steering knuckle with the 2 bolts.
- Torque:
- 151 N*m (1540 kgf*cm, 111 ft.*lbf)
- NOTICE:
- ·
Do not twist the flexible hose.
·Make sure that the threaded portion is free from damage and foreign matter.
·Do not overtighten the bolts, as the threaded portion is part of the aluminum hub carrier.
42312B
22.INSTALL REAR AXLE SHAFT NUT LH
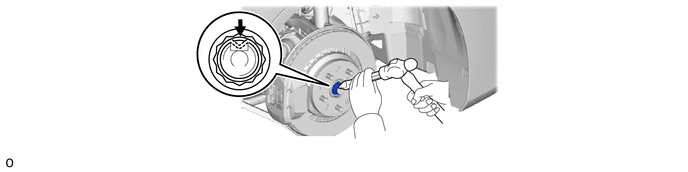
23. STABILIZE SUSPENSION
|
|
Click here()
|
48540
24.FULLY TIGHTEN REAR SHOCK ABSORBER ASSEMBLY LH
- Torque:
- 110 N*m (1122 kgf*cm, 81 ft.*lbf)
48840A
25.FULLY TIGHTEN REAR STABILIZER LINK ASSEMBLY LH
89408C
26.CONNECT REAR HEIGHT CONTROL SENSOR SUB-ASSEMBLY LH
48740F
27.FULLY TIGHTEN REAR NO. 2 SUSPENSION ARM ASSEMBLY LH
- Torque:
- 165 N*m (1683 kgf*cm, 122 ft.*lbf)
28.INSTALL REAR WHEEL
29.CONNECT CABLE TO NEGATIVE AUXILIARY BATTERY TERMINAL
|
|
Click here()
|
30.INSPECT AND ADJUST REAR WHEEL ALIGNMENT
31.CHECK FOR SPEED SENSOR SIGNAL
32.ADJUST HEADLIGHT AIMING
33.ADJUST PARKING BRAKE
34. INITIALIZATION AFTER RECONNECTING BATTERY TERMINAL
Click hereGeneral>SETUP>WHEN DISCONNECTING OR RECONNECTING BATTERY TERMINAL>WORK PROCEDURE
- HINT:
-
When disconnecting and reconnecting the battery, there is an automatic learning function that completes learning when the respective system is used.
-
Click hereGeneral>SETUP>WHEN DISCONNECTING OR RECONNECTING BATTERY TERMINAL>AUTOMATIC LEARNING CHART
35.PERFORM INITIALIZATION