SEAT FRONT POWER SEAT CONTROL SYSTEM(w/ Memory) One or more Power Seat Motors do not Operate
DESCRIPTION
Some of the motors are not operating due to some of the power seat switch signals not being sent, or the position control ECU assembly LH (for LHD) or RH (for RHD) or some of the motors (seat adjuster function) being defective.
WIRING DIAGRAM
for LHD
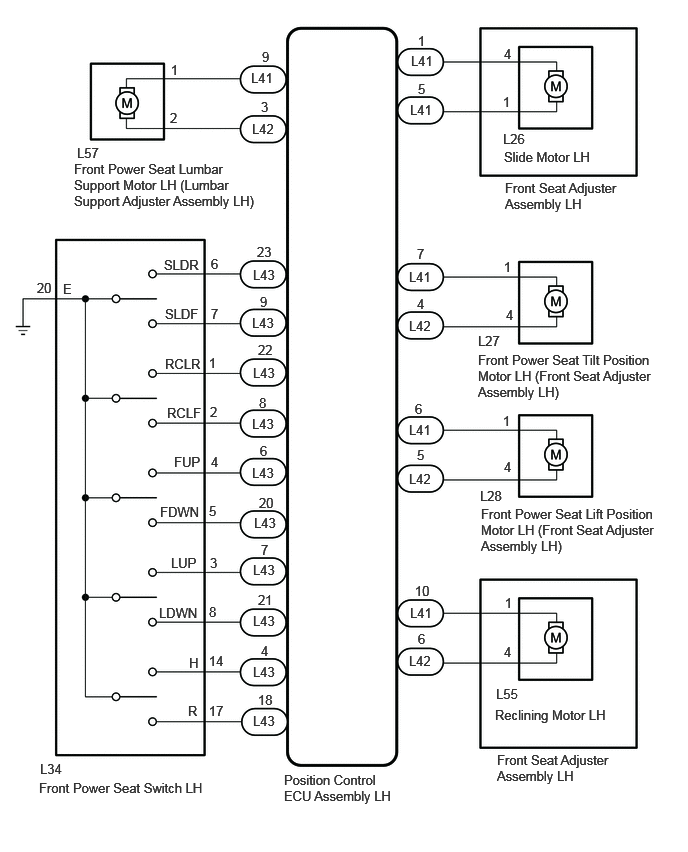
for RHD
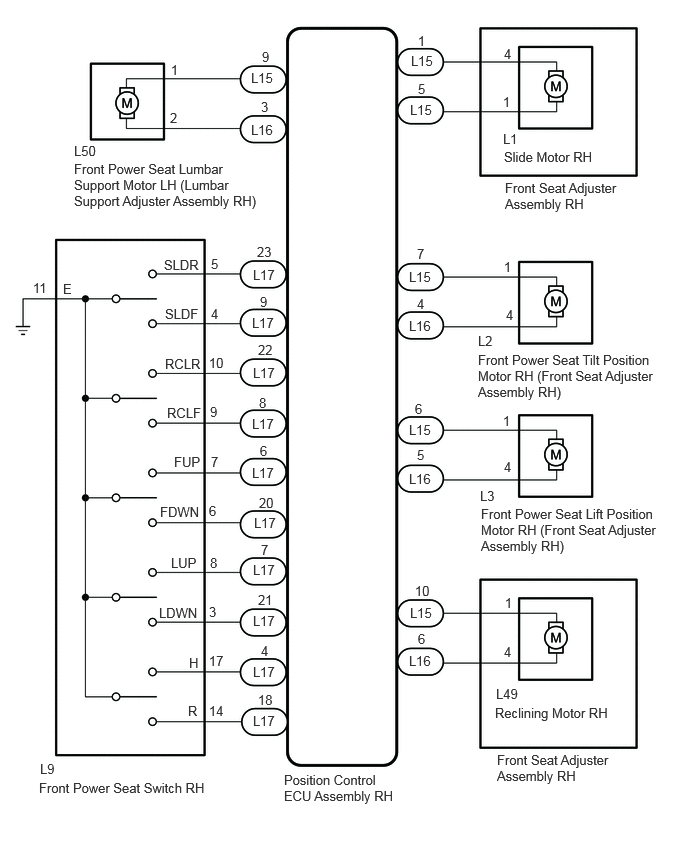
CAUTION / NOTICE / HINT
*1: for LHD
*2: for RHD
- NOTICE:
-
Initializing the position control ECU assembly LH*1 or RH*2 will clear the seat position memory.
- HINT:
-
Make sure to initialize the position control ECU assembly LH*1 or RH*2 after replacing the seat assembly or any related parts (including removal and installation).
-
Click hereVehicle Interior>SEAT>FRONT POWER SEAT CONTROL SYSTEM (w/ Memory)>REGISTRATION
PROCEDURE
Check the vehicle type.
- Result:
Result Proceed to for LHD A for RHD B
A
B
Check that each function of the power seat operates normally by using the front power seat switch LH.
Click hereVehicle Interior>SEAT>FRONT POWER SEAT CONTROL SYSTEM (w/ Memory)>OPERATION CHECK
- Result:
Result Proceed to Slide function does not operate normally A Front vertical function does not operate normally B Lifter function does not operate normally C Reclining function does not operate normally D Lumbar support function does not operate normally E All power seat functions do not operate F
A
B
C
D
E
F
Read the Data List according to the display on the GTS.
- Body Electrical > Driver Seat > Data List
-
Tester Display Measurement Item Range Normal Condition Diagnostic Note Slide Rear Slide switch signal (Rearward) ON or OFF ON: Slide switch (Rearward) on
OFF: Slide switch (Rearward) off- Slide Front Slide switch signal (Forward) ON or OFF ON: Slide switch (Forward) on
OFF: Slide switch (Forward) off-
- Body Electrical > Driver Seat > Data List
-
Tester Display Slide Rear Slide Front - 50003 162 23,24
- OK:
On the GTS screen, ON or OFF is displayed accordingly
- Result:
Proceed to OK NG
OK
NG
Perform the Active Test according to the display on the GTS.
- Body Electrical > Driver Seat > Active Test
-
Tester Display Measurement Item Control Range Diagnostic Note Seat Slide Operation Seat slide operation OFF/Rear/Front -
- Body Electrical > Driver Seat > Active Test
-
Tester Display Seat Slide Operation - 50004 162 4
- Result:
Proceed to OK NG
OK
NG
OK
NG
Disconnect the L41 position control ECU assembly LH connector.
Disconnect the L26 slide motor (front seat adjuster assembly LH) connector.
Measure the resistance according to the value(s) in the table below.
- HINT:
-
Check the wire harness and connector between the position control ECU assembly LH and applicable motor.
- Standard Resistance:
Tester Connection Condition Specified Condition Click Location & Routing(L41,L26)Location & Routingewd_type=routing;type=c,c;code=L41,L26
Click Connector(L41)Seat>Front Seat Wire RH / No. 2 Front Seat Wire LH / No. 2 Front Seat Wire RH>Position Control ECU Assembly LHewd_type=component;type=c;code=L41;pinno=1,5
L41-1 - L26-4 Always Below 1 Ω L41-1 or L26-4 - Body ground Always 10 kΩ or higher L41-5 - L26-1 Always Below 1 Ω L41-5 or L26-1 - Body ground Always 10 kΩ or higher
- Result:
Proceed to OK NG
OK
NG
OK
NG
Disconnect the L43 position control ECU assembly LH connector.
Disconnect the L34 front power seat switch LH connector.
Measure the resistance according to the value(s) in the table below.
- Standard Resistance:
Tester Connection Condition Specified Condition Click Location & Routing(L34,L43)Location & Routingewd_type=routing;type=c,c;code=L34,L43
Click Connector(L34)Seat>Front Seat Wire RH / No. 2 Front Seat Wire LH / No. 2 Front Seat Wire RH>Front Power Seat Switch LHewd_type=component;type=c;code=L34;pinno=6,7
Click Connector(L43)Seat>Front Seat Wire RH / No. 2 Front Seat Wire LH / No. 2 Front Seat Wire RH>Position Control ECU Assembly LHewd_type=component;type=c;code=L43;pinno=23,9
L34-6 (SLDR) - L43-23 Always Below 1 Ω L34-6 (SLDR) or L43-23 - Body ground Always 10 kΩ or higher L34-7 (SLDF) - L43-9 Always Below 1 Ω L34-7 (SLDF) or L43-9 - Body ground Always 10 kΩ or higher
- Result:
Proceed to OK NG
OK
NG
Read the Data List according to the display on the GTS.
- Body Electrical > Driver Seat > Data List
-
Tester Display Measurement Item Range Normal Condition Diagnostic Note Front Vertical Down Front vertical switch signal (Downward) ON or OFF ON: Front vertical switch (Downward) on
OFF: Front vertical switch (Downward) off- Front Vertical Up Front vertical switch signal (Upward) ON or OFF ON: Front vertical switch (Upward) on
OFF: Front vertical switch (Upward) off-
- Body Electrical > Driver Seat > Data List
-
Tester Display Front Vertical Down Front Vertical Up - 50003 162 19,20
- OK:
On the GTS screen, ON or OFF is displayed accordingly
- Result:
Proceed to OK NG
OK
NG
Perform the Active Test according to the display on the GTS.
- Body Electrical > Driver Seat > Active Test
-
Tester Display Measurement Item Control Range Diagnostic Note Front Vertical Operation Seat front vertical operation OFF/Down/Up -
- Body Electrical > Driver Seat > Active Test
-
Tester Display Front Vertical Operation - 50004 162 3
- Result:
Proceed to OK NG
OK
NG
OK
NG
Disconnect the L41 and L42 position control ECU assembly LH connectors.
Disconnect the L27 front vertical motor (power seat tilt motor assembly LH) connector.
Measure the resistance according to the value(s) in the table below.
- HINT:
-
Check the wire harness and connector between the position control ECU assembly LH and applicable motor.
- Standard Resistance:
Tester Connection Condition Specified Condition Click Location & Routing(L41,L27,L42)Location & Routingewd_type=routing;type=c,c,c;code=L41,L27,L42
Click Connector(L41)Seat>Front Seat Wire RH / No. 2 Front Seat Wire LH / No. 2 Front Seat Wire RH>Position Control ECU Assembly LHewd_type=component;type=c;code=L41;pinno=7
Click Connector(L42)Seat>Front Seat Wire RH / No. 2 Front Seat Wire LH / No. 2 Front Seat Wire RH>Position Control ECU Assembly LHewd_type=component;type=c;code=L42;pinno=4
L41-7 - L27-1 Always Below 1 Ω L41-7 or L27-1 - Body ground Always 10 kΩ or higher L42-4 - L27-4 Always Below 1 Ω L42-4 or L27-4 - Body ground Always 10 kΩ or higher
- Result:
Proceed to OK NG
OK
NG
OK
NG
Disconnect the L43 position control ECU assembly LH connector.
Disconnect the L34 front power seat switch LH connector.
Measure the resistance according to the value(s) in the table below.
- Standard Resistance:
Tester Connection Condition Specified Condition Click Location & Routing(L34,L43)Location & Routingewd_type=routing;type=c,c;code=L34,L43
Click Connector(L34)Seat>Front Seat Wire RH / No. 2 Front Seat Wire LH / No. 2 Front Seat Wire RH>Front Power Seat Switch LHewd_type=component;type=c;code=L34;pinno=4,5
Click Connector(L43)Seat>Front Seat Wire RH / No. 2 Front Seat Wire LH / No. 2 Front Seat Wire RH>Position Control ECU Assembly LHewd_type=component;type=c;code=L43;pinno=6,20
L34-4 (FUP) - L43-6 Always Below 1 Ω L34-4 (FUP) or L43-6 - Body ground Always 10 kΩ or higher L34-5 (FDWN) - L43-20 Always Below 1 Ω L34-5 (FDWN) or L43-20 - Body ground Always 10 kΩ or higher
- Result:
Proceed to OK NG
OK
NG
Read the Data List according to the display on the GTS.
- Body Electrical > Driver Seat > Data List
-
Tester Display Measurement Item Range Normal Condition Diagnostic Note Lifter Switch Down Rear lifter switch signal (Downward) ON or OFF ON: Rear lifter switch (Downward) on
OFF: Rear lifter switch (Downward) off- Lifter Switch Up Rear lifter switch signal (Upward) ON or OFF ON: Rear lifter switch (Upward) on
OFF: Rear lifter switch (Upward) off-
- Body Electrical > Driver Seat > Data List
-
Tester Display Lifter Switch Down Lifter Switch Up - 50003 162 21,22
- OK:
On the GTS screen, ON or OFF is displayed accordingly
- Result:
Proceed to OK NG
OK
NG
Perform the Active Test according to the display on the GTS.
- Body Electrical > Driver Seat > Active Test
-
Tester Display Measurement Item Control Range Diagnostic Note Lifter Operation Seat lifter operation OFF/Down/Up -
- Body Electrical > Driver Seat > Active Test
-
Tester Display Lifter Operation - 50004 162 2
- Result:
Proceed to OK NG
OK
NG
OK
NG
Disconnect the L41 and L42 position control ECU assembly LH connectors.
Disconnect the L28 power seat lifter motor assembly LH connector.
Measure the resistance according to the value(s) in the table below.
- HINT:
-
Check the wire harness and connector between the position control ECU assembly LH and applicable motor.
- Standard Resistance:
Tester Connection Condition Specified Condition Click Location & Routing(L41,L28,L42)Location & Routingewd_type=routing;type=c,c,c;code=L41,L28,L42
Click Connector(L41)Seat>Front Seat Wire RH / No. 2 Front Seat Wire LH / No. 2 Front Seat Wire RH>Position Control ECU Assembly LHewd_type=component;type=c;code=L41;pinno=6
Click Connector(L42)Seat>Front Seat Wire RH / No. 2 Front Seat Wire LH / No. 2 Front Seat Wire RH>Position Control ECU Assembly LHewd_type=component;type=c;code=L42;pinno=5
L41-6 - L28-1 Always Below 1 Ω L41-6 or L28-1 - Body ground Always 10 kΩ or higher L42-5 - L28-4 Always Below 1 Ω L42-5 or L28-4 - Body ground Always 10 kΩ or higher
- Result:
Proceed to OK NG
OK
NG
OK
NG
Disconnect the L43 position control ECU assembly LH connector.
Disconnect the L34 front power seat switch LH connector.
Measure the resistance according to the value(s) in the table below.
- Standard Resistance:
Tester Connection Condition Specified Condition Click Location & Routing(L34,L43)Location & Routingewd_type=routing;type=c,c;code=L34,L43
Click Connector(L34)Seat>Front Seat Wire RH / No. 2 Front Seat Wire LH / No. 2 Front Seat Wire RH>Front Power Seat Switch LHewd_type=component;type=c;code=L34;pinno=3,8
Click Connector(L43)Seat>Front Seat Wire RH / No. 2 Front Seat Wire LH / No. 2 Front Seat Wire RH>Position Control ECU Assembly LHewd_type=component;type=c;code=L43;pinno=7,21
L34-3 (LUP) - L43-7 Always Below 1 Ω L34-3 (LUP) or L43-7 - Body ground Always 10 kΩ or higher L34-8 (LDWN) - L43-21 Always Below 1 Ω L34-8 (LDWN) or L43-21 - Body ground Always 10 kΩ or higher
- Result:
Proceed to OK NG
OK
NG
Read the Data List according to the display on the GTS.
- Body Electrical > Driver Seat > Data List
-
Tester Display Measurement Item Range Normal Condition Diagnostic Note Reclining Rear Reclining switch signal (Rearward) ON or OFF ON: Reclining switch (Rearward) on
OFF: Reclining switch (Rearward) off- Reclining Front Reclining switch signal (Forward) ON or OFF ON: Reclining switch (Forward) on
OFF: Reclining switch (Forward) off-
- Body Electrical > Driver Seat > Data List
-
Tester Display Reclining Rear Reclining Front - 50003 162 17,18
- OK:
On the GTS screen, ON or OFF is displayed accordingly
- Result:
Proceed to OK NG
OK
NG
Perform the Active Test according to the display on the GTS.
- Body Electrical > Driver Seat > Active Test
-
Tester Display Measurement Item Control Range Diagnostic Note Seat Reclining Seat reclining operation OFF/Rear/Front -
- Body Electrical > Driver Seat > Active Test
-
Tester Display Seat Reclining - 50004 162 1
- Result:
Proceed to OK NG
OK
NG
OK
NG
Disconnect the L41 and L42 position control ECU assembly LH connectors.
Disconnect the L55 reclining motor (front seatback frame sub-assembly LH) connector.
Measure the resistance according to the value(s) in the table below.
- HINT:
-
Check the wire harness and connector between the position control ECU assembly LH and applicable motor.
- Standard Resistance:
Tester Connection Condition Specified Condition Click Location & Routing(L41,L55,L42)Location & Routingewd_type=routing;type=c,c,c;code=L41,L55,L42
Click Connector(L41)Seat>Front Seat Wire RH / No. 2 Front Seat Wire LH / No. 2 Front Seat Wire RH>Position Control ECU Assembly LHewd_type=component;type=c;code=L41;pinno=10
Click Connector(L42)Seat>Front Seat Wire RH / No. 2 Front Seat Wire LH / No. 2 Front Seat Wire RH>Position Control ECU Assembly LHewd_type=component;type=c;code=L42;pinno=6
L41-10 - L55-1 Always Below 1 Ω L41-10 or L55-1 - Body ground Always 10 kΩ or higher L42-6 - L55-4 Always Below 1 Ω L42-6 or L55-4 - Body ground Always 10 kΩ or higher
- Result:
Proceed to OK NG
OK
NG
OK
NG
Disconnect the L43 position control ECU assembly LH connector.
Disconnect the L34 front power seat switch LH connector.
Measure the resistance according to the value(s) in the table below.
- Standard Resistance:
Tester Connection Condition Specified Condition Click Location & Routing(L34,L43)Location & Routingewd_type=routing;type=c,c;code=L34,L43
Click Connector(L34)Seat>Front Seat Wire RH / No. 2 Front Seat Wire LH / No. 2 Front Seat Wire RH>Front Power Seat Switch LHewd_type=component;type=c;code=L34;pinno=1,2
Click Connector(L43)Seat>Front Seat Wire RH / No. 2 Front Seat Wire LH / No. 2 Front Seat Wire RH>Position Control ECU Assembly LHewd_type=component;type=c;code=L43;pinno=22,8
L34-1 (RCLR) - L43-22 Always Below 1 Ω L34-1 (RCLR) or L43-22 - Body ground Always 10 kΩ or higher L34-2 (RCLF) - L43-8 Always Below 1 Ω L34-2 (RCLF) or L43-8 - Body ground Always 10 kΩ or higher
- Result:
Proceed to OK NG
OK
NG
Read the Data List according to the display on the GTS.
- Body Electrical > Driver Seat > Data List
-
Tester Display Measurement Item Range Normal Condition Diagnostic Note Lumbar Switch Front Lumbar support adjuster switch signal (Forward) ON or OFF ON: Lumbar support adjuster switch (Forward) on
OFF: Lumbar support adjuster switch (Forward) off- Lumbar Switch Rear Lumbar support adjuster switch signal (Rearward) ON or OFF ON: Lumbar support adjuster switch (Rearward) on
OFF: Lumbar support adjuster switch (Rearward) off-
- Body Electrical > Driver Seat > Data List
-
Tester Display Lumbar Switch Front Lumbar Switch Rear - 50003 162 157,158
- OK:
On the GTS screen, ON or OFF is displayed accordingly
- Result:
Proceed to OK NG
OK
NG
Perform the Active Test according to the display on the GTS.
- Body Electrical > Driver Seat > Active Test
-
Tester Display Measurement Item Control Range Diagnostic Note Lumbar Slide Lumbar support operation OFF/Rear/Front -
- Body Electrical > Driver Seat > Active Test
-
Tester Display Lumbar Slide - 50004 162 8
- Result:
Proceed to OK NG
OK
NG
Click hereVehicle Interior>SEAT>LUMBAR SUPPORT ADJUSTER ASSEMBLY>INSPECTION
- Result:
Proceed to OK NG
OK
NG
Disconnect the L41 and L42 position control ECU assembly LH connectors.
Disconnect the L57 lumbar support adjuster assembly LH connector.
Measure the resistance according to the value(s) in the table below.
- HINT:
-
Check the wire harness and connector between the position control ECU assembly (driver seat) and applicable motor.
- Standard Resistance:
Tester Connection Condition Specified Condition Click Location & Routing(L41,L57,L42)Location & Routingewd_type=routing;type=c,c,c;code=L41,L57,L42
Click Connector(L41)Seat>Front Seat Wire RH / No. 2 Front Seat Wire LH / No. 2 Front Seat Wire RH>Position Control ECU Assembly LHewd_type=component;type=c;code=L41;pinno=9
Click Connector(L42)Seat>Front Seat Wire RH / No. 2 Front Seat Wire LH / No. 2 Front Seat Wire RH>Position Control ECU Assembly LHewd_type=component;type=c;code=L42;pinno=3
L41-9 - L57-1 Always Below 1 Ω L41-9 or L57-1 - Body ground Always 10 kΩ or higher L42-3 - L57-2 Always Below 1 Ω L42-3 or L57-2 - Body ground Always 10 kΩ or higher
- Result:
Proceed to OK NG
OK
NG
OK
NG
Disconnect the L43 position control ECU assembly LH connector.
Disconnect the L34 front power seat switch LH connector.
Measure the resistance according to the value(s) in the table below.
- Standard Resistance:
Tester Connection Condition Specified Condition Click Location & Routing(L34,L43)Location & Routingewd_type=routing;type=c,c;code=L34,L43
Click Connector(L34)Seat>Front Seat Wire RH / No. 2 Front Seat Wire LH / No. 2 Front Seat Wire RH>Front Power Seat Switch LHewd_type=component;type=c;code=L34;pinno=14,17
Click Connector(L43)Seat>Front Seat Wire RH / No. 2 Front Seat Wire LH / No. 2 Front Seat Wire RH>Position Control ECU Assembly LHewd_type=component;type=c;code=L43;pinno=4,18
L34-14 (H) - L43-4 Always Below 1 Ω L34-14 (H) or L43-4 - Body ground Always 10 kΩ or higher L34-17 (R) - L43-18 Always Below 1 Ω L34-17 (R) or L43-18 - Body ground Always 10 kΩ or higher
- Result:
Proceed to OK NG
OK
NG
Check that each function of the power seat operates normally by using the front power seat switch RH.
Click hereVehicle Interior>SEAT>FRONT POWER SEAT CONTROL SYSTEM (w/ Memory)>OPERATION CHECK
- Result:
Result Proceed to Slide function does not operate normally A Front vertical function does not operate normally B Lifter function does not operate normally C Reclining function does not operate normally D Lumbar support function does not operate normally E All power seat functions do not operate F
A
B
C
D
E
F
Read the Data List according to the display on the GTS.
- Body Electrical > Driver Seat > Data List
-
Tester Display Measurement Item Range Normal Condition Diagnostic Note Slide Rear Slide switch signal (Rearward) ON or OFF ON: Slide switch (Rearward) on
OFF: Slide switch (Rearward) off- Slide Front Slide switch signal (Forward) ON or OFF ON: Slide switch (Forward) on
OFF: Slide switch (Forward) off-
- Body Electrical > Driver Seat > Data List
-
Tester Display Slide Rear Slide Front - 50003 162 23,24
- OK:
On the GTS screen, ON or OFF is displayed accordingly
- Result:
Proceed to OK NG
OK
NG
Perform the Active Test according to the display on the GTS.
- Body Electrical > Driver Seat > Active Test
-
Tester Display Measurement Item Control Range Diagnostic Note Seat Slide Operation Seat slide operation OFF/Rear/Front -
- Body Electrical > Driver Seat > Active Test
-
Tester Display Seat Slide Operation - 50004 162 4
- Result:
Proceed to OK NG
OK
NG
OK
NG
Disconnect the L15 position control ECU assembly RH connector.
Disconnect the L1 slide motor (front seat adjuster assembly RH) connector.
Measure the resistance according to the value(s) in the table below.
- HINT:
-
Check the wire harness and connector between the position control ECU assembly RH and applicable motor.
- Standard Resistance:
Tester Connection Condition Specified Condition Click Location & Routing(L15,L1)Location & Routingewd_type=routing;type=c,c;code=L15,L1
Click Connector(L15)Seat>Front Seat Wire RH / No. 2 Front Seat Wire LH / No. 2 Front Seat Wire RH>Position Control ECU Assembly RHewd_type=component;type=c;code=L15;pinno=1,5
L15-1 - L1-4 Always Below 1 Ω L15-1 or L1-4 - Body ground Always 10 kΩ or higher L15-5 - L1-1 Always Below 1 Ω L15-5 or L1-1 - Body ground Always 10 kΩ or higher
- Result:
Proceed to OK NG
OK
NG
OK
NG
Disconnect the L17 position control ECU assembly RH connector.
Disconnect the L9 front power seat switch RH connector.
Measure the resistance according to the value(s) in the table below.
- Standard Resistance:
Tester Connection Condition Specified Condition Click Location & Routing(L9,L17)Location & Routingewd_type=routing;type=c,c;code=L9,L17
Click Connector(L9)Seat>Front Seat Wire RH / No. 2 Front Seat Wire LH / No. 2 Front Seat Wire RH>Front Power Seat Switch RHewd_type=component;type=c;code=L9;pinno=5,4
Click Connector(L17)Seat>Front Seat Wire RH / No. 2 Front Seat Wire LH / No. 2 Front Seat Wire RH>Position Control ECU Assembly RHewd_type=component;type=c;code=L17;pinno=23,9
L9-5 (SLDR) - L17-23 Always Below 1 Ω L9-5 (SLDR) or L17-23 - Body ground Always 10 kΩ or higher L9-4 (SLDF) - L17-9 Always Below 1 Ω L9-4 (SLDF) or L17-9 - Body ground Always 10 kΩ or higher
- Result:
Proceed to OK NG
OK
NG
Read the Data List according to the display on the GTS.
- Body Electrical > Driver Seat > Data List
-
Tester Display Measurement Item Range Normal Condition Diagnostic Note Front Vertical Down Front vertical switch signal (Downward) ON or OFF ON: Front vertical switch (Downward) on
OFF: Front vertical switch (Downward) off- Front Vertical Up Front vertical switch signal (Upward) ON or OFF ON: Front vertical switch (Upward) on
OFF: Front vertical switch (Upward) off-
- Body Electrical > Driver Seat > Data List
-
Tester Display Front Vertical Down Front Vertical Up - 50003 162 19,20
- OK:
On the GTS screen, ON or OFF is displayed accordingly
- Result:
Proceed to OK NG
OK
NG
Perform the Active Test according to the display on the GTS.
- Body Electrical > Driver Seat > Active Test
-
Tester Display Measurement Item Control Range Diagnostic Note Front Vertical Operation Seat front vertical operation OFF/Down/Up -
- Body Electrical > Driver Seat > Active Test
-
Tester Display Front Vertical Operation - 50004 162 3
- Result:
Proceed to OK NG
OK
NG
OK
NG
Disconnect the L15 and L16 position control ECU assembly RH connectors.
Disconnect the L2 power seat tilt motor assembly RH connector.
Measure the resistance according to the value(s) in the table below.
- HINT:
-
Check the wire harness and connector between the position control ECU assembly RH and applicable motor.
- Standard Resistance:
Tester Connection Condition Specified Condition Click Location & Routing(L15,L2,L16)Location & Routingewd_type=routing;type=c,c,c;code=L15,L2,L16
Click Connector(L15)Seat>Front Seat Wire RH / No. 2 Front Seat Wire LH / No. 2 Front Seat Wire RH>Position Control ECU Assembly RHewd_type=component;type=c;code=L15;pinno=7
Click Connector(L16)Seat>Front Seat Wire RH / No. 2 Front Seat Wire LH / No. 2 Front Seat Wire RH>Position Control ECU Assembly RHewd_type=component;type=c;code=L16;pinno=4
L15-7 - L2-1 Always Below 1 Ω L15-7 or L2-1 - Body ground Always 10 kΩ or higher L16-4 - L2-4 Always Below 1 Ω L16-4 or L2-4 - Body ground Always 10 kΩ or higher
- Result:
Proceed to OK NG
OK
NG
OK
NG
Disconnect the L17 position control ECU assembly RH connector.
Disconnect the L9 front power seat switch RH connector.
Measure the resistance according to the value(s) in the table below.
- Standard Resistance:
Tester Connection Condition Specified Condition Click Location & Routing(L9,L17)Location & Routingewd_type=routing;type=c,c;code=L9,L17
Click Connector(L9)Seat>Front Seat Wire RH / No. 2 Front Seat Wire LH / No. 2 Front Seat Wire RH>Front Power Seat Switch RHewd_type=component;type=c;code=L9;pinno=7,6
Click Connector(L17)Seat>Front Seat Wire RH / No. 2 Front Seat Wire LH / No. 2 Front Seat Wire RH>Position Control ECU Assembly RHewd_type=component;type=c;code=L17;pinno=6,20
L9-7 (FUP) - L17-6 Always Below 1 Ω L9-7 (FUP) or L17-6 - Body ground Always 10 kΩ or higher L9-6 (FDWN) - L17-20 Always Below 1 Ω L9-6 (FDWN) or L17-20 - Body ground Always 10 kΩ or higher
- Result:
Proceed to OK NG
OK
NG
Read the Data List according to the display on the GTS.
- Body Electrical > Driver Seat > Data List
-
Tester Display Measurement Item Range Normal Condition Diagnostic Note Lifter Switch Down Rear lifter switch signal (Downward) ON or OFF ON: Rear lifter switch (Downward) on
OFF: Rear lifter switch (Downward) off- Lifter Switch Up Rear lifter switch signal (Upward) ON or OFF ON: Rear lifter switch (Upward) on
OFF: Rear lifter switch (Upward) off-
- Body Electrical > Driver Seat > Data List
-
Tester Display Lifter Switch Down Lifter Switch Up - 50003 162 21,22
- OK:
On the GTS screen, ON or OFF is displayed accordingly
- Result:
Proceed to OK NG
OK
NG
Perform the Active Test according to the display on the GTS.
- Body Electrical > Driver Seat > Active Test
-
Tester Display Measurement Item Control Range Diagnostic Note Lifter Operation Seat lifter operation OFF/Down/Up -
- Body Electrical > Driver Seat > Active Test
-
Tester Display Lifter Operation - 50004 162 2
- Result:
Proceed to OK NG
OK
NG
OK
NG
Disconnect the L15 and L16 position control ECU assembly RH connectors.
Disconnect the L3 power seat lifter motor assembly RH connector.
Measure the resistance according to the value(s) in the table below.
- HINT:
-
Check the wire harness and connector between the position control ECU assembly RH and applicable motor.
- Standard Resistance:
Tester Connection Condition Specified Condition Click Location & Routing(L15,L3,L16)Location & Routingewd_type=routing;type=c,c,c;code=L15,L3,L16
Click Connector(L15)Seat>Front Seat Wire RH / No. 2 Front Seat Wire LH / No. 2 Front Seat Wire RH>Position Control ECU Assembly RHewd_type=component;type=c;code=L15;pinno=6
Click Connector(L16)Seat>Front Seat Wire RH / No. 2 Front Seat Wire LH / No. 2 Front Seat Wire RH>Position Control ECU Assembly RHewd_type=component;type=c;code=L16;pinno=5
L15-6 - L3-1 Always Below 1 Ω L15-6 or L3-1 - Body ground Always 10 kΩ or higher L16-5 - L3-4 Always Below 1 Ω L16-5 or L3-4 - Body ground Always 10 kΩ or higher
- Result:
Proceed to OK NG
OK
NG
OK
NG
Disconnect the L17 position control ECU assembly RH connector.
Disconnect the L9 front power seat switch RH connector.
Measure the resistance according to the value(s) in the table below.
- Standard Resistance:
Tester Connection Condition Specified Condition Click Location & Routing(L9,L17)Location & Routingewd_type=routing;type=c,c;code=L9,L17
Click Connector(L9)Seat>Front Seat Wire RH / No. 2 Front Seat Wire LH / No. 2 Front Seat Wire RH>Front Power Seat Switch RHewd_type=component;type=c;code=L9;pinno=8,3
Click Connector(L17)Seat>Front Seat Wire RH / No. 2 Front Seat Wire LH / No. 2 Front Seat Wire RH>Position Control ECU Assembly RHewd_type=component;type=c;code=L17;pinno=7,21
L9-8 (LUP) - L17-7 Always Below 1 Ω L9-8 (LUP) or L17-7 - Body ground Always 10 kΩ or higher L9-3 (LDWN) - L17-21 Always Below 1 Ω L9-3 (LDWN) or L17-21 - Body ground Always 10 kΩ or higher
- Result:
Proceed to OK NG
OK
NG
Read the Data List according to the display on the GTS.
- Body Electrical > Driver Seat > Data List
-
Tester Display Measurement Item Range Normal Condition Diagnostic Note Reclining Rear Reclining switch signal (Rearward) ON or OFF ON: Reclining switch (Rearward) on
OFF: Reclining switch (Rearward) off- Reclining Front Reclining switch signal (Forward) ON or OFF ON: Reclining switch (Forward) on
OFF: Reclining switch (Forward) off-
- Body Electrical > Driver Seat > Data List
-
Tester Display Reclining Rear Reclining Front - 50003 162 17,18
- OK:
On the GTS screen, ON or OFF is displayed accordingly
- Result:
Proceed to OK NG
OK
NG
Perform the Active Test according to the display on the GTS.
- Body Electrical > Driver Seat > Active Test
-
Tester Display Measurement Item Control Range Diagnostic Note Seat Reclining Seat reclining operation OFF/Rear/Front -
- Body Electrical > Driver Seat > Active Test
-
Tester Display Seat Reclining - 50004 162 1
- Result:
Proceed to OK NG
OK
NG
OK
NG
Disconnect the L15 and L16 position control ECU assembly RH connectors.
Disconnect the L49 reclining motor (front seatback frame sub-assembly RH) connector.
Measure the resistance according to the value(s) in the table below.
- HINT:
-
Check the wire harness and connector between the position control ECU assembly RH and applicable motor.
- Standard Resistance:
Tester Connection Condition Specified Condition Click Location & Routing(L15,L49,L16)Location & Routingewd_type=routing;type=c,c,c;code=L15,L49,L16
Click Connector(L15)Seat>Front Seat Wire RH / No. 2 Front Seat Wire LH / No. 2 Front Seat Wire RH>Position Control ECU Assembly RHewd_type=component;type=c;code=L15;pinno=10
Click Connector(L16)Seat>Front Seat Wire RH / No. 2 Front Seat Wire LH / No. 2 Front Seat Wire RH>Position Control ECU Assembly RHewd_type=component;type=c;code=L16;pinno=6
L15-10 (RCL+) - L49-1 Always Below 1 Ω L15-10 (RCL+) or L49-1 - Body ground Always 10 kΩ or higher L16-6 (RCL-) - L49-4 Always Below 1 Ω L16-6 (RCL-) or L49-4 - Body ground Always 10 kΩ or higher
- Result:
Proceed to OK NG
OK
NG
OK
NG
Disconnect the L17 position control ECU assembly RH connector.
Disconnect the L9 front power seat switch RH connector.
Measure the resistance according to the value(s) in the table below.
- Standard Resistance:
Tester Connection Condition Specified Condition Click Location & Routing(L9,L17)Location & Routingewd_type=routing;type=c,c;code=L9,L17
Click Connector(L9)Seat>Front Seat Wire RH / No. 2 Front Seat Wire LH / No. 2 Front Seat Wire RH>Front Power Seat Switch RHewd_type=component;type=c;code=L9;pinno=10,9
Click Connector(L17)Seat>Front Seat Wire RH / No. 2 Front Seat Wire LH / No. 2 Front Seat Wire RH>Position Control ECU Assembly RHewd_type=component;type=c;code=L17;pinno=22,8
L9-10 (RCLR) - L17-22 Always Below 1 Ω L9-10 (RCLR) or L17-22 - Body ground Always 10 kΩ or higher L9-9 (RCLF) - L17-8 Always Below 1 Ω L9-9 (RCLF) or L17-8 - Body ground Always 10 kΩ or higher
- Result:
Proceed to OK NG
OK
NG
Read the Data List according to the display on the GTS.
- Body Electrical > Driver Seat > Data List
-
Tester Display Measurement Item Range Normal Condition Diagnostic Note Lumbar Switch Front Lumbar support adjuster switch signal (Forward) ON or OFF ON: Lumbar support adjuster switch (Forward) on
OFF: Lumbar support adjuster switch (Forward) off- Lumbar Switch Rear Lumbar support adjuster switch signal (Rearward) ON or OFF ON: Lumbar support adjuster switch (Rearward) on
OFF: Lumbar support adjuster switch (Rearward) off-
- Body Electrical > Driver Seat > Data List
-
Tester Display Lumbar Switch Front Lumbar Switch Rear - 50003 162 157,158
- OK:
On the GTS screen, ON or OFF is displayed accordingly
- Result:
Proceed to OK NG
OK
NG
Perform the Active Test according to the display on the GTS.
- Body Electrical > Driver Seat > Active Test
-
Tester Display Measurement Item Control Range Diagnostic Note Lumbar Slide Lumbar support operation OFF/Rear/Front -
- Body Electrical > Driver Seat > Active Test
-
Tester Display Lumbar Slide - 50004 162 8
- Result:
Proceed to OK NG
OK
NG
Click hereVehicle Interior>SEAT>LUMBAR SUPPORT ADJUSTER ASSEMBLY>INSPECTION
- Result:
Proceed to OK NG
OK
NG
Disconnect the L15 and L16 position control ECU assembly LH connectors.
Disconnect the L50 lumbar support adjuster assembly LH connector.
Measure the resistance according to the value(s) in the table below.
- HINT:
-
Check the wire harness and connector between the position control ECU assembly RH and applicable motor.
- Standard Resistance:
Tester Connection Condition Specified Condition Click Location & Routing(L15,L50,L16)Location & Routingewd_type=routing;type=c,c,c;code=L15,L50,L16
Click Connector(L15)Seat>Front Seat Wire RH / No. 2 Front Seat Wire LH / No. 2 Front Seat Wire RH>Position Control ECU Assembly RHewd_type=component;type=c;code=L15;pinno=9
Click Connector(L16)Seat>Front Seat Wire RH / No. 2 Front Seat Wire LH / No. 2 Front Seat Wire RH>Position Control ECU Assembly RHewd_type=component;type=c;code=L16;pinno=3
L15-9 - L50-1 Always Below 1 Ω L15-9 or L50-1 - Body ground Always 10 kΩ or higher L16-3 - L50-2 Always Below 1 Ω L16-3 or L50-2 - Body ground Always 10 kΩ or higher
- Result:
Proceed to OK NG
OK
NG
OK
NG
Disconnect the L17 position control ECU assembly RH connector.
Disconnect the L9 front power seat switch RH connector.
Measure the resistance according to the value(s) in the table below.
- Standard Resistance:
Tester Connection Condition Specified Condition Click Location & Routing(L9,L17)Location & Routingewd_type=routing;type=c,c;code=L9,L17
Click Connector(L9)Seat>Front Seat Wire RH / No. 2 Front Seat Wire LH / No. 2 Front Seat Wire RH>Front Power Seat Switch RHewd_type=component;type=c;code=L9;pinno=17,14
Click Connector(L17)Seat>Front Seat Wire RH / No. 2 Front Seat Wire LH / No. 2 Front Seat Wire RH>Position Control ECU Assembly RHewd_type=component;type=c;code=L17;pinno=4,18
L9-17 (H) - L17-4 Always Below 1 Ω L9-17 (H) or L17-4 - Body ground Always 10 kΩ or higher L9-14 (R) - L17-18 Always Below 1 Ω L9-14 (R) or L17-18 - Body ground Always 10 kΩ or higher
- Result:
Proceed to OK NG
OK
NG