REPLACEMENT
Removal / installation · Vehicles built from Aug 2007
Versions by build date: Nov 2005 – Dec 2006 Jan 2007 – Jul 2007 from Aug 2007
| 1. DISCONNECT CABLE FROM NEGATIVE BATTERY TERMINAL |

- CAUTION:
- Wait at least 90 seconds after disconnecting the cable from the negative (-) battery terminal to prevent airbag and seat belt pretensioner activation.
| 2. DRAIN TRANSFER OIL |
Remove the drain plug and gasket, and drain the oil.
Install a new gasket and the drain plug.
- Torque:
- 39 N*m{ 398 kgf*cm , 28 ft.*lbf }
| 3. REMOVE ENGINE ASSEMBLY WITH TRANSAXLE |
for 1AZ-FE:
Remove the engine assembly with transaxle (Click here).
for 2AZ-FE:
Remove the engine assembly with transaxle (Click here).
for 2AD-FTV:
Remove the engine assembly with transaxle (Click here).
for 2AD-FHV:
Remove the engine assembly with transaxle (Click here).
for 2GR-FE:
Remove the engine assembly with transaxle (Click here).
| 4. REMOVE REAR ENGINE MOUNTING BRACKET |
for U140F:
Remove the rear engine mounting bracket (Click here).
for E352F/E359F:
Remove the rear engine mounting bracket (Click here).
for EA64F:
Remove the rear engine mounting bracket (Click here).
for U151F:
Remove the rear engine mounting bracket (Click here).
| 5. REMOVE TRANSFER ASSEMBLY |
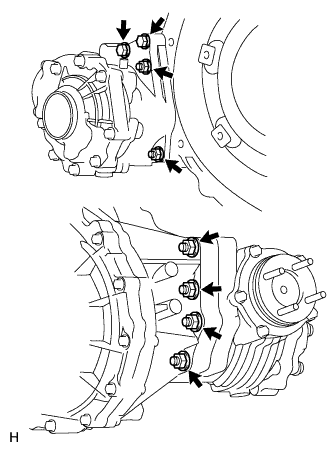  |
Remove the 6 nuts, 2 bolts and transfer from the transaxle.
| 6. REMOVE TRANSFER CASE OIL SEAL |
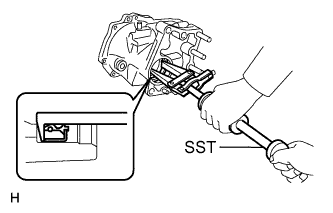 |
Using SST, tap out the transfer case oil seal.
- SST
- 09308-00010
| 7. INSTALL TRANSFER CASE OIL SEAL |
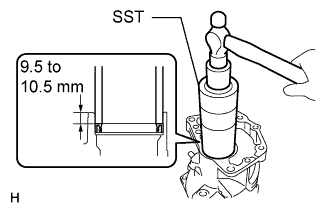 |
Coat a new oil seal lip with MP grease.
Using SST and a hammer, tap in the transfer case oil seal.
- SST
- 09316-60011
(09316-00011)
- Standard depth:
- 9.5 to 10.5 mm (0.37 to 0.41 in.)
- NOTICE:
- Do not damage the oil seal lip.
| 8. INSTALL TRANSFER ASSEMBLY |
|
|
Install the transfer to the transaxle with the 6 nuts and 2 bolts.
- Torque:
- 69 N*m{ 700 kgf*cm , 51 ft.*lbf }
| 9. INSTALL REAR ENGINE MOUNTING BRACKET |
for U140F:
Install the rear engine mounting bracket (Click here).
for E352F/E359F:
Install the rear engine mounting bracket (Click here).
for EA64F:
Install the rear engine mounting bracket (Click here).
for U151F:
Install the rear engine mounting bracket (Click here).
| 10. INSTALL TRANSAXLE WITH ENGINE ASSEMBLY |
for 1AZ-FE:
Install the transaxle with engine assembly (Click here).
for 2AZ-FE:
Install the transaxle with engine assembly (Click here).
for 2AD-FTV:
Install the transaxle with engine assembly (Click here).
for 2AD-FHV:
Install the transaxle with engine assembly (Click here).
for 2GR-FE:
Install the transaxle with engine assembly (Click here).
| 11. ADD TRANSFER OIL |
Remove the case plug (for filler) and gasket.
Pour oil so that the oil level is between 0 to 5.0 mm (0 to 0.197 in.) from the bottom lip of the case plug (for filler) hole.
- NOTICE:
- When adding oil, pour it slowly.
- Add oil a little at a time, waiting several minutes between each addition of oil.
- When adding oil, pour it slowly.
Wait approximately 5 minutes and check that the oil level has not changed.
Install a new gasket and the case plug (for filler).
- Torque:
- 39 N*m{ 398 kgf*cm , 28 ft.*lbf }
| 12. INSPECT TRANSFER OIL |
Remove the transfer case plug No. 2 (for filler) and gasket.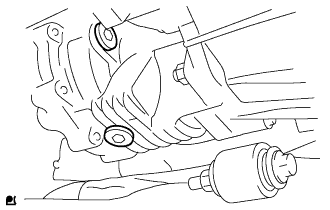
Check that the oil level is between 0 to 5.0 mm (0 to 0.20 in.) from the bottom lip of the case plug (for filler) hole.
If the result is not as specified, add transfer oil.- Oil grade:
- GL-5
- Viscosity:
- SAE 80W-90
- Standard capacity:
- 0.45 liter (0.48 US qts, 0.40 Imp. qts)
- NOTICE:
- When adding oil, pour it slowly.
- Too much or too little oil will lead to transfer problems.
- When adding oil, pour it slowly.
When the oil level is too low, check for oil leakage.
Install a new gasket into the case plug (for filler) and then tighten the plug.
- Torque:
- 39 N*m{ 398 kgf*cm , 28 ft.*lbf }
| 13. CONNECT CABLE TO NEGATIVE BATTERY TERMINAL |
| 14. INSPECT SRS WARNING LIGHT |
Check the SRS warning light (Click here).