AXLE AND DIFFERENTIAL REAR DIFFERENTIAL CARRIER ASSEMBLY(for Torque Vectoring Differential) REMOVAL
CAUTION / NOTICE / HINT
The necessary procedures (adjustment, calibration, initialization, or registration) that must be performed after parts are removed and installed, or replaced during torque vectoring differential carrier assembly removal/installation are shown below.
| Replaced Part or Performed Procedure | Necessary Procedure | Effect/Inoperative Function when Necessary Procedure not Performed | Link |
|---|---|---|---|
|
*: When performing learning using the GTS. Click here( |
|||
| Battery terminal is disconnected/reconnected | Drive the vehicle until stop and start control is permitted (approximately 5 to 60 minutes) | Stop and start system | for A25A-FKS:( ) for M20A-FKS:( )
|
| Perform steering sensor zero point calibration | Lane control system | ()
|
|
| Parking support brake system (for Gasoline model)* | |||
| Pre-collision system | |||
| Memorize steering angle neutral point | Parking assist monitor system | ()
|
|
| Panoramic view monitor system (for Gasoline model) | ()
|
||
| Reset back door close position | Power back door system (for Gasoline model) | ()
|
|
| Power back door initialization | Power door lock control system | ()
|
|
| Electro magnetic control coupling sub-assembly | ·
ECU data save ·
ECU data initialization ·
ECU data write |
Dynamic torque vectoring AWD system | ()
|
| Rear electro magnetic control clutch sub-assembly (rear differential carrier assembly) | Disconnect system function check | ||
| Rear wheel alignment adjustment | ·
Perform reset memory ·
Perform acceleration sensor zero point calibration and store system information memorization. |
·
VSC is disabled or malfunctions ·
DTCs are output ·
Slip indicator light illuminates ·
ABS warning light illuminates |
()
|
| Suspension, tires, etc.
(The vehicle height changes because of suspension or tire replacement.) |
·
Ultrasonic sensor detection angle ·
Ultrasonic sensor detection angle registration |
Parking Support Brake System (for Gasoline model) | ()
|
| Television camera assembly optical axis (Back camera position setting) | Parking Assist Monitor System | ()
|
|
·
Parking assist ECU initialization ·
Adjust steering angle |
Panoramic View Monitor System (for Gasoline model) | ()
|
|
| Perform headlight ECU sub-assembly LH initialization | Lighting System (EXT) | ()
|
|
| Gas leak from exhaust system is repaired | Inspection After Repair | ·
Poor idle, etc. ·
Engine start function, etc. |
·
for A25A-FKS w/ Canister Pump Module: ( ·
for A25A-FKS w/o Canister Pump Module: ( ·
for M20A-FKS: ( |
- CAUTION:
-
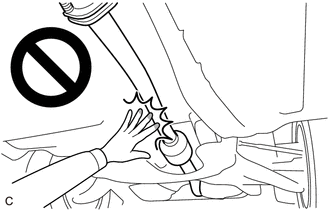
-
To prevent burns, do not touch the engine, exhaust pipe or other high temperature components while the engine is hot.
- NOTICE:
-
After the ignition switch is turned off, the navigation system requires approximately a minute to record various types of memory and settings. As a result, after turning the ignition switch off, wait a minute or more before disconnecting the cable from the negative (-) battery terminal.
PROCEDURE

 1. PRECAUTION
- NOTICE:
-
After turning the ignition switch off, waiting time may be required before disconnecting the cable from the negative (-) battery terminal. Therefore, make sure to read the disconnecting the cable from the negative (-) battery terminal notices before proceeding with work.
2.DRAIN DIFFERENTIAL OIL
37110
3.REMOVE PROPELLER SHAFT ASSEMBLY
4.REMOVE REAR STABILIZER BAR
77606
5.REMOVE NO. 1 FUEL TANK PROTECTOR
42340B
6.REMOVE REAR DRIVE SHAFT ASSEMBLY LH
42330
7.REMOVE REAR DRIVE SHAFT ASSEMBLY RH
- HINT:
-
Use the same procedure described for the LH side.
8.DISCONNECT CABLE FROM NEGATIVE BATTERY TERMINAL
for A25A-FKS: Click hereGeneral>MAINTENANCE>A25A-FKS BATTERY>REMOVAL
for M20A-FKS: Click hereGeneral>MAINTENANCE>M20A-FKS BATTERY>REMOVAL
- NOTICE:
-
When disconnecting the cable, some systems need to be initialized after the cable is reconnected.
-
Click hereGeneral>INTRODUCTION>REPAIR INSTRUCTION>INITIALIZATION
9.REMOVE REAR SEAT ASSEMBLY
73706
10.REMOVE CHILD RESTRAINT SEAT ANCHOR BRACKET SUB-ASSEMBLY LH
64910N
11.REMOVE TONNEAU COVER ASSEMBLY (w/ Tonneau Cover)
58410B
12.REMOVE DECK BOARD ASSEMBLY
58417H
13.REMOVE REAR NO. 3 FLOOR BOARD
64993
14.REMOVE REAR DECK FLOOR BOX (w/o Spare Tire)
58386
15.REMOVE REAR FLOOR FINISH PLATE
58577E
16.REMOVE REAR NO. 1 FLOOR MAT SUPPORT SIDE PLATE
67918E
17.REMOVE REAR DOOR SCUFF PLATE LH
62332C
18.REMOVE REAR DOOR OPENING TRIM WEATHERSTRIP LH
62552F
19.REMOVE REAR SEAT SIDE GARNISH LH
73708A
20.REMOVE TETHER ANCHOR BRACKET SET
58460D
21.REMOVE LUGGAGE HOLD BELT STRIKER ASSEMBLY
64740E
22.REMOVE DECK TRIM SIDE PANEL ASSEMBLY LH
52391B
23.REMOVE DIFFERENTIAL SUPPORT
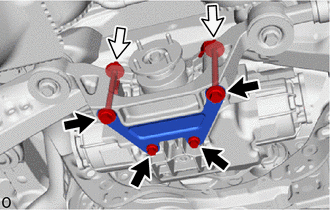
Remove the 4 bolts, 2 nuts and differential support from the rear No. 2 differential support and torque vectoring differential carrier assembly.
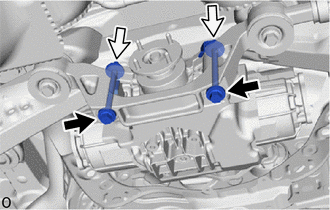
Temporarily install the 2 bolts and 2 nuts.
41110
24.REMOVE TORQUE VECTORING DIFFERENTIAL CARRIER ASSEMBLY
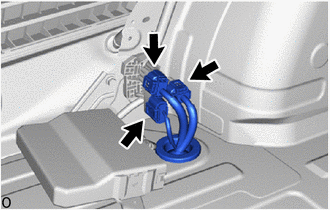
Disconnect the 3 connectors.
Remove the grommet of the frame wire and pass the connector through the hole to the outside of the vehicle.
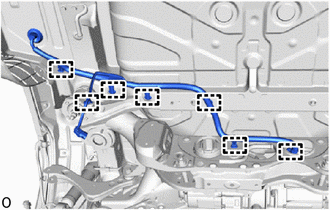
Disengage the 7 wire harness clamps to separate the frame wire.
Support the torque vectoring differential carrier assembly with 2 attachments or equivalent tools as shown in the illustration.
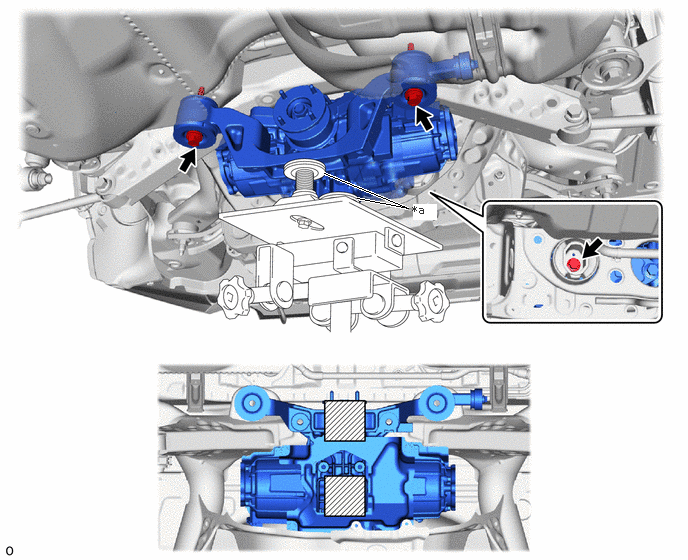
| *a | Attachment | - | - |

|
Attachment Installation Position | - | - |
- CAUTION:
-
The torque vectoring differential carrier assembly is a heavy component. Make sure that it is supported securely.
- NOTICE:
- ·
Use attachments or equivalent tools to keep the torque vectoring differential carrier assembly level.
·Be careful not to damage the frame wire.
Remove the 3 bolts and 2 rear lower differential mount stoppers.
Slowly lower the jack and then tilt the torque vectoring differential carrier assembly.
82164
25.REMOVE FRAME WIRE
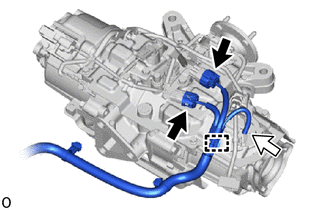
Disconnect the 2 connectors and breather tube.
Disengage the clamp to remove the frame wire.
52380C
26.REMOVE REAR NO. 2 DIFFERENTIAL SUPPORT
Remove the 2 upper rear differential mount stoppers from the rear No. 2 differential support.
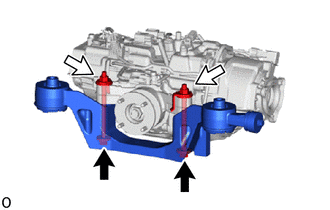
Remove the 2 bolts, 2 nuts and rear No. 2 differential support from the torque vectoring differential carrier assembly.
12351F
27.REMOVE REAR DIFFERENTIAL DAMPER
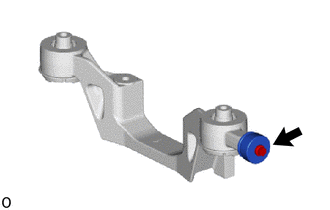
Remove the bolt and rear differential damper from the rear No. 2 differential support.
52391A
28.REMOVE REAR DIFFERENTIAL SUPPORT
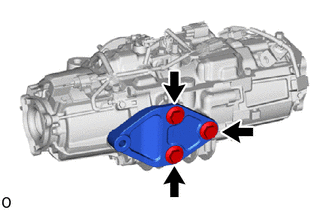
Remove the 3 bolts and rear differential support from the torque vectoring differential carrier assembly.