POWER ASSIST SYSTEMS POWER STEERING ECU(for LHD) INSTALLATION
CAUTION / NOTICE / HINT
- NOTICE:
-
After performing the update ECU security key procedure, make sure to perform the initialization procedure for when the cable has been disconnected and reconnected to the negative (-) auxiliary battery terminal.
PROCEDURE

 45254B
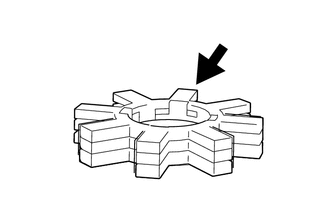
1.INSTALL ELECTRIC POWER STEERING MOTOR SHAFT DAMPER

|
Grease |
Apply grease to a new electric power steering motor shaft damper.
- NOTICE:
-
First wipe off the existing grease from the serrated part, and then apply the dedicated grease supplied with a new power steering ECU assembly or electric power steering column sub-assembly.
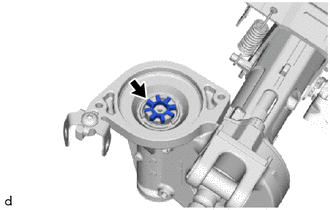
Install the electric power steering motor shaft damper to the electric power steering column sub-assembly.
89650
2.INSTALL POWER STEERING ECU ASSEMBLY
- NOTICE:
- ·
Do not drop the power steering ECU assembly, strike it with tools or subject it to impacts.
·If the power steering ECU assembly is subjected to an impact, replace it with a new one.
·Do not pull the wire harness of the electric power steering column sub-assembly.
·Do not allow any moisture to come into contact with the power steering ECU assembly.
·Do not loosen any bolts not mentioned in the procedure.
·Do not allow any foreign matter to contaminate the power steering ECU assembly.
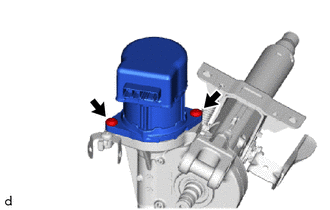
Using a T40 "TORX" socket wrench, temporarily install the power steering ECU assembly to the electric power steering column sub-assembly with the 2 bolts.
- NOTICE:
-
When temporarily installing the 2 bolts to the power steering ECU assembly, do not tighten them all the way down.
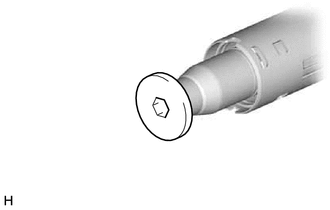
Using a 10 mm hexagon socket wrench, install the steering wheel assembly set bolt to the steering main shaft.
- NOTICE:
-
Do not apply excessive torque to the steering wheel assembly set bolt by using a tool such as an impact wrench.
- HINT:
-
The steering wheel assembly set bolt is used for turning the steering main shaft during inspection of the steering main shaft rotating torque.
-
Remove the steering wheel assembly set bolt after performing this inspection.
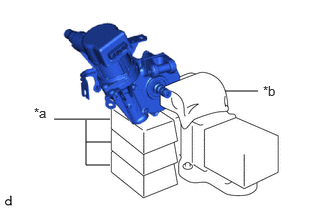
| *a | Wooden Block |
| *b | Cloth |
Secure the steering column assembly in a vise using aluminum plates, cloths and wooden blocks.
- NOTICE:
- ·
Do not overtighten the vise, as the steering column assembly may become deformed.
·Secure the power steering ECU assembly so that it is upright.
·Support the steering column assembly with wooden blocks or similar items to ensure that it does not fall.
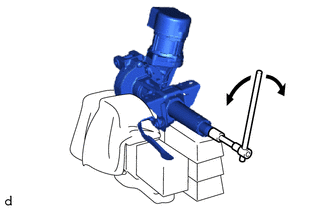
Rotate the steering main shaft 180 degrees counterclockwise and then 180 degrees clockwise at a speed of 60 rpm, and repeat 2 to 3 times to center the axis of the power steering ECU assembly. [*1]
Using a T40 "TORX" socket wrench, tighten the 2 bolts. [*2]
- Torque:
- 18.5 N*m (189 kgf*cm, 14 ft.*lbf)
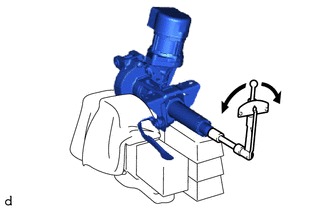
Using a torque wrench, measure the turning torque of the steering main shaft.
- Preload:
1.0 to 2.2 N*m (11 to 22 kgf*cm, 9 to 19 in.*lbf)
- NOTICE:
-
Ensure that there is no abnormal resistance during rotation.
If the turning torque is not as specified, loosen the 2 bolts and repeat steps [*1] and [*2] to recenter the axis of the power steering ECU assembly.
Remove the steering wheel assembly set bolt.
Connect the connector.
45020B
3.INSTALL STEERING LOCK ACTUATOR ASSEMBLY (w/ Entry and Start System)
4.ALIGN FRONT WHEELS FACING STRAIGHT AHEAD
5.INSTALL STEERING COLUMN ASSEMBLY
45260
6.INSTALL NO. 2 STEERING INTERMEDIATE SHAFT ASSEMBLY
45260
7.CONNECT NO. 2 STEERING INTERMEDIATE SHAFT ASSEMBLY
45259A
8.INSTALL COLUMN HOLE COVER SILENCER SHEET
87211
9.INSTALL NO. 1 AIR DUCT
84340
10.INSTALL STOP LIGHT SWITCH ASSEMBLY
55480D
11.INSTALL LOWER INSTRUMENT PANEL FINISH PANEL ASSEMBLY
53601
12.CONNECT HOOD LOCK CONTROL LEVER SUB-ASSEMBLY
55317E
13.INSTALL NO. 1 INSTRUMENT SIDE PANEL
62312B
14.INSTALL FRONT DOOR OPENING TRIM WEATHERSTRIP LH
55606
15.INSTALL NO. 1 INSTRUMENT PANEL UNDER COVER SUB-ASSEMBLY
62112
16.INSTALL COWL SIDE TRIM BOARD LH
67914B
17.INSTALL FRONT DOOR SCUFF PLATE LH
58810J
18.INSTALL FRONT CONSOLE BOX SUB-ASSEMBLY
19.INSTALL TURN SIGNAL SWITCH ASSEMBLY WITH SPIRAL CABLE SUB-ASSEMBLY
45286B
20.INSTALL UPPER STEERING COLUMN COVER
45287
21.INSTALL LOWER STEERING COLUMN COVER
22.ALIGN FRONT WHEELS FACING STRAIGHT AHEAD
23.ADJUST SPIRAL CABLE WITH SENSOR SUB-ASSEMBLY
45100
24.INSTALL STEERING WHEEL ASSEMBLY
25.CHECK STEERING WHEEL CENTER POINT
45130
26.INSTALL HORN BUTTON ASSEMBLY
27.CONNECT CABLE TO NEGATIVE AUXILIARY BATTERY TERMINAL
for M15A-FKS:
Click hereGeneral>MAINTENANCE>M15A-FKS AUXILIARY BATTERY>INSTALLATION
for M15A-FXE:
Click hereGeneral>MAINTENANCE>M15A-FXE AUXILIARY BATTERY>INSTALLATION
for 1KR-FE:
Click hereGeneral>MAINTENANCE>1KR-FE AUXILIARY BATTERY>INSTALLATION
28. UPDATE ECU SECURITY KEY
29. PERFORM POWER STEERING ECU INITIAL SETTING
45130
30.INSPECT HORN BUTTON ASSEMBLY
31. PERFORM DIAGNOSTIC SYSTEM CHECK
32.INSPECT SRS WARNING LIGHT
33. INITIALIZATION AFTER RECONNECTING AUXILIARY BATTERY TERMINAL
Click hereGeneral>SETUP>WHEN DISCONNECTING OR RECONNECTING BATTERY TERMINAL>WORK PROCEDURE
- HINT:
-
When disconnecting and reconnecting the auxiliary battery, there is an automatic learning function that completes learning when the respective system is used.
-
Click hereGeneral>SETUP>WHEN DISCONNECTING OR RECONNECTING BATTERY TERMINAL>AUTOMATIC LEARNING CHART