AXLE FRONT AXLE HUB INSTALLATION
CAUTION / NOTICE / HINT
- HINT:
- ·
Use the same procedures for the RH side and LH side.
·The procedures listed below are for the LH side.
PROCEDURE

 43502C
1.INSTALL FRONT AXLE HUB SUB-ASSEMBLY LH
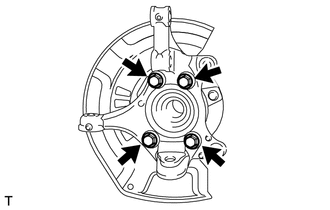
Install the dust cover to the steering knuckle.
Install the axle hub with the 4 bolts.
- Torque:
- 96 N*m (979 kgf*cm, 71 ft.*lbf)
- NOTICE:
-
Do not place the hub and bearing's magnet rotor side so that it is facing downward, and do not allow the magnet rotor side to become damaged or contact foreign matter.
43340A
2.INSTALL FRONT LOWER BALL JOINT ASSEMBLY LH
3.INSTALL STEERING KNUCKLE WITH AXLE HUB
Align the shaft splines and drive in the drive shaft.
Install the steering knuckle with axle hub with the 2 bolts and 2 nuts.
T = 240 N*m{ 2,447 kgf*cm 177 ft.*lbf }
- NOTICE:
-
Do not tighten the bolts.
48069
4.CONNECT FRONT SUSPENSION LOWER NO. 1 ARM SUB-ASSEMBLY LH
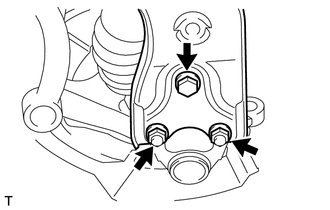
Connect the lower arm to the ball joint with the bolt and 2nuts.
- Torque:
- 93 N*m (948 kgf*cm, 69 ft.*lbf)
45046
5.CONNECT TIE ROD END SUB-ASSEMBLY LH
89543
6.INSTALL FRONT SPEED SENSOR LH
7.CHECK FRONT AXLE HUB BEARING
Check the axle hub bearing (see page Drivetrain>AXLE>FRONT AXLE HUB>ON-VEHICLE INSPECTION).
43512
8.INSTALL FRONT DISC
47750
9.INSTALL FRONT DISC BRAKE CALIPER ASSEMBLY LH
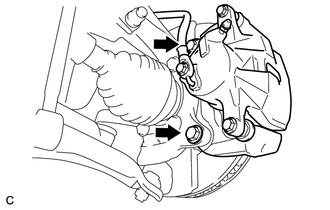
Install the caliper with 2 bolts.
- Torque:
- 98 N*m (999 kgf*cm, 72 ft.*lbf)
43502H
10.INSTALL FRONT AXLE HUB NUT (for 2AZ-FE)
Clean the threaded parts on the front drive shaft assembly and a new axle hub nut using non-residue solvent.
- NOTICE:
- ·
Be sure to perform this work even when using a new front drive shaft assembly.
·Keep the threaded parts free of oil and foreign matter.
Install the axle hub nut.
T = 216 N*m{ 2,203 kgf*cm 159 ft.*lbf }
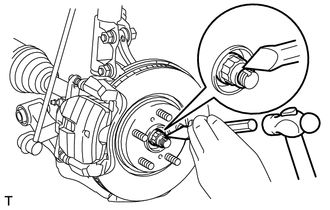
Using a chisel and hammer, stake the axle hub nut.
43502H
11.INSTALL FRONT AXLE HUB NUT (for 2GR-FE)
Clean the threaded parts on the front drive shaft assembly and a new axle hub nut using non-residue solvent.
- NOTICE:
- ·
Be sure to perform this work even when using a new front drive shaft assembly.
·Keep the threaded parts free of oil and foreign matter.
Install the axle hub nut.
T = 292 N*m{ 2,976 kgf*cm 215 ft.*lbf }
Using a chisel and hammer, stake the axle hub nut.
12.ADD AUTOMATIC TRANSAXLE FLUID (for 2AZ-FE, Automatic Transaxle)
Add the automatic transaxle fluid (see page Drivetrain>U241E (AUTOMATIC TRANSMISSION / TRANSAXLE)>AUTOMATIC TRANSAXLE ASSEMBLY>INSTALLATION).
13.ADD AUTOMATIC TRANSAXLE FLUID (for 2GR-FE)
Add the automatic transaxle fluid (see page Drivetrain>U660E (AUTOMATIC TRANSMISSION / TRANSAXLE)>AUTOMATIC TRANSAXLE FLUID>ADJUSTMENT).
14.ADD CONTINUOUSLY VARIABLE TRANSAXLE FLUID (for CVT)
15.CHECK FOR AUTOMATIC TRANSAXLE FLUID LEAKAGE
16.INSTALL FRONT WHEEL
T = 103 N*m{ 1,050 kgf*cm 76 ft.*lbf }
17.INSPECT AND ADJUST FRONT WHEEL ALIGNMENT
Inspect and adjust the wheel alignment (see page Suspension>SUSPENSION>FRONT WHEEL ALIGNMENT>ADJUSTMENT).
18.CONNECT CABLE TO NEGATIVE BATTERY TERMINAL
- NOTICE:
-
When disconnecting the cable, some systems need to be initialized after the cable is reconnected (See Page General>INTRODUCTION>REPAIR INSTRUCTION>INITIALIZATION).
19.CHECK SPEED SENSOR SIGNAL
Check the speed sensor signal for ABS (see page Brake>BRAKE CONTROL / DYNAMIC CONTROL SYSTEMS>ANTI-LOCK BRAKE SYSTEM>TEST MODE PROCEDURE).
Check the speed sensor signal for VSC (see page Brake>BRAKE CONTROL / DYNAMIC CONTROL SYSTEMS>VEHICLE STABILITY CONTROL SYSTEM>TEST MODE PROCEDURE).