GENERAL MAINTENANCE
Removal / installation · Vehicles built Apr 2016 – Dec 2016
Versions by build date: Oct 2014 – Dec 2014 Jan 2015 – Mar 2016 Apr 2016 – Dec 2016 Jan 2017 – Nov 2017 from Dec 2017
- HINT:
- Inspect these items on a cooled down engine.
| 1. INSPECT TIMING BELT |

- HINT:
- This is for vehicles often used in excessively dusty conditions. Inspect for cracks on the timing belt or abnormal wear on the timing pulley. Then, remove sand and dust in the timing belt cover.
| Type |
See procedure |
| 1KD-FTV |
Click here
|
| 2KD-FTV |
Click here
|
| 2. REPLACE TIMING BELT |
| Type |
See procedure |
| 1KD-FTV |
Click here
|
| 2KD-FTV |
Click here
|
| 5L-E |
Click here
|
| 3. INSPECT TIMING BELT PULLEY (for 1KD-FTV, 2KD-FTV) |
- HINT:
- This is for vehicles often used in excessively dusty conditions. Inspect for cracks on the timing belt or abnormal wear on the timing pulley. Then, remove sand and dust in the timing belt cover.
| Type |
See procedure |
| 1KD-FTV |
Click here
|
| 2KD-FTV |
Click here
|
| 4. CLEAN TIMING BELT COVER (for 1KD-FTV, 2KD-FTV) |
- HINT:
- This is for vehicles often used in excessively dusty conditions. Inspect for cracks on the timing belt or abnormal wear on the timing pulley. Then, remove sand and dust in the timing belt cover.
Remove the timing belt cover.
Check that the timing belt cover is not dirty.
If cleaning a timing belt cover, blow compressed air to clean it.
Reinstall the timing belt cover.
| 5. INSPECT VALVE CLEARANCE |
| Type |
See procedure |
| 1KD-FTV |
Click here
|
| 2KD-FTV |
Click here
|
| 5L-E |
Click here
|
| 6. INSPECT DRIVE BELT |
| Type |
See procedure |
| 1TR-FE |
Click here
|
| 2TR-FE |
Click here
|
| 1KD-FTV |
Click here
|
| 2KD-FTV |
Click here
|
| 5L-E |
Click here
|
| 7. REPLACE DRIVE BELT (for 5L-E) |
Replace the drive belt (Click here).
| 8. REPLACE ENGINE OIL AND OIL FILTER |
| Type |
See procedure |
| 1TR-FE |
Click here
|
| 2TR-FE |
Click here
|
| 1KD-FTV |
Click here
|
| 2KD-FTV |
Click here
|
| 5L-E |
Click here
|
| 9. INSPECT COOLING AND HEATER SYSTEM |
Check that the radiator, condenser and/or intercooler is not blocked with leaves, dirt or insects, and clean them if necessary. Also check the hose connection for the installation condition, corrosion, etc.
| 10. INSPECT ENGINE COOLANT |
| Type |
See procedure |
| 1TR-FE |
Click here
|
| 2TR-FE |
Click here
|
| 1KD-FTV |
Click here
|
| 2KD-FTV |
Click here
|
| 5L-E |
Click here
|
| 11. REPLACE ENGINE COOLANT |
| Type |
See procedure |
| 1TR-FE |
Click here
|
| 2TR-FE |
Click here
|
| 1KD-FTV |
Click here
|
| 2KD-FTV |
Click here
|
| 5L-E |
Click here
|
| 12. INSPECT EXHAUST PIPES AND MOUNTINGS |
Visually check the pipes, hangers and connections for severe corrosion, leaks or damage.
| 13. REPLACE DPR HOSES (w/ DPF) |
Replace the DPR hoses (No. 1 exhaust pipe air hose and No. 7 exhaust pipe air hose) (Click here).
| 14. REPLACE SPARK PLUGS |
| Type |
See procedure |
| 1TR-FE |
Click here
|
| 2TR-FE |
Click here
|
| 15. INSPECT BATTERY |
| Type |
See procedure |
| 1TR-FE |
Click here
|
| 2TR-FE |
Click here
|
| 1KD-FTV |
Click here
|
| 2KD-FTV |
Click here
|
| 5L-E |
Click here
|
| 16. REPLACE FUEL FILTER |
| Type |
See procedure |
| 1TR-FE |
Click here
|
| 2TR-FE |
Click here
|
| 17. INSPECT WATER SEDIMENT ACCUMULATOR |
Inspect the water sediment accumulator (Click here).
Inspect the fuel filter level warning switch.
Type
See procedure
1KD-FTV
Click here
2KD-FTV
Click here
5L-E
Click here
| 18. INSPECT AIR CLEANER FILTER (for Panel Type) |
Remove the air filter.
Visually check that the air filter is not excessively damaged, dirt or oily.
Clean the filter with compressed air.
First blow from the inside thoroughly, and then blow from the outside of the filter.
Reinstall the air filter.
| 19. INSPECT AIR CLEANER FILTER (for Cylinder Type) |
- NOTICE:
- Wear a respirator when cleaning the air cleaner filter with compressed air.
Remove the air filter.
Visually check that the air filter is not excessively damaged, dirty or oily.
Clean the filter with compressed air.
First blow from the inside thoroughly, and then blow from the outside of the filter.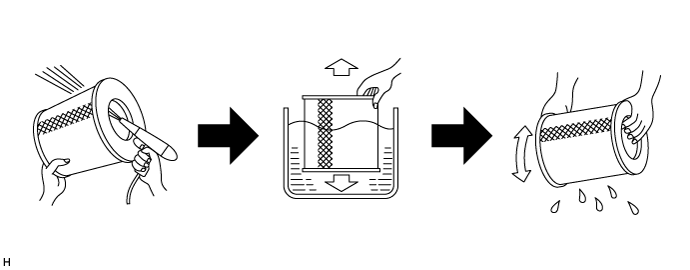

Submerge the air filter in water and move it up and down 10 times or more. (*1)
Empty the container and fill it with clean water. (*2)
Repeat steps (*1) and (*2) until the water remains clean.
Remove excess moisture using compressed air or by shaking the air filter. Do not drop or strike the air filter.
Reinstall the air filter.
| 20. REPLACE AIR CLEANER FILTER |
Replace the air filter with a new one.
| 21. CLEAN AIR FLOW METER (for 1KD-FTV) |
Blow air to the sensor intermittently for approximately 30 seconds.
| 22. INSPECT VACUUM PUMP OIL HOSE (for 5L-E) |
Visually check the vacuum pump oil hose for cracks, leakage, loose connections and deformation.
| 23. INSPECT FUEL TANK CAP GASKET |
| Type |
See procedure |
| 1TR-FE |
Click here
|
| 2TR-FE |
Click here
|
| 1KD-FTV |
Click here
|
| 2KD-FTV |
Click here
|
| 5L-E |
Click here
|
| 24. INSPECT FUEL LINES AND CONNECTIONS, FUEL TANK VAPOR VENT SYSTEM HOSES AND FUEL TANK BANDS |
Visually check the fuel lines for cracks, leakage, loose connections, deformation or tank band looseness.
| 25. INSPECT CHARCOAL CANISTER |
| Type |
See procedure |
| 1TR-FE |
Click here
|
| 2TR-FE |
Click here
|