INSTALLATION
Removal / installation · Vehicles built Aug 2012 – Jul 2013
Versions by build date: Jun 2011 – Jul 2012 Aug 2012 – Jul 2013 from Aug 2013
| 1. INSTALL TRANSFER ASSEMBLY |

| 2. INSTALL MANUAL TRANSMISSION UNIT ASSEMBLY |
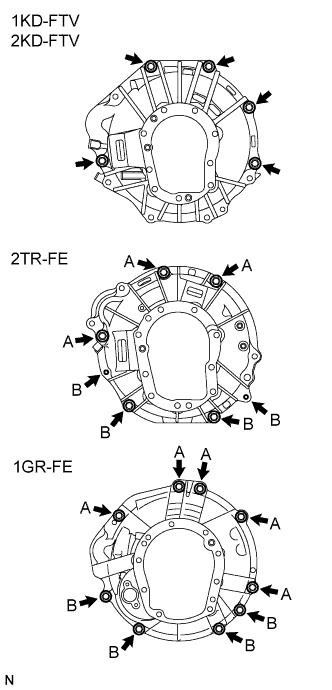  |
Align the input shaft with the clutch disc and install the transmission to the engine.
for 1KD-FTV, 2KD-FTV:
Install the 5 bolts.- Torque:
- 72 N*m{ 730 kgf*cm , 53 ft.*lbf }
for 2TR-FE:
Install the 7 bolts.- Torque:
- 72 N*m{ 730 kgf*cm , 53 ft.*lbf } for bolt A
- 37 N*m{ 377 kgf*cm , 27 ft.*lbf } for bolt B
for 1GR-FE:
Install the 9 bolts.- Torque:
- 72 N*m{ 730 kgf*cm , 53 ft.*lbf } for bolt A
- 37 N*m{ 377 kgf*cm , 27 ft.*lbf } for bolt B
| 3. INSTALL STIFFENER PLATE (for 1KD-FTV, 2KD-FTV) |
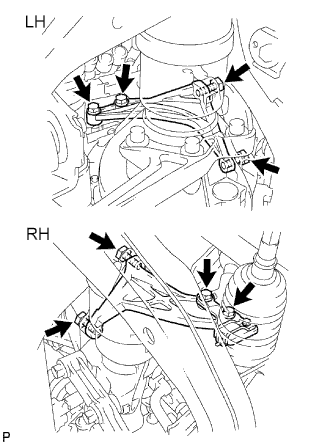 |
Install the stiffener plate RH with the 4 bolts.
- Torque:
- 72 N*m{ 730 kgf*cm , 53 ft.*lbf }
Install the stiffener plate LH with the 4 bolts.
- Torque:
- 72 N*m{ 730 kgf*cm , 53 ft.*lbf }
| 4. INSTALL EXHAUST MANIFOLD STAY (for 2TR-FE) |
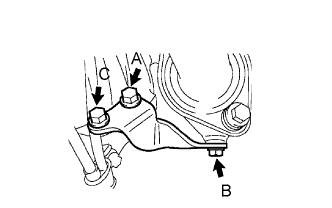 |
Install the exhaust manifold stay with the 3 bolts.
- Torque:
- 44 N*m{ 449 kgf*cm , 32 ft.*lbf } for bolt A
- 30 N*m{ 306 kgf*cm , 22 ft.*lbf } for bolt B
- 72 N*m{ 730 kgf*cm , 53 ft.*lbf } for bolt C
| 5. INSTALL REAR NO. 1 ENGINE MOUNTING INSULATOR |
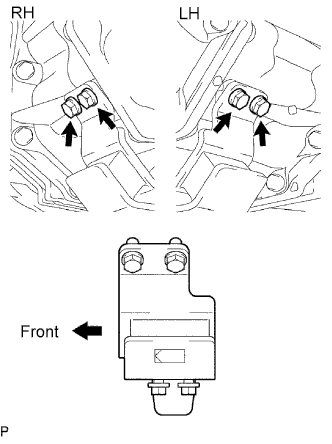 |
Install the mounting insulator with the 4 bolts.
- Torque:
- 44 N*m{ 449 kgf*cm , 32 ft.*lbf }
| 6. INSTALL NO. 3 FRAME CROSSMEMBER SUB-ASSEMBLY |
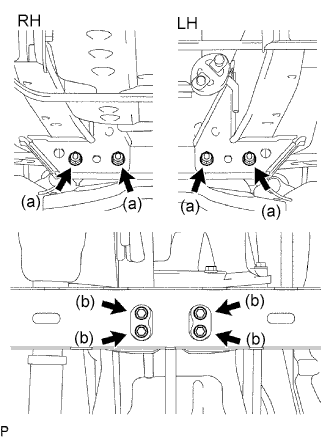 |
Install the frame crossmember with the 4 bolts and 4 nuts.
- Torque:
- 50 N*m{ 510 kgf*cm , 37 ft.*lbf }
Install the 4 set bolts to the No. 1 engine mounting insulator rear.
- Torque:
- 17 N*m{ 173 kgf*cm , 13 ft.*lbf }
| 7. INSTALL STARTER ASSEMBLY |
for 2TR-FE 1.7 kW Type: (Click here)
for 1GR-FE: (Click here)
for 1KD-FTV 2.2 kW Type Bosch Made: (Click here)
for 1KD-FTV 2.2 kW Type Denso Made: (Click here)
for 1KD-FTV 2.7 kW Type: (Click here)
for 2KD-FTV 2.0 kW Type: (Click here)
for 2KD-FTV 2.2 kW Type: (Click here)
for 2KD-FTV 2.7 kW Type: (Click here)
| 8. CONNECT CLUTCH RELEASE CYLINDER ASSEMBLY (for 1KD-FTV, 2KD-FTV, 2TR-FE) |
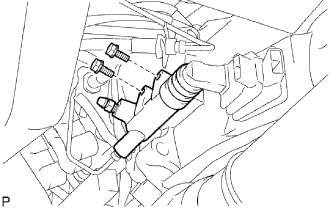 |
Install the release cylinder with the 2 bolts.
- Torque:
- 12 N*m{ 120 kgf*cm , 9 ft.*lbf }
| 9. INSTALL CLUTCH RELEASE CYLINDER ASSEMBLY (for 1GR-FE) |
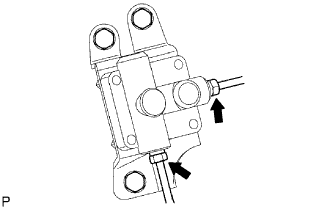 |
Install the accumulator with the 3 bolts.
- Torque:
- 12 N*m{ 120 kgf*cm , 9 ft.*lbf }
Using a union nut wrench, connect the 2 flexible hose tubes.
- Torque:
- 15 N*m{ 153 kgf*cm , 11 ft.*lbf }
- NOTICE:
- Use the formula to calculate special torque values for situations where a union nut wrench is combined with a torque wrench (Click here).
Install the clutch release cylinder with the 2 bolts.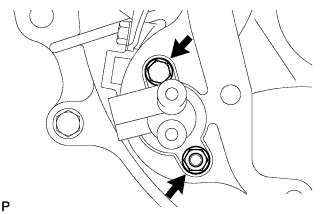
- Torque:
- 12 N*m{ 120 kgf*cm , 9 ft.*lbf }
Using a union nut wrench, connect the flexible tube.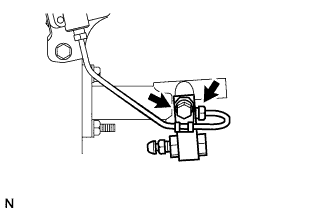
- Torque:
- 15 N*m{ 153 kgf*cm , 11 ft.*lbf }
- NOTICE:
- Use the formula to calculate special torque values for situations where a union nut wrench is combined with a torque wrench (Click here).
Install the 2 way with the bolt.
- Torque:
- 19 N*m{ 194 kgf*cm , 14 ft.*lbf }
Using a union nut wrench, install the flexible tube.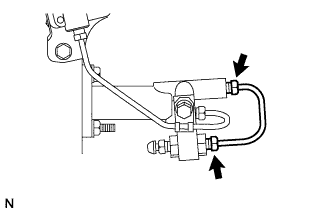
- Torque:
- 15 N*m{ 153 kgf*cm , 11 ft.*lbf }
- NOTICE:
- Use the formula to calculate special torque values for situations where a union nut wrench is combined with a torque wrench (Click here).
Install the release cylinder heat insulator with the bolt and the nut.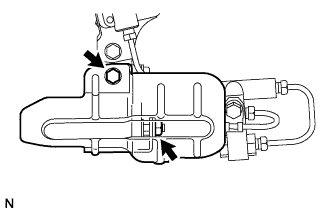
- Torque:
- 12 N*m{ 120 kgf*cm , 9 ft.*lbf }
| 10. CONNECT WIRE HARNESS |
Transmission side:
Connect the back-up light switch connector.
Transfer side:
Connect the No. 1, No. 2 and No. 3 transfer indicator switch connectors, and vehicle speed sensor connector.
| 11. INSTALL FRONT EXHAUST PIPE ASSEMBLY |
for 1GR-FE: (Click here)
for 1KD-FTV: (Click here)
for 1KD-FTV for DPF: (Click here)
for 2KD-FTV: (Click here
for 2KD-FTV for DPF: (Click here)
| 12. INSTALL REAR PROPELLER SHAFT ASSEMBLY |
for TMT Made: (Click here)
| 13. INSTALL FRONT PROPELLER SHAFT ASSEMBLY |
for TMT Made: (Click here)
| 14. ADD MANUAL TRANSMISSION OIL |
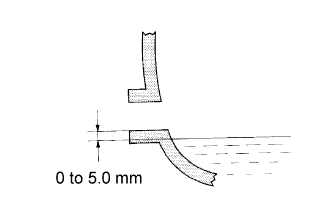 |
Stop the vehicle on a level surface.
Remove the filler plug and gasket.
Check that the oil level is between 0 to 5 mm (0 to 0.20 in.) from the bottom lip of the filler plug opening.
If the result is not as specified, add transmission oil.- Oil grade:
- GL-4
- Viscosity:
- SAE 75W-90, 80W or 80W-90
- Capacity:
- 2.2 liters (2.3 US qts, 1.9 Imp. qts)
- NOTICE:
- Too much or too little oil will lead to transmission problems.
- After adjusting the oil level, drive the vehicle and check the oil level again.
- Too much or too little oil will lead to transmission problems.
Check for oil leakage when the oil level is low. If leakage is found, repair the area necessary to stop the leak. Replace damaged parts as necessary.
Install a new gasket and the filler plug.
- Torque:
- 37 N*m (377 kgf*cm, 27 ft.*lbf)
| 15. INSTALL NO. 3 ENGINE UNDER COVER |
- Torque:
- 28 N*m{ 286 kgf*cm , 21 ft.*lbf }
| 16. INSTALL NO. 2 ENGINE UNDER COVER |
- Torque:
- 28 N*m{ 286 kgf*cm , 21 ft.*lbf }
| 17. INSTALL NO. 1 ENGINE UNDER COVER |
- Torque:
- 28 N*m{ 286 kgf*cm , 21 ft.*lbf }
| 18. INSTALL TRANSFER CASE LOWER PROTECTOR |
Install the transfer case lower protector with the 4 bolts.
- Torque:
- 18 N*m{ 183 kgf*cm , 13 ft.*lbf }
| 19. INSTALL TRANSFER HIGH AND LOW SHIFT LEVER ASSEMBLY |
Install the transfer shift lever.
Using pliers, install the snap ring.
- HINT:
- Apply MP grease to the tip of the transfer shift lever.
| 20. INSTALL FLOOR SHIFT SHIFT LEVER ASSEMBLY |
Cover the shift lever cap with a cloth.
Press down on the shift lever cap and rotate it clockwise to install it.
- HINT:
- Apply MP grease to the tip of the shift lever.
| 21. INSTALL SHIFT LEVER BOOT ASSEMBLY |
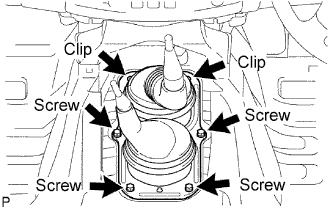 |
Install the shift lever boot with the 4 screws and 2 clips.
w/o Console Box:
Install the floor carpet, front seat, front door scuff plate, etc.
| 22. INSTALL CONSOLE BOX ASSEMBLY |
| 23. CONNECT CABLE TO NEGATIVE BATTERY TERMINAL |
| 24. PERFORM INITIALIZATION |
Perform initialization (Click here).
- NOTICE:
- Certain systems need to be initialized after disconnecting and reconnecting the cable from the negative (-) battery terminal.
| 25. CHECK SRS WARNING LIGHT |
| 26. BLEED AIR FROM CLUTCH PIPE LINE (for 1GR-FE) |
| 27. CHECK FOR CLUTCH FLUID LEAKAGE (for 1GR-FE) |