Engine does not Start
Circuit diagnosis · Vehicles built from Aug 2014
Versions by build date: Aug 2013 – Jul 2014 from Aug 2014
DESCRIPTION
The push-button start function uses a push-type engine switch, which the driver can operate by merely carrying the key. This system consists primarily of the power management control ECU, engine switch, ID code box, steering lock ECU, key, ACC relay, IG1 relay, IG2 relay and certification ECU. The power management control ECU controls the system. This function operates in cooperation with the entry and start system.WIRING DIAGRAM
- Refer to the SFI system*1, *2 or ECD system*3, *4 (DTC P0617):
- *1: for 1GR-FE (Click here).
- *2: for 2TR-FE (Click here).
- *3: for 1KD-FTV (w/o DPF) (Click here).
- *4: for 1KD-FTV (w/ DPF) (Click here).
- Refer to DTC B2284 (Click here).
INSPECTION PROCEDURE
- NOTICE:
- When using the intelligent tester with the engine switch off to troubleshoot: Connect the intelligent tester to the vehicle and turn a courtesy light switch on and off at 1.5 second intervals until communication between the intelligent tester and vehicle begins.
- Before performing the inspection, check that there are no problems related to the CAN communication system and LIN communication system.
- Inspect the fuses for circuits related to this system before performing the following inspection procedure.
- When using the intelligent tester with the engine switch off to troubleshoot: Connect the intelligent tester to the vehicle and turn a courtesy light switch on and off at 1.5 second intervals until communication between the intelligent tester and vehicle begins.
- HINT:
- After the certification ECU, steering lock actuator assembly (steering lock ECU) and/or ID code box is replaced, perform the registration procedures described in the Service Bulletin.
| 1. CHECK IF ENGINE STARTS (INITIALIZE STEERING LOCK) |

Place the key on the seat. Move the shift lever to P*1 and depress the brake pedal*1 or clutch pedal*2.*1: for Automatic Transmission*2: for Manual Transmission
Check that the engine switch indicator is illuminated in green, push the engine switch, and check that the engine starts.
Open and close the driver side door with the engine switch off.
Check if the engine can be started.
- OK:
- Engine can be started.
- HINT:
- After the battery is discharged and then recharged, the engine may not start unless the steering lock is initialized using the above procedure.
|
|
||||

| OK | ||
 |
||
| ||
| 2. READ VALUE USING INTELLIGENT TESTER (POWER SUPPLY OPEN) AND CHECK FOR DTC |
Read the value using the intelligent tester (Power Supply Open).
Connect the intelligent tester to the DLC3.
Turn the engine switch on (IG).
Turn the intelligent tester on.
Enter the following menus: Body / Entry&Start / Data List.
According to the display on the intelligent tester, read the Data List.
Entry&Start Tester Display
Measurement Item/Range
Normal Condition
Diagnostic Note
Power Supply Open
Power supply open / OK or NG (Past)
OK: Power supply normal
NG (Past): Power supply open occurred in past
-
Check for DTCs.
Enter the following menus: Body / (desired system) / DTC.
Read the DTCs.
Result Result
Proceed to
No DTC is output, power supply open has not occurred in past
A
DTCs other than B2782 are output
B
Power supply open has occurred in past and/or DTC B2782 is output
C
|
|
||||
|
|
||||

| A | |
 |
| 3. CHECK ENGINE SWITCH CONDITION |
Check if the power source mode changes.
When the key is inside the vehicle and the shift lever is in P*, push the engine switch and check that the power source mode changes.*: for Automatic Transmission
Result Result
Proceed to
OK: off → on (ACC) → on (IG) → off
A
Power source mode does not change to on (IG) or on (ACC).
B
Power source mode does not change to on (IG).
C
Power source mode does not change to on (ACC).
D
|
|
||||
|
|
||||
|
|
||||
| A | |
|
| 4. CHECK CRANKING FUNCTION |
Check the engine cranking function.
for Automatic Transmission: When there is fuel in the fuel tank, the key is inside the vehicle and the shift lever is in P, check that depressing the brake pedal and pressing the engine switch cranks the engine.
for Manual Transmission: When there is fuel in the fuel tank and the key is inside the vehicle, check that depressing the clutch pedal and pressing the engine switch cranks the engine.
- OK:
- Engine cranks.
Result Result
Proceed to
OK (for 1GR-FE and 2TR-FE)
A
OK (for 1KD-FTV)
B
NG
C
- HINT:
- for 1GR-FE:
If it is necessary to refer to the SFI system, refer to the following procedure (Click here).
- for 2TR-FE:
If it is necessary to refer to the SFI system, refer to the following procedure (Click here).
- for 1KD-FTV (w/o DPF) :
If it is necessary to refer to the ECD system, refer to the following procedure (Click here).
- for 1KD-FTV (w/ DPF) :
If it is necessary to refer to the ECD system, refer to the following procedure (Click here).
- for 1GR-FE:
|
|
||||
|
|
||||
| A | ||
|
||
| ||
| 5. INSPECT PARK/NEUTRAL POSITION SWITCH OR CLUTCH START SWITCH |
for Automatic Transmission:
Disconnect the C40 park/neutral position switch connector.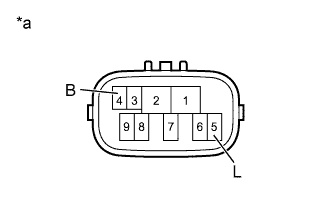

Measure the resistance according to the value(s) in the table below.
- Standard Resistance:
Tester Connection
Condition
Specified Condition
4 (B) - 5 (L)
Shift lever in P or N
Below 1 Ω
Shift lever not in P or N
10 kΩ or higher
Text in Illustration *a
Component without harness connected
(Park/Neutral Position Switch)
for Manual Transmission:
Disconnect the A40*1 or r1*2 clutch start switch connector.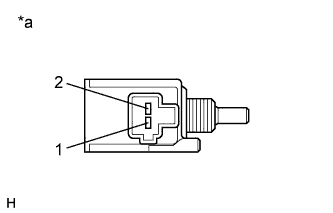
- HINT:
- *1: for LHD
- *2: for RHD
Measure the resistance according to the value(s) in the table below.
- Standard Resistance:
Tester Connection
Condition
Specified Condition
1 - 2
Pushed in
(Clutch pedal depressed)
Below 1 Ω
Released
(Clutch pedal released)
10 kΩ or higher
Text in Illustration *a
Component without harness connected
(Clutch Start Switch Assembly)
|
|
||||
| OK | |
|
| 6. INSPECT ST RELAY |
for 1GR-FE and 2TR-FE:
Remove the ST relay from the engine room relay block.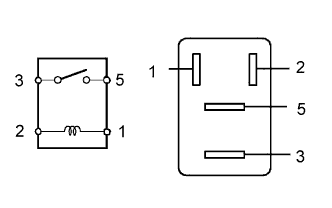
Measure the resistance according value(s) in the table below.
- Standard Resistance:
Tester Connection
Condition
Specified Condition
3 - 5
Battery voltage not applied to terminals 1 and 2
10 kΩ or higher
Battery voltage applied to terminals 1 and 2
Below 1 Ω
for 1KD-FTV:
Remove the ST relay from the engine room relay block.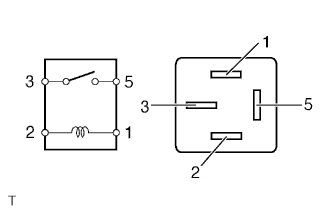
Measure the resistance according value(s) in the table below.
- Standard Resistance:
Tester Connection
Condition
Specified Condition
3 - 5
Battery voltage not applied to terminals 1 and 2
10 kΩ or higher
Battery voltage applied to terminals 1 and 2
Below 1 Ω
|
|
||||
| OK | |
|
| 7. CHECK HARNESS AND CONNECTOR (POWER MANAGEMENT CONTROL ECU - BODY GROUND) |
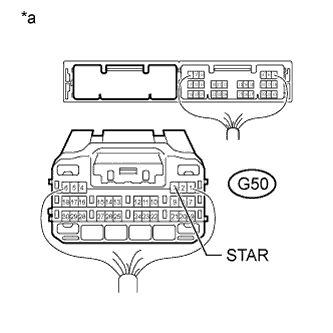 |
Disconnect the G50 power management control ECU connector.
for Automatic Transmission:Move the shift lever to P or N.
Measure the resistance according to the value(s) in the table below.
- Standard Resistance:
Tester Connection
Condition
Specified Condition
G50-3 (STAR) - Body ground
20°C (68°F)
93.8 to 136.3 Ω
Text in Illustration *a
Rear view of wire harness connector
(to Power Management Control ECU)
|
|
||||
| OK | |
|
| 8. READ VALUE USING INTELLIGENT TESTER (STOP LIGHT SWITCH OR CLUTCH START SWITCH) |
for Automatic Transmission:
Connect the intelligent tester to the DLC3.
Turn the engine switch on (IG).
Turn the intelligent tester on.
Enter the following menus: Body / Power Source Control / Data List.
According to the display on the intelligent tester, read the Data List.
Power Source Control Tester Display
Measurement Item/Range
Normal Condition
Diagnostic Note
Stop Light Switch1
Stop light switch 1 / ON or OFF
ON: Brake pedal depressed
OFF: Brake pedal released
-
- OK:
- ON (brake pedal depressed) or OFF (brake pedal released) appears on the screen according to the condition of the brake pedal.
for Manual Transmission:
Connect the intelligent tester to the DLC3.
Turn the engine switch on (IG).
Turn the intelligent tester on.
Enter the following menus: Body / Power Source Control / Data List.
According to the display on the intelligent tester, read the Data List.
Power Source Control Tester Display
Measurement Item/Range
Normal Condition
Diagnostic Note
Neutral SW/ Clutch SW
Status of the clutch start switch/ ON or OFF
ON: Clutch pedal depressed
OFF: Clutch pedal released
-
- OK:
- ON (clutch pedal depressed) or OFF (clutch pedal released) appears on the screen according to the condition of the clutch pedal.
Result Result
Proceed to
OK
A
NG (for Automatic Transmission)
B
NG (for Manual Transmission)
C
|
|
||||
|
|
||||
| A | |
|
| 9. READ VALUE USING INTELLIGENT TESTER (STEERING UNLOCK SWITCH) |
Connect the intelligent tester to the DLC3.
Turn the engine switch on (IG).
Turn the intelligent tester on.
Enter the following menus: Body / Power Source Control / Data List.
According to the display on the intelligent tester, read the Data List.
Power Source Control Tester Display
Measurement Item/Range
Normal Condition
Diagnostic Note
Steering Unlock Switch
Steering unlock switch / ON or OFF
ON: Steering lock released
OFF: Steering lock locked
-
- OK:
- ON (steering lock released) or OFF (steering lock locked) appears on the screen according to the steering lock condition.
|
|
||||
| OK | |
|
| 10. CHECK STEERING LOCK |
Turn the engine switch from off to on (ACC) and check that the steering lock moves to the released position.
- OK:
- Lock moves to released position.
|
|
||||
| OK | |
|
| 11. READ VALUE USING INTELLIGENT TESTER (ENGINE START REQUEST) |
Connect the intelligent tester to the DLC3.
Turn the intelligent tester on.
- HINT:
- When using the intelligent tester with the engine switch off, turn any of the door courtesy light switches on and off repeatedly at intervals of 1.5 seconds or less until communication between the tester and vehicle starts.
Enter the following menus: Body / Entry&Start / Data List.
According to the display on the intelligent tester, read the Data List.
Turn the engine switch on (IG).
Entry&Start Tester Display
Measurement Item/Range
Normal Condition
Diagnostic Note
Engine Start Request
Start request signal response / OK or NG
OK: Received
NG: Not received
-
- OK:
- OK appears on the screen.
|
|
||||
| OK | |
|
| 12. READ VALUE USING INTELLIGENT TESTER (L CODE CHECK) |
Connect the intelligent tester to the DLC3.
Turn the intelligent tester on.
- HINT:
- When using the intelligent tester with the engine switch off, turn any of the door courtesy light switches on and off repeatedly at intervals of 1.5 seconds or less until communication between the tester and vehicle starts.
Enter the following menus: Body / Entry&Start / Data List.
According to the display on the intelligent tester, read the Data List.
Turn the engine switch on (IG).
Entry&Start Tester Display
Measurement Item/Range
Normal Condition
Diagnostic Note
L Code Check
L code certification result / OK or NG
OK: L code certification result normal
NG: L code certification result abnormal
-
- OK:
- OK (L code certification result normal) appears on the screen.
|
|
||||
| OK | |
|
| 13. READ VALUE USING INTELLIGENT TESTER (S CODE CHECK) |
Connect the intelligent tester to the DLC3.
Turn the intelligent tester on.
- HINT:
- When using the intelligent tester with the engine switch off, turn any of the door courtesy light switches on and off repeatedly at intervals of 1.5 seconds or less until communication between the tester and vehicle starts.
Enter the following menus: Body / Entry&Start / Data List.
According to the display on the intelligent tester, read the Data List.
Turn the engine switch on (IG).
Entry&Start Tester Display
Measurement Item/Range
Normal Condition
Diagnostic Note
S Code Check
S code certification result / OK or NG
OK: S code certification result normal
NG: S code certification result abnormal
-
- OK:
- OK (S code certification result normal) appears on the screen.
|
|
||||
| OK | |
|
| 14. READ VALUE USING INTELLIGENT TESTER (STARTER REQUEST SIGNAL) |
Connect the intelligent tester to the DLC3.
Turn the intelligent tester on.
- HINT:
- When using the intelligent tester with the engine switch off, turn any of the door courtesy light switches on and off repeatedly at intervals of 1.5 seconds or less until communication between the tester and vehicle starts.
Enter the following menus: Body / Power Source Control / Data List.
According to the display on the intelligent tester, read the Data List.
Turn the engine switch on (IG).
Power Source Control Tester Display
Measurement Item/Range
Normal Condition
Diagnostic Note
Starter Request Signal
Starter request signal monitor / ON or OFF
ON: ST relay on
OFF: ST relay off
for Automatic Transmission:
The engine switch is pressed and held with the shift lever in P or N.
for Manual Transmission:
The engine switch is pressed and held.
- NOTICE:
- Check that the engine switch indicator is illuminated in green and push the engine switch.
- OK:
- The Data List item changes from OFF to ON when the engine switch is pushed.
Result Result
Proceed to
OK (for 1GR-FE and 2TR-FE)
A
OK (for 1KD-FTV)
B
NG
C
- HINT:
- for 1GR-FE:
If it is necessary to refer to the SFI system, refer to the following procedure (Click here).
- for 2TR-FE:
If it is necessary to refer to the SFI system, refer to the following procedure (Click here).
- for 1KD-FTV (w/o DPF):
If it is necessary to refer to the ECD system, refer to the following procedure (Click here).
- for 1KD-FTV (w/ DPF):
If it is necessary to refer to the ECD system, refer to the following procedure (Click here).
- for 1GR-FE:
|
|
||||
|
|
||||
| A | ||
|
||
| ||
| 15. INSPECT STOP LIGHT SWITCH ASSEMBLY |
Inspect the stop light switch assembly (Click here).
|
|
||||
| OK | |
|
| 16. CHECK HARNESS AND CONNECTOR (POWER MANAGEMENT CONTROL ECU - STOP LIGHT SWITCH ASSEMBLY) |
Disconnect the G50 power management control ECU connector.
Disconnect the A85 stop light switch assembly connector.
Measure the resistance according to the value(s) in the table below.
- Standard Resistance:
Tester Connection
Condition
Specified Condition
G50-11 (STP1) - A85-2 (L)
Always
Below 1 Ω
G50-11 (STP1) or A85-2 (L) - Body ground
Always
10 kΩ or higher
Reconnect the A85 stop light switch assembly connector.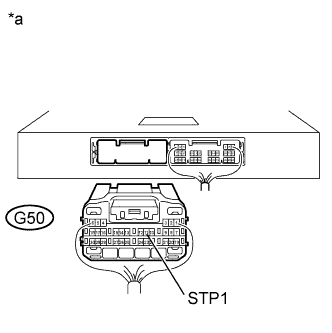
Measure the voltage according to the value(s) in the table below.
- Standard Voltage:
Tester Connection
Condition
Specified Condition
G50-11 (STP1) - Body ground
Brake pedal not depressed
Below 1 V
Brake pedal depressed
([Voltage at terminal AM21 or AM22] minus 2.0 V) or higher
Text in Illustration *a
Rear view of wire harness connector
(to Power Management Control ECU)
|
|
||||
| OK | ||
|
||
| ||
| 17. CHECK HARNESS AND CONNECTOR (POWER MANAGEMENT CONTROL ECU - STEERING LOCK ECU) |
Disconnect the G51 power management control ECU connector.
Disconnect the G35 steering lock ECU connector.
Measure the resistance according to the value(s) in the table below.
- Standard Resistance:
Tester Connection
Condition
Specified Condition
G51-3 (SLP) - G35-4 (SLP1)
Always
Below 1 Ω
G51-3 (SLP) or G35-4 (SLP1) - Body ground
Always
10 kΩ or higher
|
|
||||
| OK | |
|
| 18. INSPECT STEERING LOCK ACTUATOR ASSEMBLY (STEERING LOCK ECU) |
Measure the resistance according to the value(s) in the table below.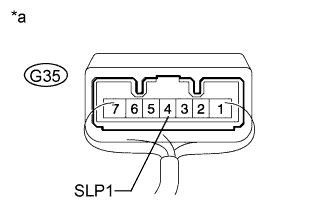
- Standard Resistance:
Tester Connection
Condition
Specified Condition
G35-4 (SLP1) - Body ground
Steering lock locked
10 kΩ or higher
G35-4 (SLP1) - Body ground
Steering lock released
Below 1 Ω
Text in Illustration *a
Component with harness connected
(Steering Lock ECU)
| Result |
Proceed to |
|
| OK |
A |
|
| NG |
for Manual Tilt and Manual Telescopic Steering Column |
B |
| for Power Tilt and Power Telescopic Steering Column |
C |
|
|
|
||||
|
|
||||
| A | ||
|
||
| ||
| 19. REPAIR OR REPLACE HARNESS OR CONNECTOR, OR REPLACE ST RELAY, PARK/NEUTRAL POSITION SWITCH OR CLUTCH START SWITCH |
Replace the ST relay, park/neutral position switch or clutch start switch with a new or normally functioning part, or repair or replace any damaged wire harness or connector.
| NEXT | |
|
| 20. READ VALUE USING INTELLIGENT TESTER (STARTER REQUEST SIGNAL) |
Connect the intelligent tester to the DLC3.
Turn the intelligent tester on.
- HINT:
- When using the intelligent tester with the engine switch off, turn any of the door courtesy light switches on and off repeatedly at intervals of 1.5 seconds or less until communication between the tester and vehicle starts.
Enter the following menus: Body / Power Source Control / Data List.
According to the display on the intelligent tester, read the Data List.
Turn the engine switch on (IG).
Power Source Control Tester Display
Measurement Item/Range
Normal Condition
Diagnostic Note
Starter Request Signal
Starter request signal monitor / ON or OFF
ON: ST relay on
OFF: ST relay off
for Automatic Transmission:
The engine switch is pressed and held with the shift lever in P or N.
for Manual Transmission:
The engine switch is pressed and held.
- NOTICE:
- Check that the engine switch indicator is illuminated in green and push the engine switch.
- OK:
- The Data List item changes from OFF to ON when the engine switch is pushed.
|
|
||||
| OK | |
|
| 21. CHECK IF ENGINE STARTS |
Place the key on the seat. Move the shift lever to P*1 and depress the brake pedal*1 or clutch pedal*2.
- *1: for Automatic Transmission
- *2: for Manual Transmission
- *1: for Automatic Transmission
Check that the engine switch indicator is illuminated in green, push the engine switch and check that the engine starts.
Open and close the driver side door with the engine switch off.
Check if the engine can be started.
- OK:
- Engine can be started.
Result Result
Proceed to
OK
A
NG (for 1GR-FE and 2TR-FE)
B
NG (for 1KD-FTV)
C
- HINT:
- After the battery is discharged and then recharged, the engine may not start unless the steering lock is initialized using the above procedure.
- for 1GR-FE:
If it is necessary to refer to the SFI system, refer to the following procedure (Click here).
- for 2TR-FE:
If it is necessary to refer to the SFI system, refer to the following procedure (Click here).
- for 1KD-FTV (w/o DPF):
If it is necessary to refer to the ECD system, refer to the following procedure (Click here).
- for 1KD-FTV (w/ DPF):
If it is necessary to refer to the ECD system, refer to the following procedure (Click here).
- After the battery is discharged and then recharged, the engine may not start unless the steering lock is initialized using the above procedure.
|
|
||||
|
|
||||
| A | ||
|
||
| ||