AJA0F AUTOMATIC TRANSMISSION / TRANSAXLE AUTOMATIC TRANSMISSION ASSEMBLY(for V35A-FTS) INSTALLATION
CAUTION / NOTICE / HINT
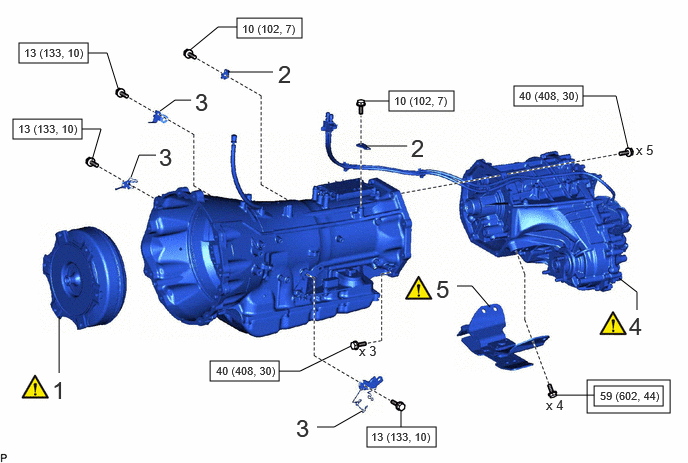
| Procedure | Part Name Code |

|

|

|
|
|---|---|---|---|---|---|
| 1 | TORQUE CONVERTER ASSEMBLY | 32000 | ( ) |
- | - |
| 2 | INSTALL WIRE HARNESS CLAMP BRACKET | - | - | - | - |
| 3 | EXHAUST SENSOR CLAMP BRACKET | - | - | - | - |
| 4 | TRANSFER ASSEMBLY | 36100 | () |
- | - |
| 5 | REAR ENGINE MOUNTING INSULATOR | 12371A | () |
- | - |

|
Tightening torque for "Major areas involving basic vehicle performance such as moving/turning/stopping": N*m (kgf*cm, ft.*lbf) |

|
N*m (kgf*cm, ft.*lbf): Specified torque |
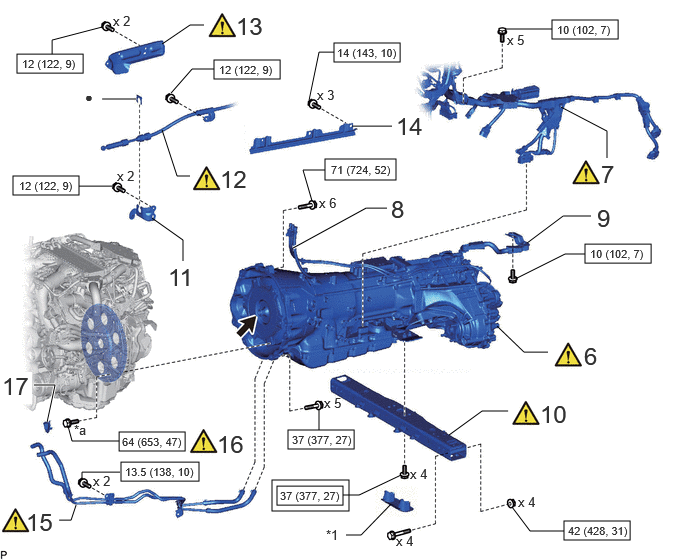
| Procedure | Part Name Code |
|
|
|
|
|---|---|---|---|---|---|
| 6 | AUTOMATIC TRANSMISSION ASSEMBLY WITH TRANSFER ASSEMBLY | - | () |
- | - |
| 7 | WIRE HARNESS | - | () |
- | - |
| 8 | TRANSFER BREATHER HOSE SUB-ASSEMBLY | 36407 | - | - | - |
| 9 | CONNECT WIRE HARNESS CLAMP BRACKET | - | - | - | - |
| 10 | NO. 3 FRAME CROSSMEMBER ASSEMBLY | - | () |
- | - |
| 11 | NO. 1 TRANSMISSION CONTROL CABLE BRACKET | 33823 | - | - | - |
| 12 | TRANSMISSION CONTROL CABLE ASSEMBLY | 33820B | () |
- | - |
| 13 | TRANSMISSION CONTROL CABLE INSULATOR | 33825 | () |
- | - |
| 14 | TRANSMISSION INSULATOR RH | 35979B | - | - | - |
| 15 | OIL COOLER TUBE SUB-ASSEMBLY | - | () |
- | - |
| 16 | DRIVE PLATE AND TORQUE CONVERTER SETTING BOLT | 32101A | () |
- | - |
| 17 | FLYWHEEL HOUSING SIDE COVER | 11363A | - | - | - |
| *1 | NO. 3 ENGINE MOUNTING HOLE COVER | - | - |
| *a | Black: x 1 Silver: x 5 |
- | - |
|
|
Tightening torque for "Major areas involving basic vehicle performance such as moving/turning/stopping": N*m (kgf*cm, ft.*lbf) |
|
N*m (kgf*cm, ft.*lbf): Specified torque |
| ● | Non-reusable part |

|
Clutch spline grease |
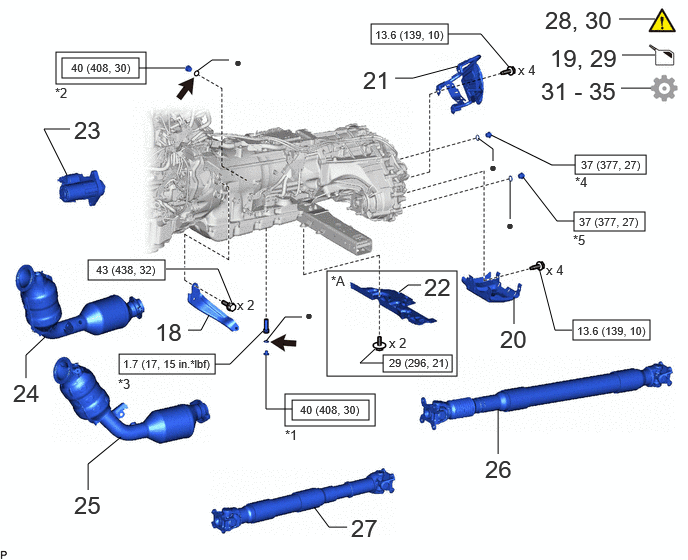
| Procedure | Part Name Code |
|
|
|
|
|---|---|---|---|---|---|
| 18 | NO. 2 MANIFOLD STAY | 17119 | - | - | - |
| 19 | ADD TRANSFER OIL | - | - | () |
- |
| 20 | LOWER TRANSFER CASE PROTECTOR | 36179 | - | - | - |
| 21 | TRANSFER HEAT INSULATOR | 36336 | - | - | - |
| 22 | TRANSMISSION UNDER COVER ASSEMBLY | 51470 | - | - | - |
| 23 | STARTER ASSEMBLY | 28100 | - | - | - |
| 24 | CONVERTER ASSEMBLY RH WITH CATALYST | 17400M | - | - | - |
| 25 | CONVERTER ASSEMBLY LH WITH CATALYST | 17500 | - | - | - |
| 26 | REAR PROPELLER SHAFT ASSEMBLY | 37110F | - | - | - |
| 27 | FRONT PROPELLER SHAFT ASSEMBLY | 37140 | - | - | - |
| 28 | INSPECT SHIFT LEVER POSITION | - | () |
- | - |
| 29 | ADD AND ADJUST AUTOMATIC TRANSMISSION FLUID | - | - | () |
- |
| 30 | INSPECT FOR EXHAUST GAS LEAK | - | - | - | - |
| 31 | ECU CONFIGURATION | - | - | - | () |
| 32 | UPDATE ECU SECURITY KEY | - | - | - | () |
| 33 | RESET MEMORY | - | - | - | () |
| 34 | CATALYST DETERIORATION CONFIRMATION DRIVING PATTERN | - | - | - | () |
| 35 | ATF THERMAL DEGRADATION ESTIMATE RESET | - | - | - | () |
| *A | w/ Cover | - | - |
| *1 | OVERFLOW PLUG | *2 | REFILL PLUG |
| *3 | NO. 1 TRANSMISSION OIL FILLER TUBE | *4 | FILLER PLUG |
| *5 | DRAIN PLUG | - | - |
|
|
Tightening torque for "Major areas involving basic vehicle performance such as moving/turning/stopping": N*m (kgf*cm, ft.*lbf) |
|
N*m (kgf*cm, ft.*lbf): Specified torque |
| ● | Non-reusable part |
|
Toyota Genuine ATF WS |
PROCEDURE

 32000 1.INSTALL TORQUE CONVERTER ASSEMBLY
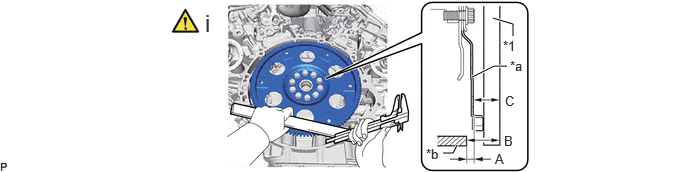
| *1 | Straightedge | - | - |
| *a | Torque converter assembly contact surface of the drive plate | *b | Automatic transmission assembly with transfer assembly contact surface of the engine assembly |
Using a vernier caliper and straightedge, measure the dimension A between the automatic transmission assembly with transfer assembly contact surface of the engine assembly and the torque converter assembly contact surface of the drive plate.
- Measurement Method:
-
B - C = A
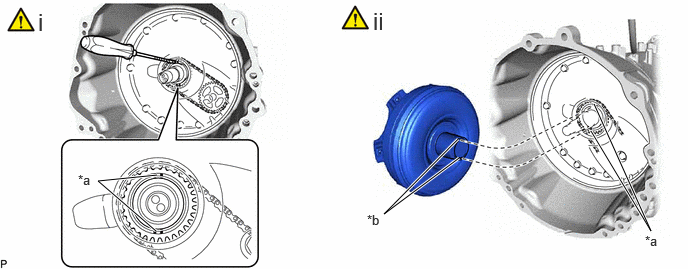
| *a | Protrusion of the Oil Pump Drive Sprocket | *b | Cutout |
Using a screwdriver with its tip wrapped with protective tape, align the oil pump drive sprocket so that it is perpendicular as shown in the illustration.
- NOTICE:
-
Do not damage the front oil pump cover seal.
Align the cutout on the torque converter assembly with the protrusion on the oil pump drive sprocket and attach the spline on the input shaft to the spline on the turbine liner.
- NOTICE:
-
·
Install the torque converter assembly to the input shaft while keeping it horizontal.
·Do not damage the front oil pump cover seal.
·Make sure the cutout on the torque converter assembly and the protrusion on the oil pump drive sprocket are properly aligned.

|
Rotates Smoothly | - | - |
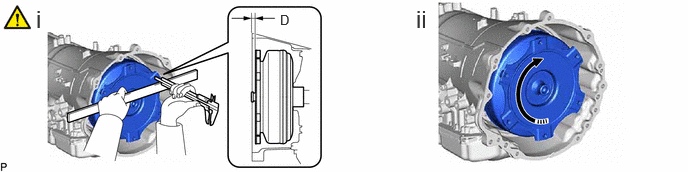
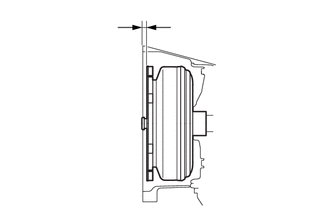
Using a vernier caliper and straightedge, measure the dimension D shown in the illustration and check that the dimension D is more than the dimension A, which was measured in the previous step.
- Standard:
-
Dimension D = Dimension A + 1.0 mm (0.0394 in.) or more
Check that the torque converter assembly rotates smoothly.
2.INSTALL WIRE HARNESS CLAMP BRACKET
- Torque:
- 10 N*m (102 kgf*cm, 7 ft.*lbf)
3.INSTALL EXHAUST SENSOR CLAMP BRACKET
- Torque:
- 13 N*m (133 kgf*cm, 10 ft.*lbf)
36100 4.INSTALL TRANSFER ASSEMBLY

Install the transfer assembly to the automatic transmission assembly with the 8 bolts.
- Torque:
- 40 N*m (408 kgf*cm, 30 ft.*lbf)
- NOTICE:
-
When installing the transfer assembly to the automatic transmission assembly, make sure that the automatic transmission assembly and oil seal do not become damaged.
12371A 5.INSTALL REAR ENGINE MOUNTING INSULATOR
|
|
Click here() |
6.INSTALL AUTOMATIC TRANSMISSION ASSEMBLY WITH TRANSFER ASSEMBLY
|
|
|
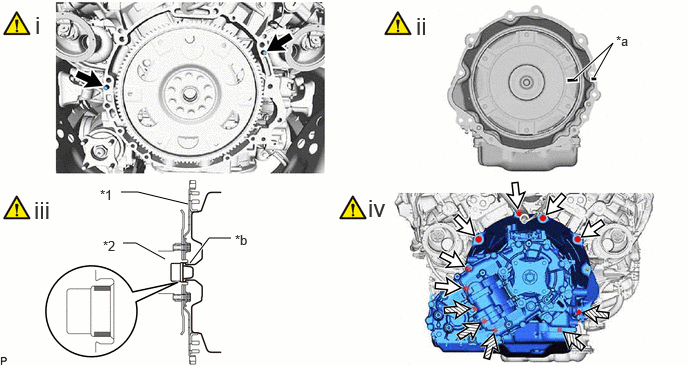
| *1 | Drive Plate | *2 | Crankshaft |
| *a | Matchmark | *b | Torque Converter Assembly Centerpiece |
|
|
Knock Pin |

|
Bolt A |

|
Bolt B |

|
Clutch Spline Grease |
Confirm that the 2 knock pins are installed to the engine assembly and are not damaged.
Make sure that the matchmark is positioned as shown in the illustration.
Apply clutch spline grease to the surface the crankshaft that contacts the torque converter assembly centerpiece.
- Clutch Spline Grease:
-
Toyota Genuine Clutch Spline Grease or equivalent
- Maximum Grease Amount:
-
Approximately 1 g (0.0353 oz.)
While keeping the engine assembly and automatic transmission assembly with transfer assembly horizontal, align the 2 knock pins with the holes in the automatic transmission assembly with transfer assembly and install the automatic transmission assembly with transfer assembly with the 11 bolts.
- Torque:
- for bolt A : 71 N*m (724 kgf*cm, 52 ft.*lbf)
- for bolt B : 37 N*m (377 kgf*cm, 27 ft.*lbf)
- NOTICE:
-
·
Do not use excessive force when installing the automatic transmission assembly with transfer assembly.
·When mounting the automatic transmission assembly with transfer assembly to the engine assembly, make sure to securely fit the 2 knock pins into the knock holes.
·When tightening the bolts, make sure that the contact surfaces of the engine assembly and the automatic transmission assembly with transfer assembly are in close contact with one another.
·When installing the automatic transmission assembly with transfer assembly, make sure that the oil cooler tube does not become damaged.
·Check that the torque converter assembly rotates smoothly after installation of the automatic transmission assembly with transfer assembly.
- HINT:
-
Item Length Bolt A 50 mm (1.97 in.) Bolt B 45 mm (1.77 in.)
7.CONNECT WIRE HARNESS
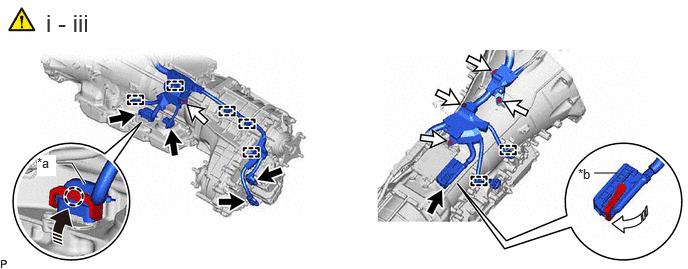
| *a | Transmission Wire Connector | *b | TCM connector |
|
|
Connector |
|
Bolt |
|
|
Push Up |

|
Securely Lock |
Connect the wire harness to the automatic transmission assembly with transfer assembly with the 5 bolts.
- Torque:
- 10 N*m (102 kgf*cm, 7 ft.*lbf)
Attach the clamp.
Connect the 5 connectors.
- NOTICE:
-
·
Push up the lever until the claw of the transmission wire connector makes a connection sound.
·Securely lock the TCM connector lever.
36407 8.CONNECT TRANSFER BREATHER HOSE SUB-ASSEMBLY
9.CONNECT WIRE HARNESS CLAMP BRACKET
10.INSTALL NO. 3 FRAME CROSSMEMBER ASSEMBLY
|
|
() |
33823 11.INSTALL NO. 1 TRANSMISSION CONTROL CABLE BRACKET
- Torque:
- 12 N*m (122 kgf*cm, 9 ft.*lbf)
33820B 12.CONNECT TRANSMISSION CONTROL CABLE ASSEMBLY
|
|
() |
33825 13.INSTALL TRANSMISSION CONTROL CABLE INSULATOR
|
|
() |
35979B 14.INSTALL TRANSMISSION INSULATOR RH
- Torque:
- 14 N*m (143 kgf*cm, 10 ft.*lbf)
15.CONNECT OIL COOLER TUBE SUB-ASSEMBLY
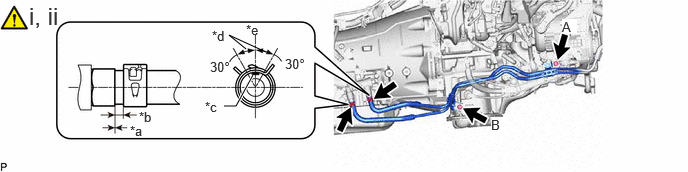
| *a | 0 to 3 mm (0 to 0.118 in.) | *b | 2 to 7 mm (0.0788 to 0.275 in.) |
| *c | Paint Mark | *d | Paint mark must be within this range |
| *e | Right Side of the Vehicle | - | - |
Connect the oil cooler tube sub-assembly to the engine assembly with the 2 bolts.
- Torque:
- 13.5 N*m (138 kgf*cm, 10 ft.*lbf)
- HINT:
-
Tightening order: Temporarily install bolt (A) →Tighten bolt (B) → Tighten bolt (A)
Connect the 2 hoses of the oil cooler tube sub-assembly to the transmission oil thermostat, and slide the 2 hose clips to secure the hose.
- NOTICE:
-
·
Do not allow any foreign matter into the hoses.
·Face the claws of the hose clips to the right side of the vehicle.
·The paint mark must be within the range shown in the illustration.
32101A 16.INSTALL DRIVE PLATE AND TORQUE CONVERTER SETTING BOLT
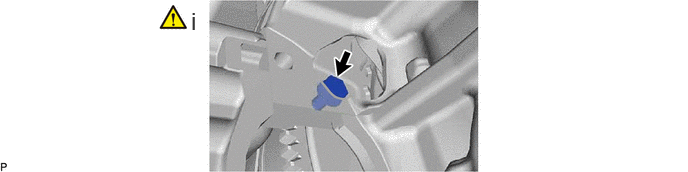
Install the torque converter assembly to the drive plate and ring gear sub-assembly with the 6 drive plate and torque converter setting bolts.
- Torque:
- 64 N*m (653 kgf*cm, 47 ft.*lbf)
- NOTICE:
-
Start by tightening the positioning drive plate and torque converter setting bolt (black), and then uniformly tighten the remaining 5 drive plate and torque converter setting bolts (silver).
- HINT:
-
Turn the crankshaft to a position where the drive plate and torque converter setting bolts can be installed, and install the drive plate and torque converter setting bolts while securing the crankshaft pulley bolt with a wrench.
11363A 17.INSTALL FLYWHEEL HOUSING SIDE COVER
17119 18.INSTALL NO. 2 MANIFOLD STAY
- Torque:
- 43 N*m (438 kgf*cm, 32 ft.*lbf)
19.ADD TRANSFER OIL
|
|
Click here() |
36179 20.INSTALL LOWER TRANSFER CASE PROTECTOR
36336 21.INSTALL TRANSFER HEAT INSULATOR
51470 22.INSTALL TRANSMISSION UNDER COVER ASSEMBLY (w/ Cover)
28100 23.INSTALL STARTER ASSEMBLY
w/ Stop and Start System:
Click hereEngine / Hybrid System>V35A-FTS (STARTING)>STARTER (w/ Stop And Start System)>INSTALLATION
w/o Stop and Start System:
Click hereEngine / Hybrid System>V35A-FTS (STARTING)>STARTER (w/o Stop And Start System)>INSTALLATION
- HINT:
-
Install the under cover after completing the adjustment and inspection procedure.
17400M 24.INSTALL CONVERTER ASSEMBLY RH WITH CATALYST
Click hereEngine / Hybrid System>V35A-FTS (EMISSION CONTROL)>MONOLITHIC CONVERTER>INSTALLATION
- HINT:
-
Install the under cover after completing the adjustment and inspection procedure.
17500 25.INSTALL CONVERTER ASSEMBLY LH WITH CATALYST
Click hereEngine / Hybrid System>V35A-FTS (EMISSION CONTROL)>MONOLITHIC CONVERTER>INSTALLATION
- HINT:
-
Install the under cover after completing the adjustment and inspection procedure.
37110F 26.INSTALL REAR PROPELLER SHAFT ASSEMBLY
Click hereDrivetrain>DRIVE SHAFT / PROPELLER SHAFT>PROPELLER SHAFT ASSEMBLY>INSTALLATION
- HINT:
-
Install the under cover after completing the adjustment and inspection procedure.
37140 27.INSTALL FRONT PROPELLER SHAFT ASSEMBLY
Click hereDrivetrain>DRIVE SHAFT / PROPELLER SHAFT>FRONT PROPELLER SHAFT ASSEMBLY>INSTALLATION
- HINT:
-
Install the under cover after completing the adjustment and inspection procedure.
28.INSPECT SHIFT LEVER POSITION
|
|
() |
29.ADD AND ADJUST AUTOMATIC TRANSMISSION FLUID
30.INSPECT FOR EXHAUST GAS LEAK
31. ECU CONFIGURATION
|
|
|
32. UPDATE ECU SECURITY KEY
33.RESET MEMORY
|
|
Click here() |
34. CATALYST DETERIORATION CONFIRMATION DRIVING PATTERN
|
|
|
35. ATF THERMAL DEGRADATION ESTIMATE RESET
|
|
|