1VD-FTV ENGINE MECHANICAL ENGINE UNIT INSTALLATION
PROCEDURE

 1.INSTALL REAR CYLINDER HEAD PLATE LH (w/o EGR System)
Install a new gasket and the rear cylinder head plate LH with the 2 bolts.
- Torque:
- 29 N*m (296 kgf*cm, 21 ft.*lbf)
- HINT:
-
The gasket claw should face toward the rear cylinder head plate LH.
2.INSTALL REAR CYLINDER HEAD PLATE RH (w/o EGR System)
Install a new gasket and the rear cylinder head plate RH with the 2 bolts.
- Torque:
- 29 N*m (296 kgf*cm, 21 ft.*lbf)
- HINT:
-
The gasket claw should face toward the rear cylinder head plate RH.
11459 3.INSTALL ENGINE OIL LEVEL DIPSTICK GUIDE SUPPORT (w/ DPF)
Install the engine oil level dipstick guide support with the 2 bolts.
- Torque:
- 10 N*m (102 kgf*cm, 7 ft.*lbf)
23255B 4.INSTALL FUEL INJECTOR SEAL (w/ DPF)
23710B 5.INSTALL EXHAUST FUEL ADDITION INJECTOR ASSEMBLY (w/ DPF)
6.INSTALL INJECTOR LEAD WIRE (w/ DPF)
Install the injector lead wire with the bolt.
- Torque:
- 10 N*m (102 kgf*cm, 7 ft.*lbf)
89491 7.INSTALL ENGINE OIL LEVEL SENSOR
8.INSTALL ENGINE WIRE BRACKET
15409F 9.INSTALL OIL FILTER OUTLET PIPE SUB-ASSEMBLY
Apply engine oil to 2 new gaskets, and install the 2 gaskets to the oil pan sub-assembly.
Install the oil filter outlet pipe sub-assembly with the 4 bolts.
- Torque:
- 10 N*m (102 kgf*cm, 7 ft.*lbf)
12315A 10.INSTALL TRANSVERSE ENGINE MOUNTING BRACKET RH
Install the transverse engine mounting bracket RH with the 4 bolts.
- Torque:
- 80 N*m (816 kgf*cm, 59 ft.*lbf)
12315A 11.INSTALL TRANSVERSE ENGINE MOUNTING BRACKET LH
Install the transverse engine mounting bracket LH with the 4 bolts.
- Torque:
- 80 N*m (816 kgf*cm, 59 ft.*lbf)
25708 12.INSTALL NO. 3 VACUUM TRANSMITTING PIPE SUB-ASSEMBLY
Connect the No. 3 vacuum transmitting pipe sub-assembly to the No. 2 vacuum transmitting pipe.
Install the No. 3 vacuum transmitting pipe sub-assembly with the 3 bolts.
- Torque:
- 6.0 N*m (61 kgf*cm, 53 in.*lbf)
12502 13.INSTALL CHAIN COVER AND COMPRESSOR BRACKET SUB-ASSEMBLY
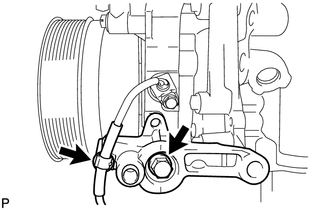
Install the chain cover and compressor bracket sub-assembly with the bolt.
- Torque:
- 21 N*m (214 kgf*cm, 15 ft.*lbf)
Connect the wire harness.
16630H 14.INSTALL IDLER PULLEY ASSEMBLY (w/o Air Conditioning System)
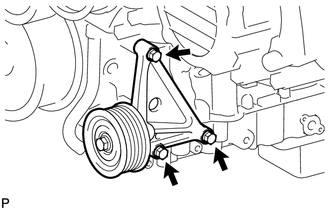
Install the idler pulley assembly with the 3 bolts.
- Torque:
- 24.5 N*m (250 kgf*cm, 18 ft.*lbf)
17142 15.INSTALL EXHAUST MANIFOLD LH WITH TURBOCHARGER SUB-ASSEMBLY
15474A 16.INSTALL TURBO OIL OUTLET HOSE
17293 17.INSTALL TURBOCHARGER STAY
17192 18.INSTALL NO. 2 EXHAUST MANIFOLD PIPE (w/ DPF)
16027 19.INSTALL NO. 1 TURBO WATER PIPE SUB-ASSEMBLY
17361J 20.INSTALL NO. 1 AIR TUBE
17878 21.INSTALL NO. 3 INTAKE AIR CONNECTOR PIPE
17141 22.INSTALL EXHAUST MANIFOLD RH
17106 23.INSTALL EXHAUST CROSSOVER PIPE SUB-ASSEMBLY
17168 24.INSTALL NO. 2 EXHAUST MANIFOLD HEAT INSULATOR
Install the No. 2 exhaust manifold heat insulator with the 3 bolts.
- Torque:
- 25 N*m (255 kgf*cm, 18 ft.*lbf)
17167 25.INSTALL NO. 1 EXHAUST MANIFOLD HEAT INSULATOR
11452 26.INSTALL ENGINE OIL LEVEL DIPSTICK GUIDE
12142 27.INSTALL NO. 2 ENGINE OIL LEVEL DIPSTICK GUIDE
15301 28.INSTALL ENGINE OIL LEVEL DIPSTICK
16262 29.CONNECT WATER INLET HOSE
Connect the water inlet hose to the timing chain cover sub-assembly, and slide the clamp to secure the hose.
16331A 30.INSTALL THERMOSTAT
16321 31.INSTALL WATER INLET
16620D 32.INSTALL V-RIBBED BELT TENSIONER ASSEMBLY
16603B 33.INSTALL IDLER PULLEY SUB-ASSEMBLY
16307A 34.INSTALL FAN BRACKET SUB-ASSEMBLY
16332 35.ASSEMBLE NO. 1 AND NO. 2 WATER OUTLET PIPES AND WATER BY-PASS OUTLET SUB-ASSEMBLY
Install the water hose joint to the water by-pass outlet sub-assembly, and slide the clamp to secure the hose.
Connect the water hose joint to the No. 2 water outlet pipe, and slide the clamp to secure the hose.
Connect a new gasket and the No. 1 and No. 2 water outlet pipes with the 2 bolts.
- Torque:
- 21 N*m (214 kgf*cm, 15 ft.*lbf)
- HINT:
-
The gasket's claws can face the No. 1 or No. 2 water outlet pipe.
36.INSTALL WATER OUTLET PIPE
Temporarily install 2 new gaskets and the water outlet pipe with the 4 bolts.
Tighten the 4 bolts.
- Torque:
- 21 N*m (214 kgf*cm, 15 ft.*lbf)
16331 37.INSTALL WATER OUTLET
Connect the No. 2 water hose joint to the No. 1 water outlet pipe, and slide the clamp to secure the hose.
Install a new gasket and the water outlet with the 2 bolts.
- Torque:
- 21 N*m (214 kgf*cm, 15 ft.*lbf)
89422C 38.INSTALL ENGINE COOLANT TEMPERATURE SENSOR
39.INSTALL NO. 3 ENGINE HANGER
Install the No. 3 engine hanger with the 2 bolts.
- Torque:
- 43 N*m (438 kgf*cm, 32 ft.*lbf)
17945 40.INSTALL INTERCOOLER SUPPORT BRACKET
Install the intercooler support bracket with the 2 bolts.
- Torque:
- 21 N*m (214 kgf*cm, 15 ft.*lbf)
17946 41.INSTALL NO. 2 INTERCOOLER SUPPORT BRACKET
Install the No. 2 intercooler support bracket with the 2 bolts.
- Torque:
- 43 N*m (438 kgf*cm, 32 ft.*lbf)
19850 42.INSTALL GLOW PLUG ASSEMBLY
43.INSTALL STARTER HOSE BRACKET SUB-ASSEMBLY
28100 44.INSTALL STARTER ASSEMBLY
17112 45.INSTALL NO. 2 INTAKE MANIFOLD
17111 46.INSTALL INTAKE MANIFOLD
16268 47.INSTALL NO. 1 WATER BY-PASS PIPE
16283 48.INSTALL NO. 6 WATER BY-PASS HOSE (w/ DPF)
Install the No. 6 water by-pass hose to the No. 1 water by-pass pipe, and slide the clamp to secure the hose.
23920A 49.INSTALL FUEL COOLER ASSEMBLY (w/o DPF)
23763 50.CONNECT NO. 3 NOZZLE LEAKAGE PIPE (w/o DPF)
Connect the No. 1 fuel hose to the fuel cooler assembly, and slide the clamp to secure the hose.
23764A 51.INSTALL NO. 4 NOZZLE LEAKAGE PIPE (w/o DPF)
16283 52.INSTALL NO. 6 WATER BY-PASS HOSE (w/o DPF)
27020 53.INSTALL GENERATOR ASSEMBLY
27280 54.INSTALL GENERATOR SPLASH GUARD COVER ASSEMBLY
29300 55.INSTALL VACUUM PUMP ASSEMBLY
44774 56.CONNECT UNION TO CONNECTOR TUBE HOSE