HYBRID / BATTERY CONTROL BATTERY VOLTAGE SENSOR REMOVAL
CAUTION / NOTICE / HINT
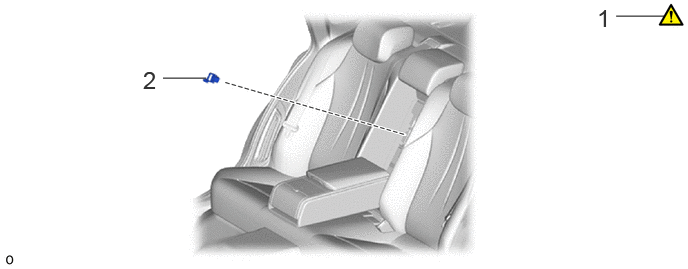
| Procedure | Part Name Code | 
|

|

|
|
|---|---|---|---|---|---|
| 1 | PRECAUTION | - | ( ) |
- | - |
| 2 | SERVICE PLUG GRIP | G3834 | - | - | - |
| Procedure | Part Name Code |
|
|
|
|
|---|---|---|---|---|---|
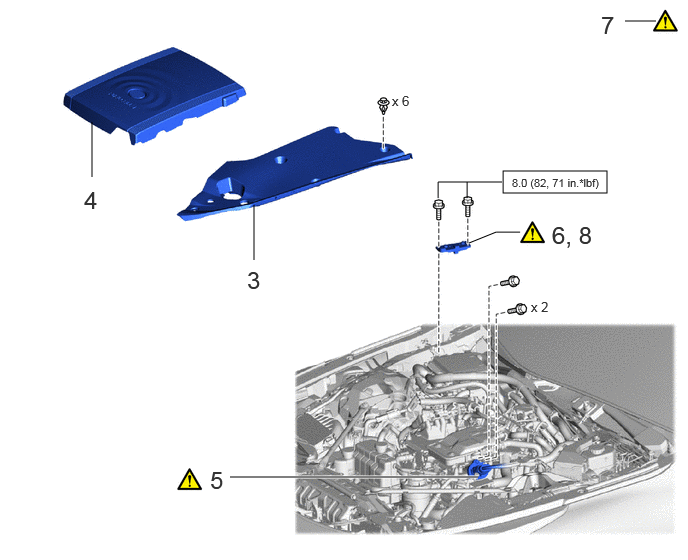
| 3 | UPPER RADIATOR SUPPORT SEAL | 53292A | - | - | - |
| 4 | FC STACK COVER SUB-ASSEMBLY | 1A906 | - | - | - |
| 5 | FC CONVERTER POWER OUTLET CABLE (INVERTER WITH CONVERTER ASSEMBLY) | G9200A | ()
|
- | - |
| 6 | REMOVE CONNECTOR COVER ASSEMBLY | - | ()
|
- | - |
| 7 | CHECK TERMINAL VOLTAGE | - | ()
|
- | - |
| 8 | INSTALL CONNECTOR COVER ASSEMBLY | - | ()
|
- | - |

|
N*m (kgf*cm, ft.*lbf): Specified torque | - | - |
| Procedure | Part Name Code |
|
|
|
|
|---|---|---|---|---|---|
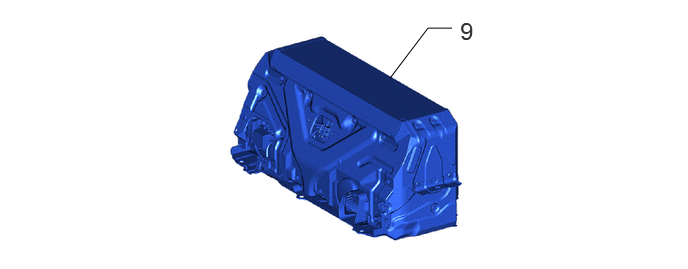
| 9 | EV SUPPLY BATTERY ASSEMBLY | G9510B | - | - | - |
| Procedure | Part Name Code |
|
|
|
|
|---|---|---|---|---|---|
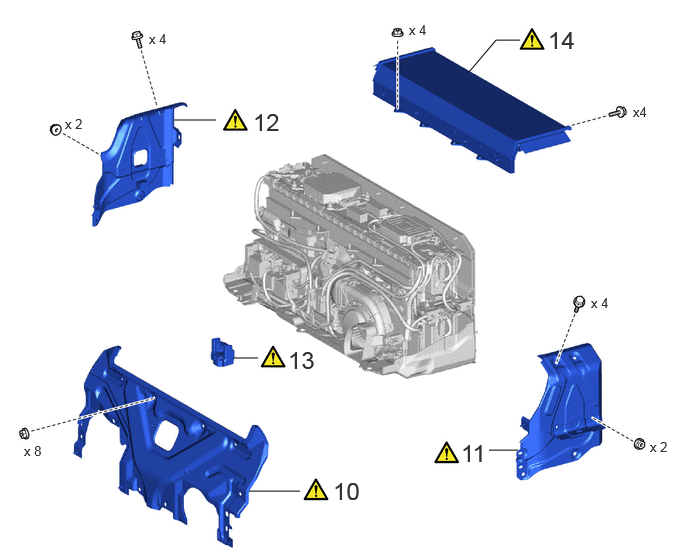
| 10 | UPPER EV BATTERY COVER PANEL | G92N1B | ()
|
- | - |
| 11 | NO. 2 EV BATTERY SHIELD SUB-ASSEMBLY | G920RB | ()
|
- | - |
| 12 | NO. 1 EV BATTERY SHIELD SUB-ASSEMBLY | G920QB | ()
|
- | - |
| 13 | EV BATTERY TERMINAL BLOCK | G92Z2A | ()
|
- | - |
| 14 | UPPER NO. 1 EV BATTERY COVER SUB-ASSEMBLY | G920LC | ()
|
- | - |
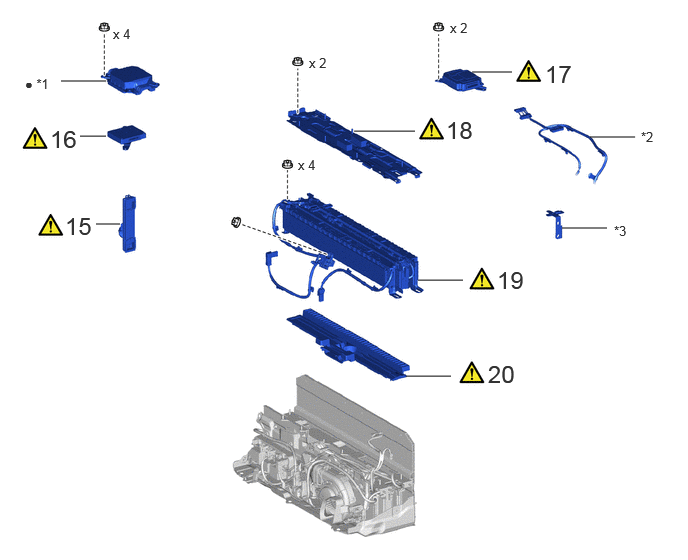
| Procedure | Part Name Code |
|
|
|
|
|---|---|---|---|---|---|
| 15 | NO. 1 EV BATTERY EXHAUST DUCT | G92F1A | ()
|
- | - |
| 16 | BATTERY VOLTAGE SENSOR (for Upper Side) | 89892A | ()
|
- | - |
| 17 | BATTERY ECU ASSEMBLY | 89890A | ()
|
- | - |
| 18 | NO. 7 EV BATTERY SHIELD SUB-ASSEMBLY (for Upper Side) | G920WA | ()
|
- | - |
| 19 | NO. 1 EV SUPPLY STACK SUB-ASSEMBLY | G9508A | ()
|
- | - |
| 20 | NO. 8 EV BATTERY INTAKE DUCT | G92D8A | ()
|
- | - |
| *1 | NO. 1 EV BATTERY PROTECTOR (for Upper Side) | *2 | NO. 1 EV BATTERY PACK WIRE |
| *3 | WIRE HARNESS CLAMP BRACKET | - | - |
| ● | Non-reusable part | - | - |
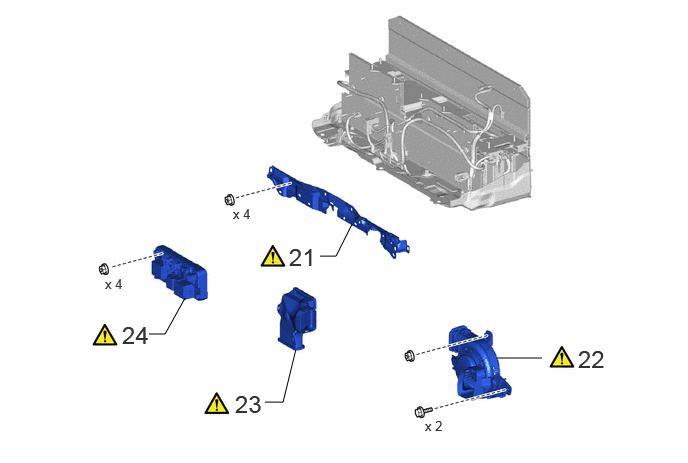
| Procedure | Part Name Code |
|
|
|
|
|---|---|---|---|---|---|
| 21 | WIRE HARNESS CLAMP BRACKET | - | ()
|
- | - |
| 22 | BATTERY COOLING BLOWER ASSEMBLY WITH NO. 5 EV BATTERY INTAKE DUCT | - | ()
|
- | - |
| 23 | NO. 6 EV BATTERY INTAKE DUCT | G92D6A | ()
|
- | - |
| 24 | NO. 1 EV BATTERY JUNCTION BLOCK ASSEMBLY | G92Z0A | ()
|
- | - |
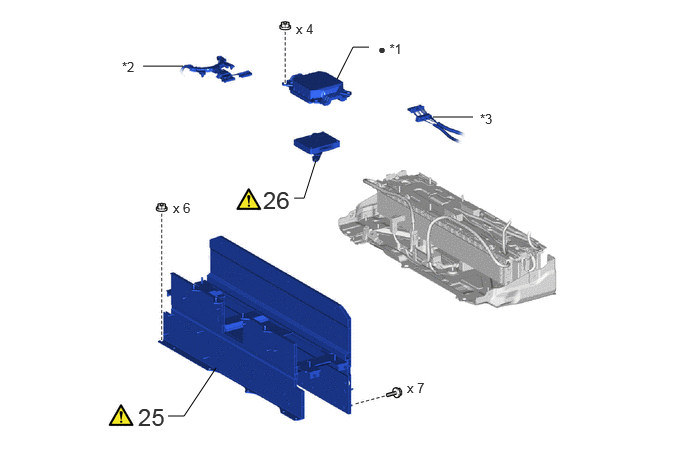
| Procedure | Part Name Code |
|
|
|
|
|---|---|---|---|---|---|
| 25 | UPPER EV BATTERY CARRIER SUB-ASSEMBLY | - | ()
|
- | - |
| 26 | BATTERY VOLTAGE SENSOR (for Lower Side) | 89892A | ()
|
- | - |
| *1 | NO. 1 EV BATTERY PROTECTOR (for Lower Side) | *2 | WIRE HARNESS (NO. 2 EV SUPPLY STACK SUB-ASSEMBLY) CELL VOLTAGE DETECTION CIRCUIT |
| *3 | NO. 1 EV BATTERY PACK WIRE | - | - |
| ● | Non-reusable part | - | - |
CAUTION / NOTICE / HINT
The necessary procedures (adjustment, calibration, initialization, or registration) that must be performed after parts are removed and installed, or replaced during battery voltage sensor removal/installation are shown below.
| Replacement Part or Procedure | Necessary Procedure | Effect/Inoperative when not Performed | Link |
|---|---|---|---|
| Disconnect cable from negative auxiliary battery terminal | Memorize steering angle neutral point | Parking assist monitor system | ()
|
| Panoramic view monitor system | ()
|
- CAUTION:
- ·
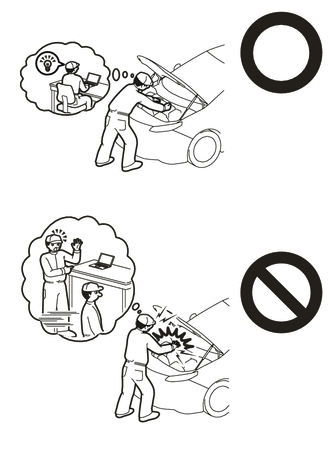
·Orange wire harnesses and connectors indicate high-voltage circuits. To prevent electric shock, always follow the procedure described in the repair manual.
Click hereEngine / Hybrid System>HYBRID / BATTERY CONTROL>HYBRID CONTROL SYSTEM>PRECAUTION
·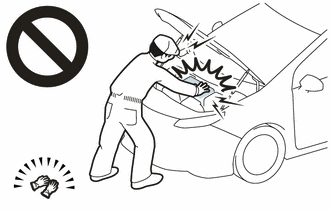
To prevent electric shock, wear insulated gloves when working on wire harnesses and components of the high voltage system.
- NOTICE:
- ·
The type of battery voltage sensor to be used varies depending on the vehicle model.
·If the wrong type of battery voltage sensor is installed, the ignition switch cannot be turned on (READY).
·After installing the battery voltage sensor, perform the following to check that the ignition switch can be turned on (READY).
-Turn the ignition switch on (READY).
-Turn the ignition switch off and wait for 30 seconds or more.
-Turn the ignition switch on (READY) again.
- HINT:
-
When the cable is disconnected/reconnected to the auxiliary battery terminal, systems temporarily stop operating. However, each system has a function that completes learning the first time the system is used.
- ·
Learning completes when vehicle is driven
Effect/Inoperative Function When Necessary Procedures are not Performed Necessary Procedures Link Lane tracing assist system Drive the vehicle straight ahead at 35 km/h (22 mph) or more for 5 seconds or more. ( )
Pre-collision system Adaptive high beam system
- ·
Learning completes when vehicle is operated normally
Effect/Inoperative Function When Necessary Procedures are not Performed Necessary Procedures Link Air conditioning system After the ignition switch is turned to ON, the servo motor and expansion valve standard position is recognized. -
PROCEDURE

 1. PRECAUTION
|
|
Click here()
|
G3834
2.REMOVE SERVICE PLUG GRIP
53292A
3.REMOVE UPPER RADIATOR SUPPORT SEAL
1A906
4.REMOVE FC STACK COVER SUB-ASSEMBLY
G9200A
5.DISCONNECT FC CONVERTER POWER OUTLET CABLE (INVERTER WITH CONVERTER ASSEMBLY)
|
|
Click here()
|
6.REMOVE CONNECTOR COVER ASSEMBLY
|
|
Click here()
|
7.CHECK TERMINAL VOLTAGE
|
|
Click here()
|
8.INSTALL CONNECTOR COVER ASSEMBLY
|
|
Click here()
|
G9510B
9.REMOVE EV SUPPLY BATTERY ASSEMBLY
G92N1B
10.REMOVE UPPER EV BATTERY COVER PANEL
|
|
Click here()
|
G920RB
11.REMOVE NO. 2 EV BATTERY SHIELD SUB-ASSEMBLY
|
|
Click here()
|
G920QB
12.REMOVE NO. 1 EV BATTERY SHIELD SUB-ASSEMBLY
|
|
Click here()
|
G92Z2A
13.REMOVE EV BATTERY TERMINAL BLOCK
|
|
Click here()
|
G920LC
14.REMOVE UPPER NO. 1 EV BATTERY COVER SUB-ASSEMBLY
|
|
Click here()
|
G92F1A
15.REMOVE NO. 1 EV BATTERY EXHAUST DUCT
|
|
Click here()
|
89892A
16.REMOVE BATTERY VOLTAGE SENSOR (for Upper Side)
|
|
|
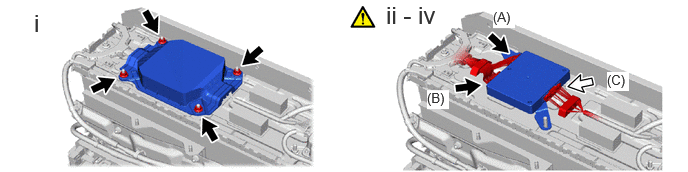
Remove the 4 nuts and No. 1 EV battery protector (for upper side).
Disconnect connector A and connector B on the wire harness (No. 1 EV supply stack sub-assembly) cell voltage detection circuit.
- CAUTION:
-
Make sure to the disconnect the connector A and connector B on the wire harness (No. 1 EV supply stack sub-assembly) cell voltage detection circuit first.
- NOTICE:
-
Insulate each disconnected high-voltage connector with insulating tape. Wrap the connector from the wire harness side to the end of the connector
Disconnect connector C on the No. 1 EV battery pack wire side.
- CAUTION:
-
Make sure to the disconnect the connector A and connector B on the wire harness (No. 1 EV supply stack sub-assembly) cell voltage detection circuit first.
- NOTICE:
-
Insulate each disconnected high-voltage connector with insulating tape. Wrap the connector from the wire harness side to the end of the connector
Remove the battery voltage sensor (for upper side).
- NOTICE:
- ·
Do not drop the battery voltage sensor (for upper side), strike it with tools or subject it to impact.
·If the battery voltage sensor (for upper side) is subjected to an impact, replace it with a new one.
89890A
17.REMOVE BATTERY ECU ASSEMBLY
|
|
Click here()
|
G920WA
18.REMOVE NO. 7 EV BATTERY SHIELD SUB-ASSEMBLY (for Upper Side)
|
|
Click here()
|
G9508A
19.REMOVE NO. 1 EV SUPPLY STACK SUB-ASSEMBLY
|
|
Click here()
|
G92D8A
20.REMOVE NO. 8 EV BATTERY INTAKE DUCT
|
|
Click here()
|
21.REMOVE WIRE HARNESS CLAMP BRACKET
|
|
Click here()
|
22.REMOVE BATTERY COOLING BLOWER ASSEMBLY WITH NO. 5 EV BATTERY INTAKE DUCT
|
|
Click here()
|
G92D6A
23.REMOVE NO. 6 EV BATTERY INTAKE DUCT
|
|
Click here()
|
G92Z0A
24.REMOVE NO. 1 EV BATTERY JUNCTION BLOCK ASSEMBLY
|
|
Click here()
|
25.REMOVE UPPER EV BATTERY CARRIER SUB-ASSEMBLY
|
|
Click here()
|
89892A
26.REMOVE BATTERY VOLTAGE SENSOR (for Lower Side)
|
|
|
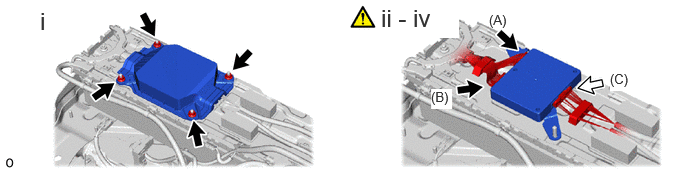
Remove the 4 nuts and No. 1 EV battery protector (for lower side).
Disconnect connector A and connector B on the wire harness (No. 2 EV supply stack sub-assembly) cell voltage detection circuit.
- CAUTION:
-
Make sure to the disconnect the connector A and connector B on the wire harness (No. 2 EV supply stack sub-assembly) cell voltage detection circuit first.
- NOTICE:
-
Insulate each disconnected high-voltage connector with insulating tape. Wrap the connector from the wire harness side to the end of the connector
Disconnect connector C on the No. 1 EV battery pack wire side.
- CAUTION:
-
Make sure to the disconnect the connector A and connector B on the wire harness (No. 2 EV supply stack sub-assembly) cell voltage detection circuit first.
- NOTICE:
-
Insulate each disconnected high-voltage connector with insulating tape. Wrap the connector from the wire harness side to the end of the connector
Remove the battery voltage sensor (for lower side).
- NOTICE:
- ·
Do not drop the battery voltage sensor (for lower side), strike it with tools or subject it to impact.
·If the battery voltage sensor (for lower side) is subjected to an impact, replace it with a new one.